Resolving Start Up and No Boot Problems Checklist
Page 1
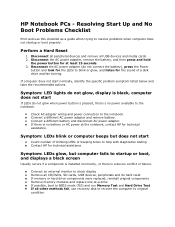
... to startup or boot, and displays a black screen Usually occurs if a component is installed incorrectly, or there is no battery or AC power at least 15 seconds. 3. HP Notebook PCs - Perform a Hard Reset 1. Symptom: LED lights do not glow, display is black, computer does not start normally, ...Remove all CD/DVDs, SD cards, USB devices, peripherals and do not connect the battery), press the Power button and look for technical assistance Symptom: LEDs glow, but computer fails to the notebook. Reconnect the AC power adapter (do hard reset If memory or hard drive components ...
... to startup or boot, and displays a black screen Usually occurs if a component is installed incorrectly, or there is no battery or AC power at least 15 seconds. 3. HP Notebook PCs - Perform a Hard Reset 1. Symptom: LED lights do not glow, display is black, computer does not start normally, ...Remove all CD/DVDs, SD cards, USB devices, peripherals and do not connect the battery), press the Power button and look for technical assistance Symptom: LEDs glow, but computer fails to the notebook. Reconnect the AC power adapter (do hard reset If memory or hard drive components ...
Limited warranty and technical support - (1 Year)
Page 3
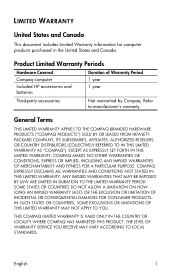
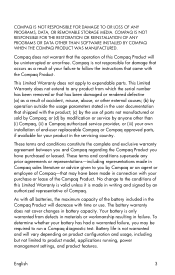
... Covered Compaq computer Included HP accessories and batteries Duration of Warranty Period 1 year 1 year Third-party accessories Not warranted by Compaq. English 1 THIS COMPAQ LIMITED WARRANTY IS VALID ONLY IN THE COUNTRY OR LOCALITY WHERE COMPAQ HAS MARKETED THIS PRODUCT. COMPAQ EXPRESSLY ...LAW ARE LIMITED IN DURATION TO THE LIMITED WARRANTY PERIOD. General Terms THIS LIMITED WARRANTY APPLIES TO THE COMPAQ BRANDED HARDWARE PRODUCTS ("COMPAQ PRODUCTS") SOLD BY OR LEASED FROM HEWLETTPACKARD COMPANY, ITS SUBSIDIARIES, AFFILIATES, AUTHORIZED RESELLERS, OR COUNTRY DISTRIBUTORS...
... Covered Compaq computer Included HP accessories and batteries Duration of Warranty Period 1 year 1 year Third-party accessories Not warranted by Compaq. English 1 THIS COMPAQ LIMITED WARRANTY IS VALID ONLY IN THE COUNTRY OR LOCALITY WHERE COMPAQ HAS MARKETED THIS PRODUCT. COMPAQ EXPRESSLY ...LAW ARE LIMITED IN DURATION TO THE LIMITED WARRANTY PERIOD. General Terms THIS LIMITED WARRANTY APPLIES TO THE COMPAQ BRANDED HARDWARE PRODUCTS ("COMPAQ PRODUCTS") SOLD BY OR LEASED FROM HEWLETTPACKARD COMPANY, ITS SUBSIDIARIES, AFFILIATES, AUTHORIZED RESELLERS, OR COUNTRY DISTRIBUTORS...
Limited warranty and technical support - (1 Year)
Page 4
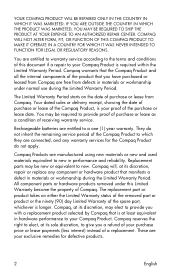
..., at least equivalent in materials or workmanship during the Limited Warranty Period. Compaq reserves the right to elect, at its discretion, repair or replace any warranty services for defective products. 2 English Rechargeable batteries are connected, and any component or hardware product that is your purchase price or lease payments (less interest) instead...
..., at least equivalent in materials or workmanship during the Limited Warranty Period. Compaq reserves the right to elect, at its discretion, repair or replace any warranty services for defective products. 2 English Rechargeable batteries are connected, and any component or hardware product that is your purchase price or lease payments (less interest) instead...
Limited warranty and technical support - (1 Year)
Page 5
...defective (a) as a result of your product in the Compaq Product will decrease with all batteries, the maximum capacity of the Compaq Product. To determine whether your purchase or lease of the battery included in the servicing country. COMPAQ IS NOT RESPONSIBLE FOR DAMAGE TO OR LOSS OF ANY...only warranted from which the serial number has been removed or that shipped with the Compaq Product. This Limited Warranty does not extend to run a Compaq diagnostic test. Your battery is not warranted and will be required to any prior agreements or representations-including ...
...defective (a) as a result of your product in the Compaq Product will decrease with all batteries, the maximum capacity of the Compaq Product. To determine whether your purchase or lease of the battery included in the servicing country. COMPAQ IS NOT RESPONSIBLE FOR DAMAGE TO OR LOSS OF ANY...only warranted from which the serial number has been removed or that shipped with the Compaq Product. This Limited Warranty does not extend to run a Compaq diagnostic test. Your battery is not warranted and will be required to any prior agreements or representations-including ...

Getting Started - Windows 7
Page 6
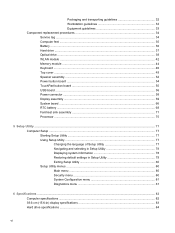
Pinching/Zooming 24 Rotating 24 5 Maintenance Inserting or removing the battery ...25 Replacing or upgrading the hard drive 27 Removing the hard drive ...27 Installing the hard drive ...28 Adding or replacing memory modules 30 Updating ...
Pinching/Zooming 24 Rotating 24 5 Maintenance Inserting or removing the battery ...25 Replacing or upgrading the hard drive 27 Removing the hard drive ...27 Installing the hard drive ...28 Adding or replacing memory modules 30 Updating ...
Getting Started - Windows 7
Page 8
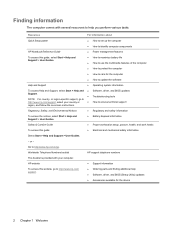
...Resources For information about Quick Setup poster ● How to set up the computer ● How to identify computer components HP Notebook Reference Guide ● Power management features To access this guide: ● Electrical and mechanical safety information Select Start > Help... Environmental Notices ● Regulatory and safety information To access the notices, select Start > Help and Support > User Guides. ● Battery disposal information Safety & Comfort Guide ● Proper workstation setup, posture, health, and work habits To access this guide, select Start ...
...Resources For information about Quick Setup poster ● How to set up the computer ● How to identify computer components HP Notebook Reference Guide ● Power management features To access this guide: ● Electrical and mechanical safety information Select Start > Help... Environmental Notices ● Regulatory and safety information To access the notices, select Start > Help and Support > User Guides. ● Battery disposal information Safety & Comfort Guide ● Proper workstation setup, posture, health, and work habits To access this guide, select Start ...
Getting Started - Windows 7
Page 19
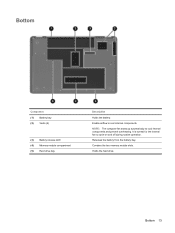
Bottom Component (1) Battery bay (2) Vents (4) (3) Battery release latch (4) Memory module compartment (5) Hard drive bay Description Holds the battery. It is normal for the internal fan to cool internal components. Contains the two memory module slots. Holds the hard drive. Bottom 13 Releases the battery from the battery bay. Enable airflow to cycle on and off during routine operation. NOTE: The computer fan starts up automatically to cool internal components and prevent overheating.
Bottom Component (1) Battery bay (2) Vents (4) (3) Battery release latch (4) Memory module compartment (5) Hard drive bay Description Holds the battery. It is normal for the internal fan to cool internal components. Contains the two memory module slots. Holds the hard drive. Bottom 13 Releases the battery from the battery bay. Enable airflow to cycle on and off during routine operation. NOTE: The computer fan starts up automatically to cool internal components and prevent overheating.
Getting Started - Windows 7
Page 20
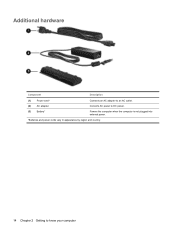
Additional hardware Component Description (1) Power cord* Connects an AC adapter to an AC outlet. (2) AC adapter Converts AC power to DC power. (3) Battery* Powers the computer when the computer is not plugged into external power. *Batteries and power cords vary in appearance by region and country. 14 Chapter 2 Getting to know your computer
Additional hardware Component Description (1) Power cord* Connects an AC adapter to an AC outlet. (2) AC adapter Converts AC power to DC power. (3) Battery* Powers the computer when the computer is not plugged into external power. *Batteries and power cords vary in appearance by region and country. 14 Chapter 2 Getting to know your computer
Getting Started - Windows 7
Page 31
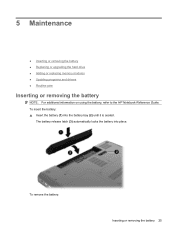
The battery release latch (3) automatically locks the battery into the battery bay (2) until it is seated. To remove the battery: Inserting or removing the battery 25 5 Maintenance ● Inserting or removing the battery ● Replacing or upgrading the hard drive ● Adding or replacing memory modules ● Updating programs and drivers ● Routine care Inserting or removing the battery NOTE: For additional information on using the battery, refer to the HP Notebook Reference Guide. To insert the battery: ▲ Insert the battery (1) into place.
The battery release latch (3) automatically locks the battery into the battery bay (2) until it is seated. To remove the battery: Inserting or removing the battery 25 5 Maintenance ● Inserting or removing the battery ● Replacing or upgrading the hard drive ● Adding or replacing memory modules ● Updating programs and drivers ● Routine care Inserting or removing the battery NOTE: For additional information on using the battery, refer to the HP Notebook Reference Guide. To insert the battery: ▲ Insert the battery (1) into place.
Getting Started - Windows 7
Page 32
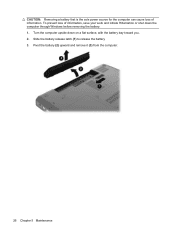
To prevent loss of information. Slide the battery release latch (1) to release the battery 3. Pivot the battery (2) upward and remove it (3) from the computer. 26 Chapter 5 Maintenance CAUTION: Removing a battery that is the sole power source for the computer can cause loss of information, save your work and initiate Hibernation or shut down on a flat surface, with the battery bay toward you. 2. Turn the computer upside down the computer through Windows before removing the battery. 1.
To prevent loss of information. Slide the battery release latch (1) to release the battery 3. Pivot the battery (2) upward and remove it (3) from the computer. 26 Chapter 5 Maintenance CAUTION: Removing a battery that is the sole power source for the computer can cause loss of information, save your work and initiate Hibernation or shut down on a flat surface, with the battery bay toward you. 2. Turn the computer upside down the computer through Windows before removing the battery. 1.

Getting Started - Windows 7
Page 33
Unplug the power cord from the computer. 7. Remove the battery from the AC outlet. 5. Remove the three screws (1) that secure the hard drive to the computer. 4. Replacing or upgrading the hard drive 27 Turn the ...
Unplug the power cord from the computer. 7. Remove the battery from the AC outlet. 5. Remove the three screws (1) that secure the hard drive to the computer. 4. Replacing or upgrading the hard drive 27 Turn the ...

Getting Started - Windows 7
Page 35
Reconnect external power and external devices. 9. Replacing or upgrading the hard drive 29 Tighten the hard drive cover screws (3). 6. Turn on the computer. Replace the battery. 7. 5. Turn the computer right-side up. 8.
Reconnect external power and external devices. 9. Replacing or upgrading the hard drive 29 Tighten the hard drive cover screws (3). 6. Turn on the computer. Replace the battery. 7. 5. Turn the computer right-side up. 8.
Getting Started - Windows 7
Page 36
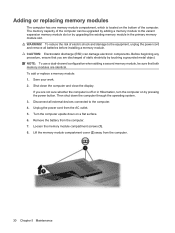
...modules are not sure whether the computer is located on the bottom of static electricity by touching a grounded metal object. Remove the battery from the computer. 30 Chapter 5 Maintenance WARNING! Then shut down the computer and close the display. Loosen the memory module ...reduce the risk of the computer can damage electronic components. CAUTION: Electrostatic discharge (ESD) can be sure that you are identical. Disconnect all batteries before installing a memory module. Turn the computer upside down on by adding a memory module to the computer. 4. Save your work. 2....
...modules are not sure whether the computer is located on the bottom of static electricity by touching a grounded metal object. Remove the battery from the computer. 30 Chapter 5 Maintenance WARNING! Then shut down the computer and close the display. Loosen the memory module ...reduce the risk of the computer can damage electronic components. CAUTION: Electrostatic discharge (ESD) can be sure that you are identical. Disconnect all batteries before installing a memory module. Turn the computer upside down on by adding a memory module to the computer. 4. Save your work. 2....
Getting Started - Windows 7
Page 38
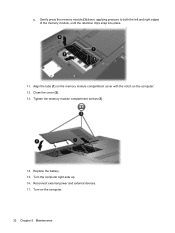
c. Align the tabs (1) on the memory module compartment cover with the notch on the computer. 32 Chapter 5 Maintenance Replace the battery. 15. Gently press the memory module (3) down, applying pressure to both the left and right edges of the memory module, until the retention clips snap into place. 11. Turn the computer right-side up. 16. Reconnect external power and external devices. 17. Turn on the computer. 12. Close the cover (2). 13. Tighten the memory module compartment screws (3). 14.
c. Align the tabs (1) on the memory module compartment cover with the notch on the computer. 32 Chapter 5 Maintenance Replace the battery. 15. Gently press the memory module (3) down, applying pressure to both the left and right edges of the memory module, until the retention clips snap into place. 11. Turn the computer right-side up. 16. Reconnect external power and external devices. 17. Turn on the computer. 12. Close the cover (2). 13. Tighten the memory module compartment screws (3). 14.

Getting Started - Windows 7
Page 45
... internationally with your computer model includes one or more wireless devices, one or more certification labels are affixed inside the battery bay. ● Wireless certification label or labels (select models only)-Provide information about the computer. Labels 39 Wireless ... when traveling internationally. You may need when you contact technical support. The Microsoft Certificate of Authenticity is affixed inside the battery bay. ● Regulatory label-Provides regulatory information about optional wireless devices and the approval markings of some of the computer...
... internationally with your computer model includes one or more wireless devices, one or more certification labels are affixed inside the battery bay. ● Wireless certification label or labels (select models only)-Provide information about the computer. Labels 39 Wireless ... when traveling internationally. You may need when you contact technical support. The Microsoft Certificate of Authenticity is affixed inside the battery bay. ● Regulatory label-Provides regulatory information about optional wireless devices and the approval markings of some of the computer...
Getting Started - Windows 7
Page 46
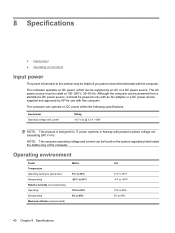
... with this section may be supplied by HP for IT power systems in this computer. The computer operates on the system regulatory label inside the battery bay of the computer. 8 Specifications ● Input power ● Operating environment Input power The power information in Norway with phase-to-phase voltage not exceeding... be helpful if you plan to 95% 40 Chapter 8 Specifications The computer can be powered from a standalone DC power source, it should be rated at 100-240 V, 50-60 Hz.
... with this section may be supplied by HP for IT power systems in this computer. The computer operates on the system regulatory label inside the battery bay of the computer. 8 Specifications ● Input power ● Operating environment Input power The power information in Norway with phase-to-phase voltage not exceeding... be helpful if you plan to 95% 40 Chapter 8 Specifications The computer can be powered from a standalone DC power source, it should be rated at 100-240 V, 50-60 Hz.

Getting Started - Windows 7
Page 48
...10 B backing up customized window, toolbar, and menu bar settings 36 personal files 36 battery bay 39 battery bay, identifying 13 battery release latch, identifying 13 battery, identifying 14 battery, replacing 25 bays battery 13 hard drive 13 Bluetooth label 39 buttons power 7 TouchPad 5 C caps lock light...8 esc 8 fn 8 Windows applications 8 Windows logo 8 L labels Bluetooth 39 regulatory 39 serial number 39 wireless certification 39 WLAN 39 latch, battery release 13 lights caps lock 6 drive light 10 optical drive 9 power 6, 9 TouchPad 5 webcam 11 wireless 6 M memory module inserting 31 ...
...10 B backing up customized window, toolbar, and menu bar settings 36 personal files 36 battery bay 39 battery bay, identifying 13 battery release latch, identifying 13 battery, identifying 14 battery, replacing 25 bays battery 13 hard drive 13 Bluetooth label 39 buttons power 7 TouchPad 5 C caps lock light...8 esc 8 fn 8 Windows applications 8 Windows logo 8 L labels Bluetooth 39 regulatory 39 serial number 39 wireless certification 39 WLAN 39 latch, battery release 13 lights caps lock 6 drive light 10 optical drive 9 power 6, 9 TouchPad 5 webcam 11 wireless 6 M memory module inserting 31 ...
Compaq Presario CQ56 Notebook PC and HP G56 Notebook PC - Maintenance and Service Guide
Page 6
Packaging and transporting guidelines 32 Workstation guidelines 32 Equipment guidelines 33 Component replacement procedures 34 Service tag ...34 Computer feet ...35 Battery ...36 Hard drive ...37 Optical drive ...39 WLAN module ...42 Memory module ...44 Keyboard ...46 Top cover ...49 Speaker ... ...52 Power button board ...54 TouchPad button board ...55 USB board ...56 Power connector ...58 Display assembly ...59 System board ...66 RTC battery ...69 Fan/heat sink assembly ...71 Processor ...75 5 Setup Utility ...77 Computer Setup ...77 Starting Setup Utility ...77 Using Setup Utility ...77...
Packaging and transporting guidelines 32 Workstation guidelines 32 Equipment guidelines 33 Component replacement procedures 34 Service tag ...34 Computer feet ...35 Battery ...36 Hard drive ...37 Optical drive ...39 WLAN module ...42 Memory module ...44 Keyboard ...46 Top cover ...49 Speaker ... ...52 Power button board ...54 TouchPad button board ...55 USB board ...56 Power connector ...58 Display assembly ...59 System board ...66 RTC battery ...69 Fan/heat sink assembly ...71 Processor ...75 5 Setup Utility ...77 Computer Setup ...77 Starting Setup Utility ...77 Using Setup Utility ...77...
Compaq Presario CQ56 Notebook PC and HP G56 Notebook PC - Maintenance and Service Guide
Page 7
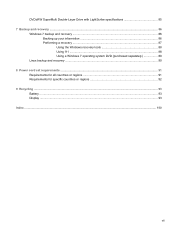
DVD±RW SuperMulti Double-Layer Drive with LightScribe specifications 85 7 Backup and recovery ...86 Windows 7 backup and recovery ...86 Backing up your information 86 Performing a recovery ...87 Using the Windows recovery tools 88 Using f11 ...88 Using a Windows 7 operating system DVD (purchased separately 89 Linux backup and recovery ...90 8 Power cord set requirements ...91 Requirements for all countries or regions 91 Requirements for specific countries or regions 92 9 Recycling ...93 Battery ...93 Display ...93 Index ...100 vii
DVD±RW SuperMulti Double-Layer Drive with LightScribe specifications 85 7 Backup and recovery ...86 Windows 7 backup and recovery ...86 Backing up your information 86 Performing a recovery ...87 Using the Windows recovery tools 88 Using f11 ...88 Using a Windows 7 operating system DVD (purchased separately 89 Linux backup and recovery ...90 8 Power cord set requirements ...91 Requirements for all countries or regions 91 Requirements for specific countries or regions 92 9 Recycling ...93 Battery ...93 Display ...93 Index ...100 vii
Compaq Presario CQ56 Notebook PC and HP G56 Notebook PC - Maintenance and Service Guide
Page 12
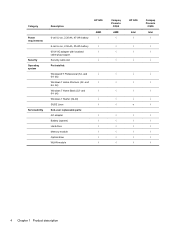
...-bit) √ SUSE Linux √ End-user replaceable parts: AC adapter √ Battery (system) √ Hard drive √ Memory module √ Optical drive √ WLAN module √ Compaq Presario CQ56 AMD √ √ √ √ √ √ √ √ √ HP G56 Intel v Compaq Presario CQ56 Intel √ √ √ √ √ √ √ √ √ 4 Chapter...
...-bit) √ SUSE Linux √ End-user replaceable parts: AC adapter √ Battery (system) √ Hard drive √ Memory module √ Optical drive √ WLAN module √ Compaq Presario CQ56 AMD √ √ √ √ √ √ √ √ √ HP G56 Intel v Compaq Presario CQ56 Intel √ √ √ √ √ √ √ √ √ 4 Chapter...


