Presario CQ56 Memory - Compaq 100 Notebook PC
Presario CQ56 Memory
View Results Below
Free Compaq Presario CQ56-100 manuals!
Problems with Compaq Presario CQ56-100?
Ask a Question
Free Compaq Presario CQ56-100 manuals!
Problems with Compaq Presario CQ56-100?
Ask a Question
Related Manual Pages


Similar Questions

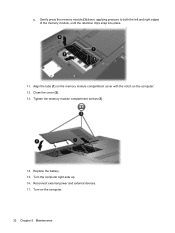
Where Are The Memory Slots
Ican find 1 memory slot underneath a smill cover in the base. where is the second one
Ican find 1 memory slot underneath a smill cover in the base. where is the second one
(Posted by irvinedouglas 11 years ago)

Purchase Hp Portable Usb Digital Drive With Memory Chip
Where can you purchase the hp portable USB digital drive with memory chip. It's a small black
Where can you purchase the hp portable USB digital drive with memory chip. It's a small black
(Posted by prote 11 years ago)

Number 2 Memory Slot On Compaq Presario X1400 Notebook.
I have found and upgraded one memory slot. but can't find the other slot to upgrade. where do I find...
I have found and upgraded one memory slot. but can't find the other slot to upgrade. where do I find...
(Posted by petermorris 12 years ago)
Related Terms
The following terms were also used when searching for Presario CQ56 Memory - Compaq 100 Notebook PC:- compaq presario cq56
- presario cq56
- presario cq56-115dx
- hp presario cq56
- compact presario cq56
- presario cq56 laptop
- presario cq56-219wm
- presario cq56 115dx
- presario cq56-112nr
- compaq presario cq56 115dx
- presario cq56-100
- presario cq56-110us
- compaq presario cq56-100
- presario cq56 112nr
- presario cq56 129nr
- presario cq56 review
- hp presario cq56-100
- presario cq56 notebook pc
- presario cq56 reviews
- compaq presario cq56 112nr notebook
- hp compaq presario cq56-100
- presario cq56 manual
- presario cq56 ram
- compaq presario cq56 100
- presario cq56 110us
- presario cq56-100 notebook pc series
- presario cq56-100 review
- compaq presario cq56 100 notebook pc
- compaq presario cq56 100 notebook pc series
- compaq presario cq56 100 review
- compaq presario cq56 100 sm
- compaq presario cq56 100 webcam
- compaq presario cq56 100 xp drivers
- compaq presario cq56 110us
- compaq presario cq56 110us notebook
- compaq presario cq56 219wm
- compaq presario cq56 webcam driver
- compaq presario cq56-100 drivers
- compaq presario cq56-100 ek
- compaq presario cq56-100 laptop price
- compaq presario cq56-100 notebook pc
- compaq presario cq56-100 notebook pc series
- compaq presario cq56-100 price
- compaq presario cq56-100 price india
- compaq presario cq56-100 review
- compaq presario cq56-100 sd
- compaq presario cq56-100 series
- compaq presario cq56-100 sm
- compaq presario cq56-100 sm drivers
- compaq presario cq56-100 specifications
- compaq presario cq56-100 specs
- compaq presario cq56-100 web cam
- hp compaq presario cq56 100
- hp compaq presario cq56-100 drivers
- hp presario cq56 100
- hp presario cq56-100 drivers
- presario cq56 100
- presario cq56 100 cpu
- presario cq56 100 notebook pc
- presario cq56 100 notebook pc series
- presario cq56 100 review
- presario cq56 100 sm
- presario cq56 100 webcam
- presario cq56 100 xp drivers
- presario cq56 110us notebook
- presario cq56 219wm
- presario cq56 battery
- presario cq56 battery replacement
- presario cq56 bios
- presario cq56 bios recovery
- presario cq56 bios update
- presario cq56 black screen
- presario cq56 boot to cd
- presario cq56 bottom case
- presario cq56 camera
- presario cq56 caps lock blinking
- presario cq56 charger
- presario cq56 clear cmos
- presario cq56 compaq restore disk download
- presario cq56 cooling fan system message
- presario cq56 cpu upgrade
- presario cq56 disassembly
- presario cq56 docking station
- presario cq56 driver
- presario cq56 driver windows 7
- presario cq56 drivers
- presario cq56 drivers for xp
- presario cq56 drivers windows 7
- presario cq56 factory reset
- presario cq56 factory restore
- presario cq56 fan
- presario cq56 fan is not working properly
- presario cq56 fan replacement
- presario cq56 graphics card
- presario cq56 hard drive
- presario cq56 hard drive replacement
- presario cq56 is super slow
- presario cq56 keyboard
- presario cq56 keyboard not working
- presario cq56 keyboard removal
- presario cq56 max memory
- presario cq56 maximum ram
- presario cq56 memory
- presario cq56 memory type
- presario cq56 memory upgrade
- presario cq56 monitor
- presario cq56 motherboard
- presario cq56 network controller driver
- presario cq56 notebook pc drivers
- presario cq56 overheating
- presario cq56 parts
- presario cq56 power cord
- presario cq56 price
- presario cq56 processor upgrade
- presario cq56 ram upgrade
- presario cq56 recovery
- presario cq56 replacement keyboard
- presario cq56 restore to factory setting
- presario cq56 running slow
- presario cq56 screen
- presario cq56 screen replacement
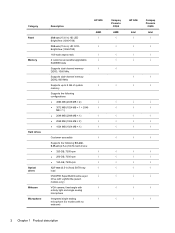
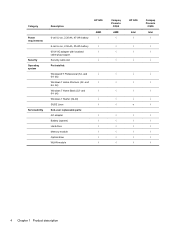
- presario cq56 specifications
- presario cq56 specs
- presario cq56 turn on touchpad
- presario cq56 turn on webcam
- presario cq56 usb problem
- presario cq56 video card
- presario cq56 webcam
- presario cq56 webcam driver
- presario cq56 webcam driver downloads
- presario cq56 wifi driver
- presario cq56 will not boot
- presario cq56 wireless card
- presario cq56 wireless driver
- presario cq56 wireless drivers
- presario cq56 wireless switch
- presario cq56-100 drivers
- presario cq56-100 ek
- presario cq56-100 laptop price
- presario cq56-100 notebook pc
- presario cq56-100 price
- presario cq56-100 price india
- presario cq56-100 sd
- presario cq56-100 series
- presario cq56-100 sm
- presario cq56-100 sm drivers
- presario cq56-100 specifications
- presario cq56-100 specs
- presario cq56-100 web cam
- presario cq56-129nr
- presario cq56-129nr laptop computer