Compaq Presario CQ56-100 - Notebook PC Research
View Results Below
Free Compaq Presario CQ56-100 manuals!
Problems with Compaq Presario CQ56-100?
Ask a Question
Free Compaq Presario CQ56-100 manuals!
Problems with Compaq Presario CQ56-100?
Ask a Question
Related Manual Pages


Related Videos

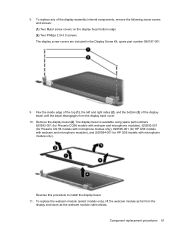
Compaq Presario CQ56 Laptop Screen Replacement Procedure
Duration: 13:31
Total Views: 62,867
Duration: 13:31
Total Views: 62,867
Replacing a Compaq Presario CQ56 or CQ62 DC Jack
Duration: 4:27
Total Views: 46,310
Duration: 4:27
Total Views: 46,310
Replacing a Compaq Presario CQ56 or CQ62 LCD Screen
Duration: 8:45
Total Views: 20,490
Duration: 8:45
Total Views: 20,490
Replacing a Compaq Presario CQ56 or CQ62 Keyboard
Duration: 1:52
Total Views: 46,504
Duration: 1:52
Total Views: 46,504
Laptop Screen Replacement / How To Replace Laptop Screen HP/Compaq Presario CQ56-115DX
Duration: 7:36
Total Views: 532
Duration: 7:36
Total Views: 532
Similar Questions

Where Is The Serial Number For Compaq Presario Cq56-115dx Notebook Located
(Posted by StRosena 9 years ago)

Security Embedded Password Error Not Able To Setup
(Posted by shashipandey09 9 years ago)

What Type Of Ports Or Connectors Does The Compaq Presario Cq56-110us Notebook Ha
(Posted by alfacey 9 years ago)

Compaq Presario Cq56-112nr Notebook Wont Boot
(Posted by unclluver 10 years ago)

I Can Not Turn On My Compaq Presario Cq40-500 Notebook Pc Series.
I can not turn on my Compaq Presario CQ40-500 Notebook PC series.when turned on right in 5 secondsan...
I can not turn on my Compaq Presario CQ40-500 Notebook PC series.when turned on right in 5 secondsan...
(Posted by lydtomei 11 years ago)
Related Terms
The following terms were also used when searching for Compaq Presario CQ56-100 - Notebook PC Research:- compaq presario cq56
- presario cq56
- presario cq56-115dx
- hp presario cq56
- compact presario cq56
- presario cq56 laptop
- presario cq56-219wm
- presario cq56 115dx
- presario cq56-112nr
- compaq presario cq56 115dx
- presario cq56-100
- presario cq56-110us
- compaq presario cq56-100
- presario cq56 112nr
- presario cq56 129nr
- presario cq56 review
- hp presario cq56-100
- presario cq56 notebook pc
- presario cq56 reviews
- compaq presario cq56 112nr notebook
- hp compaq presario cq56-100
- presario cq56 manual
- presario cq56 ram
- compaq presario cq56 100
- presario cq56 110us
- presario cq56-100 notebook pc series
- presario cq56-100 review
- compaq presario cq56 100 notebook pc
- compaq presario cq56 100 notebook pc series
- compaq presario cq56 100 review
- compaq presario cq56 100 sm
- compaq presario cq56 100 webcam
- compaq presario cq56 100 xp drivers
- compaq presario cq56 110us
- compaq presario cq56 110us notebook
- compaq presario cq56 219wm
- compaq presario cq56 webcam driver
- compaq presario cq56-100 drivers
- compaq presario cq56-100 ek
- compaq presario cq56-100 laptop price
- compaq presario cq56-100 notebook pc
- compaq presario cq56-100 notebook pc series
- compaq presario cq56-100 price
- compaq presario cq56-100 price india
- compaq presario cq56-100 review
- compaq presario cq56-100 sd
- compaq presario cq56-100 series
- compaq presario cq56-100 sm
- compaq presario cq56-100 sm drivers
- compaq presario cq56-100 specifications
- compaq presario cq56-100 specs
- compaq presario cq56-100 web cam
- hp compaq presario cq56 100
- hp compaq presario cq56-100 drivers
- hp presario cq56 100
- hp presario cq56-100 drivers
- presario cq56 100
- presario cq56 100 cpu
- presario cq56 100 notebook pc
- presario cq56 100 notebook pc series
- presario cq56 100 review
- presario cq56 100 sm
- presario cq56 100 webcam
- presario cq56 100 xp drivers
- presario cq56 110us notebook
- presario cq56 219wm
- presario cq56 battery
- presario cq56 battery replacement
- presario cq56 bios
- presario cq56 bios recovery
- presario cq56 bios update
- presario cq56 black screen
- presario cq56 boot to cd
- presario cq56 bottom case
- presario cq56 camera
- presario cq56 caps lock blinking
- presario cq56 charger
- presario cq56 clear cmos
- presario cq56 compaq restore disk download
- presario cq56 cooling fan system message
- presario cq56 cpu upgrade
- presario cq56 disassembly
- presario cq56 docking station
- presario cq56 driver
- presario cq56 driver windows 7
- presario cq56 drivers
- presario cq56 drivers for xp
- presario cq56 drivers windows 7
- presario cq56 factory reset
- presario cq56 factory restore
- presario cq56 fan
- presario cq56 fan is not working properly
- presario cq56 fan replacement
- presario cq56 graphics card
- presario cq56 hard drive
- presario cq56 hard drive replacement
- presario cq56 is super slow
- presario cq56 keyboard
- presario cq56 keyboard not working
- presario cq56 keyboard removal
- presario cq56 max memory
- presario cq56 maximum ram
- presario cq56 memory
- presario cq56 memory type
- presario cq56 memory upgrade
- presario cq56 monitor
- presario cq56 motherboard
- presario cq56 network controller driver
- presario cq56 notebook pc drivers
- presario cq56 overheating
- presario cq56 parts
- presario cq56 power cord
- presario cq56 price
- presario cq56 processor upgrade
- presario cq56 ram upgrade
- presario cq56 recovery
- presario cq56 replacement keyboard
- presario cq56 restore to factory setting
- presario cq56 running slow
- presario cq56 screen
- presario cq56 screen replacement
- presario cq56 specifications
- presario cq56 specs
- presario cq56 turn on touchpad
- presario cq56 turn on webcam
- presario cq56 usb problem
- presario cq56 video card
- presario cq56 webcam
- presario cq56 webcam driver
- presario cq56 webcam driver downloads
- presario cq56 wifi driver
- presario cq56 will not boot
- presario cq56 wireless card
- presario cq56 wireless driver
- presario cq56 wireless drivers
- presario cq56 wireless switch
- presario cq56-100 drivers
- presario cq56-100 ek
- presario cq56-100 laptop price
- presario cq56-100 notebook pc
- presario cq56-100 price
- presario cq56-100 price india
- presario cq56-100 sd
- presario cq56-100 series
- presario cq56-100 sm
- presario cq56-100 sm drivers
- presario cq56-100 specifications
- presario cq56-100 specs
- presario cq56-100 web cam
- presario cq56-129nr
- presario cq56-129nr laptop computer