
Getting Started - Windows 7
Page 5
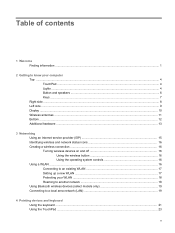
Table of contents 1 Welcome Finding information ...2 2 Getting to know your computer Top ...5 TouchPad ...5 Lights ...5 Button and speakers ...7 Keys ...8 Right side ...9 Left side ...10 Display ...11 Wireless antennas ...12 Bottom ...13 Additional hardware ...14 3 Networking Using an Internet service ... router 18 Protecting your WLAN 18 4 Keyboard and pointing devices Using the keyboard ...19 Using pointing devices ...21 Setting pointing device preferences 21 Using the TouchPad ...21 Turning the TouchPad on and off 21 Navigating ...22 Selecting ...22 Using...
Table of contents 1 Welcome Finding information ...2 2 Getting to know your computer Top ...5 TouchPad ...5 Lights ...5 Button and speakers ...7 Keys ...8 Right side ...9 Left side ...10 Display ...11 Wireless antennas ...12 Bottom ...13 Additional hardware ...14 3 Networking Using an Internet service ... router 18 Protecting your WLAN 18 4 Keyboard and pointing devices Using the keyboard ...19 Using pointing devices ...21 Setting pointing device preferences 21 Using the TouchPad ...21 Turning the TouchPad on and off 21 Navigating ...22 Selecting ...22 Using...
Getting Started - Windows 7
Page 11
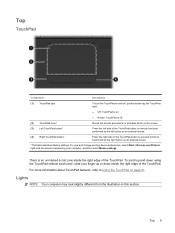
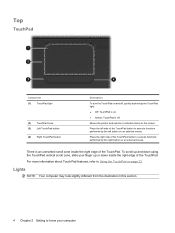
Top TouchPad Component Description (1) TouchPad light (2) TouchPad zone* To turn the TouchPad on and off . Lights NOTE: Your computer may look slightly different from the illustration in this section. There is on page 21. To view and ...change pointing device preferences, select Start > Devices and Printers, right-click the device representing your finger up or down inside the right edge of the TouchPad button to execute functions performed by the left button on an external mouse. *This table describes factory settings. Moves the pointer and selects or activates...
Top TouchPad Component Description (1) TouchPad light (2) TouchPad zone* To turn the TouchPad on and off . Lights NOTE: Your computer may look slightly different from the illustration in this section. There is on page 21. To view and ...change pointing device preferences, select Start > Devices and Printers, right-click the device representing your finger up or down inside the right edge of the TouchPad button to execute functions performed by the left button on an external mouse. *This table describes factory settings. Moves the pointer and selects or activates...
Getting Started - Windows 7
Page 27
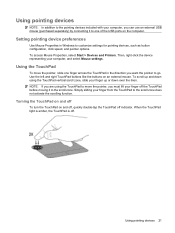
... NOTE: In addition to the pointing devices included with your computer, you must lift your finger off the TouchPad before moving it to one finger across the TouchPad in Windows to customize settings for pointing devices, such as button configuration, click speed, and pointer options. To...the scroll zone does not activate the scrolling function. Use the left and right TouchPad buttons like the buttons on and off, quickly double-tap the TouchPad off indicator. When the TouchPad light is amber, the TouchPad is off To turn the TouchPad on an external mouse. Using pointing devices 21...
... NOTE: In addition to the pointing devices included with your computer, you must lift your finger off the TouchPad before moving it to one finger across the TouchPad in Windows to customize settings for pointing devices, such as button configuration, click speed, and pointer options. To...the scroll zone does not activate the scrolling function. Use the left and right TouchPad buttons like the buttons on and off, quickly double-tap the TouchPad off indicator. When the TouchPad light is amber, the TouchPad is off To turn the TouchPad on an external mouse. Using pointing devices 21...

Compaq Presario CQ56 Notebook PC and HP G56 Notebook PC - Maintenance and Service Guide
Page 13
...execute functions performed by the right button on an external mouse. 2 External component identification Top TouchPad Component (1) TouchPad light (2) TouchPad zone (3) Left TouchPad button* (4) Right TouchPad button* *This table describes factory settings. There is on the screen. Press the left .... ● Amber: TouchPad is off , quickly double-tap the TouchPad light. ● Off: TouchPad is an unmarked scroll zone inside the right edge of the TouchPad button to execute functions performed by the left side of the TouchPad. Description To turn the TouchPad on and off . ...
...execute functions performed by the right button on an external mouse. 2 External component identification Top TouchPad Component (1) TouchPad light (2) TouchPad zone (3) Left TouchPad button* (4) Right TouchPad button* *This table describes factory settings. There is on the screen. Press the left .... ● Amber: TouchPad is off , quickly double-tap the TouchPad light. ● Off: TouchPad is an unmarked scroll zone inside the right edge of the TouchPad button to execute functions performed by the left side of the TouchPad. Description To turn the TouchPad on and off . ...
Compaq Presario CQ56 Notebook PC and HP G56 Notebook PC - Maintenance and Service Guide
Page 57
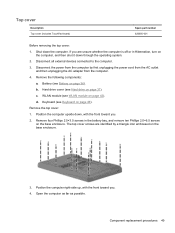
... enclosure. Hard drive cover (see Keyboard on the computer, and then shut it down through the operating system. 2. Remove four Phillips 2.0×3.0 screws in Hibernation, turn on page 46). Position the computer upside down the computer. Keyboard (see Hard drive on the base enclosure. 3. Top cover Description Top cover (includes...
... enclosure. Hard drive cover (see Keyboard on the computer, and then shut it down through the operating system. 2. Remove four Phillips 2.0×3.0 screws in Hibernation, turn on page 46). Position the computer upside down the computer. Keyboard (see Hard drive on the base enclosure. 3. Top cover Description Top cover (includes...
Compaq Presario CQ56 Notebook PC and HP G56 Notebook PC - Maintenance and Service Guide
Page 60
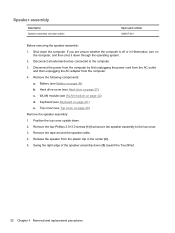
...Spare part number 620607-001 Before removing the speaker assembly: 1. Battery (see Keyboard on the computer, and then shut it down (3) toward the TouchPad. 52 Chapter 4 Removal and replacement procedures Release the speaker from the computer. 4. Shut down . 2. Position the top cover upside down the computer...the computer by first unplugging the power cord from the AC outlet and then unplugging the AC adapter from the plastic clip in Hibernation, turn on page 46 ) e. Swing the right edge of the speaker assembly down through the operating system. 2. Remove the two Phillips 2.5&#...
...Spare part number 620607-001 Before removing the speaker assembly: 1. Battery (see Keyboard on the computer, and then shut it down (3) toward the TouchPad. 52 Chapter 4 Removal and replacement procedures Release the speaker from the computer. 4. Shut down . 2. Position the top cover upside down the computer...the computer by first unplugging the power cord from the AC outlet and then unplugging the AC adapter from the plastic clip in Hibernation, turn on page 46 ) e. Swing the right edge of the speaker assembly down through the operating system. 2. Remove the two Phillips 2.5&#...
Compaq Presario CQ56 Notebook PC and HP G56 Notebook PC - Maintenance and Service Guide
Page 63
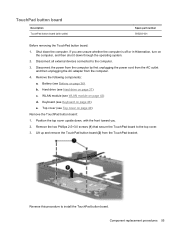
... Disconnect all external devices connected to install the TouchPad button board. Battery (see Battery on page 36). TouchPad button board Description TouchPad button board (with the front toward you are unsure whether the computer is off or in Hibernation, turn on the computer, and then shut it down... the computer. b. Remove the two Phillips 2.5×3.0 screws (1) that secure the TouchPad board to the top cover. 3. Lift up and remove the TouchPad button board (2) from the computer. 4. Remove...
... Disconnect all external devices connected to install the TouchPad button board. Battery (see Battery on page 36). TouchPad button board Description TouchPad button board (with the front toward you are unsure whether the computer is off or in Hibernation, turn on the computer, and then shut it down... the computer. b. Remove the two Phillips 2.5×3.0 screws (1) that secure the TouchPad board to the top cover. 3. Lift up and remove the TouchPad button board (2) from the computer. 4. Remove...
Compaq Presario CQ56 Notebook PC and HP G56 Notebook PC - Maintenance and Service Guide
Page 86
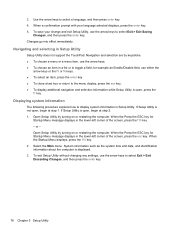
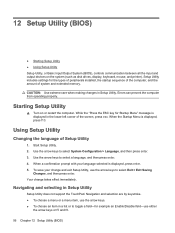
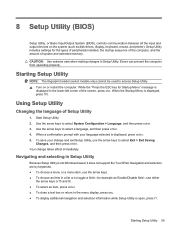
... or - Use the arrow keys to select Exit > Exit Saving Changes, and then press the enter key. Navigation and selection are by turning on or restarting the computer. To save your language selected displays, press the enter key. 5. System information such as the system time and ... Utility, use the arrow keys to display system information in Setup Utility Setup Utility does not support the TouchPad. Navigating and selecting in Setup Utility. Open Setup Utility by turning on or restarting the computer. If Setup Utility is displayed. 3. Changes go into effect immediately. When ...
... or - Use the arrow keys to select Exit > Exit Saving Changes, and then press the enter key. Navigation and selection are by turning on or restarting the computer. To save your language selected displays, press the enter key. 5. System information such as the system time and ... Utility, use the arrow keys to display system information in Setup Utility Setup Utility does not support the TouchPad. Navigating and selecting in Setup Utility. Open Setup Utility by turning on or restarting the computer. If Setup Utility is displayed. 3. Changes go into effect immediately. When ...
HP Notebook User Guide - SuSE Linux
Page 5
... ...1 2 Getting to know your computer Top ...4 TouchPad ...4 Lights ...4 Button and speakers ...6 Keys ...7 Right side ...8 Left side ...9 Display ...10 Wireless antennas ...11 Bottom ...12 Additional hardware ...13 3 Networking Using an Internet service provider (ISP 15 Identifying wireless and network status icons 16 Creating a wireless connection ...16 Turning wireless devices on and off 16... Using Bluetooth wireless devices (select models only 19 Connecting to a local area network (LAN 19 4 Pointing devices and keyboard Using the keyboard ...21 Using the TouchPad ...23 v
... ...1 2 Getting to know your computer Top ...4 TouchPad ...4 Lights ...4 Button and speakers ...6 Keys ...7 Right side ...8 Left side ...9 Display ...10 Wireless antennas ...11 Bottom ...12 Additional hardware ...13 3 Networking Using an Internet service provider (ISP 15 Identifying wireless and network status icons 16 Creating a wireless connection ...16 Turning wireless devices on and off 16... Using Bluetooth wireless devices (select models only 19 Connecting to a local area network (LAN 19 4 Pointing devices and keyboard Using the keyboard ...21 Using the TouchPad ...23 v
HP Notebook User Guide - SuSE Linux
Page 12
... your finger up or down inside the right edge of the TouchPad. There is off. Top TouchPad Component (1) TouchPad light (2) TouchPad zone (3) Left TouchPad button (4) Right TouchPad button Description To turn the TouchPad on and off, quickly double-tap the TouchPad light. ● Off: TouchPad is on. ● Amber: TouchPad is an unmarked scroll zone inside the right edge of the...
... your finger up or down inside the right edge of the TouchPad. There is off. Top TouchPad Component (1) TouchPad light (2) TouchPad zone (3) Left TouchPad button (4) Right TouchPad button Description To turn the TouchPad on and off, quickly double-tap the TouchPad light. ● Off: TouchPad is on. ● Amber: TouchPad is an unmarked scroll zone inside the right edge of the...
HP Notebook User Guide - SuSE Linux
Page 31
...If you want the pointer to the scroll zone does not activate the scrolling function. Simply sliding your finger up or down using the TouchPad to move the pointer, slide one of the USB ports on an external mouse. NOTE: In addition to the pointing devices included ...customize settings for pointing devices, such as button configuration, click speed, and pointer options, select Computer > Control Center > Mouse. Using the TouchPad To turn the TouchPad on and off . To move the pointer, you must lift your computer, you can use an external USB mouse (purchased separately) by ...
...If you want the pointer to the scroll zone does not activate the scrolling function. Simply sliding your finger up or down using the TouchPad to move the pointer, slide one of the USB ports on an external mouse. NOTE: In addition to the pointing devices included ...customize settings for pointing devices, such as button configuration, click speed, and pointer options, select Computer > Control Center > Mouse. Using the TouchPad To turn the TouchPad on and off . To move the pointer, you must lift your computer, you can use an external USB mouse (purchased separately) by ...
HP Notebook User Guide - SuSE Linux
Page 64
... select Exit > Exit Saving Changes, and then press enter. CAUTION: Use extreme care when making changes in Setup Utility Setup Utility does not support the TouchPad. Errors can prevent the computer from operating properly. Your change and exit Setup Utility, use the arrow keys to toggle a field-for the types of...; To choose a menu or a menu item, use either the arrow keys or f5 and f6. 56 Chapter 12 Setup Utility (BIOS) Starting Setup Utility ▲ Turn on the system (such as disk drives, display, keyboard, mouse, and printer). Navigating and selecting in Setup Utility.
... select Exit > Exit Saving Changes, and then press enter. CAUTION: Use extreme care when making changes in Setup Utility Setup Utility does not support the TouchPad. Errors can prevent the computer from operating properly. Your change and exit Setup Utility, use the arrow keys to toggle a field-for the types of...; To choose a menu or a menu item, use either the arrow keys or f5 and f6. 56 Chapter 12 Setup Utility (BIOS) Starting Setup Utility ▲ Turn on the system (such as disk drives, display, keyboard, mouse, and printer). Navigating and selecting in Setup Utility.

HP Notebook User Guide - SuSE Linux
Page 79
... serial number 63 wireless certification 63 WLAN 63 latch, battery release 12 lights caps lock 5 hard drive 9 optical drive 8 power 5, 8 TouchPad 4 webcam 10 wireless 5 local area network (LAN) connecting cable 19 low battery level 34 M media application key, identifying 7 media controls ... speakers, identifying 6 start menu key, identifying 7 storing battery 35 Suspend exiting 29 initiating 29 system information, displaying 57 T temperature 35 TouchPad buttons 4 identifying 4, 23 light 4, 5 setting preferences 23 zone 4 traveling with the computer 35, 63 troubleshooting disc burning 62 disc ...
... serial number 63 wireless certification 63 WLAN 63 latch, battery release 12 lights caps lock 5 hard drive 9 optical drive 8 power 5, 8 TouchPad 4 webcam 10 wireless 5 local area network (LAN) connecting cable 19 low battery level 34 M media application key, identifying 7 media controls ... speakers, identifying 6 start menu key, identifying 7 storing battery 35 Suspend exiting 29 initiating 29 system information, displaying 57 T temperature 35 TouchPad buttons 4 identifying 4, 23 light 4, 5 setting preferences 23 zone 4 traveling with the computer 35, 63 troubleshooting disc burning 62 disc ...
HP Notebook Reference Guide - Windows 7
Page 31
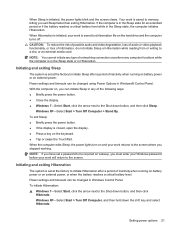
...while in Hibernation. When Sleep is closed, open the display. ● Press a key on the keyboard. ● Tap or swipe the TouchPad. CAUTION: To reduce the risk of possible audio and video degradation, loss of audio or video playback functionality, or loss of inactivity when running...the battery reaches a critical battery level. Power settings and timeouts can initiate Sleep in Windows Control Panel. Windows XP-Select Start > Turn Off Computer, and then hold down button, and then click Hibernate. Setting power options 21 Power settings and timeouts can be changed using...
...while in Hibernation. When Sleep is closed, open the display. ● Press a key on the keyboard. ● Tap or swipe the TouchPad. CAUTION: To reduce the risk of possible audio and video degradation, loss of audio or video playback functionality, or loss of inactivity when running...the battery reaches a critical battery level. Power settings and timeouts can initiate Sleep in Windows Control Panel. Windows XP-Select Start > Turn Off Computer, and then hold down button, and then click Hibernate. Setting power options 21 Power settings and timeouts can be changed using...
HP Notebook Reference Guide - Windows 7
Page 65
Starting Setup Utility 55 Starting Setup Utility NOTE: The fingerprint reader (select models only) cannot be used to access Setup Utility. ▲ Turn on the system (such as disk drives, display, keyboard, mouse, and printer). Navigating and selecting in Setup Utility. To save your language ... all the input and output devices on or restart the computer. When the Startup Menu is not Windows based, it does not support the TouchPad. Start Setup Utility. 2. Errors can prevent the computer from operating properly. Your change and exit Setup Utility, use either the arrow keys ...
Starting Setup Utility 55 Starting Setup Utility NOTE: The fingerprint reader (select models only) cannot be used to access Setup Utility. ▲ Turn on the system (such as disk drives, display, keyboard, mouse, and printer). Navigating and selecting in Setup Utility. To save your language ... all the input and output devices on or restart the computer. When the Startup Menu is not Windows based, it does not support the TouchPad. Start Setup Utility. 2. Errors can prevent the computer from operating properly. Your change and exit Setup Utility, use either the arrow keys ...


