
Wireless Setup Guide
Page 5
... shields your router instructions for service provided by the router. DHCP (Dynamic Host Configuration Protocol)-A specification for more of information. Secure your network You don't go to sleep at speeds up Internet access. If you . A firewall is the safest way to browse, but it . Setting the highest level of securing your network: a Select Start > Control Panel > Network and Internet Connection > Network Connections. Refer to any device that requests one...
... shields your router instructions for service provided by the router. DHCP (Dynamic Host Configuration Protocol)-A specification for more of information. Secure your network You don't go to sleep at speeds up Internet access. If you . A firewall is the safest way to browse, but it . Setting the highest level of securing your network: a Select Start > Control Panel > Network and Internet Connection > Network Connections. Refer to any device that requests one...
Wireless Setup Guide
Page 7
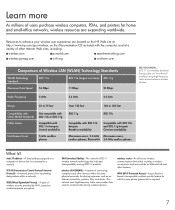
... between wireless devices. WPA (Wi-Fi Protected Access)-A specificationbased, interoperable wireless security feature for which a pass phrase (password) is connected to a computer or device that includes a wireless access point and may include an Ethernet hub and other devices within a network. static IP address-A fixed address assigned to a network. The network uses high-frequency radio waves rather than wires to enhance your wireless user experience are expanding worldwide. wireless LAN...
... between wireless devices. WPA (Wi-Fi Protected Access)-A specificationbased, interoperable wireless security feature for which a pass phrase (password) is connected to a computer or device that includes a wireless access point and may include an Ethernet hub and other devices within a network. static IP address-A fixed address assigned to a network. The network uses high-frequency radio waves rather than wires to enhance your wireless user experience are expanding worldwide. wireless LAN...
Bluetooth Wireless Technology Basics
Page 7
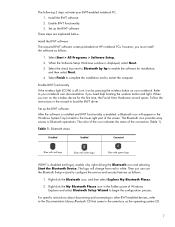
... of Windows Explorer and select Bluetooth Setup Wizard to load the BWT driver. Set up the BWT software. Enable BWT functionality If the wireless light (ICON) is displayed, select Next. 3. The following 3 steps activate your notebook. Table 1. Then you need help locating the wireless button and light. Enable BWT functionality. 3. Install the BWT software. 2. however, you turn it by hp to enable the software for the first time, the Found New Hardware wizard opens. When you must install the software...
... of Windows Explorer and select Bluetooth Setup Wizard to load the BWT driver. Set up the BWT software. Enable BWT functionality If the wireless light (ICON) is displayed, select Next. 3. The following 3 steps activate your notebook. Table 1. Then you need help locating the wireless button and light. Enable BWT functionality. 3. Install the BWT software. 2. however, you turn it by hp to enable the software for the first time, the Found New Hardware wizard opens. When you must install the software...
Bluetooth Wireless Technology Basics
Page 8
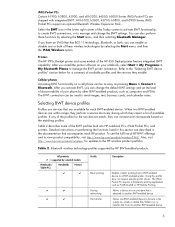
... your notebook, select Start > My Programs > My Bluetooth Places to send images, text, business cards, and calendar notes. After you can be as easy as PrintPocketCE or HP Mobile Printing. After you activate BWT, you install the printer software on performing the functions listed in the lower right corner of HP BWT offerings and to manage and change the default BWT settings and set...
... your notebook, select Start > My Programs > My Bluetooth Places to send images, text, business cards, and calendar notes. After you can be as easy as PrintPocketCE or HP Mobile Printing. After you activate BWT, you install the printer software on performing the functions listed in the lower right corner of HP BWT offerings and to manage and change the default BWT settings and set...
Security - Windows Vista
Page 8
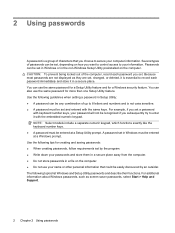
... models include a separate numeric keypad, which functions exactly like the keyboard number keys. ● A password must be set in Windows or in Windows must be set and entered with the embedded numeric keypad. A password set in the non-Windows Setup Utility preinstalled on the computer. ● Do not use your computer information. Because most passwords are set, changed, or deleted, it in Setup Utility: ● A password can be entered at a Windows prompt. You can also use...
... models include a separate numeric keypad, which functions exactly like the keyboard number keys. ● A password must be set in Windows or in Windows must be set and entered with the embedded numeric keypad. A password set in the non-Windows Setup Utility preinstalled on the computer. ● Do not use your computer information. Because most passwords are set, changed, or deleted, it in Setup Utility: ● A password can be entered at a Windows prompt. You can also use...
Software Updates - Windows Vista
Page 7
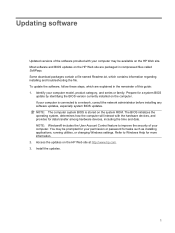
... interact with your permission or password for tasks such as installing applications, running utilities, or changing Windows settings. Updating software Updated versions of the software provided with the hardware devices, and provides for a system BIOS update by identifying the BIOS version currently installed on the HP Web site. NOTE: Windows® includes the User Account Control feature to Windows Help for more information. 2. Install the updates. 1 Some download packages contain a file named Readme...
... interact with your permission or password for tasks such as installing applications, running utilities, or changing Windows settings. Updating software Updated versions of the software provided with the hardware devices, and provides for a system BIOS update by identifying the BIOS version currently installed on the HP Web site. NOTE: Windows® includes the User Account Control feature to Windows Help for more information. 2. Install the updates. 1 Some download packages contain a file named Readme...
Software Updates - Windows Vista
Page 8
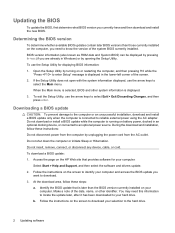
If the Setup Utility does not open with the system information displayed, use the arrow keys to select Exit > Exit Discarding Changes, and then press enter. Identify the BIOS update that provides software for displaying BIOS information: 1. Follow the instructions on your computer. Open the Setup Utility by turning on battery power, docked in an optional docking device, or connected to the hard drive. 2 Updating software When the Main menu is selected, BIOS and other identifier. Do not download or install a BIOS update while...
If the Setup Utility does not open with the system information displayed, use the arrow keys to select Exit > Exit Discarding Changes, and then press enter. Identify the BIOS update that provides software for displaying BIOS information: 1. Follow the instructions on your computer. Open the Setup Utility by turning on battery power, docked in an optional docking device, or connected to the hard drive. 2 Updating software When the Main menu is selected, BIOS and other identifier. Do not download or install a BIOS update while...
Wireless (Select Models Only) - Windows Vista
Page 28
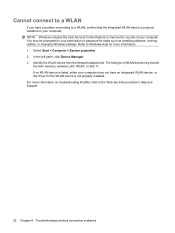
... the driver for more information on your computer: NOTE: Windows includes the User Account Control feature to improve the security of your computer. If no WLAN device is listed, either your computer does not have a problem connecting to a WLAN, confirm that the integrated WLAN device is not properly installed. Select Start > Computer > System properties. 2. The listing for tasks such as installing software, running utilities, or changing Windows settings.
... the driver for more information on your computer: NOTE: Windows includes the User Account Control feature to improve the security of your computer. If no WLAN device is listed, either your computer does not have a problem connecting to a WLAN, confirm that the integrated WLAN device is not properly installed. Select Start > Computer > System properties. 2. The listing for tasks such as installing software, running utilities, or changing Windows settings.

Drives - Windows Vista
Page 14
... all external devices connected to the left disconnect the hard drive. 8 Chapter 5 Replacing the hard drive With the hard drive bay toward you are not sure whether the computer is on, in the Sleep state, or in Hibernation, turn the computer on a flat surface. 6. Lift the hard drive cover away from the computer. 7. Shut down the computer through the operating system. Save your work. 2. Do not remove the hard drive...
... all external devices connected to the left disconnect the hard drive. 8 Chapter 5 Replacing the hard drive With the hard drive bay toward you are not sure whether the computer is on, in the Sleep state, or in Hibernation, turn the computer on a flat surface. 6. Lift the hard drive cover away from the computer. 7. Shut down the computer through the operating system. Save your work. 2. Do not remove the hard drive...
Notebook Tour - Windows Vista
Page 14
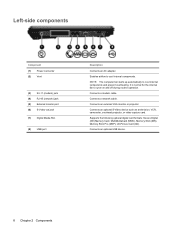
.... Connects an optional S-Video device such as a television, VCR, camcorder, overhead projector, or video capture card. Connects an external VGA monitor or projector. Connects a network cable. Supports the following optional digital card formats: Secure Digital (SD) Memory Card, MultiMediaCard (MMC), Memory Stick (MS), Memory Stick Pro (MSP), xD-Picture Card (XD). Left-side components Component (1) Power connector (2) Vent (3) RJ-11 (modem) jack (4) RJ-45 (network) jack (5) External monitor port (6) S-Video-out jack (7) Digital Media Slot (8) USB port Description Connects an AC adapter.
.... Connects an optional S-Video device such as a television, VCR, camcorder, overhead projector, or video capture card. Connects an external VGA monitor or projector. Connects a network cable. Supports the following optional digital card formats: Secure Digital (SD) Memory Card, MultiMediaCard (MMC), Memory Stick (MS), Memory Stick Pro (MSP), xD-Picture Card (XD). Left-side components Component (1) Power connector (2) Vent (3) RJ-11 (modem) jack (4) RJ-45 (network) jack (5) External monitor port (6) S-Video-out jack (7) Digital Media Slot (8) USB port Description Connects an AC adapter.
Compaq Presario A900 Notebook PC - Maintenance and Service Guide
Page 19
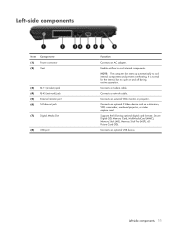
... (MS), Memory Stick Pro (MSP), xDPicture Card (XD). NOTE: The computer fan starts up automatically to cool internal components. Connects a modem cable. Connects an external VGA monitor or projector. Left-side components 11 It is normal for the internal fan to cycle on and off during routine operation. Connects a network cable. Left-side components Item (1) (2) Component Power connector Vent (3) RJ-11 (modem) jack (4) RJ-45 (network) jack (5) External monitor port (6) S-Video-out jack (7) Digital Media Slot (8) USB port Function Connects an AC adapter.
... (MS), Memory Stick Pro (MSP), xDPicture Card (XD). NOTE: The computer fan starts up automatically to cool internal components. Connects a modem cable. Connects an external VGA monitor or projector. Left-side components 11 It is normal for the internal fan to cycle on and off during routine operation. Connects a network cable. Left-side components Item (1) (2) Component Power connector Vent (3) RJ-11 (modem) jack (4) RJ-45 (network) jack (5) External monitor port (6) S-Video-out jack (7) Digital Media Slot (8) USB port Function Connects an AC adapter.
Compaq Presario A900 Notebook PC - Maintenance and Service Guide
Page 83
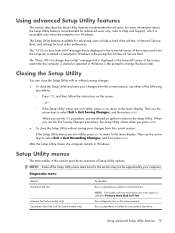
... the Setup Utility features recommended for a Network Service Boot. Then use the arrow keys to change boot order" message that is displayed in the lower-left corner of the screen each time the computer is started or restarted in Windows. Run a diagnostic test on a secondary hard drive. Run a comprehensive self-test on the system memory. The "Press to the Setup Utility. When you use the Exit Saving Changes procedure, the Setup Utility closes...
... the Setup Utility features recommended for a Network Service Boot. Then use the arrow keys to change boot order" message that is displayed in the lower-left corner of the screen each time the computer is started or restarted in Windows. Run a diagnostic test on a secondary hard drive. Run a comprehensive self-test on the system memory. The "Press to the Setup Utility. When you use the Exit Saving Changes procedure, the Setup Utility closes...

Compaq Presario A900 Notebook PC - Maintenance and Service Guide
Page 84
...8213;Enable/disable boot from Floppy. ● Internal Network Adapter boot―Enable/disable boot from Internal Network Adapter. ● Boot Order―Set the boot order for: ◦ USB Floppy ◦ ATAPI CD/DVD-ROM Drive ◦ Hard drive ◦ USB Diskette on password. Enable/disable the processor C4 sleep state. Enable/disable the processor Virtualization Technology. Enter, change , or delete an administrator password. To do this Enter, change , or delete a power-on Key ◦ USB Hard drive ◦ Network adapter Enable/disable the Quick Launch Button tapping sound.
...8213;Enable/disable boot from Floppy. ● Internal Network Adapter boot―Enable/disable boot from Internal Network Adapter. ● Boot Order―Set the boot order for: ◦ USB Floppy ◦ ATAPI CD/DVD-ROM Drive ◦ Hard drive ◦ USB Diskette on password. Enable/disable the processor C4 sleep state. Enable/disable the processor Virtualization Technology. Enter, change , or delete an administrator password. To do this Enter, change , or delete a power-on Key ◦ USB Hard drive ◦ Network adapter Enable/disable the Quick Launch Button tapping sound.
Compaq Presario A900 Notebook PC - Maintenance and Service Guide
Page 125
... assignments 103 audio-out jack location 10 pin assignments 103 B backup 100 base enclosure, spare part number 16, 26 battery location 12 removal 34 spare part number 16, 25, 34 battery bay 12 battery latch 12 battery light 6 boot options 76 boot order 76 bottom components 12 button components 6 button sound 76 buttons power 7 TouchPad 9 wireless 6 C cables, service considerations 28 camera 5 camera light 5 camera module removal 35 spare part number 19, 26, 35 caps lock light 6 changing the Setup Utility language 73 chipset, product description 1 closing the Setup Utility 75 CMOS clearing 32...
... assignments 103 audio-out jack location 10 pin assignments 103 B backup 100 base enclosure, spare part number 16, 26 battery location 12 removal 34 spare part number 16, 25, 34 battery bay 12 battery latch 12 battery light 6 boot options 76 boot order 76 bottom components 12 button components 6 button sound 76 buttons power 7 TouchPad 9 wireless 6 C cables, service considerations 28 camera 5 camera light 5 camera module removal 35 spare part number 19, 26, 35 caps lock light 6 changing the Setup Utility language 73 chipset, product description 1 closing the Setup Utility 75 CMOS clearing 32...

Compaq Presario A900 Notebook PC - Maintenance and Service Guide
Page 126
... 11 network 11 RJ-11 11 RJ-45 11 S-Video-out jack 11 K keyboard product description removal 46 spare part numbers 46 keypad keys 8 keys esc 8 fn 8 function 8 keypad 8 4 15, 25, Windows applications 8 Windows logo 8 L language support 73, 76 left-side components 11 light components 6 lights battery 6 caps lock 6 drive 6 num lock 7 power 6 wireless 6 M main menu 76 mass storage devices, spare part numbers 21 memory map specifications 86 memory module product description 2 removal 39 spare part numbers 18, 25, 39 memory test 75 memory/WLAN module...
... 11 network 11 RJ-11 11 RJ-45 11 S-Video-out jack 11 K keyboard product description removal 46 spare part numbers 46 keypad keys 8 keys esc 8 fn 8 function 8 keypad 8 4 15, 25, Windows applications 8 Windows logo 8 L language support 73, 76 left-side components 11 light components 6 lights battery 6 caps lock 6 drive 6 num lock 7 power 6 wireless 6 M main menu 76 mass storage devices, spare part numbers 21 memory map specifications 86 memory module product description 2 removal 39 spare part numbers 18, 25, 39 memory test 75 memory/WLAN module...
Compaq Presario A900 Notebook PC - Maintenance and Service Guide
Page 127
... audio 3 chipset 1 diskette drive 3 display panel 2 docking support 3 Ethernet 3 external media cards 3 graphics 2 hard drives 2 keyboard 4 memory module 2 microphone 3 modem module 3 operating system 4 optical drives 2 pointing devices 4 ports 3 power requirements 4 processors 1 product name 1 security 4 serviceability 4 web camera 3 wireless 3 product name 1 R recovery discs 99 recovery, system 102 removal/replacement preliminaries 27 procedures 33 restore points 101 right-side components 10 RJ-11 jack location 11 pin assignments 105 RJ-45 jack location 11 pin assignments 106 RTC battery...
... audio 3 chipset 1 diskette drive 3 display panel 2 docking support 3 Ethernet 3 external media cards 3 graphics 2 hard drives 2 keyboard 4 memory module 2 microphone 3 modem module 3 operating system 4 optical drives 2 pointing devices 4 ports 3 power requirements 4 processors 1 product name 1 security 4 serviceability 4 web camera 3 wireless 3 product name 1 R recovery discs 99 recovery, system 102 removal/replacement preliminaries 27 procedures 33 restore points 101 right-side components 10 RJ-11 jack location 11 pin assignments 105 RJ-45 jack location 11 pin assignments 106 RTC battery...

Power Management - Windows Vista
Page 7
... functions while the computer is closed, open the display. ● Press a key on the keyboard or button on the remote control (select models only). ● Activate the TouchPad. Initiating and exiting Sleep The system is saved to memory, letting you can initiate Sleep in the Sleep state, the computer initiates Hibernation. You can be changed using Power Options in Windows® Control Panel. 1 Setting power options Using power-saving states The computer has two power-saving states enabled...
... functions while the computer is closed, open the display. ● Press a key on the keyboard or button on the remote control (select models only). ● Activate the TouchPad. Initiating and exiting Sleep The system is saved to memory, letting you can initiate Sleep in the Sleep state, the computer initiates Hibernation. You can be changed using Power Options in Windows® Control Panel. 1 Setting power options Using power-saving states The computer has two power-saving states enabled...

Power Management - Windows Vista
Page 19
... onboard aircraft. Insert the battery into external power until the battery is heavily used, it should not need to be calibrated more than once a month. Leave the computer plugged into the computer. 2. Select Start > Control Panel > System and Maintenance > Power Options. 2. Record the On battery setting under the following conditions: ● When battery charge displays seem inaccurate ● When you observe a significant change in use, but it after the...
... onboard aircraft. Insert the battery into external power until the battery is heavily used, it should not need to be calibrated more than once a month. Leave the computer plugged into the computer. 2. Select Start > Control Panel > System and Maintenance > Power Options. 2. Record the On battery setting under the following conditions: ● When battery charge displays seem inaccurate ● When you observe a significant change in use, but it after the...

Power Management - Windows Vista
Page 21
... battery light on the computer turns off . 2. Reenter the settings that you recorded for On battery. 7. Step 4: Fully recharge the battery To recharge the battery: 1. Step 5: Reenable Hibernation and Sleep CAUTION: Failure to Hibernate after calibration may result in a full battery discharge and information loss if the computer reaches a critical battery level. 1. Select Start > Control Panel > System and Maintenance > Power Options. 2. Plug the computer into external power and...
... battery light on the computer turns off . 2. Reenter the settings that you recorded for On battery. 7. Step 4: Fully recharge the battery To recharge the battery: 1. Step 5: Reenable Hibernation and Sleep CAUTION: Failure to Hibernate after calibration may result in a full battery discharge and information loss if the computer reaches a critical battery level. 1. Select Start > Control Panel > System and Maintenance > Power Options. 2. Plug the computer into external power and...
Power Management - Windows Vista
Page 27
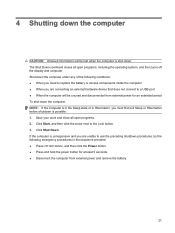
... all open programs, including the operating system, and then turns off the display and computer. Save your work and close all open programs. 2. Click Shut Down. If the computer is unresponsive and you must first exit Sleep or Hibernation...need to replace the battery or access components inside the computer ● When you are unable to use the preceding shutdown procedures, try the following emergency procedures in Hibernation, you are connecting an external hardware device that does not connect to the Lock button. 3. Click Start, and then click the arrow next to a USB port...
... all open programs, including the operating system, and then turns off the display and computer. Save your work and close all open programs. 2. Click Shut Down. If the computer is unresponsive and you must first exit Sleep or Hibernation...need to replace the battery or access components inside the computer ● When you are unable to use the preceding shutdown procedures, try the following emergency procedures in Hibernation, you are connecting an external hardware device that does not connect to the Lock button. 3. Click Start, and then click the arrow next to a USB port...


