User Guide
Page 1
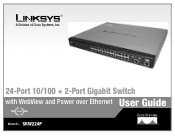
® A Division of Cisco Systems, Inc. 24-Port 10/100 + 2-Port Gigabit Switch with WebView and Power over Ethernet User Guide WIRED Model No. SRW224P
® A Division of Cisco Systems, Inc. 24-Port 10/100 + 2-Port Gigabit Switch with WebView and Power over Ethernet User Guide WIRED Model No. SRW224P

User Guide
Page 2
Other brands and product names are trademarks or registered trademarks of Cisco Systems, Inc. Wash hands after handling. SRW224P-UG-51008 KL Look for technical terms that could damage your property or the Switch. All rights reserved. In addition to these symbols, there are definitions for ... you might need to the State of Contents". and certain other image) is a note of Figures" section in the U.S. 24-Port 10/100 + 2-Port Gigabit Switch with the Switch easier than ever. WARNING: This product contains chemicals, including lead, known to do while using the...
Other brands and product names are trademarks or registered trademarks of Cisco Systems, Inc. Wash hands after handling. SRW224P-UG-51008 KL Look for technical terms that could damage your property or the Switch. All rights reserved. In addition to these symbols, there are definitions for ... you might need to the State of Contents". and certain other image) is a note of Figures" section in the U.S. 24-Port 10/100 + 2-Port Gigabit Switch with the Switch easier than ever. WARNING: This product contains chemicals, including lead, known to do while using the...

User Guide
Page 3
24-Port 10/100 + 2-Port Gigabit Switch with Webview and Power over Ethernet Table of Contents Chapter 1: Introduction 1 Welcome 1 What's in this Guide? 2 Chapter 2: Getting to Know the Switch 3 The Front Panel 3 The Back Panel 4 The Side Panel 4 RJ-45 Ports 5 The Gigabit Expansion Ports 5 The Console Port 5 Chapter 3: Connecting the Switch 6 Overview 6 Pre-Installation Considerations 7 Hardware Installation 8 Placement Options...
24-Port 10/100 + 2-Port Gigabit Switch with Webview and Power over Ethernet Table of Contents Chapter 1: Introduction 1 Welcome 1 What's in this Guide? 2 Chapter 2: Getting to Know the Switch 3 The Front Panel 3 The Back Panel 4 The Side Panel 4 RJ-45 Ports 5 The Gigabit Expansion Ports 5 The Console Port 5 Chapter 3: Connecting the Switch 6 Overview 6 Pre-Installation Considerations 7 Hardware Installation 8 Placement Options...

User Guide
Page 4
24-Port 10/100 + 2-Port Gigabit Switch with Webview and Power over Ethernet Help 82 Appendix A: Fast Ethernet and Gigabit Ethernet 83 About Fast Ethernet 83 About Gigabit Ethernet 83 Appendix B: Cabling 84 Overview 84 Twisted Pair Cabling 84 Fiber Optic Cabling 84 Appendix C: Glossary 85 Appendix D: Specifications 88 Appendix E: Warranty Information 89 Appendix F: Regulatory Information 90 Appendix G: Contact Information 96
24-Port 10/100 + 2-Port Gigabit Switch with Webview and Power over Ethernet Help 82 Appendix A: Fast Ethernet and Gigabit Ethernet 83 About Fast Ethernet 83 About Gigabit Ethernet 83 Appendix B: Cabling 84 Overview 84 Twisted Pair Cabling 84 Fiber Optic Cabling 84 Appendix C: Glossary 85 Appendix D: Specifications 88 Appendix E: Warranty Information 89 Appendix F: Regulatory Information 90 Appendix G: Contact Information 96
User Guide
Page 5
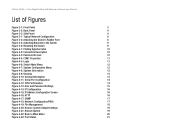
24-Port 10/100 + 2-Port Gigabit Switch with Webview and Power over Ethernet List of Figures Figure 2-1: Front Panel 3 Figure 2-2: Back Panel 4 Figure 2-3: Side Panel 4 Figure 3-1: Typical Network Configuration 6 Figure 3-2: Attaching the Switch's Rubber Feet 8 Figure 3-3: Attaching Brackets to the Switch 9 Figure 3-4: Mounting the Switch 9 Figure 4-1: Finding Hyperterminal 10 Figure 4-2: Connection Description 10 Figure 4-3: Password Screen 10 Figure...
24-Port 10/100 + 2-Port Gigabit Switch with Webview and Power over Ethernet List of Figures Figure 2-1: Front Panel 3 Figure 2-2: Back Panel 4 Figure 2-3: Side Panel 4 Figure 3-1: Typical Network Configuration 6 Figure 3-2: Attaching the Switch's Rubber Feet 8 Figure 3-3: Attaching Brackets to the Switch 9 Figure 3-4: Mounting the Switch 9 Figure 4-1: Finding Hyperterminal 10 Figure 4-2: Connection Description 10 Figure 4-3: Password Screen 10 Figure...

User Guide
Page 7
24-Port 10/100 + 2-Port Gigabit Switch with Webview and Power over Ethernet Figure 5-28: QoS - Interface Statistics 66 Figure 5-53: Statistics - IP Precedence/DSCP 46 Figure 5-29: QoS - Rate Limit 49 ... Figure 5-59: Spanning Tree - Information 72 Figure 5-60: Spanning Tree - Configuration 73 RADIUS Server 62 Figure 5-47: Security - Power Config 68 Figure 5-56: PoE - Power Port Status 69 Figure 5-58: PoE - Adding a Policy 53 Figure 5-37: DiffServ Policy Map - Adding/Editing Standard ACL 57 Figure 5-41: ACL Conf - Diffserv Class Map...
24-Port 10/100 + 2-Port Gigabit Switch with Webview and Power over Ethernet Figure 5-28: QoS - Interface Statistics 66 Figure 5-53: Statistics - IP Precedence/DSCP 46 Figure 5-29: QoS - Rate Limit 49 ... Figure 5-59: Spanning Tree - Information 72 Figure 5-60: Spanning Tree - Configuration 73 RADIUS Server 62 Figure 5-47: Security - Power Config 68 Figure 5-56: PoE - Power Port Status 69 Figure 5-58: PoE - Adding a Policy 53 Figure 5-37: DiffServ Policy Map - Adding/Editing Standard ACL 57 Figure 5-41: ACL Conf - Diffserv Class Map...

User Guide
Page 8
... 78 Figure 5-66: IGMP - Restore Defaults 81 Figure 5-73: Maintenance - IGMP Router Conf 78 Figure 5-67: IGMP - File Download 80 Figure 5-71: Maintenance - 24-Port 10/100 + 2-Port Gigabit Switch with Webview and Power over Ethernet Figure 5-61: Spanning Tree - SNMP Config 75 Figure 5-64: IGMP - IP Multicast Reg Table 79 Figure 5-68: IGMP...
... 78 Figure 5-66: IGMP - Restore Defaults 81 Figure 5-73: Maintenance - IGMP Router Conf 78 Figure 5-67: IGMP - File Download 80 Figure 5-71: Maintenance - 24-Port 10/100 + 2-Port Gigabit Switch with Webview and Power over Ethernet Figure 5-61: Spanning Tree - SNMP Config 75 Figure 5-64: IGMP - IP Multicast Reg Table 79 Figure 5-68: IGMP...
User Guide
Page 9
...manage the 128 VLANs and up your different networks. Or if you prefer, you connect the Switch, set it up, and configure it easy to other switches and the backbone at Gigabit speeds. or full-duplex mode. Use the instructions in this Switch support IEEE 802.3af standard (802.3af) Power-over Ethernet. 24-Port...amount of cables attached to run in half- Head-of the 24-port 10/100 + 2-Port Gigabit Switch with WebView and Power over -Ethernet (PoE) capabilities. All ports have automatic MDI/MDI-X crossover detection. Each port can provide DC power to a wide range of connected devices...
...manage the 128 VLANs and up your different networks. Or if you prefer, you connect the Switch, set it up, and configure it easy to other switches and the backbone at Gigabit speeds. or full-duplex mode. Use the instructions in this Switch support IEEE 802.3af standard (802.3af) Power-over Ethernet. 24-Port...amount of cables attached to run in half- Head-of the 24-port 10/100 + 2-Port Gigabit Switch with WebView and Power over -Ethernet (PoE) capabilities. All ports have automatic MDI/MDI-X crossover detection. Each port can provide DC power to a wide range of connected devices...

User Guide
Page 10
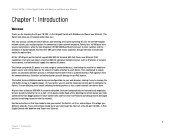
24-Port 10/100 + 2-Port Gigabit Switch with Webview and Power over Ethernet What's in this Guide? This user guide covers the steps for setting up and using the Switch. • Chapter 1: Introduction This chapter describes the Switch's applications and this User Guide. • Chapter 2: Getting to Know the Switch This chapter describes the physical features of the...
24-Port 10/100 + 2-Port Gigabit Switch with Webview and Power over Ethernet What's in this Guide? This user guide covers the steps for setting up and using the Switch. • Chapter 1: Introduction This chapter describes the Switch's applications and this User Guide. • Chapter 2: Getting to Know the Switch This chapter describes the physical features of the...
User Guide
Page 11
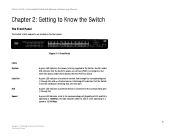
... LED indicates a functional network link through the corresponding port (1 through 24). LEDs System Link/Act PoE Speed Figure 2-1: Front Panel A green LED indicates that power is in progress, but when this blinks amber that indicates that the Switch's power-on the front panel. 24-Port 10/100 + 2-Port Gigabit Switch with an attached device. A solid, amber LED...
... LED indicates a functional network link through the corresponding port (1 through 24). LEDs System Link/Act PoE Speed Figure 2-1: Front Panel A green LED indicates that power is in progress, but when this blinks amber that indicates that the Switch's power-on the front panel. 24-Port 10/100 + 2-Port Gigabit Switch with an attached device. A solid, amber LED...
User Guide
Page 12
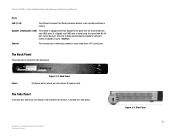
... slot, where you will connect the power cord. 24-Port 10/100 + 2-Port Gigabit Switch with two mini-GBIC ports. Gigabit1 (25)/Gigabit 2 (26) The Switch is equipped with two Gigabit RJ-45 ports that are shared with Webview and Power over Ethernet Ports LAN (1-24) The LAN ports connect to protect the Switch, is where you can attach a lock to...
... slot, where you will connect the power cord. 24-Port 10/100 + 2-Port Gigabit Switch with two mini-GBIC ports. Gigabit1 (25)/Gigabit 2 (26) The Switch is equipped with two Gigabit RJ-45 ports that are shared with Webview and Power over Ethernet Ports LAN (1-24) The LAN ports connect to protect the Switch, is where you can attach a lock to...

User Guide
Page 13
...for more information on the front of one expansion module. The Switch delivers power to a device using a mini-GBIC port, you will need to manage the Switch using wires in the connecting twisted-pair cable. To connect a device to a port, you will need to install an MGBT1, MGBSX1, or MGBLH1... translates into greater network availability. With this and many other Linksys products, your networking options are limitless. 24-Port 10/100 + 2-Port Gigabit Switch with Webview and Power over the twisted-pair cable without requiring its speed and duplex accordingly. You will need to 15...
...for more information on the front of one expansion module. The Switch delivers power to a device using a mini-GBIC port, you will need to manage the Switch using wires in the connecting twisted-pair cable. To connect a device to a port, you will need to install an MGBT1, MGBSX1, or MGBLH1... translates into greater network availability. With this and many other Linksys products, your networking options are limitless. 24-Port 10/100 + 2-Port Gigabit Switch with Webview and Power over the twisted-pair cable without requiring its speed and duplex accordingly. You will need to 15...

User Guide
Page 14
... Distance 100 meters (328 feet) 5 meters (16,4 feet) 100 meters (328 feet) *A hub refers to any type of 100Mbps hub. 24-Port 10/100 + 2-Port Gigabit Switch with Webview and Power over Ethernet Chapter 3: Connecting the Switch Overview This chapter will explain how to connect network devices to 100 meters (328 feet). 6 Chapter 3: Connecting the...
... Distance 100 meters (328 feet) 5 meters (16,4 feet) 100 meters (328 feet) *A hub refers to any type of 100Mbps hub. 24-Port 10/100 + 2-Port Gigabit Switch with Webview and Power over Ethernet Chapter 3: Connecting the Switch Overview This chapter will explain how to connect network devices to 100 meters (328 feet). 6 Chapter 3: Connecting the...

User Guide
Page 15
... of electrical noise, power lines, and fluorescent lighting fixtures. 3. Position the Switch away from sources of two inches (50mm). 5. Make sure that the cables can be connected easily. 2. Keep cabling away from water and moisture sources. 4. 24-Port 10/100 + 2-Port Gigabit Switch with Webview and Power over Ethernet Pre-Installation Considerations Fast Ethernet Considerations...
... of electrical noise, power lines, and fluorescent lighting fixtures. 3. Position the Switch away from sources of two inches (50mm). 5. Make sure that the cables can be connected easily. 2. Keep cabling away from water and moisture sources. 4. 24-Port 10/100 + 2-Port Gigabit Switch with Webview and Power over Ethernet Pre-Installation Considerations Fast Ethernet Considerations...

User Guide
Page 16
... from the back of the numbered ports on the Switch, and connect the other end to physically install the Switch, either set the Switch on the Switch. Chapter 3: Connecting the Switch Hardware Installation IMPORTANT: Make sure to a PC or other end into an electrical outlet. 24-Port 10/100 + 2-Port Gigabit Switch with the Switch. Connect the other end to use...
... from the back of the numbered ports on the Switch, and connect the other end to physically install the Switch, either set the Switch on the Switch. Chapter 3: Connecting the Switch Hardware Installation IMPORTANT: Make sure to a PC or other end into an electrical outlet. 24-Port 10/100 + 2-Port Gigabit Switch with the Switch. Connect the other end to use...

User Guide
Page 17
... towards your front side 2. Connect the Switch to network devices according to any standard 19-inch rack, follow the instructions described below. 1. The hardware installation is supplied with the Switch. 24-Port 10/100 + 2-Port Gigabit Switch with Webview and Power over Ethernet Rack...-Mount Placement To rack-mount the Switch in any standard 19-inch rack. 6. MDI/MDIX will automatically detect ...
... towards your front side 2. Connect the Switch to network devices according to any standard 19-inch rack, follow the instructions described below. 1. The hardware installation is supplied with the Switch. 24-Port 10/100 + 2-Port Gigabit Switch with Webview and Power over Ethernet Rack...-Mount Placement To rack-mount the Switch in any standard 19-inch rack. 6. MDI/MDIX will automatically detect ...

User Guide
Page 18
...Password Screen 10 Select an icon for this connection. Select COM1 or COM2. 4. Before you can easily manage your network from the screens through the console port. Select Accessories and then select Communications. Click OK. 3. These settings should be : • Bits ... 1 • Flow control: None Chapter 4: Configuration using the Console Interface Overview The Switch features a menu-driven console interface for basic configuration. 24-Port 10/100 + 2-Port Gigabit Switch with the Switch. Click the Start button. HyperTerminal should be one of connection is SRW224P. Enter a name...
...Password Screen 10 Select an icon for this connection. Select COM1 or COM2. 4. Before you can easily manage your network from the screens through the console port. Select Accessories and then select Communications. Click OK. 3. These settings should be : • Bits ... 1 • Flow control: None Chapter 4: Configuration using the Console Interface Overview The Switch features a menu-driven console interface for basic configuration. 24-Port 10/100 + 2-Port Gigabit Switch with the Switch. Click the Start button. HyperTerminal should be one of connection is SRW224P. Enter a name...

User Guide
Page 19
... To navigate through the Console Interface Figure 4-5: Login 11 Figure 4-4: COM1 Properties Chapter 4: Configuration using the Console Interface Configuring the Switch through the Console Interface use the Up Arrow or Down Arrow keys to move up or down, or use the number keys to... Esc key to return to choose; The bottom of the window always has a listing of menus. 24-Port 10/100 + 2-Port Gigabit Switch with Webview and Power over Ethernet Configuring the Switch through the Console Interface Login When you finish configuring HyperTerminal, the Login screen will get highlighted.
... To navigate through the Console Interface Figure 4-5: Login 11 Figure 4-4: COM1 Properties Chapter 4: Configuration using the Console Interface Configuring the Switch through the Console Interface use the Up Arrow or Down Arrow keys to move up or down, or use the number keys to... Esc key to return to choose; The bottom of the window always has a listing of menus. 24-Port 10/100 + 2-Port Gigabit Switch with Webview and Power over Ethernet Configuring the Switch through the Console Interface Login When you finish configuring HyperTerminal, the Login screen will get highlighted.
User Guide
Page 20
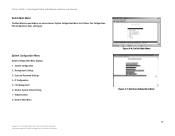
... 12 Back to Main Menu. System Configuration 2. Restore System Default Setting 7. IP Configuration 5. File Management 6. 24-Port 10/100 + 2-Port Gigabit Switch with Webview and Power over Ethernet Switch Main Menu The Main Menu screen displays six menu choices: System Configuration Menu, Port Status, Port Configuration, PoE Configuration, Help, and Logout. System Configuration Menu System Configuration Menu displays: 1.
... 12 Back to Main Menu. System Configuration 2. Restore System Default Setting 7. IP Configuration 5. File Management 6. 24-Port 10/100 + 2-Port Gigabit Switch with Webview and Power over Ethernet Switch Main Menu The Main Menu screen displays six menu choices: System Configuration Menu, Port Status, Port Configuration, PoE Configuration, Help, and Logout. System Configuration Menu System Configuration Menu displays: 1.

User Guide
Page 21
This file runs when the Switch is turned on. Software Version. Hardware Version. This file loads the software from storage memory to main memory. General Information The General Information screen displays ... the Console Interface Figure 4-10: General Information 13 It loads the operating system for the Switch. The current hardware setup of the Switch. This file contains the programming code that runs the Switch. Loader Version. 24-Port 10/100 + 2-Port Gigabit Switch with Webview and Power over Ethernet System Information In System Information, you can check the...
This file runs when the Switch is turned on. Software Version. Hardware Version. This file loads the software from storage memory to main memory. General Information The General Information screen displays ... the Console Interface Figure 4-10: General Information 13 It loads the operating system for the Switch. The current hardware setup of the Switch. This file contains the programming code that runs the Switch. Loader Version. 24-Port 10/100 + 2-Port Gigabit Switch with Webview and Power over Ethernet System Information In System Information, you can check the...


