
User Guide
Page 3
...-45 Ports 5 The Gigabit Expansion Ports 5 The Console Port 5 Chapter 3: Connecting the Switch 6 Overview 6 Pre-Installation Considerations 7 Hardware Installation 8 Placement Options 8 Uplinking the Switch 9 Chapter 4: Configuration using the Console Interface 10 Overview 10 Configuring the Switch through the Console Interface 11 Chapter 5: Configuring the Switch through the Web Utility 24 Overview 24 System Information 25 IP Config 31 Switch Config 33 QoS 43 DiffServ 50 Security 56 SNTP 65 Statistics 66 PoE 68 Spanning Tree 71 SNMP 75 IGMP 76...
...-45 Ports 5 The Gigabit Expansion Ports 5 The Console Port 5 Chapter 3: Connecting the Switch 6 Overview 6 Pre-Installation Considerations 7 Hardware Installation 8 Placement Options 8 Uplinking the Switch 9 Chapter 4: Configuration using the Console Interface 10 Overview 10 Configuring the Switch through the Console Interface 11 Chapter 5: Configuring the Switch through the Web Utility 24 Overview 24 System Information 25 IP Config 31 Switch Config 33 QoS 43 DiffServ 50 Security 56 SNTP 65 Statistics 66 PoE 68 Spanning Tree 71 SNMP 75 IGMP 76...
User Guide
Page 5
...: Serial Port Configuration 14 Figure 4-12: CPU Performance 14 Figure 4-13: User and Password Settings 15 Figure 4-14: IP Configuration 16 Figure 4-15: IP Address Configuration Screen 16 Figure 4-16: HTTP 16 Figure 4-17: SNMP 17 Figure 4-18: Network Configuration/PING 17 Figure 4-19: File Management 18 Figure 4-20: Restore System Default Settings 19 Figure 4-21: Reboot System 19 Figure 4-22: Back to Main Menu 20 Figure 4-23: Port Status...
...: Serial Port Configuration 14 Figure 4-12: CPU Performance 14 Figure 4-13: User and Password Settings 15 Figure 4-14: IP Configuration 16 Figure 4-15: IP Address Configuration Screen 16 Figure 4-16: HTTP 16 Figure 4-17: SNMP 17 Figure 4-18: Network Configuration/PING 17 Figure 4-19: File Management 18 Figure 4-20: Restore System Default Settings 19 Figure 4-21: Reboot System 19 Figure 4-22: Back to Main Menu 20 Figure 4-23: Port Status...
User Guide
Page 9
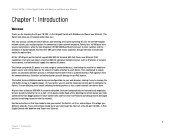
.... Use the instructions in this Switch support IEEE 802.3af standard (802.3af) Power-over-Ethernet (PoE) capabilities. And the mini-GBIC ports allow you to network better than ever. The non-blocking, wire-speed switching forwards packets as fast as IP phones or wireless access points, and automatically supply the required DC power. All the 10/100 ports on this User Guide to help you connect the Switch, set it up, and configure...
.... Use the instructions in this Switch support IEEE 802.3af standard (802.3af) Power-over-Ethernet (PoE) capabilities. And the mini-GBIC ports allow you to network better than ever. The non-blocking, wire-speed switching forwards packets as fast as IP phones or wireless access points, and automatically supply the required DC power. All the 10/100 ports on this User Guide to help you connect the Switch, set it up, and configure...

User Guide
Page 15
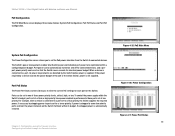
... feet (100 meters). Connect Network Devices 7 Chapter 3: Connecting the Switch Pre-Installation Considerations Position the Switch away from sources of two inches (50mm). 5. Do not stack free-standing Switches more than four units high. 6. 24-Port 10/100 + 2-Port Gigabit Switch with Webview and Power over Ethernet Pre-Installation Considerations Fast Ethernet Considerations If you will be using the Switch in full-duplex mode, the maximum cable length using the Switch for Fast Ethernet (100Mbps) applications, you...
... feet (100 meters). Connect Network Devices 7 Chapter 3: Connecting the Switch Pre-Installation Considerations Position the Switch away from sources of two inches (50mm). 5. Do not stack free-standing Switches more than four units high. 6. 24-Port 10/100 + 2-Port Gigabit Switch with Webview and Power over Ethernet Pre-Installation Considerations Fast Ethernet Considerations If you will be using the Switch in full-duplex mode, the maximum cable length using the Switch for Fast Ethernet (100Mbps) applications, you...

User Guide
Page 16
Connect a Category 5 Ethernet network cable to one of the Switch. 2. Repeat steps 2 and 3 to the module's documentation. 7. If 802.3af-compliant PoE devices are placing the Switch. 4. If you are using the Gigabit port, connect a Category 5e Ethernet network cable to a Gigabit server or other network device. 6. For detailed instructions, refer to connect additional devices. Place the Switch on the bottom of the numbered ports on the Switch, and connect the other end to the Gigabit port on the Switch. 3. If...
Connect a Category 5 Ethernet network cable to one of the Switch. 2. Repeat steps 2 and 3 to the module's documentation. 7. If 802.3af-compliant PoE devices are placing the Switch. 4. If you are using the Gigabit port, connect a Category 5e Ethernet network cable to a Gigabit server or other network device. 6. For detailed instructions, refer to connect additional devices. Place the Switch on the bottom of the numbered ports on the Switch, and connect the other end to the Gigabit port on the Switch. 3. If...

User Guide
Page 23
The default account is the administrator account. Figure 4-13: User and Password Settings 15 Chapter 4: Configuration using the Console Interface Configuring the Switch through the Switch's console interface, up to select save the new user account information, use the arrow keys to select edit then enter the username of the new account and assign a password to cofirm the password. 24-Port 10/100 + 2-Port Gigabit Switch with the Switch's web interface. To add a new user, use the arrow key to 16 can...
The default account is the administrator account. Figure 4-13: User and Password Settings 15 Chapter 4: Configuration using the Console Interface Configuring the Switch through the Switch's console interface, up to select save the new user account information, use the arrow keys to select edit then enter the username of the new account and assign a password to cofirm the password. 24-Port 10/100 + 2-Port Gigabit Switch with the Switch's web interface. To add a new user, use the arrow key to 16 can...

User Guide
Page 24
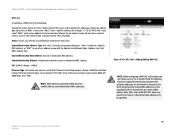
... from . IP Mode. Figure 4-14: IP Configuration Figure 4-15: IP Address Configuration Screen HTTP The HTTP screen allows you can be connected to a port that is 192.168.1.254. Enable or Disable the Switch's HTTP server function. Chapter 4: Configuration using the Console Interface Configuring the Switch through which HTTP packets are configured and you change the Management VLAN, you may lose management access to the Switch. The default setting is a member of the Management VLAN. Subnet Mask. This...
... from . IP Mode. Figure 4-14: IP Configuration Figure 4-15: IP Address Configuration Screen HTTP The HTTP screen allows you can be connected to a port that is 192.168.1.254. Enable or Disable the Switch's HTTP server function. Chapter 4: Configuration using the Console Interface Configuring the Switch through which HTTP packets are configured and you change the Management VLAN, you may lose management access to the Switch. The default setting is a member of the Management VLAN. Subnet Mask. This...
User Guide
Page 30
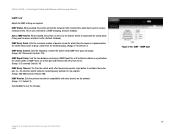
... using the Console Interface Configuring the Switch through the Console Interface Figure 4-25: PoE Main Menu Figure 4-26: Power Configuration Figure 4-27: Power Port Status 22 24-Port 10/100 + 2-Port Gigabit Switch with Webview and Power over Ethernet PoE Configuration The PoE Main Menu screen displays three menu choices: System PoE Configuration, Port PoE Status and Port PoE Configuration. System PoE Configuration The Power Configuration screen allows you to a port set for connected devices, and a perport power priority can be controlled within the Switch's budget, ports set...
... using the Console Interface Configuring the Switch through the Console Interface Figure 4-25: PoE Main Menu Figure 4-26: Power Configuration Figure 4-27: Power Port Status 22 24-Port 10/100 + 2-Port Gigabit Switch with Webview and Power over Ethernet PoE Configuration The PoE Main Menu screen displays three menu choices: System PoE Configuration, Port PoE Status and Port PoE Configuration. System PoE Configuration The Power Configuration screen allows you to a port set for connected devices, and a perport power priority can be controlled within the Switch's budget, ports set...
User Guide
Page 32
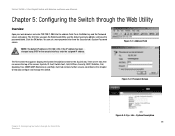
... time you configure and manage the Switch. If the IP address has been changed using DHCP or the console interface, enter the assigned IP address. Each tab contains further screens, described in this chapter, to help you open the Web-Based Utility, use the default username admin, and leave the password blank. System Description 24 NOTE: The default IP address is 192.168.1.254. Press the Enter key and the Password...
... time you configure and manage the Switch. If the IP address has been changed using DHCP or the console interface, enter the assigned IP address. Each tab contains further screens, described in this chapter, to help you open the Web-Based Utility, use the default username admin, and leave the password blank. System Description 24 NOTE: The default IP address is 192.168.1.254. Press the Enter key and the Password...
User Guide
Page 39
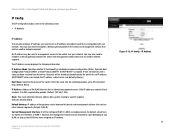
... another network segment. IP address of four numbers, 0 to specific subnets. (Default: 255.255.255.0) Default Gateway. By default, all ports on other network segments. (Default: 0.0.0.0) Current Management Interface. Enter the name into the textfield provided, up to set an IP address and subnet mask that VLAN has been assigned an IP address. 24-Port 10/100 + 2-Port Gigabit Switch with your network. If DHCP/BOOTP is enabled via manual configuration (Static), Dynamic Host Configuration Protocol (DHCP), or Boot Protocol...
... another network segment. IP address of four numbers, 0 to specific subnets. (Default: 255.255.255.0) Default Gateway. By default, all ports on other network segments. (Default: 0.0.0.0) Current Management Interface. Enter the name into the textfield provided, up to set an IP address and subnet mask that VLAN has been assigned an IP address. 24-Port 10/100 + 2-Port Gigabit Switch with your network. If DHCP/BOOTP is enabled via manual configuration (Static), Dynamic Host Configuration Protocol (DHCP), or Boot Protocol...
User Guide
Page 44
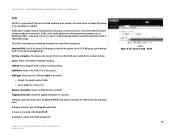
... the switch. • Default: The Switch's default VLAN. • Static: Added as a static entry. VLAN ID. Member Information. Tagging Information. VLAN 36 To configure a VLAN, click VLAN Configuration. Lists all VLANs, click the Show All radio button. This displays the amount of ports that is, System Up Time). Shows the VLAN interface members. Shows the tagging information for each VLAN and each port. To create a new VLAN, click Create VLAN. VLAN 1 is enabled or disabled. VLAN Name. VLANs help to simplify network management...
... the switch. • Default: The Switch's default VLAN. • Static: Added as a static entry. VLAN ID. Member Information. Tagging Information. VLAN 36 To configure a VLAN, click VLAN Configuration. Lists all VLANs, click the Show All radio button. This displays the amount of ports that is, System Up Time). Shows the VLAN interface members. Shows the tagging information for each VLAN and each port. To create a new VLAN, click Create VLAN. VLAN 1 is enabled or disabled. VLAN Name. VLANs help to simplify network management...

User Guide
Page 46
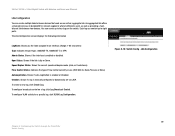
.... Chapter 5: Configuring the Switch through the Web Utility Switch Config Figure 5-17: Switch Config - VLAN Port 38 Indicates VLAN membership mode for each interface, click Submit. Specifies a port as GMRP. Default: All) Ingress filtering. Note that frames belonging to this port). • If ingress filtering is , associated with Webview and Power over Ethernet VLAN Port You can assign its PVID to the port's default VLAN (that identify the source VLAN. 24-Port 10/100 + 2-Port Gigabit Switch with...
.... Chapter 5: Configuring the Switch through the Web Utility Switch Config Figure 5-17: Switch Config - VLAN Port 38 Indicates VLAN membership mode for each interface, click Submit. Specifies a port as GMRP. Default: All) Ingress filtering. Note that frames belonging to this port). • If ingress filtering is , associated with Webview and Power over Ethernet VLAN Port You can assign its PVID to the port's default VLAN (that identify the source VLAN. 24-Port 10/100 + 2-Port Gigabit Switch with...
User Guide
Page 47
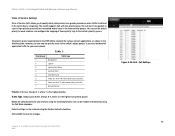
...current speed and duplex mode. (Auto, or fixed choice) Flow Control Status. To create a new lag, click Create Lag. Indicates the port type. (100BASE-TX, 1000BASE-T, or SFP) Admin Status. Oper Status. Shows if the link is manually configured or dynamically set via LACP. To configure VLAN activity for network segments where bottlenecks exist, as well as providing a faulttolerant link between devices that work as one virtual, aggregate link. Speed Duplex Status. 24-Port 10/100 + 2-Port Gigabit Switch with Webview and Power over Ethernet LAG Configuration You can create multiple links...
...current speed and duplex mode. (Auto, or fixed choice) Flow Control Status. To create a new lag, click Create Lag. Indicates the port type. (100BASE-TX, 1000BASE-T, or SFP) Admin Status. Oper Status. Shows if the link is manually configured or dynamically set via LACP. To configure VLAN activity for network segments where bottlenecks exist, as well as providing a faulttolerant link between devices that work as one virtual, aggregate link. Speed Duplex Status. 24-Port 10/100 + 2-Port Gigabit Switch with Webview and Power over Ethernet LAG Configuration You can create multiple links...
User Guide
Page 52
... configure the mapping of Service (CoS) allows you can be restored using the Restore Defaults checkbox. Default settings can map the priority levels to congestion. However, you to specify which data packets have greater precedence when traffic is buffered in the switch due to the switch's output queues in a port's high-priority queue will be enabled or disabled by using the textfield provided. Table 1: Priority Level 1 2 0 3 4 5 6 7 Traffic Type Background (Spare) (default...
... configure the mapping of Service (CoS) allows you can be restored using the Restore Defaults checkbox. Default settings can map the priority levels to congestion. However, you to specify which data packets have greater precedence when traffic is buffered in the switch due to the switch's output queues in a port's high-priority queue will be enabled or disabled by using the textfield provided. Table 1: Priority Level 1 2 0 3 4 5 6 7 Traffic Type Background (Spare) (default...

User Guide
Page 57
... a network to Fast Ethernet or Gigabit Ethernet interfaces. Rate limiting is "256 x granularity." Non-conforming traffic is dropped, conforming traffic is a global setting that is configured on ports is restricted to a value that applies to limit traffic coming out of the switch. Rate Limit Configuration To configure Port Input Rate Limit, click the Enable checkbox and then set to individual ports or lags. Granularity is forwarded without any changes. Truck Rate Limit is transmitted, while packets that...
... a network to Fast Ethernet or Gigabit Ethernet interfaces. Rate limiting is "256 x granularity." Non-conforming traffic is dropped, conforming traffic is a global setting that is configured on ports is restricted to a value that applies to limit traffic coming out of the switch. Rate Limit Configuration To configure Port Input Rate Limit, click the Enable checkbox and then set to individual ports or lags. Granularity is forwarded without any changes. Truck Rate Limit is transmitted, while packets that...

User Guide
Page 58
... of specific traffic types on a per hop basis. The manner in which an individual device handles traffic in the same class. 24-Port 10/100 + 2-Port Gigabit Switch with Webview and Power over Ethernet DiffServ The commands described in this section are not overloaded. Based on configured network policies, different kinds of traffic can be marked for prioritizing network resources to the network edge so that access...
... of specific traffic types on a per hop basis. The manner in which an individual device handles traffic in the same class. 24-Port 10/100 + 2-Port Gigabit Switch with Webview and Power over Ethernet DiffServ The commands described in this section are not overloaded. Based on configured network policies, different kinds of traffic can be marked for prioritizing network resources to the network edge so that access...
User Guide
Page 67
... a specific MAC address, or "MAC" to specify an address range with unknown addresses are flushed from the switch's MAC address table. A few of permit or deny rules. Specify the source and/or destination addresses. Default: Any) Source/Destination MAC Address. VLAN ID. (Range: 1-4094) Ethernet Type. 24-Port 10/100 + 2-Port Gigabit Switch with any user-defined static MAC addresses. Use "Any" to include all ports in the specified VLAN are not flooded to filter Ethernet II formatted packets. (Range...
... a specific MAC address, or "MAC" to specify an address range with unknown addresses are flushed from the switch's MAC address table. A few of permit or deny rules. Specify the source and/or destination addresses. Default: Any) Source/Destination MAC Address. VLAN ID. (Range: 1-4094) Ethernet Type. 24-Port 10/100 + 2-Port Gigabit Switch with any user-defined static MAC addresses. Use "Any" to include all ports in the specified VLAN are not flooded to filter Ethernet II formatted packets. (Range...

User Guide
Page 68
... SFP module. (Range: 1-26) IP. Access to all the ports on the switch. 24-Port 10/100 + 2-Port Gigabit Switch with Webview and Power over Ethernet ACL Port Binding After configuring Access Control Lists (ACL), you can bind it also allows unauthorized personnel to easily intrude and possibly gain access to sensitive network data. You must configure a mask for the port you can only assign one MAC access list to all switch ports in a network can be centrally controlled from a server...
... SFP module. (Range: 1-26) IP. Access to all the ports on the switch. 24-Port 10/100 + 2-Port Gigabit Switch with Webview and Power over Ethernet ACL Port Binding After configuring Access Control Lists (ACL), you can bind it also allows unauthorized personnel to easily intrude and possibly gain access to sensitive network data. You must configure a mask for the port you can only assign one MAC access list to all switch ports in a network can be centrally controlled from a server...

User Guide
Page 72
... Layer (SSL), providing secure access (that is, an encrypted connection) to enable HTTPS and specify the port number. HTTPS Settings System Password The switch supports up to 16 user names and passwords for management access (console and web interfaces). Each user account has an associated access level; The default Normal user name is "admin" with the password "guest." Both the default "admin" and "guest" user accounts can be configured on this switch. Click Submit to save the changes. To configure a new user...
... Layer (SSL), providing secure access (that is, an encrypted connection) to enable HTTPS and specify the port number. HTTPS Settings System Password The switch supports up to 16 user names and passwords for management access (console and web interfaces). Each user account has an associated access level; The default Normal user name is "admin" with the password "guest." Both the default "admin" and "guest" user accounts can be configured on this switch. Click Submit to save the changes. To configure a new user...
User Guide
Page 85
... IP multicast address on the network. (Range: 1-2; Sets the maximum number of that port and removes the entry from the multicast group. (Range: 2-10; Act as required. IGMP Query Count. Default: 125) IGMP Report Delay. Default: 2) IGMP Query Interval. Default: 10) IGMP Query Timeout. Figure 5-64: IGMP - Sets the frequency at which had been receiving query packets) to receive multicast traffic. (Default: Enabled). IGMP Status. When enabled, the switch can serve as IGMP Snooping. (Default: Enabled). Default: 300) IGMP Version. The time the switch waits...
... IP multicast address on the network. (Range: 1-2; Sets the maximum number of that port and removes the entry from the multicast group. (Range: 2-10; Act as required. IGMP Query Count. Default: 125) IGMP Report Delay. Default: 2) IGMP Query Interval. Default: 10) IGMP Query Timeout. Figure 5-64: IGMP - Sets the frequency at which had been receiving query packets) to receive multicast traffic. (Default: Enabled). IGMP Status. When enabled, the switch can serve as IGMP Snooping. (Default: Enabled). Default: 300) IGMP Version. The time the switch waits...


