User Guide
Page 15
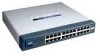
...3. 24-port 10/100 + 2-Port Gigabit Switch with the Switch. Power on the devices connected to the Switch's power port, and plug the other end into an electrical outlet. 8. Figure 3-2: Attaching the Rubber Feet to reset the Switch, remove the power cord from the back of ...a different power cord could damage the Switch and would invalidate your warranty. 1. See Figure 3-1. 2. Connect the Switch to network devices according to the module's documentation. IMPORTANT...
...3. 24-port 10/100 + 2-Port Gigabit Switch with the Switch. Power on the devices connected to the Switch's power port, and plug the other end into an electrical outlet. 8. Figure 3-2: Attaching the Rubber Feet to reset the Switch, remove the power cord from the back of ...a different power cord could damage the Switch and would invalidate your warranty. 1. See Figure 3-1. 2. Connect the Switch to network devices according to the module's documentation. IMPORTANT...
User Guide
Page 22
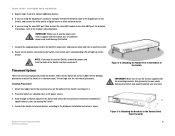
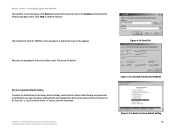
... Send for SRW224 Figure 4-16: Restore System Default Setting 16 Chapter 4: Configuration using the Console Interface Configuring the Switch through the Console Interface Figure 4-15: Xmodem File Send for SRW224 screen will be reset to Default. Press the "y" key to continue or the "n" key to locate the firmware file. Click Send to...
... Send for SRW224 Figure 4-16: Restore System Default Setting 16 Chapter 4: Configuration using the Console Interface Configuring the Switch through the Console Interface Figure 4-15: Xmodem File Send for SRW224 screen will be reset to Default. Press the "y" key to continue or the "n" key to locate the firmware file. Click Send to...


