User Guide
Page 3
... 4 The Back Panel 5 The Side Panel 5 Chapter 3: Connecting the Switch 7 Overview 7 Pre-Installation Considerations 8 Hardware Installation 8 Placement Options 9 Uplinking the Switch 10 Chapter 4: Configuration using the Console Interface 11 Overview 11 Configuring the HyperTerminal Application 11 Configuring the Switch through the Console Interface 12 Chapter 5: Configuring the Switch through the Web Utility 19 Overview 19 System Tab 20...
... 4 The Back Panel 5 The Side Panel 5 Chapter 3: Connecting the Switch 7 Overview 7 Pre-Installation Considerations 8 Hardware Installation 8 Placement Options 9 Uplinking the Switch 10 Chapter 4: Configuration using the Console Interface 11 Overview 11 Configuring the HyperTerminal Application 11 Configuring the Switch through the Console Interface 12 Chapter 5: Configuring the Switch through the Web Utility 19 Overview 19 System Tab 20...
User Guide
Page 5
... Description 11 Figure 4-3: Connect To 11 Figure 4-4: COM1 Properties 12 Figure 4-5: Login 12 Figure 4-6: Switch Main Menu 12 Figure 4-7: System Configuration 13 Figure 4-8: System Information 13 Figure 4-9: Advanced Switch Configuration 14 Figure 4-10: Password Setting 14 Figure 4-11: IP Configuration 15 Figure 4-12: Firmware Update 15 Figure 4-13: Main Menu 15 Figure 4-14: Send File...
... Description 11 Figure 4-3: Connect To 11 Figure 4-4: COM1 Properties 12 Figure 4-5: Login 12 Figure 4-6: Switch Main Menu 12 Figure 4-7: System Configuration 13 Figure 4-8: System Information 13 Figure 4-9: Advanced Switch Configuration 14 Figure 4-10: Password Setting 14 Figure 4-11: IP Configuration 15 Figure 4-12: Firmware Update 15 Figure 4-13: Main Menu 15 Figure 4-14: Send File...
User Guide
Page 6
...Switch with WebView Figure 5-1: Addrees Field 19 Figure 5-2: Password Screen 19 Figure 5-3: Welcome Screen 19 Figure 5-4: System Tab-System Information 20 Figure 5-5: System Tab-MISC Configuration 20 Figure 5-6: System Tab-Username/Password Setting 21 Figure 5-7: Port Tab-Port Status 22 Figure 5-8: Port Tab-Port Configuration 22 Figure 5-9: Trunk Configuration... VLAN 25 Figure 5-15: Add a Port Base VLAN Group 25 Figure 5-16: QoS Configuration 26 Figure 5-17: Logout Tab 26 Figure B-1: Cable Charts 28 Figure B-2: Straight-Through Cable 29 Figure B-3: Crossed-Over Cable ...
...Switch with WebView Figure 5-1: Addrees Field 19 Figure 5-2: Password Screen 19 Figure 5-3: Welcome Screen 19 Figure 5-4: System Tab-System Information 20 Figure 5-5: System Tab-MISC Configuration 20 Figure 5-6: System Tab-Username/Password Setting 21 Figure 5-7: Port Tab-Port Status 22 Figure 5-8: Port Tab-Port Configuration 22 Figure 5-9: Trunk Configuration... VLAN 25 Figure 5-15: Add a Port Base VLAN Group 25 Figure 5-16: QoS Configuration 26 Figure 5-17: Logout Tab 26 Figure B-1: Cable Charts 28 Figure B-2: Straight-Through Cable 29 Figure B-3: Crossed-Over Cable ...
User Guide
Page 7
... 10, and 100 megabit network clients, plus multiple options for best speed and whether to 7 trunking groups. This Switch will allow you connect the Switch, set it up, and configure it easy to manage the 26 VLANs and up your network can use the integrated console port to... configure the switch. And the mini GBIC port allows future expansion to network better than ever. This new Linksys rackmount switch delivers non-blocking, wire speed switching for your network backbone. Use the instructions in half- All ...
... 10, and 100 megabit network clients, plus multiple options for best speed and whether to 7 trunking groups. This Switch will allow you connect the Switch, set it up, and configure it easy to manage the 26 VLANs and up your network can use the integrated console port to... configure the switch. And the mini GBIC port allows future expansion to network better than ever. This new Linksys rackmount switch delivers non-blocking, wire speed switching for your network backbone. Use the instructions in half- All ...
User Guide
Page 8
...in this User Guide. • Chapter 2: Getting to Know the Switch This chapter describes the physical features of the Switch. • Chapter 3: Connecting the Switch This chapter describes how to configure the Switch usign the Web Utility. • Appendix A: Fast Ethernet and ...use the Switch's console interface for configuring the Switch. • Chapter 5: Configuring the Switch through the Web Utility This chapter shows you how to connect the Switch. • Chapter 4: Configuration using the Switch. • Chapter 1: Introduction This chapter describes the Switch's applications and...
...in this User Guide. • Chapter 2: Getting to Know the Switch This chapter describes the physical features of the Switch. • Chapter 3: Connecting the Switch This chapter describes how to configure the Switch usign the Web Utility. • Appendix A: Fast Ethernet and ...use the Switch's console interface for configuring the Switch. • Chapter 5: Configuring the Switch through the Web Utility This chapter shows you how to connect the Switch. • Chapter 4: Configuration using the Switch. • Chapter 1: Introduction This chapter describes the Switch's applications and...
User Guide
Page 12
... will need to it (10Mbps or 100Mbps), and adjust its speed and duplex accordingly. The Console Port The Switch is equipped with one miniGBIC port and two Gigabit Ethernet ports that provide for configuration purposes) using the console port. Chapter 2: Getting to a computer's serial port (for the installation of either 10Mbps or...
... will need to it (10Mbps or 100Mbps), and adjust its speed and duplex accordingly. The Console Port The Switch is equipped with one miniGBIC port and two Gigabit Ethernet ports that provide for configuration purposes) using the console port. Chapter 2: Getting to a computer's serial port (for the installation of either 10Mbps or...
User Guide
Page 13
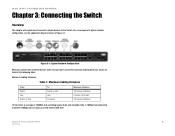
... hubs. Figure 3-1: Typical Network Configuration When you connect your network devices, make sure you don't exceed the maximum cabling distances, which are listed in Figure 3-1. Table 1: Maximum Cabling Distances From Switch Hub Switch or Hub To Switch or Hub Hub Computer Maximum Distance...(328 feet) *A hub refers to the Switch. 24-port 10/100 + 2-Port Gigabit Switch with WebView Chapter 3: Connecting the Switch Overview This chapter will explain how to connect network devices to any type of a typical network configuration, see the application diagram shown in the following...
... hubs. Figure 3-1: Typical Network Configuration When you connect your network devices, make sure you don't exceed the maximum cabling distances, which are listed in Figure 3-1. Table 1: Maximum Cabling Distances From Switch Hub Switch or Hub To Switch or Hub Hub Computer Maximum Distance...(328 feet) *A hub refers to the Switch. 24-port 10/100 + 2-Port Gigabit Switch with WebView Chapter 3: Connecting the Switch Overview This chapter will explain how to connect network devices to any type of a typical network configuration, see the application diagram shown in the following...
User Guide
Page 17
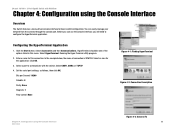
... per Second: 19200 Databits: 8 Parity: None Stop bits: 1 Flow control: None Figure 4-1: Finding HyperTerminal Figure 4-2: Connection Description Chapter 4: Configuration using the Console Interface Overview The Switch features a menu-driven console interface for basic switch configuration. In the example below, the name of the options listed in this connection. Set the serial port settings, as...
... per Second: 19200 Databits: 8 Parity: None Stop bits: 1 Flow control: None Figure 4-1: Finding HyperTerminal Figure 4-2: Connection Description Chapter 4: Configuration using the Console Interface Overview The Switch features a menu-driven console interface for basic switch configuration. In the example below, the name of the options listed in this connection. Set the serial port settings, as...

User Guide
Page 18
... or Down Arrow keys to choose; Figure 4-4: COM1 Properties Figure 4-5: Login Chapter 4: Configuration using the Console Interface Configuring the Switch through the Console Interface Figure 4-6: Switch Main Menu 12 pressing the Enter key activates the highlighted option. Each menu has several ...strokes. Note that the bottom of the window always has a listing of menus. Switch Main Menu The Switch Main Menu screen displays four menu choices: System Configuration, Port Status, Port Configuration, and Logout. menu options and any values entered or present will appear. 24...
... or Down Arrow keys to choose; Figure 4-4: COM1 Properties Figure 4-5: Login Chapter 4: Configuration using the Console Interface Configuring the Switch through the Console Interface Figure 4-6: Switch Main Menu 12 pressing the Enter key activates the highlighted option. Each menu has several ...strokes. Note that the bottom of the window always has a listing of menus. Switch Main Menu The Switch Main Menu screen displays four menu choices: System Configuration, Port Status, Port Configuration, and Logout. menu options and any values entered or present will appear. 24...
User Guide
Page 19
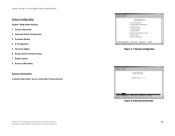
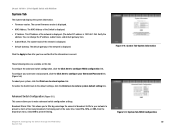
System Information In System Information, you can check the Firmware Version. Password Setting 4. Advanced Switch Configuration 3. Restore System Default Setting 7. IP Configuration 5. Firmware Update 6. Reboot System 0. Return to Main Menu. 24-port 10/100 + 2-Port Gigabit Switch with WebView System Configuration System Configuration displays: 1. Chapter 4: Configuration using the Console Interface Configuring the Switch through the Console Interface Figure 4-7: System Configuration Figure 4-8: System Information 13 System Information 2.
System Information In System Information, you can check the Firmware Version. Password Setting 4. Advanced Switch Configuration 3. Restore System Default Setting 7. IP Configuration 5. Firmware Update 6. Reboot System 0. Return to Main Menu. 24-port 10/100 + 2-Port Gigabit Switch with WebView System Configuration System Configuration displays: 1. Chapter 4: Configuration using the Console Interface Configuring the Switch through the Console Interface Figure 4-7: System Configuration Figure 4-8: System Information 13 System Information 2.
User Guide
Page 20
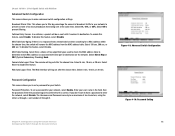
...Logout Time. Select 5 min, 10 min, or 20 min. Select 5 min, 10 min, or 20 min. Figure 4-9: Advanced Switch Configuration Figure 4-10: Password Setting Chapter 4: Configuration using the letters a through z, and numbers 0 through the Console Interface Broadcast Storm Filter. MAC Table Auto-Aging. The console will...and Password can only be re-sent until it is associated with WebView Advanced Switch Configuration This screen allows you to set a password for a MAC address within the chosen time, the switch will be a maximum of two algorithm types used to check the MAC address ...
...Logout Time. Select 5 min, 10 min, or 20 min. Select 5 min, 10 min, or 20 min. Figure 4-9: Advanced Switch Configuration Figure 4-10: Password Setting Chapter 4: Configuration using the letters a through z, and numbers 0 through the Console Interface Broadcast Storm Filter. MAC Table Auto-Aging. The console will...and Password can only be re-sent until it is associated with WebView Advanced Switch Configuration This screen allows you to set a password for a MAC address within the chosen time, the switch will be a maximum of two algorithm types used to check the MAC address ...
User Guide
Page 21
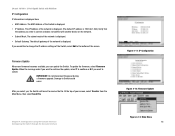
...; Default Gateway. To update the firmware, select Firmware Update. Figure 4-11: IP Configuration Figure 4-12: Firmware Update Chapter 4: Configuration using the Console Interface Configuring the Switch through the Console Interface Figure 4-13: Main Menu 15 24-port 10/100 + 2-Port Gigabit Switch with another device on the network. • Subnet Mask. The MAC Address of...
...; Default Gateway. To update the firmware, select Firmware Update. Figure 4-11: IP Configuration Figure 4-12: Firmware Update Chapter 4: Configuration using the Console Interface Configuring the Switch through the Console Interface Figure 4-13: Main Menu 15 24-port 10/100 + 2-Port Gigabit Switch with another device on the network. • Subnet Mask. The MAC Address of...
User Guide
Page 22
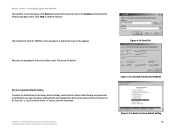
... for SRW224 Figure 4-16: Restore System Default Setting 16 Chapter 4: Configuration using the Console Interface Configuring the Switch through the Console Interface Figure 4-15: Xmodem File Send for SRW224 screen will appear to send the firmware. 24-port 10/100 + 2-Port Gigabit Switch with WebView The Send File screen will be reset to Default...
... for SRW224 Figure 4-16: Restore System Default Setting 16 Chapter 4: Configuration using the Console Interface Configuring the Switch through the Console Interface Figure 4-15: Xmodem File Send for SRW224 screen will appear to send the firmware. 24-port 10/100 + 2-Port Gigabit Switch with WebView The Send File screen will be reset to Default...

User Guide
Page 23
24-port 10/100 + 2-Port Gigabit Switch with WebView Reboot System If you want to return to the main menu. Chapter 4: Configuration using the Console Interface Configuring the Switch through the Console Interface Figure 4-17: Reboot System Figure 4-18: Return to reboot the Switch, select Reboot System and press Enter. Return to Main Menu Select Return to Main Menu if you would like to Main Menu 17
24-port 10/100 + 2-Port Gigabit Switch with WebView Reboot System If you want to return to the main menu. Chapter 4: Configuration using the Console Interface Configuring the Switch through the Console Interface Figure 4-17: Reboot System Figure 4-18: Return to reboot the Switch, select Reboot System and press Enter. Return to Main Menu Select Return to Main Menu if you would like to Main Menu 17

User Guide
Page 24
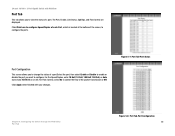
... WebView Port Status This screen allows you to view the status of a port. Port Configuration This screen allows you don't. Figure 4-20: Port Configuration Chapter 4: Configuration using the Console Interface Configuring the Switch through the Console Interface Figure 4-21: Logout 18 For the Speed/Duplex, enter 10 Half, 10 Full, 100 Half, 100 Full, or... Logout to change the status of a port. The Port, Enable, Link Status, Spd/Dpx, and Flow Control are displayed. For Flow Control, select On to configure or Disable if you to log out of the packet transmission or Off.
... WebView Port Status This screen allows you to view the status of a port. Port Configuration This screen allows you don't. Figure 4-20: Port Configuration Chapter 4: Configuration using the Console Interface Configuring the Switch through the Console Interface Figure 4-21: Logout 18 For the Speed/Duplex, enter 10 Half, 10 Full, 100 Half, 100 Full, or... Logout to change the status of a port. The Port, Enable, Link Status, Spd/Dpx, and Flow Control are displayed. For Flow Control, select On to configure or Disable if you to log out of the packet transmission or Off.
User Guide
Page 25
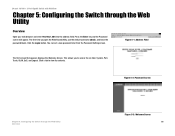
... password later from the Password Setting screen. Figure 5-1: Addrees Field The first screen that appears displays the Welcome Screen. Figure 5-2: Password Screen Chapter 5: Configuring the Switch through the Web Utility Overview Open your web browser and enter 192.168.1.254 into the address field. Click the Login button. Press the Enter... key and the Password screen will appear. 24-port 10/100 + 2-Port Gigabit Switch with WebView Chapter 5: Configuring the Switch through the Web Utility Overview Figure 5-3: Welcome Screen 19
... password later from the Password Setting screen. Figure 5-1: Addrees Field The first screen that appears displays the Welcome Screen. Figure 5-2: Password Screen Chapter 5: Configuring the Switch through the Web Utility Overview Open your web browser and enter 192.168.1.254 into the address field. Click the Login button. Press the Enter... key and the Password screen will appear. 24-port 10/100 + 2-Port Gigabit Switch with WebView Chapter 5: Configuring the Switch through the Web Utility Overview Figure 5-3: Welcome Screen 19
User Guide
Page 26
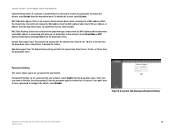
...are available on this tab: To configure the advanced switch configuration, click the Click here to restore system default setting link. To restore the Switch back to the default settings, click the Click here to configure MISC configuration link. The current firmware version ... Address. Figure 5-5: System Tab-MISC Configuration Chapter 5: Configuring the Switch through the Web Utility 20 System Tab Select 5%, 10%, or 20% from being sent at the same time. Figure 5-4: System Tab-System Information Advanced Switch Configuration (Figure 5-5.) This screen allows you have...
...are available on this tab: To configure the advanced switch configuration, click the Click here to restore system default setting link. To restore the Switch back to the default settings, click the Click here to configure MISC configuration link. The current firmware version ... Address. Figure 5-5: System Tab-MISC Configuration Chapter 5: Configuring the Switch through the Web Utility 20 System Tab Select 5%, 10%, or 20% from being sent at the same time. Figure 5-4: System Tab-System Information Advanced Switch Configuration (Figure 5-5.) This screen allows you have...
User Guide
Page 27
...down menu. Password Setting This screen allows you don't want to have a password to configure the Switch, select Disable. To set a password for a MAC address within the chosen time, the switch will log out after the chosen time. If there is associated with WebView Collision Retry ...disable the feature. Console Auto Logout Time. Web Auto Logout Time. Password Protection. Figure 5-6: System Tab-Username/Password Setting Chapter 5: Configuring the Switch through the Web Utility 21 System Tab Select 5 min, 10 min, or 20 min from the drop-down menu. The console will...
...down menu. Password Setting This screen allows you don't want to have a password to configure the Switch, select Disable. To set a password for a MAC address within the chosen time, the switch will log out after the chosen time. If there is associated with WebView Collision Retry ...disable the feature. Console Auto Logout Time. Web Auto Logout Time. Password Protection. Figure 5-6: System Tab-Username/Password Setting Chapter 5: Configuring the Switch through the Web Utility 21 System Tab Select 5 min, 10 min, or 20 min from the drop-down menu. The console will...
User Guide
Page 28
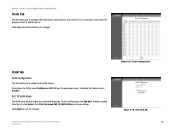
Click Click here to configure. Figure 5-7: Port Tab-Port Status Chapter 5: Configuring the Switch through the Web Utility Port Tab Figure 5-8: Port Tab-Port Configuration 22 Click Apply when finished with WebView Port Tab This tab allows you want to configure Speed/Duplex of each Port, which is located at ... Off. The Port, Enable, Link Status, Spd/Dpx, and Flow Control are displayed. 24-port 10/100 + 2-Port Gigabit Switch with your changes. Port Configuration This screen allows you to change the status of a port.Select the port, then select Enable or Disable to enable or disable...
Click Click here to configure. Figure 5-7: Port Tab-Port Status Chapter 5: Configuring the Switch through the Web Utility Port Tab Figure 5-8: Port Tab-Port Configuration 22 Click Apply when finished with WebView Port Tab This tab allows you want to configure Speed/Duplex of each Port, which is located at ... Off. The Port, Enable, Link Status, Spd/Dpx, and Flow Control are displayed. 24-port 10/100 + 2-Port Gigabit Switch with your changes. Port Configuration This screen allows you to change the status of a port.Select the port, then select Enable or Disable to enable or disable...
User Guide
Page 29
... tab allows you want to add the port to. To add a VLAN group, click Add New. Chapter 5: Configuring the Switch through the Web Utility Trunk Tab Figure 5-9: Trunk Configuration Figure 5-10: 802.1Q VLAN 23 To configure the VLAN, select PortBased or 802.1Q from the list, click Delete. To disable this feature, select...
... tab allows you want to add the port to. To add a VLAN group, click Add New. Chapter 5: Configuring the Switch through the Web Utility Trunk Tab Figure 5-9: Trunk Configuration Figure 5-10: 802.1Q VLAN 23 To configure the VLAN, select PortBased or 802.1Q from the list, click Delete. To disable this feature, select...


