User Guide
Page 3
...in this Guide? 2 Chapter 2: Getting to Know the Switch 4 The Front Panel 4 The Back Panel 5 The Side Panel 5 Chapter 3: Connecting the Switch 7 Overview 7 Pre-Installation Considerations 8 Hardware Installation 8 Placement Options 9 Uplinking the Switch 10 Chapter 4: Configuration using the Console Interface 11 Overview... the HyperTerminal Application 11 Configuring the Switch through the Console Interface 12 Chapter 5: Configuring the Switch through the Web Utility 19 Overview 19 System Tab 20 Port Tab 22 Trunk Tab 23 VLAN Tab 23 Appendix A: Fast Ethernet...
...in this Guide? 2 Chapter 2: Getting to Know the Switch 4 The Front Panel 4 The Back Panel 5 The Side Panel 5 Chapter 3: Connecting the Switch 7 Overview 7 Pre-Installation Considerations 8 Hardware Installation 8 Placement Options 9 Uplinking the Switch 10 Chapter 4: Configuration using the Console Interface 11 Overview... the HyperTerminal Application 11 Configuring the Switch through the Console Interface 12 Chapter 5: Configuring the Switch through the Web Utility 19 Overview 19 System Tab 20 Port Tab 22 Trunk Tab 23 VLAN Tab 23 Appendix A: Fast Ethernet...
User Guide
Page 6
24-port 10/100 + 2-Port Gigabit Switch with WebView Figure 5-1: Addrees Field 19 Figure 5-2: Password Screen 19 Figure 5-3: Welcome Screen 19 Figure 5-4: System Tab-System Information 20 Figure 5-5: System Tab-MISC Configuration ... Configuration 22 Figure 5-9: Trunk Configuration 23 Figure 5-10: 802.1Q VLAN 23 Figure 5-11: Advanced 802.1Q VLAN Setting 24 Figure 5-12: Edit a 802.1Q VLAN Group 24 Figure 5-13: Mode Change 25 Figure 5-14: Port Based VLAN 25 Figure 5-15: Add a Port Base VLAN Group 25 Figure 5-16: QoS Configuration 26 Figure 5-17: Logout...
24-port 10/100 + 2-Port Gigabit Switch with WebView Figure 5-1: Addrees Field 19 Figure 5-2: Password Screen 19 Figure 5-3: Welcome Screen 19 Figure 5-4: System Tab-System Information 20 Figure 5-5: System Tab-MISC Configuration ... Configuration 22 Figure 5-9: Trunk Configuration 23 Figure 5-10: 802.1Q VLAN 23 Figure 5-11: Advanced 802.1Q VLAN Setting 24 Figure 5-12: Edit a 802.1Q VLAN Group 24 Figure 5-13: Mode Change 25 Figure 5-14: Port Based VLAN 25 Figure 5-15: Add a Port Base VLAN Group 25 Figure 5-16: QoS Configuration 26 Figure 5-17: Logout...
User Guide
Page 7
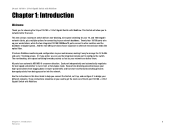
...your web browser, making it to your different networks. The non-blocking, wire-speed switching forwards packets as fast as your workstations, while the two integrated 10/100/1000BaseTX ports connect to manage the 26 VLANs and up your network can use the integrated console port to 7 trunking groups. ...Or if you prefer, you connect the Switch, set it up, and configure it easy to other switches and the backbone at Gigabit speeds. This Switch will allow you to alternate ...
...your web browser, making it to your different networks. The non-blocking, wire-speed switching forwards packets as fast as your workstations, while the two integrated 10/100/1000BaseTX ports connect to manage the 26 VLANs and up your network can use the integrated console port to 7 trunking groups. ...Or if you prefer, you connect the Switch, set it up, and configure it easy to other switches and the backbone at Gigabit speeds. This Switch will allow you to alternate ...
User Guide
Page 25
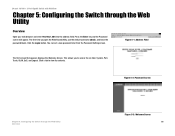
You can set a new password later from the Password Setting screen. Figure 5-2: Password Screen Chapter 5: Configuring the Switch through the Web Utility Overview Open your web browser and enter 192.168.1.254 into the address field. Figure 5-1: Addrees Field The ...Welcome Screen. Click the Login button. Click a tab to access the six tabs: System, Port, Trunk, VLAN, QoS, and Logout. 24-port 10/100 + 2-Port Gigabit Switch with WebView Chapter 5: Configuring the Switch through the Web Utility Overview Figure 5-3: Welcome Screen 19 The first time you to view its contents. This...
You can set a new password later from the Password Setting screen. Figure 5-2: Password Screen Chapter 5: Configuring the Switch through the Web Utility Overview Open your web browser and enter 192.168.1.254 into the address field. Figure 5-1: Addrees Field The ...Welcome Screen. Click the Login button. Click a tab to access the six tabs: System, Port, Trunk, VLAN, QoS, and Logout. 24-port 10/100 + 2-Port Gigabit Switch with WebView Chapter 5: Configuring the Switch through the Web Utility Overview Figure 5-3: Welcome Screen 19 The first time you to view its contents. This...
User Guide
Page 29
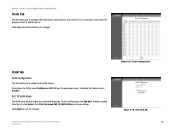
... settings. To disable this feature, select Disable. To add a VLAN group, click Add New. Chapter 5: Configuring the Switch through the Web Utility Trunk Tab Figure 5-9: Trunk Configuration Figure 5-10: 802.1Q VLAN 23 To configure the VLAN, select PortBased or 802.1Q from the list, click Delete. ...I 802.1Q VLAN Mode The VLAN Group list will display the existing VLAN groups. Click Click Advanced 802.1Q VLAN Setting to save the changes. 24-port 10/100 + 2-Port Gigabit Switch with your changes. VLAN Tab VLAN Configuration This tab allows you want to add...
... settings. To disable this feature, select Disable. To add a VLAN group, click Add New. Chapter 5: Configuring the Switch through the Web Utility Trunk Tab Figure 5-9: Trunk Configuration Figure 5-10: 802.1Q VLAN 23 To configure the VLAN, select PortBased or 802.1Q from the list, click Delete. ...I 802.1Q VLAN Mode The VLAN Group list will display the existing VLAN groups. Click Click Advanced 802.1Q VLAN Setting to save the changes. 24-port 10/100 + 2-Port Gigabit Switch with your changes. VLAN Tab VLAN Configuration This tab allows you want to add...
User Guide
Page 30
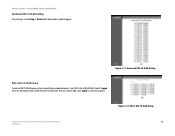
Select Tagged from the drop-down menu under the port for each port, select Drop or Forward for Nonmember and Untagged. Click Apply to add. Figure 5-12: Edit a 802.1Q VLAN Group Chapter 5: Configuring the Switch through the Web Utility 24 VLAN Tab 24-port 10/100 + 2-Port Gigabit Switch with WebView Advanced 802.1Q VLAN Setting For each port that you want to save the changes. Figure 5-11: Advanced 802.1Q VLAN Setting Edit a 802.1Q VLAN Group To add an 802.1QVLAN group, enter an identifying number between 1 and 255 in the VLAN ID field.
Select Tagged from the drop-down menu under the port for each port, select Drop or Forward for Nonmember and Untagged. Click Apply to add. Figure 5-12: Edit a 802.1Q VLAN Group Chapter 5: Configuring the Switch through the Web Utility 24 VLAN Tab 24-port 10/100 + 2-Port Gigabit Switch with WebView Advanced 802.1Q VLAN Setting For each port that you want to save the changes. Figure 5-11: Advanced 802.1Q VLAN Setting Edit a 802.1Q VLAN Group To add an 802.1QVLAN group, enter an identifying number between 1 and 255 in the VLAN ID field.
User Guide
Page 31
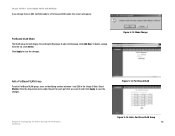
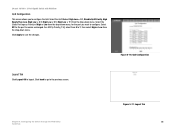
24-port 10/100 + 2-Port Gigabit Switch with WebView If you want to a Port-based VLAN mode, this screen will display the existing VLAN groups.To add a VLAN group, click Add New. Select Member from the drop-down menu under the port for each port that you...Change Add a PortBased VLAN Group To add a PortBased VLAN group, enter an identifying number between 1 and 255 in the Group ID field. Figure 5-14: Port Based VLAN Chapter 5: Configuring the Switch through the Web Utility VLAN Tab Figure 5-15: Add a Port Base VLAN Group 25 PortBased VLAN Mode The VLAN Group list will appear...
24-port 10/100 + 2-Port Gigabit Switch with WebView If you want to a Port-based VLAN mode, this screen will display the existing VLAN groups.To add a VLAN group, click Add New. Select Member from the drop-down menu under the port for each port that you...Change Add a PortBased VLAN Group To add a PortBased VLAN group, enter an identifying number between 1 and 255 in the Group ID field. Figure 5-14: Port Based VLAN Chapter 5: Configuring the Switch through the Web Utility VLAN Tab Figure 5-15: Add a Port Base VLAN Group 25 PortBased VLAN Mode The VLAN Group list will appear...
User Guide
Page 32
...= 7:1 from the drop-down menu. Select Off for the port you to configure the QoS. Figure 5-16: QoS Configuration Chapter 5: Configuring the Switch through the Web Utility VLAN Tab Figure 5-17: Logout Tab 26 Click Apply to the previous screen. Click back to go to save the changes. 24-port 10.../100 + 2-Port Gigabit Switch with WebView QoS Configuration This screen allows you want to remain unchanged. Select the QoS Mode of High or ...
...= 7:1 from the drop-down menu. Select Off for the port you to configure the QoS. Figure 5-16: QoS Configuration Chapter 5: Configuring the Switch through the Web Utility VLAN Tab Figure 5-17: Logout Tab 26 Click Apply to the previous screen. Click back to go to save the changes. 24-port 10.../100 + 2-Port Gigabit Switch with WebView QoS Configuration This screen allows you want to remain unchanged. Select the QoS Mode of High or ...
