User Guide
Page 5
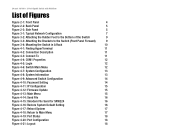
... To 11 Figure 4-4: COM1 Properties 12 Figure 4-5: Login 12 Figure 4-6: Switch Main Menu 12 Figure 4-7: System Configuration 13 Figure 4-8: System Information 13 Figure 4-9: Advanced Switch Configuration 14 Figure 4-10: Password Setting 14 Figure 4-11: IP Configuration 15 Figure 4-12: Firmware Update ...15 Figure 4-13: Main Menu 15 Figure 4-14: Send File 16 Figure 4-15: Xmodem File Send for SRW224 16 Figure 4-16: Restore System Default ...
... To 11 Figure 4-4: COM1 Properties 12 Figure 4-5: Login 12 Figure 4-6: Switch Main Menu 12 Figure 4-7: System Configuration 13 Figure 4-8: System Information 13 Figure 4-9: Advanced Switch Configuration 14 Figure 4-10: Password Setting 14 Figure 4-11: IP Configuration 15 Figure 4-12: Firmware Update ...15 Figure 4-13: Main Menu 15 Figure 4-14: Send File 16 Figure 4-15: Xmodem File Send for SRW224 16 Figure 4-16: Restore System Default ...

User Guide
Page 18
.... Figure 4-4: COM1 Properties Figure 4-5: Login Chapter 4: Configuration using the Console Interface Configuring the Switch through the Console Interface use the Up Arrow or Down Arrow keys to move up or down, use the default username admin, and leave the password blank. pressing the Enter key activates the highlighted option. menu options and any...
.... Figure 4-4: COM1 Properties Figure 4-5: Login Chapter 4: Configuration using the Console Interface Configuring the Switch through the Console Interface use the Up Arrow or Down Arrow keys to move up or down, use the default username admin, and leave the password blank. pressing the Enter key activates the highlighted option. menu options and any...
User Guide
Page 19
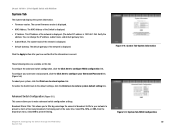
Reboot System 0. Password Setting 4. System Information In System Information, you can check the Firmware Version. IP Configuration 5. Firmware Update 6. Chapter 4: Configuration using the Console Interface Configuring the Switch through the Console Interface Figure 4-7: System Configuration Figure 4-8: System Information 13 24-port 10/100 + 2-Port Gigabit Switch with WebView System Configuration System Configuration displays: 1. System Information 2. Return to Main Menu. Restore System Default Setting 7. Advanced Switch Configuration 3.
Reboot System 0. Password Setting 4. System Information In System Information, you can check the Firmware Version. IP Configuration 5. Firmware Update 6. Chapter 4: Configuration using the Console Interface Configuring the Switch through the Console Interface Figure 4-7: System Configuration Figure 4-8: System Information 13 24-port 10/100 + 2-Port Gigabit Switch with WebView System Configuration System Configuration displays: 1. System Information 2. Return to Main Menu. Restore System Default Setting 7. Advanced Switch Configuration 3.
User Guide
Page 25
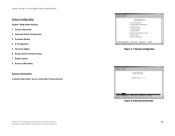
... will appear. This allows you open the Web-Based Utility, use the default username admin, and leave the password blank. The first time you to view its contents. 24-port 10/100 + 2-Port Gigabit Switch with WebView Chapter 5: Configuring the Switch through the Web Utility Overview Figure 5-3: Welcome Screen 19 You can set a new...
... will appear. This allows you open the Web-Based Utility, use the default username admin, and leave the password blank. The first time you to view its contents. 24-port 10/100 + 2-Port Gigabit Switch with WebView Chapter 5: Configuring the Switch through the Web Utility Overview Figure 5-3: Welcome Screen 19 You can set a new...
User Guide
Page 26
... same time. This IP Address of the Switch is 192.168.1.254. The subnet mask of the network is displayed. • Default Gateway. This allows you to restore system default setting link. The default gateway of the network is displayed. Verify the address. To configure your username and password, click the Click here to configure...
... same time. This IP Address of the Switch is 192.168.1.254. The subnet mask of the network is displayed. • Default Gateway. This allows you to restore system default setting link. The default gateway of the network is displayed. Verify the address. To configure your username and password, click the Click here to configure...


