User Guide
Page 1
SRW224 ® A Division of Cisco Systems, Inc. 24 Port 10/100 + 2-Port Gigabit Switch with WebView User Guide WIRED Model No.
SRW224 ® A Division of Cisco Systems, Inc. 24 Port 10/100 + 2-Port Gigabit Switch with WebView User Guide WIRED Model No.
User Guide
Page 2
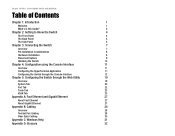
...24-port 10/100 + 2-Port Gigabit Switch with WebView has been designed to make understanding networking with a reminder about something you might need to while using the Switch. This question mark provides you should pay special attention to do while using the Switch. Also, each figure (diagram, screenshot, or other countries. Copyright © 2004 Cisco...Look for technical terms that could damage your property or the Switch. Linksys is something you with the switch easier than ever. 24-port 10/100 + 2-Port Gigabit Switch with a figure number and description, like this: word: ...
...24-port 10/100 + 2-Port Gigabit Switch with WebView has been designed to make understanding networking with a reminder about something you might need to while using the Switch. This question mark provides you should pay special attention to do while using the Switch. Also, each figure (diagram, screenshot, or other countries. Copyright © 2004 Cisco...Look for technical terms that could damage your property or the Switch. Linksys is something you with the switch easier than ever. 24-port 10/100 + 2-Port Gigabit Switch with a figure number and description, like this: word: ...
User Guide
Page 3
24-port 10/100 + 2-Port Gigabit Switch with WebView Table of Contents Chapter 1: Introduction 1 Welcome 1 What's in this Guide? 2 Chapter 2: Getting to Know the Switch 4 The Front Panel 4 The Back Panel 5 The Side Panel 5 Chapter 3: Connecting the Switch 7 Overview 7 Pre-Installation Considerations 8 Hardware Installation 8 Placement Options 9 Uplinking the Switch 10 Chapter 4: Configuration using the Console Interface 11 Overview...
24-port 10/100 + 2-Port Gigabit Switch with WebView Table of Contents Chapter 1: Introduction 1 Welcome 1 What's in this Guide? 2 Chapter 2: Getting to Know the Switch 4 The Front Panel 4 The Back Panel 5 The Side Panel 5 Chapter 3: Connecting the Switch 7 Overview 7 Pre-Installation Considerations 8 Hardware Installation 8 Placement Options 9 Uplinking the Switch 10 Chapter 4: Configuration using the Console Interface 11 Overview...
User Guide
Page 4
24-port 10/100 + 2-Port Gigabit Switch with WebView Appendix E: Specifications 38 Appendix F: Warranty Information 39 Appendix G: Regulatory Information 40 Appendix H: Contact Information 41
24-port 10/100 + 2-Port Gigabit Switch with WebView Appendix E: Specifications 38 Appendix F: Warranty Information 39 Appendix G: Regulatory Information 40 Appendix H: Contact Information 41
User Guide
Page 5
24-port 10/100 + 2-Port Gigabit Switch with WebView List of Figures Figure 2-1: Front Panel 4 Figure 2-2: Back Panel 5 Figure 2-3: Side Panel 5 Figure 3-1: Typical Network Configuration 7 Figure 3-2: Attaching the Rubber Feet to the Bottom of the Switch 9 Figure 3-3: Attaching the Brackets to the Switch (Front Panel Forward) 9 Figure 3-4: Mounting the Switch...Properties 12 Figure 4-5: Login 12 Figure 4-6: Switch Main Menu 12 Figure 4-7: System Configuration 13 Figure 4-8: System Information 13 Figure 4-9: Advanced Switch Configuration 14 Figure 4-10: Password Setting 14...
24-port 10/100 + 2-Port Gigabit Switch with WebView List of Figures Figure 2-1: Front Panel 4 Figure 2-2: Back Panel 5 Figure 2-3: Side Panel 5 Figure 3-1: Typical Network Configuration 7 Figure 3-2: Attaching the Rubber Feet to the Bottom of the Switch 9 Figure 3-3: Attaching the Brackets to the Switch (Front Panel Forward) 9 Figure 3-4: Mounting the Switch...Properties 12 Figure 4-5: Login 12 Figure 4-6: Switch Main Menu 12 Figure 4-7: System Configuration 13 Figure 4-8: System Information 13 Figure 4-9: Advanced Switch Configuration 14 Figure 4-10: Password Setting 14...
User Guide
Page 6
24-port 10/100 + 2-Port Gigabit Switch with WebView Figure 5-1: Addrees Field 19 Figure 5-2: Password Screen 19 Figure 5-3: Welcome Screen 19 Figure 5-4: System Tab-System Information 20 Figure 5-5: System Tab-MISC Configuration 20 Figure 5-6: System Tab-Username/Password Setting 21 Figure 5-7: Port Tab-Port Status 22 Figure 5-8: Port Tab-Port... 23 Figure 5-11: Advanced 802.1Q VLAN Setting 24 Figure 5-12: Edit a 802.1Q VLAN Group 24 Figure 5-13: Mode Change 25 Figure 5-14: Port Based VLAN 25 Figure 5-15: Add a Port Base VLAN Group 25 Figure 5-16: QoS Configuration ...
24-port 10/100 + 2-Port Gigabit Switch with WebView Figure 5-1: Addrees Field 19 Figure 5-2: Password Screen 19 Figure 5-3: Welcome Screen 19 Figure 5-4: System Tab-System Information 20 Figure 5-5: System Tab-MISC Configuration 20 Figure 5-6: System Tab-Username/Password Setting 21 Figure 5-7: Port Tab-Port Status 22 Figure 5-8: Port Tab-Port... 23 Figure 5-11: Advanced 802.1Q VLAN Setting 24 Figure 5-12: Edit a 802.1Q VLAN Group 24 Figure 5-13: Mode Change 25 Figure 5-14: Port Based VLAN 25 Figure 5-15: Add a Port Base VLAN Group 25 Figure 5-16: QoS Configuration ...
User Guide
Page 7
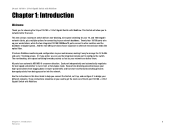
... detection. 24-port 10/100 + 2-Port Gigabit Switch with WebView Chapter 1: Introduction Welcome Thank you for choosing the 24-port 10/100 + 2-Port Gigabit Switch with WebView. This new Linksys rackmount switch delivers non-blocking, wire speed switching for your high-speed clients from being passed on into the network. Head-of the 24-port 10/100 + 2-Port Gigabit Switch with WebView. This Switch will...
... detection. 24-port 10/100 + 2-Port Gigabit Switch with WebView Chapter 1: Introduction Welcome Thank you for choosing the 24-port 10/100 + 2-Port Gigabit Switch with WebView. This new Linksys rackmount switch delivers non-blocking, wire speed switching for your high-speed clients from being passed on into the network. Head-of the 24-port 10/100 + 2-Port Gigabit Switch with WebView. This Switch will...
User Guide
Page 8
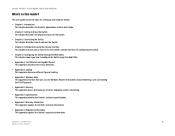
.... • Appendix D: Glossary This appendix gives a brief glossary of terms frequently used in this Guide? 24-port 10/100 + 2-Port Gigabit Switch with WebView What's in networking. • Appendix E: Specifications This appendix provides the Switch's technical specifications. • Appendix F: Warranty Information This appendix supplies the Switch's warranty information. • Appendix G: Regulatory Information This appendix supplies the...
.... • Appendix D: Glossary This appendix gives a brief glossary of terms frequently used in this Guide? 24-port 10/100 + 2-Port Gigabit Switch with WebView What's in networking. • Appendix E: Specifications This appendix provides the Switch's technical specifications. • Appendix F: Warranty Information This appendix supplies the Switch's warranty information. • Appendix G: Regulatory Information This appendix supplies the...
User Guide
Page 9
24-port 10/100 + 2-Port Gigabit Switch with WebView • Appendix H: Contact Information This appendix provides contact information for a variety of Linksys resources, including Technical Support. Chapter 1: Introduction 3 What's in this Guide?
24-port 10/100 + 2-Port Gigabit Switch with WebView • Appendix H: Contact Information This appendix provides contact information for a variety of Linksys resources, including Technical Support. Chapter 1: Introduction 3 What's in this Guide?
User Guide
Page 10
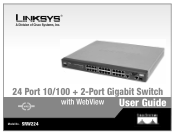
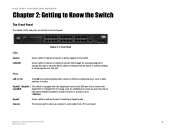
... a functional network link through the corresponding port (1 through 24) with an attached device. Lights to Know the Switch 4 The Front Panel 24-port 10/100 + 2-Port Gigabit Switch with WebView Chapter 2: Getting to indicate the port is shared with miniGBIB Gigabit Port 2. Lights to indicate that the Switch is being used, the minGBIC port cannot be used. Blinks to indicate the...
... a functional network link through the corresponding port (1 through 24) with an attached device. Lights to Know the Switch 4 The Front Panel 24-port 10/100 + 2-Port Gigabit Switch with WebView Chapter 2: Getting to indicate the port is shared with miniGBIB Gigabit Port 2. Lights to indicate that the Switch is being used, the minGBIC port cannot be used. Blinks to indicate the...
User Guide
Page 11
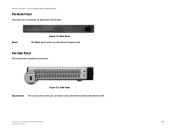
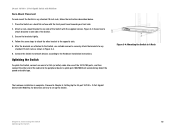
Figure 2-3: Side Panel Security Slot The security slot is where you will be protected from theft. The Side Panel The security slot is located on the back panel of the Switch. Chapter 2: Getting to Know the Switch 5 The Back Panel Power Figure 2-2: Back Panel The Power port is where you can attach a lock so the Switch will connect the power cord. 24-port 10/100 + 2-Port Gigabit Switch with WebView The Back Panel The power port is located on a side panel.
Figure 2-3: Side Panel Security Slot The security slot is where you will be protected from theft. The Side Panel The security slot is located on the back panel of the Switch. Chapter 2: Getting to Know the Switch 5 The Back Panel Power Figure 2-2: Back Panel The Power port is where you can attach a lock so the Switch will connect the power cord. 24-port 10/100 + 2-Port Gigabit Switch with WebView The Back Panel The power port is located on a side panel.
User Guide
Page 12
... HyperTerminal to it (10Mbps or 100Mbps), and adjust its speed and duplex accordingly. 24-port 10/100 + 2-Port Gigabit Switch with WebView RJ-45 Ports The Switch is equipped with one miniGBIC port and two Gigabit Ethernet ports that provide for the installation of one expansion module. These RJ-45...you to connect to 1000Mbps (Gigabit Ethernet). The Console Port The Switch is equipped with a serial port labeled CONSOLE (located on the front of the switch) that work with twenty-four auto-sensing RJ-45 ports. These ports provide links to high-speed network segments or individual ...
... HyperTerminal to it (10Mbps or 100Mbps), and adjust its speed and duplex accordingly. 24-port 10/100 + 2-Port Gigabit Switch with WebView RJ-45 Ports The Switch is equipped with one miniGBIC port and two Gigabit Ethernet ports that provide for the installation of one expansion module. These RJ-45...you to connect to 1000Mbps (Gigabit Ethernet). The Console Port The Switch is equipped with a serial port labeled CONSOLE (located on the front of the switch) that work with twenty-four auto-sensing RJ-45 ports. These ports provide links to high-speed network segments or individual ...
User Guide
Page 13
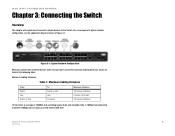
... cabling distances, which are listed in Figure 3-1. 24-port 10/100 + 2-Port Gigabit Switch with WebView Chapter 3: Connecting the Switch Overview This chapter will explain how to connect network devices to 100 meters (328 feet) Chapter 3: Connecting the Switch 7 Overview Table 1: Maximum Cabling Distances From Switch Hub Switch or Hub To Switch or Hub Hub Computer Maximum Distance 100...
... cabling distances, which are listed in Figure 3-1. 24-port 10/100 + 2-Port Gigabit Switch with WebView Chapter 3: Connecting the Switch Overview This chapter will explain how to connect network devices to 100 meters (328 feet) Chapter 3: Connecting the Switch 7 Overview Table 1: Maximum Cabling Distances From Switch Hub Switch or Hub To Switch or Hub Hub Computer Maximum Distance 100...
User Guide
Page 14
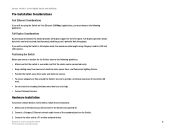
24-port 10/100 + 2-Port Gigabit Switch with WebView Pre-Installation Considerations Fast Ethernet Considerations If you will connect to the Switch are powered off. 2. Make sure all the devices you will be using the Switch in full-duplex mode, the maximum cable length using the Switch for Fast Ethernet (100Mbps) applications, you choose a location for the Switch...cable is accessible and that the switch is 328 feet (100 meters). Connect the other end to provide a minimum clearance of the numbered ports on the Switch. 3. Positioning the Switch Before you must observe the ...
24-port 10/100 + 2-Port Gigabit Switch with WebView Pre-Installation Considerations Fast Ethernet Considerations If you will connect to the Switch are powered off. 2. Make sure all the devices you will be using the Switch in full-duplex mode, the maximum cable length using the Switch for Fast Ethernet (100Mbps) applications, you choose a location for the Switch...cable is accessible and that the switch is 328 feet (100 meters). Connect the other end to provide a minimum clearance of the numbered ports on the Switch. 3. Positioning the Switch Before you must observe the ...
User Guide
Page 15
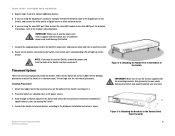
... the power cord from the back of the Switch. Attach the rubber feet to the Switch's power port, and plug the other network device. 6. Connect the supplied power cord to the recessed areas on its four rubber feet for rack-mount placement. 24-port 10/100 + 2-Port Gigabit Switch with the mounting brackets. If you need to...
... the power cord from the back of the Switch. Attach the rubber feet to the Switch's power port, and plug the other network device. 6. Connect the supplied power cord to the recessed areas on its four rubber feet for rack-mount placement. 24-port 10/100 + 2-Port Gigabit Switch with the mounting brackets. If you need to...
User Guide
Page 16
... securely attach the brackets to one side of the cable into one side of the Switch with the front panel faced towards your front side 2. 24-port 10/100 + 2-Port Gigabit Switch with WebView Rack-Mount Placement To rack-mount the Switch in any standard 19-inch rack as shown in A Rack The hardware installation is...
... securely attach the brackets to one side of the cable into one side of the Switch with the front panel faced towards your front side 2. 24-port 10/100 + 2-Port Gigabit Switch with WebView Rack-Mount Placement To rack-mount the Switch in any standard 19-inch rack as shown in A Rack The hardware installation is...
User Guide
Page 17
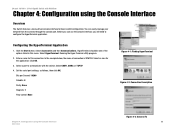
... a menu-driven console interface for basic switch configuration. Configuring the HyperTerminal Application 1. Click OK. 3. You can use the console interface, you can easily manage your network from the screens through the console port. Click the Start button. HyperTerminal should be one of connection is SRW224. Select COM1, COM2... Overview Figure 4-3: Connect To 11 Select HyperTerminal. In the example below, the name of the options listed in this connection. 24-port 10/100 + 2-Port Gigabit Switch with the switch. Set the serial port settings, as follows, then click OK.
... a menu-driven console interface for basic switch configuration. Configuring the HyperTerminal Application 1. Click OK. 3. You can use the console interface, you can easily manage your network from the screens through the console port. Click the Start button. HyperTerminal should be one of connection is SRW224. Select COM1, COM2... Overview Figure 4-3: Connect To 11 Select HyperTerminal. In the example below, the name of the options listed in this connection. 24-port 10/100 + 2-Port Gigabit Switch with the switch. Set the serial port settings, as follows, then click OK.

User Guide
Page 18
... Console Interface use the Up Arrow or Down Arrow keys to move up or down, use the default username admin, and leave the password blank. 24-port 10/100 + 2-Port Gigabit Switch with WebView Configuring the Switch through the Console Interface Login When you wish to choose; To navigate through the Console Interface Figure...
... Console Interface use the Up Arrow or Down Arrow keys to move up or down, use the default username admin, and leave the password blank. 24-port 10/100 + 2-Port Gigabit Switch with WebView Configuring the Switch through the Console Interface Login When you wish to choose; To navigate through the Console Interface Figure...
User Guide
Page 19
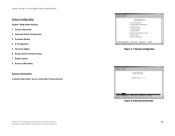
Password Setting 4. Restore System Default Setting 7. System Information In System Information, you can check the Firmware Version. System Information 2. 24-port 10/100 + 2-Port Gigabit Switch with WebView System Configuration System Configuration displays: 1. IP Configuration 5. Reboot System 0. Chapter 4: Configuration using the Console Interface Configuring the Switch through the Console Interface Figure 4-7: System Configuration Figure 4-8: System Information 13 Firmware Update 6. Return to Main Menu. Advanced Switch Configuration 3.
Password Setting 4. Restore System Default Setting 7. System Information In System Information, you can check the Firmware Version. System Information 2. 24-port 10/100 + 2-Port Gigabit Switch with WebView System Configuration System Configuration displays: 1. IP Configuration 5. Reboot System 0. Chapter 4: Configuration using the Console Interface Configuring the Switch through the Console Interface Figure 4-7: System Configuration Figure 4-8: System Information 13 Firmware Update 6. Return to Main Menu. Advanced Switch Configuration 3.
User Guide
Page 20
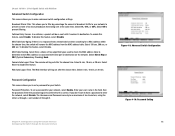
... storm of too many broadcasts from the MAC address table. Select 5 min, 10 min, or 20 min. 24-port 10/100 + 2-Port Gigabit Switch with what port or destination on the network. Password Configuration This screen allows you to filter by percentage the amount of six characters..., using the Console Interface 14 Configuring the Switch through 9. To disable this feature, select Disable. The Username...
... storm of too many broadcasts from the MAC address table. Select 5 min, 10 min, or 20 min. 24-port 10/100 + 2-Port Gigabit Switch with what port or destination on the network. Password Configuration This screen allows you to filter by percentage the amount of six characters..., using the Console Interface 14 Configuring the Switch through 9. To disable this feature, select Disable. The Username...


