
User Guide
Page 3
...E-5 Connecting Headphones E-5 Connecting to Match Another Instrument E-19 Using MIDI E-20 Expanding the Selections in this manual may be registered trademarks of the Keyboard ......... E-7 Using the Piano's Pedals E-8 Using the Built-in Metronome E-9 Playing Rhythms E-10 Using Auto Accompaniment E-11 Learning to ...to and Playing Back from Song Memory E-18 Other Settings E-19 Changing the Keyboard Touch E-19 Changing the Piano Key E-19 Changing the Pitch of the Piano to a PEDAL Jack E-5 Playing with Different Tones ... Contents General Guide E-2 Playing Back All the Music ...
...E-5 Connecting Headphones E-5 Connecting to Match Another Instrument E-19 Using MIDI E-20 Expanding the Selections in this manual may be registered trademarks of the Keyboard ......... E-7 Using the Piano's Pedals E-8 Using the Built-in Metronome E-9 Playing Rhythms E-10 Using Auto Accompaniment E-11 Learning to ...to and Playing Back from Song Memory E-18 Other Settings E-19 Changing the Keyboard Touch E-19 Changing the Piano Key E-19 Changing the Pitch of the Piano to a PEDAL Jack E-5 Playing with Different Tones ... Contents General Guide E-2 Playing Back All the Music ...
User Guide
Page 4
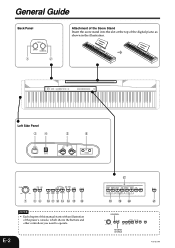
E-2 G HIJ CONTROL REVERB CHORUS K 412A-E-004A General Guide Back Panel Attachment of the Score Stand Insert the score stand into the slot at the top of the digital piano as shown in the illustration. 1 2 Left Side Panel 34 5 6 7 89 0ABC D E F NOTE • Each chapter of this manual starts with an illustration of the piano's console, which shows the buttons and other controllers you need to operate.
E-2 G HIJ CONTROL REVERB CHORUS K 412A-E-004A General Guide Back Panel Attachment of the Score Stand Insert the score stand into the slot at the top of the digital piano as shown in the illustration. 1 2 Left Side Panel 34 5 6 7 89 0ABC D E F NOTE • Each chapter of this manual starts with an illustration of the piano's console, which shows the buttons and other controllers you need to operate.
User Guide
Page 5
... that is preset for the Music Library tune that is playing. 2 Press the START/STOP button again to flash, and starts sequential playback of this manual using bold type. 1 PEDAL DAMPER jack 2 PEDAL SOFT/SOSTENUTO jack 3 POWER button 4 DC 12V jack 5 MIDI OUT/IN terminals 6 PHONES jacks 7 VOLUME knob 8 CONTROL button...
... that is preset for the Music Library tune that is playing. 2 Press the START/STOP button again to flash, and starts sequential playback of this manual using bold type. 1 PEDAL DAMPER jack 2 PEDAL SOFT/SOSTENUTO jack 3 POWER button 4 DC 12V jack 5 MIDI OUT/IN terminals 6 PHONES jacks 7 VOLUME knob 8 CONTROL button...

User Guide
Page 17
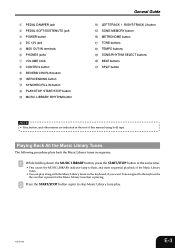
See the Song List on page A-1 of this manual for the first time, a slow tempo is lit. • Each press of the tune,...RHYTHM SELECT E-15 NOTE • You can turn off . Learning to Play the Music Library Tunes Playing a Music Library Tune Your piano comes with 30 Music Library tunes built in step 2 by holding down the CONTROL button and pressing the SONG/RHYTHM SELECT [ ] ...hand part of the tune. 4 Press the PLAY/STOP button again to stop song playback. Always input two digits for the tune number. 3 Press the PLAY/STOP button. • This starts the playback of a Music Library tune ...
See the Song List on page A-1 of this manual for the first time, a slow tempo is lit. • Each press of the tune,...RHYTHM SELECT E-15 NOTE • You can turn off . Learning to Play the Music Library Tunes Playing a Music Library Tune Your piano comes with 30 Music Library tunes built in step 2 by holding down the CONTROL button and pressing the SONG/RHYTHM SELECT [ ] ...hand part of the tune. 4 Press the PLAY/STOP button again to stop song playback. Always input two digits for the tune number. 3 Press the PLAY/STOP button. • This starts the playback of a Music Library tune ...

User Guide
Page 26
...exterior of the unit. • To clean the keyboard, use of this product or this manual. • The contents of this manual are the result of the molding process used to shape the plastic of this manual in its entirety or in part is turned off . Wring out all memory contents will be... go dead, all excess moisture from battery replacement. You may notice lines in the finish of the case of the case. All rights reserved. • CASIO COMPUTER CO., LTD. Note that the battery was installed. These lines are subject to change without notice. The normal life of the lithium battery is...
...exterior of the unit. • To clean the keyboard, use of this product or this manual. • The contents of this manual are the result of the molding process used to shape the plastic of this manual in its entirety or in part is turned off . Wring out all memory contents will be... go dead, all excess moisture from battery replacement. You may notice lines in the finish of the case of the case. All rights reserved. • CASIO COMPUTER CO., LTD. Note that the battery was installed. These lines are subject to change without notice. The normal life of the lithium battery is...

