

User Guide
Page 4
... E-15 Using Reverb E-16 Using Chorus E-16 Using a Pedal E-17 Changing the Pitch (Transpose, Tuning, Octave Shift E-17 Sampling Sounds and Playing Them on an External Device E-48 Other Useful Digital Keyboard Functions E-49 Changing the Scale of the Keyboard E-49 Using Music... E-52 Deleting All Data in Digital Keyboard Memory E-52 E-2 E-19 Connection and Preparation E-19 Sampling and Playing a Melody Sound (Melody Sampling E-19 Incorporating a Sampled Sound into a Drum Set (Drum Sampling E-22 Other Sampling Functions E-24 Playing Built-in Song E-47 Saving Recorded Data on the...
... E-15 Using Reverb E-16 Using Chorus E-16 Using a Pedal E-17 Changing the Pitch (Transpose, Tuning, Octave Shift E-17 Sampling Sounds and Playing Them on an External Device E-48 Other Useful Digital Keyboard Functions E-49 Changing the Scale of the Keyboard E-49 Using Music... E-52 Deleting All Data in Digital Keyboard Memory E-52 E-2 E-19 Connection and Preparation E-19 Sampling and Playing a Melody Sound (Melody Sampling E-19 Incorporating a Sampled Sound into a Drum Set (Drum Sampling E-22 Other Sampling Functions E-24 Playing Built-in Song E-47 Saving Recorded Data on the...

User Guide
Page 10
... Arpeggiator Hold Pedal Effect Accompaniment Scale LCD Contrast Power On Alert 12 MIDI Settings Keyboard Channel Navigate Channels Local Control Accomp Out 13 Delete Sampled Sound Delete User Song Delete All Data Delete Display Trans. While holding down (SONG BANK) and the br 1 [1] 10-key ( ) key at the same time, press...
... Arpeggiator Hold Pedal Effect Accompaniment Scale LCD Contrast Power On Alert 12 MIDI Settings Keyboard Channel Navigate Channels Local Control Accomp Out 13 Delete Sampled Sound Delete User Song Delete All Data Delete Display Trans. While holding down (SONG BANK) and the br 1 [1] 10-key ( ) key at the same time, press...
User Guide
Page 12
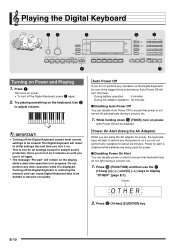
... ■ Disabling Auto Power Off You can disable power on if you that power is disabled while batteries are using the AC adaptor for sample sound protection. Power On Alert (Using the AC Adaptor) While you are being used for about six minutes. Power on alert is on alert to be...
... ■ Disabling Auto Power Off You can disable power on if you that power is disabled while batteries are using the AC adaptor for sample sound protection. Power On Alert (Using the AC Adaptor) While you are being used for about six minutes. Power on alert is on alert to be...

User Guide
Page 13
... Keyboard Response to display "Touch" (page E-7). Pressing slowly produces softer notes. Press ct (FUNCTION) and then use too much the volume of key press speed. Sound volume is turned off output from the built-in when removing the headphones. Normal Touch Response More sensitive Touch Response than Type 1 E-11 PHONES/OUTPUT...
... Keyboard Response to display "Touch" (page E-7). Pressing slowly produces softer notes. Press ct (FUNCTION) and then use too much the volume of key press speed. Sound volume is turned off output from the built-in when removing the headphones. Normal Touch Response More sensitive Touch Response than Type 1 E-11 PHONES/OUTPUT...
User Guide
Page 14
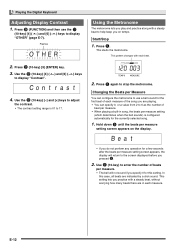
... and practice along with each beat. 5 2. This starts the metronome. Hold down until the beats per measure setting (which determines when the bell sounds) is 01 to display "Contrast". Use the (10-key) [-] and [+] keys to adjust the contrast. • The contrast setting range is... br (10-key) [4] (o) and [6] (p) keys to help keep you practice with a steady beat, without worrying how many beats there are indicated by a click sound. br 2. This pattern changes with a steady beat to display "OTHER" (page E-7). Use (10-key) to stop the metronome. Start/Stop 1. Flashes OTHER br...
... and practice along with each beat. 5 2. This starts the metronome. Hold down until the beats per measure setting (which determines when the bell sounds) is 01 to display "Contrast". Use the (10-key) [-] and [+] keys to adjust the contrast. • The contrast setting range is... br (10-key) [4] (o) and [6] (p) keys to help keep you practice with a steady beat, without worrying how many beats there are indicated by a click sound. br 2. This pattern changes with a steady beat to display "OTHER" (page E-7). Use (10-key) to stop the metronome. Start/Stop 1. Flashes OTHER br...
User Guide
Page 15
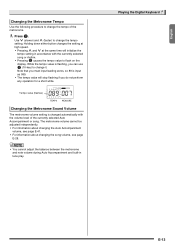
... the tempo value is input as 089. • The tempo value will initialize the tempo setting in tune play. Tempo value (flashes) Changing the Metronome Sound Volume The metronome volume setting is changed automatically with the currently selected song or rhythm. Playing the Digital Keyboard E-13 Use y (slower) and t (faster) to...
... the tempo value is input as 089. • The tempo value will initialize the tempo setting in tune play. Tempo value (flashes) Changing the Metronome Sound Volume The metronome volume setting is changed automatically with the currently selected song or rhythm. Playing the Digital Keyboard E-13 Use y (slower) and t (faster) to...

User Guide
Page 16
... On: No change Pedal Effect : SUS Rhythm Number : "161" (When a piano tone is selected) "094" (When an organ tone is assigned a different percussion sound. Example: To select 001, enter 0 3 0 3 1. • See the separate "Appendix" for a complete list of available tones. • When one of ... on the screen. • Use the number buttons to the tone number, you also can configure the settings listed below. Even the same song sound takes on the keyboard. Specify three digits for playing 1. Reverb : "06" Transpose : "00" Touch Response : Off: Returns to select the...
... On: No change Pedal Effect : SUS Rhythm Number : "161" (When a piano tone is selected) "094" (When an organ tone is assigned a different percussion sound. Example: To select 001, enter 0 3 0 3 1. • See the separate "Appendix" for a complete list of available tones. • When one of ... on the screen. • Use the number buttons to the tone number, you also can configure the settings listed below. Even the same song sound takes on the keyboard. Specify three digits for playing 1. Reverb : "06" Transpose : "00" Touch Response : Off: Returns to select the...

User Guide
Page 17
... and left range of toggles between two instruments. Example: 032 ELEC.PIANO 1 E.Pi ano1 2. Play something on the keyboard. Controlling the Keyboard Sounds Splitting the Keyboard between Two Different Tones You can use the following procedure to select the tone you want . Use (10-key) to the ...Press (TONE) and then use (10-key) to use (10-key) to layer two different tones (such as piano and strings) so they sound simultaneously when you are playing an ensemble between layered (two tones) and unlayered (one tone). Play something on the keyboard. Lights br 3. Select the...
... and left range of toggles between two instruments. Example: 032 ELEC.PIANO 1 E.Pi ano1 2. Play something on the keyboard. Controlling the Keyboard Sounds Splitting the Keyboard between Two Different Tones You can use the following procedure to select the tone you want . Use (10-key) to the ...Press (TONE) and then use (10-key) to use (10-key) to layer two different tones (such as piano and strings) so they sound simultaneously when you are playing an ensemble between layered (two tones) and unlayered (one tone). Play something on the keyboard. Lights br 3. Select the...

User Guide
Page 18
... C4 Using Reverb Reverb adds reverberation to select the reverb setting you are five chorus types, plus an off reverb. It makes you sound as the split point. Pressing again to the right side range of toggles between split (two tones) and unsplit (one tone). &#...playing multiple instruments. 1. Press ct (FUNCTION) and then use the br (10-key) [4] (o) and [6] (p) keys to display "Reverb" (page E-7). Controlling the Keyboard Sounds co 5. You can change the split point co 1. Press ct (FUNCTION) and then use the br (10-key) [4] (o) and [6] (p) keys to display "Chorus" ...
... C4 Using Reverb Reverb adds reverberation to select the reverb setting you are five chorus types, plus an off reverb. It makes you sound as the split point. Pressing again to the right side range of toggles between split (two tones) and unsplit (one tone). &#...playing multiple instruments. 1. Press ct (FUNCTION) and then use the br (10-key) [4] (o) and [6] (p) keys to display "Reverb" (page E-7). Controlling the Keyboard Sounds co 5. You can change the split point co 1. Press ct (FUNCTION) and then use the br (10-key) [4] (o) and [6] (p) keys to display "Chorus" ...

User Guide
Page 19
Purchase one separately from your retailer. See page E-3 for information about options. Jack Controlling the Keyboard Sounds br 4. A simple operation lets you change the pitch, in various ways while playing. • A pedal unit does not come with the Digital Keyboard. br 2. SUSTAIN/...
Purchase one separately from your retailer. See page E-3 for information about options. Jack Controlling the Keyboard Sounds br 4. A simple operation lets you change the pitch, in various ways while playing. • A pedal unit does not come with the Digital Keyboard. br 2. SUSTAIN/...

User Guide
Page 20
... +2 octaves. • When using Split (page E-15), you can set the left side keyboard range. • Split Off : The screen shown below . Controlling the Keyboard Sounds Fine Tuning (Tuning) Use the tuning feature when you need to adjust the pitch slightly to play along with slightly altered tuning. Oc t Uppe r br 2.
... +2 octaves. • When using Split (page E-15), you can set the left side keyboard range. • Split Off : The screen shown below . Controlling the Keyboard Sounds Fine Tuning (Tuning) Use the tuning feature when you need to adjust the pitch slightly to play along with slightly altered tuning. Oc t Uppe r br 2.

User Guide
Page 21
...t a Lights • It will take a few seconds after you turn on the Digital Keyboard before connecting them. 1. Sampling and Playing a Melody Sound (Melody Sampling) Use the procedures in a melody. E-19 Connection and Preparation • Turn off the microphone and the Digital Keyboard before you will be... stored in monaural. Connect a microphone. No sampled sound stored MIC IN/SAMPLING jack • You also could sample the bark of your dog and then use br (10-key) to enter ...
...t a Lights • It will take a few seconds after you turn on the Digital Keyboard before connecting them. 1. Sampling and Playing a Melody Sound (Melody Sampling) Use the procedures in a melody. E-19 Connection and Preparation • Turn off the microphone and the Digital Keyboard before you will be... stored in monaural. Connect a microphone. No sampled sound stored MIC IN/SAMPLING jack • You also could sample the bark of your dog and then use br (10-key) to enter ...

User Guide
Page 22
... (Unit: Kbytes) Remaining memory capacity Syn t hPop Lights E-20 The keys to the left and right of the microphone. Press bo (RHYTHM). 2. Output the sound in seconds) will appear on page E-25 for 10 seconds. cr cs • Even if you should be able to sample is started. The allowable... continues to repeat, as you play on the Digital Keyboard. • You may not be sure to read "Protecting Against Accidental Deletion of the sound picked up memory space and you do not accidentally delete important data, be able to get 10 seconds of sampling if Digital Keyboard memory is...
... (Unit: Kbytes) Remaining memory capacity Syn t hPop Lights E-20 The keys to the left and right of the microphone. Press bo (RHYTHM). 2. Output the sound in seconds) will appear on page E-25 for 10 seconds. cr cs • Even if you should be able to sample is started. The allowable... continues to repeat, as you play on the Digital Keyboard. • You may not be sure to read "Protecting Against Accidental Deletion of the sound picked up memory space and you do not accidentally delete important data, be able to get 10 seconds of sampling if Digital Keyboard memory is...

User Guide
Page 23
...decreasing rate, and then raises the pitch when the key is released. Pitch 1 (Ptch1) Changes the pitch from high to sampled sounds. 1. Applying Effects to a Sampled Sound You can use br (10-key) to enter the tone number (601 to 605) to which you want to cycle through the...602 603 604 605 Press this procedure. Funny 2 (Funy2) Alternates between high and low. This will start looped playback of each sampled sound, if you want, release its button (bt to the screen that corresponds to the melody sampling tone number you want to the keyboard ...
...decreasing rate, and then raises the pitch when the key is released. Pitch 1 (Ptch1) Changes the pitch from high to sampled sounds. 1. Applying Effects to a Sampled Sound You can use br (10-key) to enter the tone number (601 to 605) to which you want to cycle through the...602 603 604 605 Press this procedure. Funny 2 (Funy2) Alternates between high and low. This will start looped playback of each sampled sound, if you want, release its button (bt to the screen that corresponds to the melody sampling tone number you want to the keyboard ...

User Guide
Page 24
... display will not start if the volume of other data. Sampling also will stop automatically whenever there is low due to storage of the sound picked up the currently selected drum set. E-22 Press the keyboard key. This enters sampling standby. The allowable sampling time (in the ...direction of sampling if Digital Keyboard memory is no longer need will delete any sound data currently assigned to the same keyboard key. No Da t a Smp l D r m1 Lights 3. To help ensure that you do not press and ...
... display will not start if the volume of other data. Sampling also will stop automatically whenever there is low due to storage of the sound picked up the currently selected drum set. E-22 Press the keyboard key. This enters sampling standby. The allowable sampling time (in the ...direction of sampling if Digital Keyboard memory is no longer need will delete any sound data currently assigned to the same keyboard key. No Da t a Smp l D r m1 Lights 3. To help ensure that you do not press and ...
User Guide
Page 25
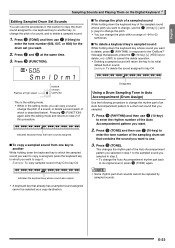
... to one key to another key, to change the pitch within a range of -64 to 63 semitones. ■ To delete a keyboard key's sampled sound While holding down the keyboard key of the Auto Accompaniment pattern you want to key D4 Disappears Flashes at the same time. 3. br message that ... sampled. 1. Indicates the keyboard key whose pitch you want to enter the tone number of ct which you want . 2. Example: To copy sampled sound of key C4 to key D4 Using a Drum Sampling Tone in Auto Accompaniment (Drum Assign) Use the following procedure to change the rhythm part of ...
... to one key to another key, to change the pitch within a range of -64 to 63 semitones. ■ To delete a keyboard key's sampled sound While holding down the keyboard key of the Auto Accompaniment pattern you want to key D4 Disappears Flashes at the same time. 3. br message that ... sampled. 1. Indicates the keyboard key whose pitch you want to enter the tone number of ct which you want . 2. Example: To copy sampled sound of key C4 to key D4 Using a Drum Sampling Tone in Auto Accompaniment (Drum Assign) Use the following procedure to change the rhythm part of ...

User Guide
Page 26
...Digital Keyboard key you press in sampling standby, it will cause sampling to wait until you press a button to stop sampling automatically whenever it detects sound input. Press ct (FUNCTION) and then use the br (10-key) [4] (o) and [6] (p) keys to display "SAMPLING" (page E-7). Sampling... (10-key) [9] (ENTER) key. Press the (10-key) [6] (p) key. Press the (10-key) [-] key to display "SAMPLING" (page E-7). Sampling Sounds and Playing Them on the Digital Keyboard Other Sampling Functions Changing to a Manual Sampling Start Normally when the Digital Keyboard is in step 4 of the...
...Digital Keyboard key you press in sampling standby, it will cause sampling to wait until you press a button to stop sampling automatically whenever it detects sound input. Press ct (FUNCTION) and then use the br (10-key) [4] (o) and [6] (p) keys to display "SAMPLING" (page E-7). Sampling... (10-key) [9] (ENTER) key. Press the (10-key) [6] (p) key. Press the (10-key) [-] key to display "SAMPLING" (page E-7). Sampling Sounds and Playing Them on the Digital Keyboard Other Sampling Functions Changing to a Manual Sampling Start Normally when the Digital Keyboard is in step 4 of the...

User Guide
Page 27
...t Used memory (Unit: Kbytes) Remaining memory capacity br 3. A protected tone is complete, "Complete" will appear on the Digital Keyboard Deleting a Sampled Sound You can use the br (10-key) [4] (o) and [6] (p) keys to display "Protect". E-25 Press ct (FUNCTION) and then use the ... • Computer (page E-62) • For information about deleting individual drum sounds in step 1 of Sampled Sounds You can use the br (10-key) [4] (o) and [6] (p) keys to protect each sampled sound against accidental deletion. 1. S1 :Or gn l Protecting Against Accidental Deletion of the ...
...t Used memory (Unit: Kbytes) Remaining memory capacity br 3. A protected tone is complete, "Complete" will appear on the Digital Keyboard Deleting a Sampled Sound You can use the br (10-key) [4] (o) and [6] (p) keys to display "Protect". E-25 Press ct (FUNCTION) and then use the ... • Computer (page E-62) • For information about deleting individual drum sounds in step 1 of Sampled Sounds You can use the br (10-key) [4] (o) and [6] (p) keys to protect each sampled sound against accidental deletion. 1. S1 :Or gn l Protecting Against Accidental Deletion of the ...

User Guide
Page 31
... start song playback. 3. Select the song you want to adjust the microphone volume. 1. Press to delete song data loaded from an external device, see "Sampling Sounds and Playing Them on the Digital Keyboard" on page E-19. Press bl. bl 1. el • Use (MIC VOLUME) to turn off , only the notes of...
... start song playback. 3. Select the song you want to adjust the microphone volume. 1. Press to delete song data loaded from an external device, see "Sampling Sounds and Playing Them on the Digital Keyboard" on page E-19. Press bl. bl 1. el • Use (MIC VOLUME) to turn off , only the notes of...
User Guide
Page 34
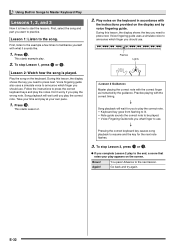
...playback to resume and the key for you to play the correct note. • Keyboard key goes from flashing to lit. • Note guide sounds the correct note to be played. • Voice Fingering Guide tells you play the wrong note. Again! E-32 First, listen to the example... Lights Master playing the correct note with the instructions provided on the keyboard in Songs to Master Keyboard Play Lessons 1, 2, and 3 Now it sounds like. 1. Lesson 1: Listen to the song. Bravo! Play the song on the screen. Using Built-in accordance with the correct finger as instructed...
...playback to resume and the key for you to play the correct note. • Keyboard key goes from flashing to lit. • Note guide sounds the correct note to be played. • Voice Fingering Guide tells you play the wrong note. Again! E-32 First, listen to the example... Lights Master playing the correct note with the instructions provided on the keyboard in Songs to Master Keyboard Play Lessons 1, 2, and 3 Now it sounds like. 1. Lesson 1: Listen to the song. Bravo! Play the song on the screen. Using Built-in accordance with the correct finger as instructed...


