Setup Guide
Page 1
... Guide, such as paper saving tips, how to print a poster and banner with the printer. • Canon, the Canon logo, and imagePROGRAF are trademarks or registered trademarks of CANON INC. • Microsoft and Windows are trademarks of Microsoft Corporation, registered in addition to ...on the included items not described in this Setup Guide. Adjustment paper h. Spacer for Mac OS X v10.7 and later). +800mm +150mm Printer iPF6400/ Printer alone iPF6450 With stand attached With stand and spectrophotometer iPF6450 unit attached Installation space (W x D x H mm) 1527 × 1802 ×...
... Guide, such as paper saving tips, how to print a poster and banner with the printer. • Canon, the Canon logo, and imagePROGRAF are trademarks or registered trademarks of CANON INC. • Microsoft and Windows are trademarks of Microsoft Corporation, registered in addition to ...on the included items not described in this Setup Guide. Adjustment paper h. Spacer for Mac OS X v10.7 and later). +800mm +150mm Printer iPF6400/ Printer alone iPF6450 With stand attached With stand and spectrophotometer iPF6450 unit attached Installation space (W x D x H mm) 1527 × 1802 ×...
Setup Guide
Page 2
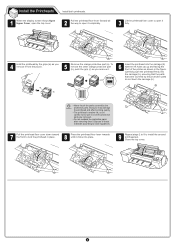
... again. After removing the orange tape and packing material from the carriage shaft (a) and pull it towards you are needed to lift the printer by its carrying handles (a), located under its right and left ends. 4 Remove all the packing materials. b • If the Spectrophotometer... it. a a a 6 Lift the belt stopper (b) from inside the ejection guide (b), reattach it and connecting the power cord. 1 Install the printer. Remove the roll holder (b) from the roll feed unit (a) and remove the protective materials and all the orange tape on the top cover (a) and...
... again. After removing the orange tape and packing material from the carriage shaft (a) and pull it towards you are needed to lift the printer by its carrying handles (a), located under its right and left ends. 4 Remove all the packing materials. b • If the Spectrophotometer... it. a a a 6 Lift the belt stopper (b) from inside the ejection guide (b), reattach it and connecting the power cord. 1 Install the printer. Remove the roll holder (b) from the roll feed unit (a) and remove the protective materials and all the orange tape on the top cover (a) and...
Setup Guide
Page 3
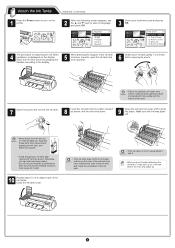
... lock lever inwards, open the ink tank lock lever upwards. 6 Shake each of the ink tank. • If the ink lamp is displayed on the printer. Make sure the ink lamp lights red. • Never touch the ink holes (a) or metal contacts (b). Touching these parts may leak and cause stains. •...
... lock lever inwards, open the ink tank lock lever upwards. 6 Shake each of the ink tank. • If the ink lamp is displayed on the printer. Make sure the ink lamp lights red. • Never touch the ink holes (a) or metal contacts (b). Touching these parts may leak and cause stains. •...
Setup Guide
Page 4
... in place. 8 Press the printhead fixer lever inwards until it clicks into the carriage (b) with the ink holes (a) up and facing the front of the printer as shown in the figure. a • Never touch the parts covered by the protective parts do not touch the carriage (b). b 9 Repeat steps 2 to 8 to spill...
... in place. 8 Press the printhead fixer lever inwards until it clicks into the carriage (b) with the ink holes (a) up and facing the front of the printer as shown in the figure. a • Never touch the parts covered by the protective parts do not touch the carriage (b). b 9 Repeat steps 2 to 8 to spill...

Setup Guide
Page 5
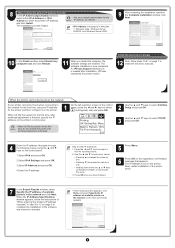
... • Return unused paper to the pouch it came in the User's Guide. • If you will load. tab) and select Adjust Printer - For information on page 6 to load roll paper. 1.Press Navigate. Calibration - Refer to the packaging for changes in the Top Paper Feed...the Spectrophotometer Unit (option)" in , and store it is shown on the display screen. 4 Prepare one sheet, printing-side up the printer and installing the software and electronic manuals, we recommend performing color calibration. During color calibration, on page 1. 5 Follow the procedure below to...
... • Return unused paper to the pouch it came in the User's Guide. • If you will load. tab) and select Adjust Printer - For information on page 6 to load roll paper. 1.Press Navigate. Calibration - Refer to the packaging for changes in the Top Paper Feed...the Spectrophotometer Unit (option)" in , and store it is shown on the display screen. 4 Prepare one sheet, printing-side up the printer and installing the software and electronic manuals, we recommend performing color calibration. During color calibration, on page 1. 5 Follow the procedure below to...
Setup Guide
Page 6
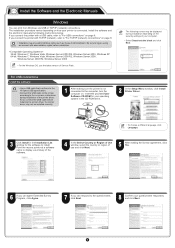
... install. Insert the provided User Software CD-ROM for your operating system in the CD-ROM drive. 2 In the Setup Menu window, click Install Printer Driver. • To choose a different language, click MEMO Language. 3 Click Install in the Installation List window for the software to log on...network) connections" on page 8. • Installation requires administrative rights (such as those of use the latest version of Service Pack. If you connect the printer with TCP/IP (network), refer to "For USB connections" on page 6. If you can print from Windows via USB or TCP/IP (network) ...
... install. Insert the provided User Software CD-ROM for your operating system in the CD-ROM drive. 2 In the Setup Menu window, click Install Printer Driver. • To choose a different language, click MEMO Language. 3 Click Install in the Installation List window for the software to log on...network) connections" on page 8. • Installation requires administrative rights (such as those of use the latest version of Service Pack. If you connect the printer with TCP/IP (network), refer to "For USB connections" on page 6. If you can print from Windows via USB or TCP/IP (network) ...
Setup Guide
Page 7
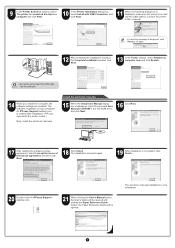
...the Paper Reference Guide will be opened. The installation process begins. 19 After installation is created after installation. (iPFxxxx represents the printer model.) Next, install the electronic manuals. The electronic manuals installation is displayed, click MEMO Retry to try again. 12 After reviewing...of the license agreement, and then click Next. 18 Click Install. 9 In the Printer Selection window, select The printer is connected directly to a computer and click Next. 10 In the Printer Installation dialog box, select Install with USB Connection, and click Next. 11 When the ...
...the Paper Reference Guide will be opened. The installation process begins. 19 After installation is created after installation. (iPFxxxx represents the printer model.) Next, install the electronic manuals. The electronic manuals installation is displayed, click MEMO Retry to try again. 12 After reviewing...of the license agreement, and then click Next. 18 Click Install. 9 In the Printer Selection window, select The printer is connected directly to a computer and click Next. 10 In the Printer Installation dialog box, select Install with USB Connection, and click Next. 11 When the ...
Setup Guide
Page 8
...and insert the provided User Software CD-ROM for assignment of the following ways: • Configure the setting for dynamic DNS updating In the printer menu, either their IPv4 Devices or IPv6 Devices tabs and click Next. • The IPv6 Devices tab is displayed in Windows 7, Windows ...Vista, MEMO Windows Server 2008 R2, and Windows Server 2008. • If the printer you use is connected to computers in the Search Results window. Turn the computer on . When using DHCP server functions, consult your network administrator ...
...and insert the provided User Software CD-ROM for assignment of the following ways: • Configure the setting for dynamic DNS updating In the printer menu, either their IPv4 Devices or IPv6 Devices tabs and click Next. • The IPv6 Devices tab is displayed in Windows 7, Windows ...Vista, MEMO Windows Server 2008 R2, and Windows Server 2008. • If the printer you use is connected to computers in the Search Results window. Turn the computer on . When using DHCP server functions, consult your network administrator ...
Setup Guide
Page 9
...IP Address Specifications window appears, follow steps 15-21 on page 7 to install the electronic manuals. ▲ ▲ ▲ ▲ When the printer cannot be found on the control panel. 1.Select IPv4 and press OK. 2.Select IPv4 Settings and press OK. 3.Select IP Address and press OK. ... increases or decreases the value. 3. and click Install. tab) and press OK. Press the and keys to select a field for the printer and then configure it on the next screen that appears. Printing OK:Setting/Adj. An iPFxxxx Support desktop icon is created after printhead adjustment is...
...IP Address Specifications window appears, follow steps 15-21 on page 7 to install the electronic manuals. ▲ ▲ ▲ ▲ When the printer cannot be found on the control panel. 1.Select IPv4 and press OK. 2.Select IPv4 Settings and press OK. 3.Select IP Address and press OK. ... increases or decreases the value. 3. and click Install. tab) and press OK. Press the and keys to select a field for the printer and then configure it on the next screen that appears. Printing OK:Setting/Adj. An iPFxxxx Support desktop icon is created after printhead adjustment is...
Setup Guide
Page 10
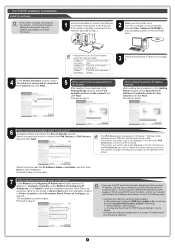
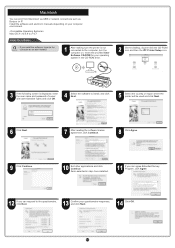
... Install the software • If you can print from Macintosh via USB or network connections such as an administrator. 1 After making sure the printer is displayed, enter the user name and password of a user with administrative rights and click OK. 4 Select the software to install, and click... Next. 5 Select the country or region where the printer will be used and click Next. 6 Click Next. 7 After reading the software license agreement, click Continue. 8 Click Agree. 9 Click Continue. 10...
... Install the software • If you can print from Macintosh via USB or network connections such as an administrator. 1 After making sure the printer is displayed, enter the user name and password of a user with administrative rights and click OK. 4 Select the software to install, and click... Next. 5 Select the country or region where the printer will be used and click Next. 6 Click Next. 7 After reading the software license agreement, click Continue. 8 Click Agree. 9 Click Continue. 10...

Setup Guide
Page 11
... the electronic manuals 23 Next, install the electronic manuals. 15 Click Quit. Select the desired printer and click Next. 24 Double-click the iPFxxxx Manual Installer icon on , and then connect the printer to the computer or the network with a cable. • For USB connections • For...following screen is displayed and paper information is no longer displayed. • To register another printer, click MEMO Continue Registration, and repeat steps 17 to the computer. MEMO 18 Select the printer to insert the USB cable into the LAN port. When the paper information has been updated...
... the electronic manuals 23 Next, install the electronic manuals. 15 Click Quit. Select the desired printer and click Next. 24 Double-click the iPFxxxx Manual Installer icon on , and then connect the printer to the computer or the network with a cable. • For USB connections • For...following screen is displayed and paper information is no longer displayed. • To register another printer, click MEMO Continue Registration, and repeat steps 17 to the computer. MEMO 18 Select the printer to insert the USB cable into the LAN port. When the paper information has been updated...
Setup Guide
Page 12
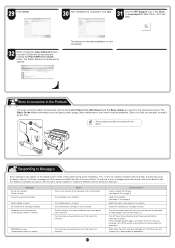
...later). 32 When clicking the User's Manual button, the User's Guide will be opened . The Basic Guide details information such as basic printer usage, daily maintenance, and how to resolve problems. Store it so that cannot be resolved. Cannot recognize printhead x. Paper loaded crooked. ...The maintenance cartridge is crooked. Turn off the printer, and contact your Canon dealer for assistance. The loaded paper is not connected. Hardware error. You may appear on the display screen of the ...
...later). 32 When clicking the User's Manual button, the User's Guide will be opened . The Basic Guide details information such as basic printer usage, daily maintenance, and how to resolve problems. Store it so that cannot be resolved. Cannot recognize printhead x. Paper loaded crooked. ...The maintenance cartridge is crooked. Turn off the printer, and contact your Canon dealer for assistance. The loaded paper is not connected. Hardware error. You may appear on the display screen of the ...
User Guide
Page 1
...banners or at other non-standard sizes 109 Tiling and multiple pages per sheet 122 Centering originals 139 and so on Windows Software 173 Printer Driver 174 Preview 208 Free Layout 218 Color imageRUNNER Enlargement Copy 241 Print Plug-In for Photoshop / Digital Photo Professional 252 Layout ...Plug-In for Photoshop 312 Print Plug-In for Office 317 and so on Mac OS X Software 359 Printer Driver 360 Preview 384 Free Layout 412 Color imageRUNNER Enlargement Copy 443 Print Plug-In for Photoshop / Digital Photo Professional 460 Layout Plug-...
...banners or at other non-standard sizes 109 Tiling and multiple pages per sheet 122 Centering originals 139 and so on Windows Software 173 Printer Driver 174 Preview 208 Free Layout 218 Color imageRUNNER Enlargement Copy 241 Print Plug-In for Photoshop / Digital Photo Professional 252 Layout ...Plug-In for Photoshop 312 Print Plug-In for Office 317 and so on Mac OS X Software 359 Printer Driver 360 Preview 384 Free Layout 412 Color imageRUNNER Enlargement Copy 443 Print Plug-In for Photoshop / Digital Photo Professional 460 Layout Plug-...

User Guide
Page 2
We appreciate your understanding. 2 Thus, there are descriptions that are applied only in HTML format, and functions (video display function, etc.) that cannot be printed easily, this PDF-format manual is converted from the HTML-format instruction manual included on the "User Manuals CD-ROM" supplied with the printer. Note In order to be used.
We appreciate your understanding. 2 Thus, there are descriptions that are applied only in HTML format, and functions (video display function, etc.) that cannot be printed easily, this PDF-format manual is converted from the HTML-format instruction manual included on the "User Manuals CD-ROM" supplied with the printer. Note In order to be used.
User Guide
Page 3
... 34 Pausing Printing ...34 Enhanced Printing Options 35 Choosing Paper for Printing 36 Choosing a Paper for Printing ...36 Specifying Paper in the Printer Driver ...36 Printing Photos and Office Documents 37 Printing Photos and Images ...37 Printing Photos and Images (Windows) ...38 Printing Photos and... ...48 Printing Office Documents (Mac OS X) ...50 Using PosterArtist to Compose Originals ...52 Adjusting Images 54 Adjusting the Color in the Printer Driver ...54 Fine-Tuning Colors of Photos and Images (Windows 56 Fine-Tuning Colors of Photos and Images (Mac OS X 58 Giving...
... 34 Pausing Printing ...34 Enhanced Printing Options 35 Choosing Paper for Printing 36 Choosing a Paper for Printing ...36 Specifying Paper in the Printer Driver ...36 Printing Photos and Office Documents 37 Printing Photos and Images ...37 Printing Photos and Images (Windows) ...38 Printing Photos and... ...48 Printing Office Documents (Mac OS X) ...50 Using PosterArtist to Compose Originals ...52 Adjusting Images 54 Adjusting the Color in the Printer Driver ...54 Fine-Tuning Colors of Photos and Images (Windows 56 Fine-Tuning Colors of Photos and Images (Mac OS X 58 Giving...

User Guide
Page 5
...Windows) ...168 Cutting Roll Paper After Printing (Mac OS X) ...169 Windows Software Windows Software 173 Printer Driver 174 Printer Driver Settings ...174 Specifying Paper in the Printer Driver ...176 Confirming Print Settings ...178 Checking the Layout in a Preview Before Printing 178 Using Favorites ......180 Accessing the Printer Driver Dialog Box from Applications 181 Accessing the Printer Driver Dialog Box from the Operating System Menu 183 Main Sheet ...184 Paper Information on Printer Dialog Box ...187 Paper Detailed Settings Dialog Box ...
...Windows) ...168 Cutting Roll Paper After Printing (Mac OS X) ...169 Windows Software Windows Software 173 Printer Driver 174 Printer Driver Settings ...174 Specifying Paper in the Printer Driver ...176 Confirming Print Settings ...178 Checking the Layout in a Preview Before Printing 178 Using Favorites ......180 Accessing the Printer Driver Dialog Box from Applications 181 Accessing the Printer Driver Dialog Box from the Operating System Menu 183 Main Sheet ...184 Paper Information on Printer Dialog Box ...187 Paper Detailed Settings Dialog Box ...
User Guide
Page 8
... ...362 Confirming Print Settings ...364 Checking the Layout in a Preview Before Printing 364 Using Favorites ...365 Accessing the Printer Driver Dialog Box from Applications 366 Main Pane ...366 Paper Information on Printer Dialog Box ...369 Paper Detailed Settings Dialog Box ...370 View settings Dialog Box for the Printing Application 372 Matching pane...
... ...362 Confirming Print Settings ...364 Checking the Layout in a Preview Before Printing 364 Using Favorites ...365 Accessing the Printer Driver Dialog Box from Applications 366 Main Pane ...366 Paper Information on Printer Dialog Box ...369 Paper Detailed Settings Dialog Box ...370 View settings Dialog Box for the Printing Application 372 Matching pane...
User Guide
Page 10
... Displaying the Paper Reference Guide ...528 Updating paper information ...529 Handling rolls 531 10 Loading Rolls on the Roll Holder ...531 Loading Rolls in the Printer ...534 Changing the Type of Paper ...536 Specifying the Paper Length ...537 Removing the Roll from the...
... Displaying the Paper Reference Guide ...528 Updating paper information ...529 Handling rolls 531 10 Loading Rolls on the Roll Holder ...531 Loading Rolls in the Printer ...534 Changing the Type of Paper ...536 Specifying the Paper Length ...537 Removing the Roll from the...
User Guide
Page 12
...630 Control Panel ...630 Control Panel Display ...632 How to View Instructions with Navigate ...635 Checking Instructions During Printer Operations ...637 Printer Menu 639 Printer Menu Operations ...639 Menu Operations ...640 Menu Structure ...643 Menu Settings ...648 Status Print ...657 Printing Interface Setting ... ...674 Using RemoteUI 677 Using RemoteUI ...677 Initial Settings 679 Configuring the IP Address on the Printer ...679 Configuring the IP Address Using the Printer Control Panel 679 Configuring the IP Address Using ARP and PING Commands 680 Configuring TCP/IPv6 Network ...
...630 Control Panel ...630 Control Panel Display ...632 How to View Instructions with Navigate ...635 Checking Instructions During Printer Operations ...637 Printer Menu 639 Printer Menu Operations ...639 Menu Operations ...640 Menu Structure ...643 Menu Settings ...648 Status Print ...657 Printing Interface Setting ... ...674 Using RemoteUI 677 Using RemoteUI ...677 Initial Settings 679 Configuring the IP Address on the Printer ...679 Configuring the IP Address Using the Printer Control Panel 679 Configuring the IP Address Using ARP and PING Commands 680 Configuring TCP/IPv6 Network ...
User Guide
Page 13
... Printer-Related Information ...700 Configuring the Communication Mode Manually ...701 Email Notification When Printing is Finished or Errors Occur 702 Initializing the Network Settings ...702 Device Setup Utility (Windows) 703 imagePROGRAF Device Setup Utility ...703 Installing imagePROGRAF Device... Setup Utility ...703 Configuring the IP Address Using imagePROGRAF Device Setup Utility 703 Print Job Management Print Job Management 707 ...
... Printer-Related Information ...700 Configuring the Communication Mode Manually ...701 Email Notification When Printing is Finished or Errors Occur 702 Initializing the Network Settings ...702 Device Setup Utility (Windows) 703 imagePROGRAF Device Setup Utility ...703 Installing imagePROGRAF Device... Setup Utility ...703 Configuring the IP Address Using imagePROGRAF Device Setup Utility 703 Print Job Management Print Job Management 707 ...


