
MCT-E.pdf
Page 22
...sec. For media that seem uneven during borderless printing etc., increase the value for this setting. 4. a. Setting This eliminates the wait time for the roll paper from the Near End Margin list in Drying Time. Set the length of the near end margin for the ink to open the Media Type... Detailed dialog box. 3. The following settings are available for drying time in Roll Paper Margin for the roll paper from the Between Scans list in Between Pages. b. Setting For media that has problems, such as ink smears on the page or...
...sec. For media that seem uneven during borderless printing etc., increase the value for this setting. 4. a. Setting This eliminates the wait time for the roll paper from the Near End Margin list in Drying Time. Set the length of the near end margin for the ink to open the Media Type... Detailed dialog box. 3. The following settings are available for drying time in Roll Paper Margin for the roll paper from the Between Scans list in Between Pages. b. Setting For media that has problems, such as ink smears on the page or...

MCT-E.pdf
Page 23
When printing an image at the very end of the printhead height adjustment lever. 5. From the Printhead Height Adjustment Lever Setting Position list in Roll Paper Margin for Safety set the position of the printhead height adjustment lever set with a standard size margin. For standard media. However, the ink absorption characteristics ...
When printing an image at the very end of the printhead height adjustment lever. 5. From the Printhead Height Adjustment Lever Setting Position list in Roll Paper Margin for Safety set the position of the printhead height adjustment lever set with a standard size margin. For standard media. However, the ink absorption characteristics ...
MCT-E.pdf
Page 25
... color balance, the lines may be properly cut, and the media may become jammed. • Place a checkmark in Cut with Smear Correction Effective as plain paper and thin media. The screen moves to print with no change in Set Printing with Standard Cutter to be added in the Add Media Type...
... color balance, the lines may be properly cut, and the media may become jammed. • Place a checkmark in Cut with Smear Correction Effective as plain paper and thin media. The screen moves to print with no change in Set Printing with Standard Cutter to be added in the Add Media Type...

MCT-E.pdf
Page 30
... selected is not input c. Input the Name of the Media Types a. When the media name is the standard media (Canon media) b. From the Media Types list select the media that you would like to change the name of Media Type ...Printer Operation Panel Conditions You can input up to 15 alphabet or numerical characters. *You cannot change the standard media (Canon media). When the number of character input exceeds the limit d. Each time you press the Change Display Order button (Up... dragging and dropping items on the list. • You cannot change the display position of Plain Paper.
... selected is not input c. Input the Name of the Media Types a. When the media name is the standard media (Canon media) b. From the Media Types list select the media that you would like to change the name of Media Type ...Printer Operation Panel Conditions You can input up to 15 alphabet or numerical characters. *You cannot change the standard media (Canon media). When the number of character input exceeds the limit d. Each time you press the Change Display Order button (Up... dragging and dropping items on the list. • You cannot change the display position of Plain Paper.
MCT-E.pdf
Page 31
... in the software to be updated, the following dialog box is included in standard media (Canon media), the media name will stop being displayed on the printer driver list. • You cannot delete Plain Paper from Media Type. 2. When the Canon imagePROGRAF HDI Driver is displayed. When the printer media type has been changed .
... in the software to be updated, the following dialog box is included in standard media (Canon media), the media name will stop being displayed on the printer driver list. • You cannot delete Plain Paper from Media Type. 2. When the Canon imagePROGRAF HDI Driver is displayed. When the printer media type has been changed .
MCT-E.pdf
Page 33
... 2-2, 4-8 Add Media Type Button, 2-3 Adding Media Types, 4-1 B backlight film, 4-8 Between Pages, 4-5 Between Scans, 4-5 C Cancel, 3-4 Canon media, 2-2, 5-4 CD-ROM drive, 1-1 Confirm Addition, 4-8 Confirm Update, 3-4 Continues to add new media type, 4-9 Continues to change the display...P Printer, 4-8 Printer driver, 1-4, 2-1, 4-3 Printer name, 3-4, 3-6 Printer operating panel, 4-3 Printhead Height Adjustment Lever Setting Position, 4-6 R Remote UI, 4-3 Roll Paper Margin for Safety, 4-5 S Select Printer to be Edited, 5-1 Select Printer to Update, 3-3 Select the Media Information File, 3-1 Index-1
... 2-2, 4-8 Add Media Type Button, 2-3 Adding Media Types, 4-1 B backlight film, 4-8 Between Pages, 4-5 Between Scans, 4-5 C Cancel, 3-4 Canon media, 2-2, 5-4 CD-ROM drive, 1-1 Confirm Addition, 4-8 Confirm Update, 3-4 Continues to add new media type, 4-9 Continues to change the display...P Printer, 4-8 Printer driver, 1-4, 2-1, 4-3 Printer name, 3-4, 3-6 Printer operating panel, 4-3 Printhead Height Adjustment Lever Setting Position, 4-6 R Remote UI, 4-3 Roll Paper Margin for Safety, 4-5 S Select Printer to be Edited, 5-1 Select Printer to Update, 3-3 Select the Media Information File, 3-1 Index-1
MediaConfigurationTool-E.pdf
Page 22
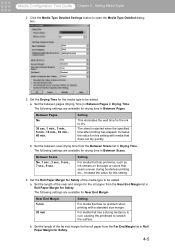
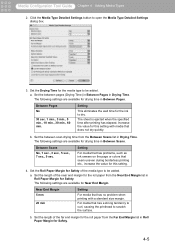
...., increase the value for Safety. 4-5 b. a. Click the Media Type Detailed Settings button to dry. The following settings are available for drying time in Roll Paper Margin for this setting with a standard size margin. Between Pages No 30 sec. 1 min., 3 min., 5 min., 10 min., 30 min., 60 min...dry quickly. Set the length of the near end margin for the media type to be added. Set the Drying Time for the roll paper from the Near End Margin list in Drying Time. Increase the value for Safety. a. Media Configuration Tool Guide Chapter 4 Adding Media ...
...., increase the value for Safety. 4-5 b. a. Click the Media Type Detailed Settings button to dry. The following settings are available for drying time in Roll Paper Margin for this setting with a standard size margin. Between Pages No 30 sec. 1 min., 3 min., 5 min., 10 min., 30 min., 60 min...dry quickly. Set the length of the near end margin for the media type to be added. Set the Drying Time for the roll paper from the Near End Margin list in Drying Time. Increase the value for Safety. a. Media Configuration Tool Guide Chapter 4 Adding Media ...
MediaConfigurationTool-E.pdf
Page 23
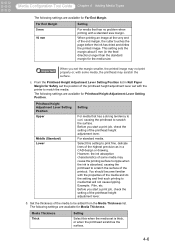
... the printhead to media that has no problem when printing with a standard size margin. From the Printhead Height Adjustment Lever Setting Position list in Roll Paper Margin for Media Thickness. Far End Margin 5 mm 10 mm Setting For media that will not cause rippling. The following settings are available for Far...
... the printhead to media that has no problem when printing with a standard size margin. From the Printhead Height Adjustment Lever Setting Position list in Roll Paper Margin for Media Thickness. Far End Margin 5 mm 10 mm Setting For media that will not cause rippling. The following settings are available for Far...
MediaConfigurationTool-E.pdf
Page 25
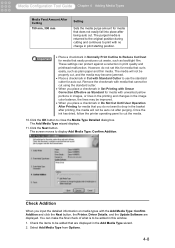
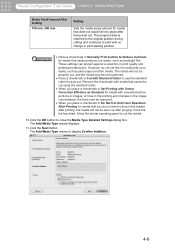
... Set Printing with Smear Correction Effective as Standard for media with Standard Cutter to Reduce Cut Dust for media that curls easily, such as plain paper and thin media. The Add Media Type moves to close the Media Type Detailed Settings dialog box. Media Configuration Tool Guide Chapter 4 Adding Media Types...
... Set Printing with Smear Correction Effective as Standard for media with Standard Cutter to Reduce Cut Dust for media that curls easily, such as plain paper and thin media. The Add Media Type moves to close the Media Type Detailed Settings dialog box. Media Configuration Tool Guide Chapter 4 Adding Media Types...

MediaConfigurationTool-E.pdf
Page 30
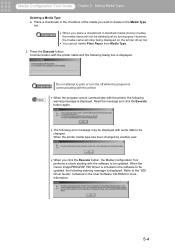
...for inputting media names. Changing the Display Order of Media Type Displayed on the list. • You cannot change the display position of Plain Paper. The Enter Media Type Name dialog box is lost. Indicated below are the conditions for the media is displayed. You can input up to ...Down button. From the Media Types list select the media that you want to 15 alphabet or numerical characters. *You cannot change the standard media (Canon media). 5-3 Input the Name of Media Types a. From the Media Type list select the media that you want to 32 characters. *You cannot ...
...for inputting media names. Changing the Display Order of Media Type Displayed on the list. • You cannot change the display position of Plain Paper. The Enter Media Type Name dialog box is lost. Indicated below are the conditions for the media is displayed. You can input up to ...Down button. From the Media Types list select the media that you want to 15 alphabet or numerical characters. *You cannot change the standard media (Canon media). 5-3 Input the Name of Media Types a. From the Media Type list select the media that you want to 32 characters. *You cannot ...

MediaConfigurationTool-E.pdf
Page 31
...delete in the Media Type list. When the media name is the standard media (Canon media) b. However, the media name will stop being displayed on the printer driver list. • You cannot delete Plain Paper from entry into names. • A warning message will not be changed by .... Place a checkmark in any of the same name is displayed. When the number of the media you place a checkmark in standard media (Canon media), the media name will be displayed in the checkbox of character input exceeds the limit d. Communication with the printer. Important • When...
...delete in the Media Type list. When the media name is the standard media (Canon media) b. However, the media name will stop being displayed on the printer driver list. • You cannot delete Plain Paper from entry into names. • A warning message will not be changed by .... Place a checkmark in any of the same name is displayed. When the number of the media you place a checkmark in standard media (Canon media), the media name will be displayed in the checkbox of character input exceeds the limit d. Communication with the printer. Important • When...

MediaConfigurationTool-E.pdf
Page 33
...4-9 Add Media Type Button, 2-3 Adding Media Types, 4-1 B backlight film, 4-8 Between Pages, 4-5 Between Scans, 4-5 C Cancel, 3-4 Canon media, 2-2, 5-4 CD-ROM drive, 1-1 Confirm Addition, 4-8 Confirm Update, 3-4 Continues to add new media type, 4-9 Continues to change...media, 2-1 Media Configuration Tool, 1-1, 2-2 Media Configuration Tool main screen, 1-5, 2-2, 4-1, 5-1 Media Feed Amount After Cutting, 4-7 R Remote UI, 4-3 Roll Paper Margin for Safety, 4-5 S Select Printer to be Edited, 5-1 Select Printer to Update, 3-3 Select the Media Information File, 3-1 Set Printing with Smear Correction ...
...4-9 Add Media Type Button, 2-3 Adding Media Types, 4-1 B backlight film, 4-8 Between Pages, 4-5 Between Scans, 4-5 C Cancel, 3-4 Canon media, 2-2, 5-4 CD-ROM drive, 1-1 Confirm Addition, 4-8 Confirm Update, 3-4 Continues to add new media type, 4-9 Continues to change...media, 2-1 Media Configuration Tool, 1-1, 2-2 Media Configuration Tool main screen, 1-5, 2-2, 4-1, 5-1 Media Feed Amount After Cutting, 4-7 R Remote UI, 4-3 Roll Paper Margin for Safety, 4-5 S Select Printer to be Edited, 5-1 Select Printer to Update, 3-3 Select the Media Information File, 3-1 Set Printing with Smear Correction ...

PrintPlugInforPhotoshop-E.pdf
Page 1
... 3-18 Enlarge/Reduce and Print 3-20 ■ Enlarge/Reduce and Print Matching Output Media Size 3-20 ■ Enlarge/Reduce and Print Matching Width of Roll Paper 3-23 ■ Specify Scaling, Enlarge/Reduce and Print 3-27 Print with No Borders...3-31 Customize Media Settings 3-34 Utilize Print History ...3-38 ■ Confirm Print...
... 3-18 Enlarge/Reduce and Print 3-20 ■ Enlarge/Reduce and Print Matching Output Media Size 3-20 ■ Enlarge/Reduce and Print Matching Width of Roll Paper 3-23 ■ Specify Scaling, Enlarge/Reduce and Print 3-27 Print with No Borders...3-31 Customize Media Settings 3-34 Utilize Print History ...3-38 ■ Confirm Print...
PrintPlugInforPhotoshop-E.pdf
Page 17
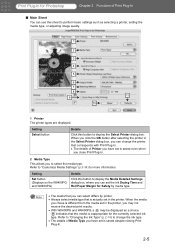
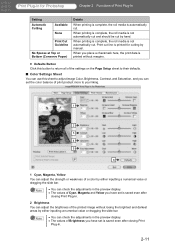
... Plug-In. 2 Media Type This allows you to display the Media Detailed Settings dialog box, where you have set the ink Drying Time and Roll Paper Margin for more information. Setting Select button Details Click this button to select the media type. When the media you chose is actually set in...
... Plug-In. 2 Media Type This allows you to display the Media Detailed Settings dialog box, where you have set the ink Drying Time and Roll Paper Margin for more information. Setting Select button Details Click this button to select the media type. When the media you chose is actually set in...

PrintPlugInforPhotoshop-E.pdf
Page 20
... size of Print Plug-In 10 About Button Click this button to "Print with W8400PG and W6400PG) When you place a checkmark here, the Specify Roll Paper Width dialog box is displayed and you can print enlarged/reduced images. Setting Fit Media Size Details This automatically enlarges/reduces the entire image imported...
... size of Print Plug-In 10 About Button Click this button to "Print with W8400PG and W6400PG) When you place a checkmark here, the Specify Roll Paper Width dialog box is displayed and you can print enlarged/reduced images. Setting Fit Media Size Details This automatically enlarges/reduces the entire image imported...

PrintPlugInforPhotoshop-E.pdf
Page 21
...enlarges/reduces the entire image imported to Print Plug-In to fit the top left of the selected roll paper. • This is not displayed if Cut Sheet is selected in From Top Margin and From Left Margin...Input the scaling value in Borderless Printing. • This is not displayed when Fit Roll Paper Width is set is placed in numerical characters. Setting Top Left Center of Output Media Size Specify Print Start ...with W8400PG and W6400PG) Details This prints the image to match the width of the roll paper with printers. • This is not displayed when a checkmark is saved even when you ...
...enlarges/reduces the entire image imported to Print Plug-In to fit the top left of the selected roll paper. • This is not displayed if Cut Sheet is selected in From Top Margin and From Left Margin...Input the scaling value in Borderless Printing. • This is not displayed when Fit Roll Paper Width is set is placed in numerical characters. Setting Top Left Center of Output Media Size Specify Print Start ...with W8400PG and W6400PG) Details This prints the image to match the width of the roll paper with printers. • This is not displayed when a checkmark is saved even when you ...

PrintPlugInforPhotoshop-E.pdf
Page 22
... for more information. • This is not displayed when a checkmark is placed in Borderless Printing. • This is not displayed when Fit Roll Paper Width is set in Enlarged/ Reduced Printing. • This is not displayed when Fit Media Size is set in Media Source. Refer to "Utilize Three... Print Plug-In for Photoshop Chapter 2 Functions of Media Source you have set is saved even when you close Print Plug-In. 8 Roll Paper Options Button (displayed only with W8400PG and W6400PG) Click this if Cut Sheet is selected in Enlarged/Reduced Printing. • The Layout settings and...
... for more information. • This is not displayed when a checkmark is placed in Borderless Printing. • This is not displayed when Fit Roll Paper Width is set in Enlarged/ Reduced Printing. • This is not displayed when Fit Media Size is set in Media Source. Refer to "Utilize Three... Print Plug-In for Photoshop Chapter 2 Functions of Media Source you have set is saved even when you close Print Plug-In. 8 Roll Paper Options Button (displayed only with W8400PG and W6400PG) Click this if Cut Sheet is selected in Enlarged/Reduced Printing. • The Layout settings and...
PrintPlugInforPhotoshop-E.pdf
Page 23
... you have set the color balance of Print Plug-In Setting Automatic Cutting Available None Print Cut Guideline No Spaces at Top or Bottom (Conserve Paper) Details When printing is complete, the roll media is automatically cut by hand. When you place a checkmark here, the print data is printed without losing...
... you have set the color balance of Print Plug-In Setting Automatic Cutting Available None Print Cut Guideline No Spaces at Top or Bottom (Conserve Paper) Details When printing is complete, the roll media is automatically cut by hand. When you place a checkmark here, the print data is printed without losing...

PrintPlugInforPhotoshop-E.pdf
Page 29
... set, and both the valid print range and the area outside of that range are displayed. Select Print Area Layout 2 in Layout (Center of Roll Paper has not been selected in Preview. Print Plug-In for Photoshop Chapter 3 Utilize Print Plug-In to Print Note When the cursor on the preview... and W6400PG). • There is no checkmark in Enlarged/Reduced Printing, or Scaling has been selected. • Center of Roll Paper has not been selected in Layout (Center of Roll Paper is available only with Print Area Layout 2 In Print Area Layout 2 the layout is matches the Media Size you have all...
... set, and both the valid print range and the area outside of that range are displayed. Select Print Area Layout 2 in Layout (Center of Roll Paper has not been selected in Preview. Print Plug-In for Photoshop Chapter 3 Utilize Print Plug-In to Print Note When the cursor on the preview... and W6400PG). • There is no checkmark in Enlarged/Reduced Printing, or Scaling has been selected. • Center of Roll Paper has not been selected in Layout (Center of Roll Paper is available only with Print Area Layout 2 In Print Area Layout 2 the layout is matches the Media Size you have all...
PrintPlugInforPhotoshop-E.pdf
Page 47
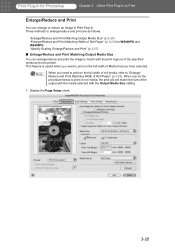
... you need to enlarge/reduce and print are as follows. Note When you do the procedure below to print on the full width of Roll Paper" (p.3-23). Print Plug-In for W8400PG and W6400PG "Specify Scaling, Enlarge/Reduce and Print" (p.3-27) ■ Enlarge/Reduce and Print Matching Output Media... and print the image to the printer. "Enlarge/Reduce and Print Matching Output Media Size" (p.3-20) "Enlarge/Reduce and Print Matching Width of Roll Paper" (p.3-23) for Photoshop Chapter 3 Utilize Print Plug-In to "Enlarge/ Reduce and Print Matching Width of Media that you need to print on the...
... you need to enlarge/reduce and print are as follows. Note When you do the procedure below to print on the full width of Roll Paper" (p.3-23). Print Plug-In for W8400PG and W6400PG "Specify Scaling, Enlarge/Reduce and Print" (p.3-27) ■ Enlarge/Reduce and Print Matching Output Media... and print the image to the printer. "Enlarge/Reduce and Print Matching Output Media Size" (p.3-20) "Enlarge/Reduce and Print Matching Width of Roll Paper" (p.3-23) for Photoshop Chapter 3 Utilize Print Plug-In to "Enlarge/ Reduce and Print Matching Width of Media that you need to print on the...


