Basic Guide
Page 6
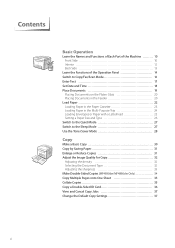
... or Paper with a Letterhead 25 Setting a Paper Size and Type 26 Switch to the Quiet Mode 27 Switch to the Sleep Mode 27 Use the Toner Saver Mode 28 Copy Make a Basic Copy 30 Copy by Saving Paper 31 Enlarge or Reduce Copies 31 Adjust the Image Quality for Copy 32... Adjusting the density 32 Selecting the Document Type 32 Adjusting the sharpness 33 Make Double-Sided Copies (MF4890dw/MF4880dw Only 34 Copy Multiple Pages onto One Sheet 35 Collate Copies 35 Copy a Double-Sided ID Card 36 View and Cancel Copy Jobs 37 Change...
... or Paper with a Letterhead 25 Setting a Paper Size and Type 26 Switch to the Quiet Mode 27 Switch to the Sleep Mode 27 Use the Toner Saver Mode 28 Copy Make a Basic Copy 30 Copy by Saving Paper 31 Enlarge or Reduce Copies 31 Adjust the Image Quality for Copy 32... Adjusting the density 32 Selecting the Document Type 32 Adjusting the sharpness 33 Make Double-Sided Copies (MF4890dw/MF4880dw Only 34 Copy Multiple Pages onto One Sheet 35 Collate Copies 35 Copy a Double-Sided ID Card 36 View and Cancel Copy Jobs 37 Change...
Basic Guide
Page 8
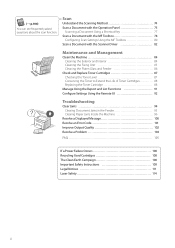
... Interior 84 Cleaning the Fixing Unit 85 Cleaning the Platen Glass and Feeder 86 Check and Replace Toner Cartridges 87 Checking the Toner Level 87 Conserving the Toner to Extend the Life of Toner Cartridges 88 Replacing the Toner Cartridge 88 Manage Using the Report and List Functions 91 Configure Settings Using the Remote UI...
... Interior 84 Cleaning the Fixing Unit 85 Cleaning the Platen Glass and Feeder 86 Check and Replace Toner Cartridges 87 Checking the Toner Level 87 Conserving the Toner to Extend the Life of Toner Cartridges 88 Replacing the Toner Cartridge 88 Manage Using the Report and List Functions 91 Configure Settings Using the Remote UI...
Basic Guide
Page 9
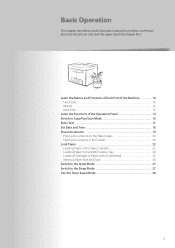
... the documents and load the paper. Basic Operation This chapter describes overall information about the machine, and how to the Sleep Mode 27 Use the Toner Saver Mode 28 9 Read this chapter first.
... the documents and load the paper. Basic Operation This chapter describes overall information about the machine, and how to the Sleep Mode 27 Use the Toner Saver Mode 28 9 Read this chapter first.
Basic Guide
Page 12
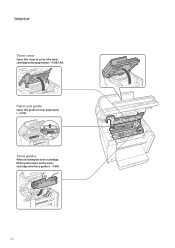
Toner guides When inserting the toner cartridge, fit the protrusions on the toner cartridge into these guides (→P.88). 12 Paper exit guide Open this cover to clear paper jams (→P.96). Interior Toner cover Open this guide to access the toner cartridge or clear paper jams (→P.88, P.96).
Toner guides When inserting the toner cartridge, fit the protrusions on the toner cartridge into these guides (→P.88). 12 Paper exit guide Open this cover to clear paper jams (→P.96). Interior Toner cover Open this guide to access the toner cartridge or clear paper jams (→P.88, P.96).

Basic Guide
Page 28
... Mode You can set whether or not to close the screen. 28 Preferences Sound Volume Control Display Settings Toner Saver Mode Paper Feed Method Sw... 4 Press [▲] or [▼] to highlight or , and then press [OK]. 5 Press [▲] or [▼] to highlight or , and ...then press [OK]. 6 Press [ ] (Menu) to conserve toner when copying or faxing. When using the Toner Saver mode, the output may not be clear, as subtle details, such as thin lines and light colors, may not be clearly...
... Mode You can set whether or not to close the screen. 28 Preferences Sound Volume Control Display Settings Toner Saver Mode Paper Feed Method Sw... 4 Press [▲] or [▼] to highlight or , and then press [OK]. 5 Press [▲] or [▼] to highlight or , and ...then press [OK]. 6 Press [ ] (Menu) to conserve toner when copying or faxing. When using the Toner Saver mode, the output may not be clear, as subtle details, such as thin lines and light colors, may not be clearly...
Basic Guide
Page 47
... for Phoning 62 Receiving Faxes in the e-Manual. See "PC Fax" in Manual Mode 63 Receive a Fax from the computer, you can reserve paper and toner, and send a higher-quality fax document. About PC Fax You can see frequentely asked questions about the receive mode. Fax This chapter describes the basic...
... for Phoning 62 Receiving Faxes in the e-Manual. See "PC Fax" in Manual Mode 63 Receive a Fax from the computer, you can reserve paper and toner, and send a higher-quality fax document. About PC Fax You can see frequentely asked questions about the receive mode. Fax This chapter describes the basic...
Basic Guide
Page 70
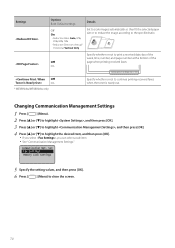
... at the bottom of the page when printing received faxes. 01/01/2012 SAT 02:07 PM [TX/RX NO 5001] P.0001 On * MF4890dw/MF4880dw only Specify whether or not to highlight the desired item, and then press [OK]. • If you select , you can select a sub-item...press [OK]. 3 Press [▲] or [▼] to highlight , and then press [OK]. 4 Press [▲] or [▼] to continue printing received faxes when the toner is nearly out. Communication Mgt. Set Fax Settings Memory Lock Settings 5 Specify the setting values, and then press [OK]. 6 Press [ ] (Menu) to the specified...
... at the bottom of the page when printing received faxes. 01/01/2012 SAT 02:07 PM [TX/RX NO 5001] P.0001 On * MF4890dw/MF4880dw only Specify whether or not to highlight the desired item, and then press [OK]. • If you select , you can select a sub-item...press [OK]. 3 Press [▲] or [▼] to highlight , and then press [OK]. 4 Press [▲] or [▼] to continue printing received faxes when the toner is nearly out. Communication Mgt. Set Fax Settings Memory Lock Settings 5 Specify the setting values, and then press [OK]. 6 Press [ ] (Menu) to the specified...
Basic Guide
Page 83
Maintenance and Management This chapter describes how to Extend the Life of Toner Cartridges 88 Replacing the Toner Cartridge 88 Manage Using the Report and List Functions 91 Configure Settings Using the Remote UI 92 83 Clean the Machine 84 Cleaning the Exterior and Interior 84 Cleaning the Fixing Unit 85 Cleaning the Platen Glass and Feeder 86 Check and Replace Toner Cartridges 87 Checking the Toner Level 87 Conserving the Toner to clean the machine, replace the toner cartridge, and explains the report and list functions used for managing the machine.
Maintenance and Management This chapter describes how to Extend the Life of Toner Cartridges 88 Replacing the Toner Cartridge 88 Manage Using the Report and List Functions 91 Configure Settings Using the Remote UI 92 83 Clean the Machine 84 Cleaning the Exterior and Interior 84 Cleaning the Fixing Unit 85 Cleaning the Platen Glass and Feeder 86 Check and Replace Toner Cartridges 87 Checking the Toner Level 87 Conserving the Toner to clean the machine, replace the toner cartridge, and explains the report and list functions used for managing the machine.

Basic Guide
Page 84
...of the machine, platen glass, feeder, and the fixing unit periodically. When you finish cleaning the machine, wait for the printer to prevent toner powder and paper dust from the machine before reconnecting the power cord, and then turn ON the power. Cleaning the Exterior and Interior Clean ... disconnect all the cables from the machine. 2 Remove any documents from the platen glass or feeder. 3 Lift the scanning platform, open the toner cover, and then remove the toner cartridge. 84 Cleaning the Interior 1 Turn OFF the machine and disconnect all cables from accumulating inside.
...of the machine, platen glass, feeder, and the fixing unit periodically. When you finish cleaning the machine, wait for the printer to prevent toner powder and paper dust from the machine before reconnecting the power cord, and then turn ON the power. Cleaning the Exterior and Interior Clean ... disconnect all the cables from the machine. 2 Remove any documents from the platen glass or feeder. 3 Lift the scanning platform, open the toner cover, and then remove the toner cartridge. 84 Cleaning the Interior 1 Turn OFF the machine and disconnect all cables from accumulating inside.
Basic Guide
Page 85
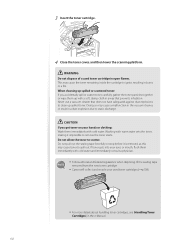
... appear on printed pages. 1 Press [ ] (Menu). 2 Press [▲] or [▼] to highlight , and then press [OK]. 3 Press [▲] or [▼] to get toner on your hands or clothing: If toner gets on your fingers caught. Touching the fixing unit (A) may cause burns as it impossible to remove the...then press [OK]. • The cleaning process begins. Cleaning takes approximately 90 seconds. 5 When the cleaning is clean and lint-free. 5 Insert the toner cartridge. 6 Close the toner cover, and then lower the scanning platform. 7 Reconnect all the cables, and then turn ON the power.
... appear on printed pages. 1 Press [ ] (Menu). 2 Press [▲] or [▼] to highlight , and then press [OK]. 3 Press [▲] or [▼] to get toner on your hands or clothing: If toner gets on your fingers caught. Touching the fixing unit (A) may cause burns as it impossible to remove the...then press [OK]. • The cleaning process begins. Cleaning takes approximately 90 seconds. 5 When the cleaning is clean and lint-free. 5 Insert the toner cartridge. 6 Close the toner cover, and then lower the scanning platform. 7 Reconnect all the cables, and then turn ON the power.

Basic Guide
Page 87
... Type: Text... You can also set to highlight , and then press [OK]. 4 Check the toner level. • The toner level will be light or blurred. Maintenance and Management Check and Replace Toner Cartridges Toner cartridges are consumable products. Checking the Toner Level 1 Press [ ] (Status Monitor/Cancel). 2 Press [▲] or [▼] to highlight , and then press...
... Type: Text... You can also set to highlight , and then press [OK]. 4 Check the toner level. • The toner level will be light or blurred. Maintenance and Management Check and Replace Toner Cartridges Toner cartridges are consumable products. Checking the Toner Level 1 Press [ ] (Status Monitor/Cancel). 2 Press [▲] or [▼] to highlight , and then press...
Basic Guide
Page 88
..., and then lower the scanning platform. Do not wash with cold water. Supported genuine Canon toner cartridge: Canon Cartridge 128 Starter 88 CAUTION If toner gets on your local authorized Canon dealer. Replacing the Toner Cartridge You can purchase replacement toner cartridges from your hands or clothing, wash them immediately with warm water, as it sets the...
..., and then lower the scanning platform. Do not wash with cold water. Supported genuine Canon toner cartridge: Canon Cartridge 128 Starter 88 CAUTION If toner gets on your local authorized Canon dealer. Replacing the Toner Cartridge You can purchase replacement toner cartridges from your hands or clothing, wash them immediately with warm water, as it sets the...
Basic Guide
Page 89
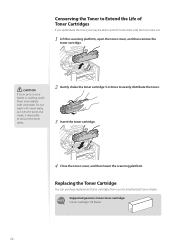
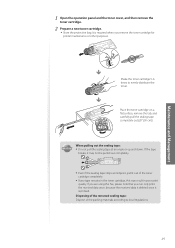
... print the received data once, because the received data is deleted once it out of the packing materials according to evenly distribute the toner. IMPORTANT When pulling out the sealing tape: • Do not pull the sealing tape at midpoint, pull it is required when you ... printer maintenance or other purposes. Disposing of the removed sealing tape: Dispose of the toner cartridge completely. • If any tape remains in the toner cartridge, this may result in poor print quality. Place the toner cartridge on a flat surface, remove the tab, and carefully pull the sealing tape ...
... print the received data once, because the received data is deleted once it out of the packing materials according to evenly distribute the toner. IMPORTANT When pulling out the sealing tape: • Do not pull the sealing tape at midpoint, pull it is required when you ... printer maintenance or other purposes. Disposing of the removed sealing tape: Dispose of the toner cartridge completely. • If any tape remains in the toner cartridge, this may result in poor print quality. Place the toner cartridge on a flat surface, remove the tab, and carefully pull the sealing tape ...
Basic Guide
Page 90
... dust explosions to remove the toner stains. Do not pull out the sealing tape forcefully or stop before it impossible to clean up with cold water. WARNING Do not dispose of the sealing tape removed from the new toner cartridge. • Canon will collect and recycle your ...hands or clothing: Wash them up spilled toner. Do not allow the toner to static discharge. Never use a vacuum cleaner that prevents inhalation. Washing with cold...
... dust explosions to remove the toner stains. Do not pull out the sealing tape forcefully or stop before it impossible to clean up with cold water. WARNING Do not dispose of the sealing tape removed from the new toner cartridge. • Canon will collect and recycle your ...hands or clothing: Wash them up spilled toner. Do not allow the toner to static discharge. Never use a vacuum cleaner that prevents inhalation. Washing with cold...

Basic Guide
Page 94
... from the inside of paper remain inside the machine according to the displayed message. Do not wash with warm water, as this will set the toner and cause it into contact with cold water. Be sure to remove it. • Fan the paper stack and tap the edge on the display... to align the paper before loading it to the end of the machine, as this may result in burns or electrical shock. CAUTION If loose toner comes into the machine. • Make sure that the paper meets the requirements for use (→ p.22). • Make sure that no pieces of the...
... from the inside of paper remain inside the machine according to the displayed message. Do not wash with warm water, as this will set the toner and cause it into contact with cold water. Be sure to remove it. • Fan the paper stack and tap the edge on the display... to align the paper before loading it to the end of the machine, as this may result in burns or electrical shock. CAUTION If loose toner comes into the machine. • Make sure that the paper meets the requirements for use (→ p.22). • Make sure that no pieces of the...
Basic Guide
Page 96
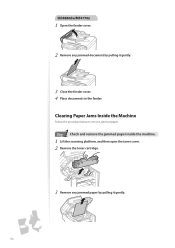
Clearing Paper Jams Inside the Machine Follow the procedure below to remove jammed paper. 1 Step Check and remove the jammed paper inside the machine. 1 Lift the scanning platform, and then open the toner cover. 2 Remove the toner cartridge. 3 Remove any jammed document by pulling it gently. 3 Close the feeder cover. 4 Place documents in the feeder. MF4880dw/MF4770n 1 Open the feeder cover. 2 Remove any jammed paper by pulling it gently. 96
Clearing Paper Jams Inside the Machine Follow the procedure below to remove jammed paper. 1 Step Check and remove the jammed paper inside the machine. 1 Lift the scanning platform, and then open the toner cover. 2 Remove the toner cartridge. 3 Remove any jammed document by pulling it gently. 3 Close the feeder cover. 4 Place documents in the feeder. MF4880dw/MF4770n 1 Open the feeder cover. 2 Remove any jammed paper by pulling it gently. 96
Basic Guide
Page 99
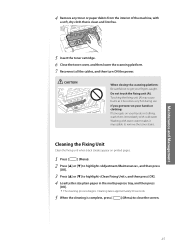
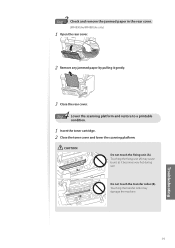
... rear cover. 4 Step Lower the scanning platform and restore to a printable condition. 1 Insert the toner cartridge. 2 Close the toner cover and lower the scanning platform. 3 Step Check and remove the jammed paper in the rear cover. (MF4890dw/MF4880dw only) 1 Open the rear cover. 2 Remove any jammed paper by pulling it becomes very hot...
... rear cover. 4 Step Lower the scanning platform and restore to a printable condition. 1 Insert the toner cartridge. 2 Close the toner cover and lower the scanning platform. 3 Step Check and remove the jammed paper in the rear cover. (MF4890dw/MF4880dw only) 1 Open the rear cover. 2 Remove any jammed paper by pulling it becomes very hot...
Basic Guide
Page 100
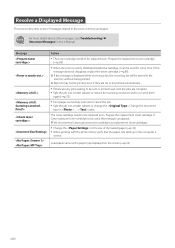
... memory without being printed. We recommend Canon genuine toner cartridges as the paper type displayed on the computer is evenly distributed inside the cartridge, it can appear. Message Action • The toner cartridge needs to the size of messages related to the toner, memory, and paper. If this..., wait until the jobs are complete. • Split the job into smaller subsets or change the . Prepare the replacement toner cartridge. If Canon genuine toner cartridge is displayed while receiving a fax, the incoming fax will be used , this message does not disappear, replace the...
... memory without being printed. We recommend Canon genuine toner cartridges as the paper type displayed on the computer is evenly distributed inside the cartridge, it can appear. Message Action • The toner cartridge needs to the size of messages related to the toner, memory, and paper. If this..., wait until the jobs are complete. • Split the job into smaller subsets or change the . Prepare the replacement toner cartridge. If Canon genuine toner cartridge is displayed while receiving a fax, the incoming fax will be used , this message does not disappear, replace the...
Basic Guide
Page 102
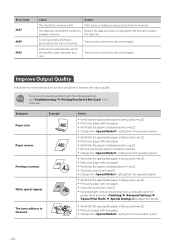
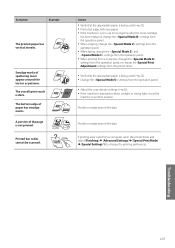
...(→p.22). • Print a test page with new paper. • Verify that the paper is loaded properly (→p.22). • Check the toner level (→p.87). • Change the setting from the operation panel. • Verify that the appropriate paper is being used (→p.22). •... Print a test page with new paper. • Check the toner level (→p.87). • If printing high-contrast documents from the operation panel. • Verify that the appropriate paper is being used (→p....
...(→p.22). • Print a test page with new paper. • Verify that the paper is loaded properly (→p.22). • Check the toner level (→p.87). • Change the setting from the operation panel. • Verify that the appropriate paper is being used (→p.22). •... Print a test page with new paper. • Check the toner level (→p.87). • If printing high-contrast documents from the operation panel. • Verify that the appropriate paper is being used (→p....
Basic Guide
Page 103
... is being used (→p.22). • Print a test page with new paper. • If the machine is not in use for a long time after the toner cartridge has been replaced, change the settings from the operation panel. • When copying, change the settings from the operation panel. • When faxing, change...
... is being used (→p.22). • Print a test page with new paper. • If the machine is not in use for a long time after the toner cartridge has been replaced, change the settings from the operation panel. • When copying, change the settings from the operation panel. • When faxing, change...


