User Manual for Windows
Page 10
... Using imagePROGRAF Device Setup Utility 636 Network Setting (Macintosh 637 Configuring the Printer's AppleTalk Network Settings 637 Configuring the Printer Driver Destination (Macintosh 638 Configuring the Destination for AppleTalk Network (Macintosh 639 Configuring the Destination for TCP/IP Network (Macintosh 643 Configuring the Destination for Bonjour Network (Macintosh 647 Maintenance 649 Adjusting the Printhead...
... Using imagePROGRAF Device Setup Utility 636 Network Setting (Macintosh 637 Configuring the Printer's AppleTalk Network Settings 637 Configuring the Printer Driver Destination (Macintosh 638 Configuring the Destination for AppleTalk Network (Macintosh 639 Configuring the Destination for TCP/IP Network (Macintosh 643 Configuring the Destination for Bonjour Network (Macintosh 647 Maintenance 649 Adjusting the Printhead...
User Manual for Windows
Page 11
... Capacity 714 When to Replace the Maintenance Cartridge 715 Cleaning the Printer 716 Cleaning the Printer Exterior...716 Cleaning Inside the Top Cover 718 Cleaning the Printhead...721 Other Maintenance 722 Preparing to Transfer the Printer 722 Updating the Firmware...728 Troubleshooting 729 Frequently Asked Questions 729 ... the paper is dirty 742 The back side of the paper is dirty 742 Banding in different colors occurs 742 The contrast becomes uneven during printing 743 Colors in printed images are uneven 743 Problems with the printing quality caused by the type of paper ...
... Capacity 714 When to Replace the Maintenance Cartridge 715 Cleaning the Printer 716 Cleaning the Printer Exterior...716 Cleaning Inside the Top Cover 718 Cleaning the Printhead...721 Other Maintenance 722 Preparing to Transfer the Printer 722 Updating the Firmware...728 Troubleshooting 729 Frequently Asked Questions 729 ... the paper is dirty 742 The back side of the paper is dirty 742 Banding in different colors occurs 742 The contrast becomes uneven during printing 743 Colors in printed images are uneven 743 Problems with the printing quality caused by the type of paper ...

User Manual for Windows
Page 13
...Maintenance cartridge full...782 Maintenance cartridge problem 782 Messages regarding printheads 780 Cannot adjust printhead...780 Cannot adjust band...780 x printhead needs cleaning. (x is Left or Right 780 PHeads: wrong pos...780 Problem with Printhead x (x is L, R, or LR 781 x printhead error (x is empty. Use other paper 778 Cannot print... as specified...778 Cannot adjust band...778 Cannot adjust printhead...779 Excessive temperature or humidity 779 Cannot calibrate...779 Messages regarding the hard disk 783 Mail box nearly full......
...Maintenance cartridge full...782 Maintenance cartridge problem 782 Messages regarding printheads 780 Cannot adjust printhead...780 Cannot adjust band...780 x printhead needs cleaning. (x is Left or Right 780 PHeads: wrong pos...780 Problem with Printhead x (x is L, R, or LR 781 x printhead error (x is empty. Use other paper 778 Cannot print... as specified...778 Cannot adjust band...778 Cannot adjust printhead...779 Excessive temperature or humidity 779 Cannot calibrate...779 Messages regarding the hard disk 783 Mail box nearly full......
User Manual for Windows
Page 21
Top Cover Open this groove. Roll Holder Load the roll on the Roll Holder with scissors) over this cover to install the Printhead, load paper, and remove any jammed paper from winding around the Roll Holder or Paper Feed Slot. g. Ink Tank Cover Open this...into this guide when loading a roll. f. h. j. Cutter Groove Paper is cut (using the cutter or manually with this cover to operate the printer and check the printer status. (→P.14) Printer Parts 7 d. e. Paper Feed Slot When loading a roll, insert the edge of the roll paper here. Control Panel Use this holder. i....
Top Cover Open this groove. Roll Holder Load the roll on the Roll Holder with scissors) over this cover to install the Printhead, load paper, and remove any jammed paper from winding around the Roll Holder or Paper Feed Slot. g. Ink Tank Cover Open this...into this guide when loading a roll. f. h. j. Cutter Groove Paper is cut (using the cutter or manually with this cover to operate the printer and check the printer status. (→P.14) Printer Parts 7 d. e. Paper Feed Slot When loading a roll, insert the edge of the roll paper here. Control Panel Use this holder. i....

User Manual for Windows
Page 24
Paper Alignment Line Align paper with this shaft. Carriage Moves the Printhead. Platen The Printhead moves across the platen to cut paper. 10 Printer Parts Borderless Printing Ink Grooves These grooves catch ink outside the edges of the Top Cover, use this blade to print. Fixed Blade The .... The Vacuum holes on the Platen. Top Cover Roller Prevents paper from rising when ejected. The carriage serves a key role in printing. (→P.11) d. b. h. g. i. Printer parts Top Cover (Inside) a. c. Carriage Shaft The Carriage slides along this line when loading it is fed.
Paper Alignment Line Align paper with this shaft. Carriage Moves the Printhead. Platen The Printhead moves across the platen to cut paper. 10 Printer Parts Borderless Printing Ink Grooves These grooves catch ink outside the edges of the Top Cover, use this blade to print. Fixed Blade The .... The Vacuum holes on the Platen. Top Cover Roller Prevents paper from rising when ejected. The carriage serves a key role in printing. (→P.11) d. b. h. g. i. Printer parts Top Cover (Inside) a. c. Carriage Shaft The Carriage slides along this line when loading it is fed.

User Manual for Windows
Page 25
c. Printhead L Equipped with ink nozzles. Printheads serve a key role in place. f. Printhead R Equipped with ink nozzles. Printer Parts 11 Printhead Fixer Cover Holds the Printhead in printing. Printhead Fixer Lever Locks the Printhead Fixer Cover. g. b. The cutter blade is retracted inside when not cutting. Cutter Unit A round-bladed cutter for automatic paper cutting. Shaft Cleaner Prevents the Carriage Shaft from becoming dirty. e. Carriage Printer parts a. Carriage Cover Protects the Carriage. Printheads serve a key role in printing. d.
c. Printhead L Equipped with ink nozzles. Printheads serve a key role in place. f. Printhead R Equipped with ink nozzles. Printer Parts 11 Printhead Fixer Cover Holds the Printhead in printing. Printhead Fixer Lever Locks the Printhead Fixer Cover. g. b. The cutter blade is retracted inside when not cutting. Cutter Unit A round-bladed cutter for automatic paper cutting. Shaft Cleaner Prevents the Carriage Shaft from becoming dirty. e. Carriage Printer parts a. Carriage Cover Protects the Carriage. Printheads serve a key role in printing. d.
User Manual for Windows
Page 29
... label indicates the Ink Tank color. HDD lamp (Green) • On Indicates the printer is accessing the hard disk. • Off Indicates the printer is loaded, and instructions for loading paper are shown if paper is loaded. Press this button to display information about ink, paper,...;ine mode: Press this button to clean the Printhead ( Head Cleaning A ). Also press this button to cancel print jobs in the direction of ejection, as the printer status and messages. Stop Button Hold down this button to bring the printer online again. The label corresponds to display the ...
... label indicates the Ink Tank color. HDD lamp (Green) • On Indicates the printer is accessing the hard disk. • Off Indicates the printer is loaded, and instructions for loading paper are shown if paper is loaded. Press this button to display information about ink, paper,...;ine mode: Press this button to clean the Printhead ( Head Cleaning A ). Also press this button to cancel print jobs in the direction of ejection, as the printer status and messages. Stop Button Hold down this button to bring the printer online again. The label corresponds to display the ...
User Manual for Windows
Page 32
...the same time. To prevent this issue. 18 Printer Parts Please wait. The printer will now start up . The printer will not go online in the following situations. After the Display Screen shows the Canon logo, Starting up... Connecting the printer to the computer via the USB cable to ... • The Printhead is not installed Please see "Replacing the Printhead". (→P.695) • Ink Tank is not installed Please see "Replacing Ink Tanks". (→P.678) • "ERROR" is shown on the Display Screen Make sure the printer is off the printer and contact your Canon dealer. •...
...the same time. To prevent this issue. 18 Printer Parts Please wait. The printer will now start up . The printer will not go online in the following situations. After the Display Screen shows the Canon logo, Starting up... Connecting the printer to the computer via the USB cable to ... • The Printhead is not installed Please see "Replacing the Printhead". (→P.695) • Ink Tank is not installed Please see "Replacing Ink Tanks". (→P.678) • "ERROR" is shown on the Display Screen Make sure the printer is off the printer and contact your Canon dealer. •...
User Manual for Windows
Page 41
...the problem is solved. However, for settings that are available from the main menu. • Paper settings • Print settings • Printer settings • Job management For a description of specic items available in the main menu during printing, see "Main Menu Settings ...Adj., Information, and Job Mgmt Menu ) are available from the main menu during printing. • Printhead cleaning • Manual adjustment of the paper feed amount • Display of printer-related information • Job management For a description of specic items available in the main menu,...
...the problem is solved. However, for settings that are available from the main menu. • Paper settings • Print settings • Printer settings • Job management For a description of specic items available in the main menu during printing, see "Main Menu Settings ...Adj., Information, and Job Mgmt Menu ) are available from the main menu during printing. • Printhead cleaning • Manual adjustment of the paper feed amount • Display of printer-related information • Job management For a description of specic items available in the main menu,...
User Manual for Windows
Page 55
... None Off * On ISO A3+ * 13"x19"(Super B) ISO B1 * 28"x40" (ANSI F) Control Panel Fifth Level Printer Parts 41 maint cart Replace P.head Third Level Yes No Yes Printhead L Printhead R L & R Printheads Repl. S. Cleaner Change Cutter Move Printer Warning No * Yes No * Yes Level 1 * Level 2 Level 3 Buzzer Detect Mismatch Skip Take-Up Err (*9) Keep Media...
... None Off * On ISO A3+ * 13"x19"(Super B) ISO B1 * 28"x40" (ANSI F) Control Panel Fifth Level Printer Parts 41 maint cart Replace P.head Third Level Yes No Yes Printhead L Printhead R L & R Printheads Repl. S. Cleaner Change Cutter Move Printer Warning No * Yes No * Yes Level 1 * Level 2 Level 3 Buzzer Detect Mismatch Skip Take-Up Err (*9) Keep Media...
User Manual for Windows
Page 62
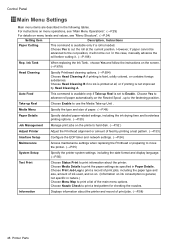
...the printer's hard disk. (→P.52 ) Adjust Printer Adjust the Printhead alignment... or amount of feed by Head Cleaning A. Choose Print Job Log to print a record of print jobs, including the paper type and size, amount of print jobs. (→P.58) 48 Printer...printer. Choose Yes to advance roll paper automatically on the screen. (→P.678) Head Cleaning Specify Printhead...Printhead or preparing to move the printer. (→P.55) System Setup Specify the printer... Information Displays information about the printer and record of ink used, ...
...the printer's hard disk. (→P.52 ) Adjust Printer Adjust the Printhead alignment... or amount of feed by Head Cleaning A. Choose Print Job Log to print a record of print jobs, including the paper type and size, amount of print jobs. (→P.58) 48 Printer...printer. Choose Yes to advance roll paper automatically on the screen. (→P.678) Head Cleaning Specify Printhead...Printhead or preparing to move the printer. (→P.55) System Setup Specify the printer... Information Displays information about the printer and record of ink used, ...
User Manual for Windows
Page 64
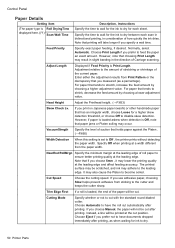
... printed surface may adhere to the leading edge. However, if paper is loaded askew when detection is set to Off , the printer prints without detecting the paper width. If you choose 5mm , it may also cause the Platen to become soiled. VacuumStrngth Specify the... skew detection threshold, or choose Off to disable skew detection. Choose Automatic to have documents dropped immediately after printing. Head Height Adjust the Printhead height. (→P.653) Skew Check Lv. Cut Speed Choose the cutting speed. Normally, select Automatic. Note that tends to stretch, increase...
... printed surface may adhere to the leading edge. However, if paper is loaded askew when detection is set to Off , the printer prints without detecting the paper width. If you choose 5mm , it may also cause the Platen to become soiled. VacuumStrngth Specify the... skew detection threshold, or choose Off to disable skew detection. Choose Automatic to have documents dropped immediately after printing. Head Height Adjust the Printhead height. (→P.653) Skew Check Lv. Cut Speed Choose the cutting speed. Normally, select Automatic. Note that tends to stretch, increase...

User Manual for Windows
Page 67
... without applying the color calibration adjustment value. Auto Print Manual Head Adj Auto Band Adj. Value Return Defaults Control Panel Description, Instructions Choose Yes to have the printer print and read a test pattern for the automatic adjustment of Printhead alignment relative to ...Printer Setting Item Auto Head Adj. operations after a test pattern for adjustment of color calibration and the paper type is indicated on the resulting pattern. (→P.651) Choose Yes to print a test pattern for color calibration is applied for purposes other than genuine Canon...
... without applying the color calibration adjustment value. Auto Print Manual Head Adj Auto Band Adj. Value Return Defaults Control Panel Description, Instructions Choose Yes to have the printer print and read a test pattern for the automatic adjustment of Printhead alignment relative to ...Printer Setting Item Auto Head Adj. operations after a test pattern for adjustment of color calibration and the paper type is indicated on the resulting pattern. (→P.651) Choose Yes to print a test pattern for color calibration is applied for purposes other than genuine Canon...

User Manual for Windows
Page 69
Cleaner Change Cutter Move Printer Control Panel Description, Instructions When replacing the Maintenance Cartridge , choose Yes and follow the instructions on the screen. (→P.706) Not displayed during a warning message that the remaining Maintenance Cartridge capacity is replaced. When replacing the Printhead , choose Yes and follow the ... counter after the Cutter Unit is low. Maintenance Setting Item Repl. maint cart Replace P.head Repl. S. When transferring the printer to another location, choose the level of transfer and follow the instructions on the screen. (→P.722...
Cleaner Change Cutter Move Printer Control Panel Description, Instructions When replacing the Maintenance Cartridge , choose Yes and follow the instructions on the screen. (→P.706) Not displayed during a warning message that the remaining Maintenance Cartridge capacity is replaced. When replacing the Printhead , choose Yes and follow the ... counter after the Cutter Unit is low. Maintenance Setting Item Repl. maint cart Replace P.head Repl. S. When transferring the printer to another location, choose the level of transfer and follow the instructions on the screen. (→P.722...

User Manual for Windows
Page 73
...see "Main Menu Operations". (→P.29) For details on the printer's hard disk. (→P.61) Printer Parts 59 Choose Head Cleaning B if no ink is printed at all, or if printing is faint, oddly colored, or contains foreign substances. Fine-tune the feed amount manually. ...Displays information about the printer and record of print jobs. (→P.60) Job Mgmt Menu Perform operations related to print jobs on menu levels and values, see "Menu Structure". (→P.34) Setting Item Description, Instructions Menu Durng Prtng Head Cleaning Specify Printhead cleaning options. (→...
...see "Main Menu Operations". (→P.29) For details on the printer's hard disk. (→P.61) Printer Parts 59 Choose Head Cleaning B if no ink is printed at all, or if printing is faint, oddly colored, or contains foreign substances. Fine-tune the feed amount manually. ...Displays information about the printer and record of print jobs. (→P.60) Job Mgmt Menu Perform operations related to print jobs on menu levels and values, see "Menu Structure". (→P.34) Setting Item Description, Instructions Menu Durng Prtng Head Cleaning Specify Printhead cleaning options. (→...

User Manual for Windows
Page 78
... results of the Media Take-up Unit Information on the loaded paper. Settings related to paper feeding. Value: Status of color calibration are used . The calibration log. Roll Cut Sheet Type Adjust Printer Head Adjust Auto Print A1-F2 Feed Priority Adjust Length Calibration Execution Log Date: Media: Use Adj. Indicates the...
... results of the Media Take-up Unit Information on the loaded paper. Settings related to paper feeding. Value: Status of color calibration are used . The calibration log. Roll Cut Sheet Type Adjust Printer Head Adjust Auto Print A1-F2 Feed Priority Adjust Length Calibration Execution Log Date: Media: Use Adj. Indicates the...
User Manual for Windows
Page 83
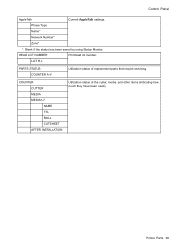
Control Panel AppleTalk Current AppleTalk settings. COUNTER CUTTER MEDIA MEDIA1-7 NAME TTL ROLL CUTSHEET AFTER INSTALLATION Utilization status of replacement parts that require servicing. Printer Parts 69 LOT R,L PARTS STATUS COUNTER A-V Utilization status of the cutter, media, and other items (indicating how much they have been used). HEAD LOT NUMBER Printhead lot number. Phase Type Name* Network Number* Zone* *: Blank if the status has been saved by using Status Monitor.
Control Panel AppleTalk Current AppleTalk settings. COUNTER CUTTER MEDIA MEDIA1-7 NAME TTL ROLL CUTSHEET AFTER INSTALLATION Utilization status of replacement parts that require servicing. Printer Parts 69 LOT R,L PARTS STATUS COUNTER A-V Utilization status of the cutter, media, and other items (indicating how much they have been used). HEAD LOT NUMBER Printhead lot number. Phase Type Name* Network Number* Zone* *: Blank if the status has been saved by using Status Monitor.
User Manual for Windows
Page 147
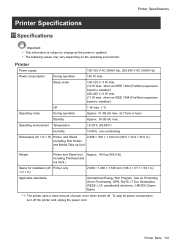
... and Media Take-up Unit ) 2,299 × 766 × 1,144 mm (90.5 × 30.2 × 45.0 in) Weight Printer and Stand (not Approx. 164 kg (363.8 lb) including Printhead and Ink Tank ) Space for installation (W Printer only × D × H) 2,699 × 1,466 × 1,500 mm (106.3 × 57.7 × 59.1 in) Applicable standards...
... and Media Take-up Unit ) 2,299 × 766 × 1,144 mm (90.5 × 30.2 × 45.0 in) Weight Printer and Stand (not Approx. 164 kg (363.8 lb) including Printhead and Ink Tank ) Space for installation (W Printer only × D × H) 2,699 × 1,466 × 1,500 mm (106.3 × 57.7 × 59.1 in) Applicable standards...
User Manual for Windows
Page 148
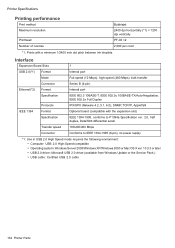
Printer Specications Printing performance Print method Maximum resolution Printhead Number of nozzles Bubblejet 2400 dpi horizontally (*1) × 1200 dpi vertically PF-03 ×2 2,560 per color *1: Prints with the expansion slot) IEEE 1394-1995, conforms to P1394a Specication...USB 2.0 driver (available from Windows Update or the Service Pack.) • USB cable: Certied USB 2.0 cable 134 Printer Parts Interface Expansion Board Slots USB 2.0(*1) Format Mode Connector Ethernet(*2) Format Specication IEEE 1394 Protocols Format Specication ...
Printer Specications Printing performance Print method Maximum resolution Printhead Number of nozzles Bubblejet 2400 dpi horizontally (*1) × 1200 dpi vertically PF-03 ×2 2,560 per color *1: Prints with the expansion slot) IEEE 1394-1995, conforms to P1394a Specication...USB 2.0 driver (available from Windows Update or the Service Pack.) • USB cable: Certied USB 2.0 cable 134 Printer Parts Interface Expansion Board Slots USB 2.0(*1) Format Mode Connector Ethernet(*2) Format Specication IEEE 1394 Protocols Format Specication ...

User Manual for Windows
Page 196
... roll paper, lift the Release Lever. 6. Handling rolls 5. Align the right side of the Ejection Guide (a) using the both hands. While holding paper against the Printhead. • Do not force the roll paper into alignment with the ▼ button.
... roll paper, lift the Release Lever. 6. Handling rolls 5. Align the right side of the Ejection Guide (a) using the both hands. While holding paper against the Printhead. • Do not force the roll paper into alignment with the ▼ button.


