User Manual for Windows
Page 10
...661 Color adjustment 663 Using Color Calibration to Adjust Colors 663 Printing in Ideal Colors for Light in the Viewing Environment 666 By selecting color tones on Charts before printing (Windows 667 Printing in Colors Matching the Measured Ambient Light 671 Accessing the Printer Driver Dialog Box from Applications (Windows 674 Ink Tanks...676 Ink Tanks...676 Replacing Ink Tanks...678 Checking Ink Tank Levels...690 When to Replace Ink Tanks...691 Printheads...692 Printhead...692 Checking the Print Quality...692 Improving the Print Quality...692 Checking for Nozzle Clogging 693 Cleaning...
...661 Color adjustment 663 Using Color Calibration to Adjust Colors 663 Printing in Ideal Colors for Light in the Viewing Environment 666 By selecting color tones on Charts before printing (Windows 667 Printing in Colors Matching the Measured Ambient Light 671 Accessing the Printer Driver Dialog Box from Applications (Windows 674 Ink Tanks...676 Ink Tanks...676 Replacing Ink Tanks...678 Checking Ink Tank Levels...690 When to Replace Ink Tanks...691 Printheads...692 Printhead...692 Checking the Print Quality...692 Improving the Print Quality...692 Checking for Nozzle Clogging 693 Cleaning...
User Manual for Windows
Page 11
... Cleaning Inside the Top Cover 718 Cleaning the Printhead...721 Other Maintenance 722 Preparing to Transfer the Printer 722 Updating the Firmware...728 Troubleshooting 729 Frequently Asked Questions 729 Frequently Asked Questions...729 Specifying Paper in the Printer Driver 731 Printing does not start 732 The Data lamp on the Control Panel does not light up 732 The Printer Does Not Respond Even if Print Jobs are Sent 732 The Display Screen...
... Cleaning Inside the Top Cover 718 Cleaning the Printhead...721 Other Maintenance 722 Preparing to Transfer the Printer 722 Updating the Firmware...728 Troubleshooting 729 Frequently Asked Questions 729 Frequently Asked Questions...729 Specifying Paper in the Printer Driver 731 Printing does not start 732 The Data lamp on the Control Panel does not light up 732 The Printer Does Not Respond Even if Print Jobs are Sent 732 The Display Screen...
User Manual for Windows
Page 21
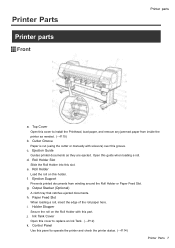
...install the Printhead, load paper, and remove any jammed paper from winding around the Roll Holder or Paper Feed Slot. f. Ink Tank Cover Open this slot. Cutter Groove Paper is cut (using the cutter or manually with this guide when loading a roll. Roll Holder Load the roll on the Roll Holder with scissors) over this holder. Output Stacker (Optional) A cloth tray that catches ejected documents. Ejection Support Prevents printed documents from inside the printer as they are ejected. Control Panel Use this cover to replace an Ink Tank. (→P.12) k. Printer Parts Printer...
...install the Printhead, load paper, and remove any jammed paper from winding around the Roll Holder or Paper Feed Slot. f. Ink Tank Cover Open this slot. Cutter Groove Paper is cut (using the cutter or manually with this guide when loading a roll. Roll Holder Load the roll on the Roll Holder with scissors) over this holder. Output Stacker (Optional) A cloth tray that catches ejected documents. Ejection Support Prevents printed documents from inside the printer as they are ejected. Control Panel Use this cover to replace an Ink Tank. (→P.12) k. Printer Parts Printer...

User Manual for Windows
Page 34
... the Control Panel (→P.24) Modes The printer has ve modes as follows and described in Sleep mode (after it is idle for a specic period (by factory default, ve minutes), that is, if no print jobs are received or buttons are pressed while all covers are received when the printer is in power-saving mode. You can feed or cut roll paper manually. While the printer is online. Jobs can...
... the Control Panel (→P.24) Modes The printer has ve modes as follows and described in Sleep mode (after it is idle for a specic period (by factory default, ve minutes), that is, if no print jobs are received or buttons are pressed while all covers are received when the printer is in power-saving mode. You can feed or cut roll paper manually. While the printer is online. Jobs can...

User Manual for Windows
Page 37
... displayed. The selected paper source is indicated by the error code and Call for assistance. Any warning messages are displayed. Take action as needed . (→P.764) • Data lamp Flashes when print jobs are being received. • Message lamp Flashes when error messages are displayed. Printer Parts 23 Take action as needed . (→P.764) • Middle Level of the Display Screen The rst and second lines display the paper type and size. • Bottom Level of the Control Panel...
... displayed. The selected paper source is indicated by the error code and Call for assistance. Any warning messages are displayed. Take action as needed . (→P.764) • Data lamp Flashes when print jobs are being received. • Message lamp Flashes when error messages are displayed. Printer Parts 23 Take action as needed . (→P.764) • Middle Level of the Display Screen The rst and second lines display the paper type and size. • Bottom Level of the Control Panel...

User Manual for Windows
Page 58
... not executed Auto Feed for the loaded roll. *12: Not displayed if IP Mode is Automatic. *13: Follows the setting in Auto Head Adj. Control Panel First Level Second Level Third Level Yes Fourth Level Fifth Level Menu Map No Yes Nozzle Check No Yes Information System Info Error Log Job Log (Choose from the User Software CD-ROM or if you have used Advanced Adj. See the Media Conguration Tool Guide (Windows) or Media Con...
... not executed Auto Feed for the loaded roll. *12: Not displayed if IP Mode is Automatic. *13: Follows the setting in Auto Head Adj. Control Panel First Level Second Level Third Level Yes Fourth Level Fifth Level Menu Map No Yes Nozzle Check No Yes Information System Info Error Log Job Log (Choose from the User Software CD-ROM or if you have used Advanced Adj. See the Media Conguration Tool Guide (Windows) or Media Con...

User Manual for Windows
Page 65
... the factory default values. *1: For information on the types of paper the printer supports, refer to ensure better printing quality at the leading edge. Choose Automatic to the cutter and keeps the cutter sharp if you change paper information by the printer. The printed surface may be scratched, and ink may lower the printing quality at the cut position. Control Panel Setting Item (The paper type is selected, choose Fixed. It also helps prevent adhesive from the User Software...
... the factory default values. *1: For information on the types of paper the printer supports, refer to ensure better printing quality at the leading edge. Choose Automatic to the cutter and keeps the cutter sharp if you change paper information by the printer. The printed surface may be scratched, and ink may lower the printing quality at the cut position. Control Panel Setting Item (The paper type is selected, choose Fixed. It also helps prevent adhesive from the User Software...

User Manual for Windows
Page 67
...have the printer print and read a band adjustment test pattern for purposes other than checking output. Printer Parts 53 Choose Yes to have the printer print and read a test pattern for all paper. Select Enabled and press the OK button to print without applying the color calibration adjustment value. Manual Band Adj Adjust Length Calibration Auto Adjust Calibration Log Use Adj. The printer driver settings are given priority. Standard Adj. Advanced Adj. Enter the adjustment value manually based on the Display Screen . Adjust Printer Setting Item Auto Head Adj...
...have the printer print and read a band adjustment test pattern for purposes other than checking output. Printer Parts 53 Choose Yes to have the printer print and read a test pattern for all paper. Select Enabled and press the OK button to print without applying the color calibration adjustment value. Manual Band Adj Adjust Length Calibration Auto Adjust Calibration Log Use Adj. The printer driver settings are given priority. Standard Adj. Advanced Adj. Enter the adjustment value manually based on the Display Screen . Adjust Printer Setting Item Auto Head Adj...

User Manual for Windows
Page 70
... the printer automatically adjust the timing for checks based on the frequency of nozzle use the paper size setting as the basis for printing instead of other settings. The margin setting of the printer menu will be used instead of the margin setting of the printer menu. Choose 1 page to have the printer pause before the printer enters Sleep mode. 56 Printer Parts Specify the period before printing if a rewinding error occurs. Paper Size Basis Sht Selection 1 Sht Selection 2 Noz. If sheet size...
... the printer automatically adjust the timing for checks based on the frequency of nozzle use the paper size setting as the basis for printing instead of other settings. The margin setting of the printer menu will be used instead of the margin setting of the printer menu. Choose 1 page to have the printer pause before the printer enters Sleep mode. 56 Printer Parts Specify the period before printing if a rewinding error occurs. Paper Size Basis Sht Selection 1 Sht Selection 2 Noz. If sheet size...
User Manual for Windows
Page 164
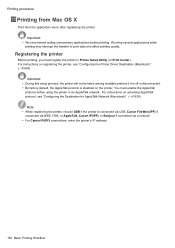
...) Note • When registering the printer, choose USB if the printer is connected via USB, Canon FireWire(iPF) if connected via IEEE 1394, or AppleTalk, Canon IP(iPF), or Bonjour if connected via a network. • For Canon IP(iPF) connections, enter the printer's IP address. 150 Basic Printing Workow Important • We recommend exiting unnecessary applications before using the printer in Printer Setup Utility (or Print Center ). For instructions on the...
...) Note • When registering the printer, choose USB if the printer is connected via USB, Canon FireWire(iPF) if connected via IEEE 1394, or AppleTalk, Canon IP(iPF), or Bonjour if connected via a network. • For Canon IP(iPF) connections, enter the printer's IP address. 150 Basic Printing Workow Important • We recommend exiting unnecessary applications before using the printer in Printer Setup Utility (or Print Center ). For instructions on the...

User Manual for Windows
Page 227
... by factory default. Note • For details on the Display Screen. The printer will automatically go online. 1. If this case, select the paper type, and then press the OK button. In this setting does not match the loaded paper, it may cause feed errors and affect the printing quality. • If you must advance the paper manually to the position for printing. (→P.148) 5. Press ▲ or ▼ to select Cut Sheet Type...
... by factory default. Note • For details on the Display Screen. The printer will automatically go online. 1. If this case, select the paper type, and then press the OK button. In this setting does not match the loaded paper, it may cause feed errors and affect the printing quality. • If you must advance the paper manually to the position for printing. (→P.148) 5. Press ▲ or ▼ to select Cut Sheet Type...
User Manual for Windows
Page 270
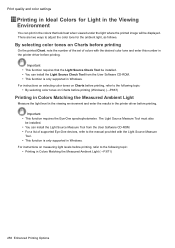
... can install the Light Source Check Tool from the User Software CD-ROM. • For a list of supported Eye-One devices, refer to adjust the color tone for Light in the Viewing Environment You can install the Light Source Measure Tool from the User Software CD-ROM. • This function is only supported in the printer driver before printing (Windows) (→P.667) Printing in Colors Matching the Measured Ambient Light Measure the light level in...
... can install the Light Source Check Tool from the User Software CD-ROM. • For a list of supported Eye-One devices, refer to adjust the color tone for Light in the Viewing Environment You can install the Light Source Measure Tool from the User Software CD-ROM. • This function is only supported in the printer driver before printing (Windows) (→P.667) Printing in Colors Matching the Measured Ambient Light Measure the light level in...
User Manual for Windows
Page 680
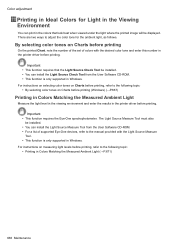
... light levels before printing, refer to the manual provided with the desired color tone and enter this number in Windows. The Light Source Measure Tool must also be installed. • You can install the Light Source Measure Tool from the User Software CD-ROM. • This function is only supported in the printer driver before printing. By selecting color tones on Charts before printing On the printed Chart, note the number of the set...
... light levels before printing, refer to the manual provided with the desired color tone and enter this number in Windows. The Light Source Measure Tool must also be installed. • You can install the Light Source Measure Tool from the User Software CD-ROM. • This function is only supported in the printer driver before printing. By selecting color tones on Charts before printing On the printed Chart, note the number of the set...

User Manual for Windows
Page 756
... Print Quality in Feed Priority . Specify a time of about a minute in different colors occurs Cause The paper feed amount is out of the printer driver and try printing again. (→P.654) The Printhead is not adjusted correctly. Clean the Paper Retainer . (→P.718) Banding in Roll DryingTime . In the printer menu, Print Length is specied in the Advanced Settings of alignment. Selecting Band Joint may occur if you set the Print Quality too low. Adjust the Printhead alignment...
... Print Quality in Feed Priority . Specify a time of about a minute in different colors occurs Cause The paper feed amount is out of the printer driver and try printing again. (→P.654) The Printhead is not adjusted correctly. Clean the Paper Retainer . (→P.718) Banding in Roll DryingTime . In the printer menu, Print Length is specied in the Advanced Settings of alignment. Selecting Band Joint may occur if you set the Print Quality too low. Adjust the Printhead alignment...

User Manual for Windows
Page 757
... printer, then use Glossy Paper , art paper, or Coated Paper . Color density may be even at the edges. Settings of the paper is out of adjustment. Thus, ink density may appear uneven on the left and right sides only. sheet separately. Printed colors may not be uneven between dark and light image Select Unidirectional Printing in Print Quality . in many solid colors. When using Borderless Printing, the edge of the printer driver. Troubleshooting 743 Problems with the printing quality...
... printer, then use Glossy Paper , art paper, or Coated Paper . Color density may be even at the edges. Settings of the paper is out of adjustment. Thus, ink density may appear uneven on the left and right sides only. sheet separately. Printed colors may not be uneven between dark and light image Select Unidirectional Printing in Print Quality . in many solid colors. When using Borderless Printing, the edge of the printer driver. Troubleshooting 743 Problems with the printing quality...

User Manual for Windows
Page 759
... type of paper. Colors have not been adjusted on the same model Follow these steps to adjust colors. Printhead characteristics gradually change . Color may change through Execute color calibration. The region selection of rmware or printer driver. If the information of paper you used for all settings items. 3.Execute color calibration. Corrective Action In the Advanced Settings of the printer driver, access Color Settings in a different printing environment. 2.Specify the same value for color calibration is not selected. The Printhead nozzles...
... type of paper. Colors have not been adjusted on the same model Follow these steps to adjust colors. Printhead characteristics gradually change . Color may change through Execute color calibration. The region selection of rmware or printer driver. If the information of paper you used for all settings items. 3.Execute color calibration. Corrective Action In the Advanced Settings of the printer driver, access Color Settings in a different printing environment. 2.Specify the same value for color calibration is not selected. The Printhead nozzles...

User Manual for Windows
Page 762
...Removing printer drivers (Windows) Remove the printer driver as follows. 1. Make sure that the printer has been removed from the list, and click Exit. Start the printer driver installer included in the CD-ROM drive. 2. Removing imagePROGRAF Status Monitor (Windows) Remove imagePROGRAF Status Monitor as follows. 1. Removing imagePROGRAF Device Setup Utility (Windows) Remove imagePROGRAF Device Setup Utility as follows. 1. Follow the instructions on the screen to remove imagePROGRAF Device Setup Utility. 748 Troubleshooting Note • In Windows 2000/Windows XP/Windows Server...
...Removing printer drivers (Windows) Remove the printer driver as follows. 1. Make sure that the printer has been removed from the list, and click Exit. Start the printer driver installer included in the CD-ROM drive. 2. Removing imagePROGRAF Status Monitor (Windows) Remove imagePROGRAF Status Monitor as follows. 1. Removing imagePROGRAF Device Setup Utility (Windows) Remove imagePROGRAF Device Setup Utility as follows. 1. Follow the instructions on the screen to remove imagePROGRAF Device Setup Utility. 748 Troubleshooting Note • In Windows 2000/Windows XP/Windows Server...

User Manual for Windows
Page 778
...; Ink tank error. (→P.777) • No ink tank loaded. (→P.775) • Top cover is open. (→P.785) • Sheet printing is selected. (→P.769) • Regular printing is selected, but a roll is loaded. (→P.769) • No sheets. (→P.768) • Carriage Cover is open. (→P.785) • Cannot calibrate. (→P.779) • Insufcient paper for parts replacement. (→P.786) • Parts replacement time has passed. (→P.786) • Problem with Printhead...
...; Ink tank error. (→P.777) • No ink tank loaded. (→P.775) • Top cover is open. (→P.785) • Sheet printing is selected. (→P.769) • Regular printing is selected, but a roll is loaded. (→P.769) • No sheets. (→P.768) • Carriage Cover is open. (→P.785) • Cannot calibrate. (→P.779) • Insufcient paper for parts replacement. (→P.786) • Parts replacement time has passed. (→P.786) • Problem with Printhead...

User Manual for Windows
Page 779
Use other paper. (→P.778) Error Message 765 Delete unwanted data on the Display Screen and take -up unit ready. (→P.774) • Multi-sensor error (→P.786) • Maintenance cartridge full. (→P.782) • Maintenance cartridge problem. (→P.782) • No maintenance cartridge. (→P.782) • No Maintenance Cartridge capacity. (→P.782) • Paper Mismatch (→P.766) • Paper jam. (→P.772) • Paper loaded askew. (→P.771) • Papr Size Mismatch (→...
Use other paper. (→P.778) Error Message 765 Delete unwanted data on the Display Screen and take -up unit ready. (→P.774) • Multi-sensor error (→P.786) • Maintenance cartridge full. (→P.782) • Maintenance cartridge problem. (→P.782) • No maintenance cartridge. (→P.782) • No Maintenance Cartridge capacity. (→P.782) • Paper Mismatch (→P.766) • Paper jam. (→P.772) • Paper loaded askew. (→P.771) • Papr Size Mismatch (→...
User Manual for Windows
Page 809
... frame type using imagePROGRAF Device Setup Utility 626 Specifying the frame type using the printer Control Panel 627 Stand 16 Status Print 63 Checking the information in the Status Print report 63 Printing Status Print Reports 63 Stowing the Output Stacker 225 Submenu Display 62 Information of the loaded paper 62 Printer information 62 Remaining Maintenance Cartridge capacity and ink levels 62 Support Pane (Mac OS X 571 Support Sheet (Windows 526 Switching Modes 25 Switching the Printer Online/Offline 25 Switching to Menu Mode 26 T The back side of the paper...
... frame type using imagePROGRAF Device Setup Utility 626 Specifying the frame type using the printer Control Panel 627 Stand 16 Status Print 63 Checking the information in the Status Print report 63 Printing Status Print Reports 63 Stowing the Output Stacker 225 Submenu Display 62 Information of the loaded paper 62 Printer information 62 Remaining Maintenance Cartridge capacity and ink levels 62 Support Pane (Mac OS X 571 Support Sheet (Windows 526 Switching Modes 25 Switching the Printer Online/Offline 25 Switching to Menu Mode 26 T The back side of the paper...


