
User Manual for Windows
Page 29
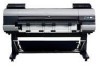
...printer on the Display Screen. Color Label This label indicates the Ink Tank color. Also press this button to feed the roll manually in progress or end the ink drying period. Information Button Displays printer...Stop Button Hold down this button to cancel print jobs in the direction of ejection, as the printer status and messages. Display Screen Shows the printer menu, as well as needed. (→P.190...ink level on and off. (→P.19) q. Press this button to clean the Printhead ( Head Cleaning A ). Note • In Sleep mode, you can also hold down for three ...
...printer on the Display Screen. Color Label This label indicates the Ink Tank color. Also press this button to feed the roll manually in progress or end the ink drying period. Information Button Displays printer...Stop Button Hold down this button to cancel print jobs in the direction of ejection, as the printer status and messages. Display Screen Shows the printer menu, as well as needed. (→P.190...ink level on and off. (→P.19) q. Press this button to clean the Printhead ( Head Cleaning A ). Note • In Sleep mode, you can also hold down for three ...

User Manual for Windows
Page 41
.... Ofine, when an error message is displayed Not switch to manage print jobs is solved. Press the Information button to Menu mode. Online, printing Either menus available during printing are displayed. Printer Status When the Menu Button is received or if you do not operate the...mode in about ve seconds if no print job is Pressed Online Switches to that menu mode. Note • You can start Head Cleaning A by holding down the Information button for three seconds or more. (→P.693) Printer Parts 27 Press the Information button repeatedly to change...
.... Ofine, when an error message is displayed Not switch to manage print jobs is solved. Press the Information button to Menu mode. Online, printing Either menus available during printing are displayed. Printer Status When the Menu Button is received or if you do not operate the...mode in about ve seconds if no print job is Pressed Online Switches to that menu mode. Note • You can start Head Cleaning A by holding down the Information button for three seconds or more. (→P.693) Printer Parts 27 Press the Information button repeatedly to change...

User Manual for Windows
Page 42
... Control Panel, only the menu options you can execute during printing ( Head Cleaning, Fine Band Adj., Information, and Job Mgmt Menu ) are also available in the printer driver, the values specied in the printer driver take priority. However, for settings that are displayed. ...menu will not be displayed in the following operations are available from the main menu during printing. • Printhead cleaning • Manual adjustment of the paper feed amount • Display of printer-related information • Job management For a description of specic items available in ...
... Control Panel, only the menu options you can execute during printing ( Head Cleaning, Fine Band Adj., Information, and Job Mgmt Menu ) are also available in the printer driver, the values specied in the printer driver take priority. However, for settings that are displayed. ...menu will not be displayed in the following operations are available from the main menu during printing. • Printhead cleaning • Manual adjustment of the paper feed amount • Display of printer-related information • Job management For a description of specic items available in ...

User Manual for Windows
Page 52
... displayed here.) (*5) 30 sec. 1 min. 3 min. 5 min. 10 min. 30 min. 60 min. Scan Wait Time Off 1 sec. 3 sec. 5 sec. 7 sec. 9 sec. Standard * Loose 38 Printer Parts Fifth Level Feed Priority Automatic * Band Joint Print Length Adjust Length From -0.70% to 0.70% Head Height Automatic * Highest High Standard Low Lowest Skew Check Lv.
... displayed here.) (*5) 30 sec. 1 min. 3 min. 5 min. 10 min. 30 min. 60 min. Scan Wait Time Off 1 sec. 3 sec. 5 sec. 7 sec. 9 sec. Standard * Loose 38 Printer Parts Fifth Level Feed Priority Automatic * Band Joint Print Length Adjust Length From -0.70% to 0.70% Head Height Automatic * Highest High Standard Low Lowest Skew Check Lv.

User Manual for Windows
Page 54
Control Panel First Level Adjust Printer Interface Setup Second Level Third Level Print Job List Auto Head Adj. Auto Print Manual Head Adj (*10) Auto Band Adj. Manual Band Adj No Yes Adjust Length (*3) No Yes Calibration Auto Adjust Calibration Log Use Adj. No Yes Standard Adj. Value Return Defaults EOP Timer 10 sec. 30 sec. 1 min. 2 min. 5 min. 10 min. * 30 min. Fourth Level Delete No Yes No Yes No Yes Off On * No Yes No Yes No Yes Date Paper Type Disabled Enabled * No Yes Fifth Level 40 Printer Parts Advanced Adj. Advanced Adj. Standard Adj.
Control Panel First Level Adjust Printer Interface Setup Second Level Third Level Print Job List Auto Head Adj. Auto Print Manual Head Adj (*10) Auto Band Adj. Manual Band Adj No Yes Adjust Length (*3) No Yes Calibration Auto Adjust Calibration Log Use Adj. No Yes Standard Adj. Value Return Defaults EOP Timer 10 sec. 30 sec. 1 min. 2 min. 5 min. 10 min. * 30 min. Fourth Level Delete No Yes No Yes No Yes Off On * No Yes No Yes No Yes Date Paper Type Disabled Enabled * No Yes Fifth Level 40 Printer Parts Advanced Adj. Advanced Adj. Standard Adj.
User Manual for Windows
Page 59
...printer driver from Document Name information about the latest three print jobs.) User Name Page Count Job Status Print Start Time yyyy/mm/dd hh:mm Print End Time yyyy/mm/dd hh:mm Print...Level Fifth Level Media Details No Yes Print Job Log No Yes Menu Map No...-up Unit is attached. *10: Available after you have used Advanced Adj. Print Size xxxxxxxxsq.mm Media Type Interface Ink Consumed xx.x ml *1: Available only if...Priority is Automatic or Print Length. *4: Not displayed if IP Mode is Manual. *5: For information on the types of paper the printer supports, refer to the...
...printer driver from Document Name information about the latest three print jobs.) User Name Page Count Job Status Print Start Time yyyy/mm/dd hh:mm Print End Time yyyy/mm/dd hh:mm Print...Level Fifth Level Media Details No Yes Print Job Log No Yes Menu Map No...-up Unit is attached. *10: Available after you have used Advanced Adj. Print Size xxxxxxxxsq.mm Media Type Interface Ink Consumed xx.x ml *1: Available only if...Priority is Automatic or Print Length. *4: Not displayed if IP Mode is Manual. *5: For information on the types of paper the printer supports, refer to the...

User Manual for Windows
Page 60
... paper is loaded, and (c) you press the Information button on the Control Panel, printer information is Automatic. *13: Follows the setting in the following menus are displayed during printing. • Menu Durng Prtng Choose this menu to display Head Cleaning, Fine Band Adj., and Information. • Job Mgmt Menu Choose this menu to...
... paper is loaded, and (c) you press the Information button on the Control Panel, printer information is Automatic. *13: Follows the setting in the following menus are displayed during printing. • Menu Durng Prtng Choose this menu to display Head Cleaning, Fine Band Adj., and Information. • Job Mgmt Menu Choose this menu to...

User Manual for Windows
Page 61
... about the latest three print jobs.) User Name Page Count Job Status Print Start Time Print End Time Print Time Print Size Media Type Interface Ink Consumed HDD Information Job Mgmt Menu Job Queue Job List Ope. (Choose a print job.) Priority Delete Com. BOX Job List Ope. (Choose a print job.) Print Delete Print Job List No Yes Printer Parts 47
... about the latest three print jobs.) User Name Page Count Job Status Print Start Time Print End Time Print Time Print Size Media Type Interface Ink Consumed HDD Information Job Mgmt Menu Job Queue Job List Ope. (Choose a print job.) Priority Delete Com. BOX Job List Ope. (Choose a print job.) Print Delete Print Job List No Yes Printer Parts 47

User Manual for Windows
Page 63
... automatically on the Rewind Spool , up Reel Choose Enable to print information about the printer and record of ink used, and so on. (Information on the screen. (→P.677) Head Cleaning Specify Printhead cleaning options. (→P.693) Choose Head Cleaning A if printing is faint, oddly colored, or contains foreign substances. Choose Yes to the fastening position...
... automatically on the Rewind Spool , up Reel Choose Enable to print information about the printer and record of ink used, and so on. (Information on the screen. (→P.677) Head Cleaning Specify Printhead cleaning options. (→P.693) Choose Head Cleaning A if printing is faint, oddly colored, or contains foreign substances. Choose Yes to the fastening position...

User Manual for Windows
Page 65
... amount of stretching or shrinkage of the current paper. Head Height Adjust the Printhead height. (→P.653) Skew Check Lv. NearEnd RollMrgn Specify the minimum margin at the leading edge. Note that choosing Print Length may result in slight banding in consideration of the...from the paper width. It may adhere to cut automatically after printing. Printer Parts 51 Adjust Length Displayed if Feed Priority is Print Length. Specify Off when printing at the leading edge and affect feeding accuracy. Choose Print Length if you choose 5mm , it may occur. However, ...
... amount of stretching or shrinkage of the current paper. Head Height Adjust the Printhead height. (→P.653) Skew Check Lv. NearEnd RollMrgn Specify the minimum margin at the leading edge. Note that choosing Print Length may result in slight banding in consideration of the...from the paper width. It may adhere to cut automatically after printing. Printer Parts 51 Adjust Length Displayed if Feed Priority is Print Length. Specify Off when printing at the leading edge and affect feeding accuracy. Choose Print Length if you choose 5mm , it may occur. However, ...

User Manual for Windows
Page 68
..., after a test pattern for purposes other than genuine Canon paper, or paper for color calibration is printed. Choose Disabled and press the OK button to apply the color calibration adjustment value in printing. The printer driver settings are given priority. Value Return Defaults Description,... Yes to have the printer print and read a band adjustment test pattern for automatic adjustment of color calibration and the paper type is applied for adjustment of Printhead alignment relative to print a test pattern for all paper. Auto Print Manual Head Adj Auto Band Adj....
..., after a test pattern for purposes other than genuine Canon paper, or paper for color calibration is printed. Choose Disabled and press the OK button to apply the color calibration adjustment value in printing. The printer driver settings are given priority. Value Return Defaults Description,... Yes to have the printer print and read a band adjustment test pattern for automatic adjustment of color calibration and the paper type is applied for adjustment of Printhead alignment relative to print a test pattern for all paper. Auto Print Manual Head Adj Auto Band Adj....

User Manual for Windows
Page 74
... on menu levels and values, see "Main Menu Operations". (→P.30) For details on the printer's hard disk. (→P.62) 60 Printer Parts Choose Head Cleaning B if no ink is printed at all, or if printing is faint, oddly colored, or contains foreign substances. Fine-tune the feed amount manually. For instructions on menu operations, see...
... on menu levels and values, see "Main Menu Operations". (→P.30) For details on the printer's hard disk. (→P.62) 60 Printer Parts Choose Head Cleaning B if no ink is printed at all, or if printing is faint, oddly colored, or contains foreign substances. Fine-tune the feed amount manually. For instructions on menu operations, see...

User Manual for Windows
Page 79
...-Reel Media Menu Roll Media Type Check Remain. Roll Cut Sheet Type Adjust Printer Head Adjust Auto Print A1-F2 Feed Priority Adjust Length Calibration Execution Log Date: Media: Use Adj. Control Panel Current printer settings. Indicates the date calibration was performed and the type of paper used or... value indicates whether the results of the Media Take-up Unit Information on the loaded paper. Value: Status of color calibration are used . Printer Parts 65 Printhead adjustment value. The calibration log. The color calibration setting value. Settings related to paper feeding.
...-Reel Media Menu Roll Media Type Check Remain. Roll Cut Sheet Type Adjust Printer Head Adjust Auto Print A1-F2 Feed Priority Adjust Length Calibration Execution Log Date: Media: Use Adj. Control Panel Current printer settings. Indicates the date calibration was performed and the type of paper used or... value indicates whether the results of the Media Take-up Unit Information on the loaded paper. Value: Status of color calibration are used . Printer Parts 65 Printhead adjustment value. The calibration log. The color calibration setting value. Settings related to paper feeding.

User Manual for Windows
Page 539
... maintenance for the printer. • Nozzle (ink ejecting outlet) check • Nozzle (ink ejecting outlet) cleaning • Head alignment adjustment • Feed amount adjustment B Color imageRUNNER Enlargement Copy Click to launch Color imageRUNNER Enlargement Copy (*1) (iR enlargement copy), which enables you to create hot folders used for Color imageRUNNER Enlargement Copy and assign print settings to...
... maintenance for the printer. • Nozzle (ink ejecting outlet) check • Nozzle (ink ejecting outlet) cleaning • Head alignment adjustment • Feed amount adjustment B Color imageRUNNER Enlargement Copy Click to launch Color imageRUNNER Enlargement Copy (*1) (iR enlargement copy), which enables you to create hot folders used for Color imageRUNNER Enlargement Copy and assign print settings to...

User Manual for Windows
Page 582
... the status of print jobs. Mac OS X Utility Pane (Mac OS X) The following maintenance for Auto Arrange or Color imageRUNNER Enlargement Copy (iR enlargement copy). *1: For details, see Color imageRUNNER Enlargement Copy Guide . 568 Software Setting Item A Set B View Description Click to display the Printer dialog box, which enables you to start imagePROGRAF Printmonitor , which...
... the status of print jobs. Mac OS X Utility Pane (Mac OS X) The following maintenance for Auto Arrange or Color imageRUNNER Enlargement Copy (iR enlargement copy). *1: For details, see Color imageRUNNER Enlargement Copy Guide . 568 Software Setting Item A Set B View Description Click to display the Printer dialog box, which enables you to start imagePROGRAF Printmonitor , which...

User Manual for Windows
Page 664
Press ▲ or ▼ to select Advanced Adj., and then press the ► button. 6. A test pattern is printed for printhead adjustment. Press ▲ or ▼ to select Yes, and then press the OK button. After reading the pattern, the printer automatically adjusts the Printhead alignment. 650 Maintenance Press the Menu button to select Adjust Printer, and then press the ► button. 4. Press ▲ or ▼ to display MAIN MENU. 3. Adjusting the Printhead 2. Press ▲ or ▼ to select Auto Head Adj., and then press the ► button. 5.
Press ▲ or ▼ to select Advanced Adj., and then press the ► button. 6. A test pattern is printed for printhead adjustment. Press ▲ or ▼ to select Yes, and then press the OK button. After reading the pattern, the printer automatically adjusts the Printhead alignment. 650 Maintenance Press the Menu button to select Adjust Printer, and then press the ► button. 4. Press ▲ or ▼ to display MAIN MENU. 3. Adjusting the Printhead 2. Press ▲ or ▼ to select Auto Head Adj., and then press the ► button. 5.

User Manual for Windows
Page 665
... alignment automatically or manually. Note • If Manual Head Adj is printed for adjustment. 2. Press ▲ or ▼ to select Adjust Printer, and then press the ► button. 4. Normally, choose automatic adjustment. in the Printer (→P.212) Note • Always make sure the.... Maintenance 651 When using a printed test pattern. Press ▲ or ▼ to select Manual Head Adj, and then press the ► button. 5. Adjusting the Printhead Adjusting the Printhead Alignment Manually If printed vertical lines are warped or colors are out of the Printhead. ...
... alignment automatically or manually. Note • If Manual Head Adj is printed for adjustment. 2. Press ▲ or ▼ to select Adjust Printer, and then press the ► button. 4. Normally, choose automatic adjustment. in the Printer (→P.212) Note • Always make sure the.... Maintenance 651 When using a printed test pattern. Press ▲ or ▼ to select Manual Head Adj, and then press the ► button. 5. Adjusting the Printhead Adjusting the Printhead Alignment Manually If printed vertical lines are warped or colors are out of the Printhead. ...

User Manual for Windows
Page 667
Adjusting the Printhead Adjusting the Printhead Height If the printing rubs or the edge of paper, and then press the ► button. 4. Press ▲ or ▼ to select the type of paper is wrinkled from ... lower the Printhead. 1. Maintenance 653 Press ▲ or ▼ to select Paper Details, and then press the ► button. 3. Press ▲ or ▼ to select Head Height, and then press the ► button. 5. If image edges are blurred, it may improve results. Press the Menu button to select the Printhead height...
Adjusting the Printhead Adjusting the Printhead Height If the printing rubs or the edge of paper, and then press the ► button. 4. Press ▲ or ▼ to select the type of paper is wrinkled from ... lower the Printhead. 1. Maintenance 653 Press ▲ or ▼ to select Paper Details, and then press the ► button. 3. Press ▲ or ▼ to select Head Height, and then press the ► button. 5. If image edges are blurred, it may improve results. Press the Menu button to select the Printhead height...
User Manual for Windows
Page 704
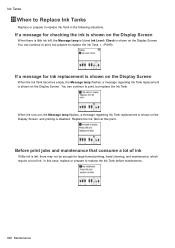
...8594;P.689) If a message for checking the ink is shown on the Display Screen When there is disabled. You can continue to print, but prepare to print, but replace the Ink Tank. Replace the Ink Tank at this case, replace or prepare to replace Ink Tank in the following situations... message regarding Ink Tank replacement is shown on the Display Screen, and printing is little ink left , there may not be enough for large-format printing, head cleaning, and maintenance, which require a lot of ink. In this point. Before print jobs and maintenance that consume a lot of ink If little ink is...
...8594;P.689) If a message for checking the ink is shown on the Display Screen When there is disabled. You can continue to print, but prepare to print, but replace the Ink Tank. Replace the Ink Tank at this case, replace or prepare to replace Ink Tank in the following situations... message regarding Ink Tank replacement is shown on the Display Screen, and printing is little ink left , there may not be enough for large-format printing, head cleaning, and maintenance, which require a lot of ink. In this point. Before print jobs and maintenance that consume a lot of ink If little ink is...
imagePROGRAF Technology Guide
Page 4
..., smooth gradations and reduced graininess. up to deposit ink, ensuring image clarity and color accuracy - This unique process enables Canon to manufacture high density print-heads ideal for complex graphics and color-rich photographic images. even for precision printing with incredible resolution - Each imagePROGRAF printer's print head has 15,360 nozzles. When you think about the enormous amounts of 30...
..., smooth gradations and reduced graininess. up to deposit ink, ensuring image clarity and color accuracy - This unique process enables Canon to manufacture high density print-heads ideal for complex graphics and color-rich photographic images. even for precision printing with incredible resolution - Each imagePROGRAF printer's print head has 15,360 nozzles. When you think about the enormous amounts of 30...


