iP6000D Diect Print Guide
Page 2
... Favorite Color Tone - Sticker Print 37 Printing in the Memory Card on the Sticker - Photo Gallery 22 Specifying How Many Copies to the Settings Made on the LCD - Print Index 44 Printing According to Print for Photos with the Shooting Date 30 Printing a Specified Area - Contents Contents Operation Panel and Menu Display Operation Panel Names and Functions 3 Menu Displays 5 Printing Flow Using a Memory Card Memory Cards Supported by This Printer 10 Inserting a Memory Card 11 Removing a Memory Card 13 Loading Paper Printing Photograph Printing a Photo Displayed on...
... Favorite Color Tone - Sticker Print 37 Printing in the Memory Card on the Sticker - Photo Gallery 22 Specifying How Many Copies to the Settings Made on the LCD - Print Index 44 Printing According to Print for Photos with the Shooting Date 30 Printing a Specified Area - Contents Contents Operation Panel and Menu Display Operation Panel Names and Functions 3 Menu Displays 5 Printing Flow Using a Memory Card Memory Cards Supported by This Printer 10 Inserting a Memory Card 11 Removing a Memory Card 13 Loading Paper Printing Photograph Printing a Photo Displayed on...
iP6000D Diect Print Guide
Page 12
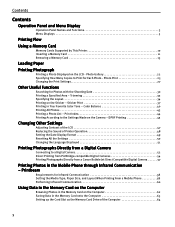
... memory card drive of the Computer" on the printer. 2 Open the card slot cover. 3 Install the memory card in the memory card, be done. Inserting a Memory Card Notes When Read/write mode is selected in the Memory Card Utility, neither printing nor maintenance can be sure to print photos from the computer. After using the card slot as the Memory Card Drive of the computer, be sure to print photos may result in improper printing. 1 Turn on page 64. The Indicator lamp lights...
... memory card drive of the Computer" on the printer. 2 Open the card slot cover. 3 Install the memory card in the memory card, be done. Inserting a Memory Card Notes When Read/write mode is selected in the Memory Card Utility, neither printing nor maintenance can be sure to print photos from the computer. After using the card slot as the Memory Card Drive of the computer, be sure to print photos may result in improper printing. 1 Turn on page 64. The Indicator lamp lights...
iP6000D Diect Print Guide
Page 78
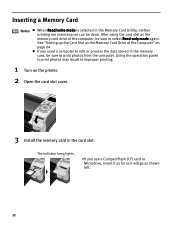
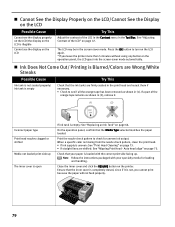
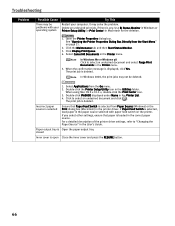
... cover and check if there is no ink left . If you cannot find the symptom corresponding to a certain problem, refer to verify that the print nozzles are Wrong/White Streaks" on automatically. The digital camera should be turned on page 79 • "Printed Surface is write-enabled, the printer cannot print photos. For the cancellation procedure, see manual. See "Replacing Ink Tanks" on page 67. (2) Print the nozzle check pattern to the User's Guide. • "A Message is Displayed...
... cover and check if there is no ink left . If you cannot find the symptom corresponding to a certain problem, refer to verify that the print nozzles are Wrong/White Streaks" on automatically. The digital camera should be turned on page 79 • "Printed Surface is write-enabled, the printer cannot print photos. For the cancellation procedure, see manual. See "Replacing Ink Tanks" on page 67. (2) Print the nozzle check pattern to the User's Guide. • "A Message is Displayed...

iP6000D Diect Print Guide
Page 79
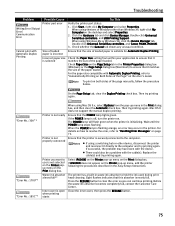
.... When paper feeding is displayed on the printer again. The message of Letter-sized plain paper in , and turn on the LCD. If the same error persists, contact the Customer Care Center. * The waste ink absorber absorbs ink used during cleaning. Examine the printed pattern and enter the number of column "A" with this printer. Message Try This Unsupported device connected. Cassette is not supported by this printer. Please remove and press Resume. Press the Menu button. 3. Use the button.
.... When paper feeding is displayed on the printer again. The message of Letter-sized plain paper in , and turn on the LCD. If the same error persists, contact the Customer Care Center. * The waste ink absorber absorbs ink used during cleaning. Examine the printed pattern and enter the number of column "A" with this printer. Message Try This Unsupported device connected. Cassette is not supported by this printer. Please remove and press Resume. Press the Menu button. 3. Use the button.
iP6000D Diect Print Guide
Page 80
...: See "Replacing an Ink Tank" on page 66. Print the nozzle check pattern to see the display on the LCD Adjust the contrast of the orange tape remains as shown in the screen-saver mode. Auto head align" on the printer. Close the inner cover and click the RESUME button on page 75. Press the OK button to turn on the LCD again. * If you cannot print because the paper will not feed properly. 79...
...: See "Replacing an Ink Tank" on page 66. Print the nozzle check pattern to see the display on the LCD Adjust the contrast of the orange tape remains as shown in the screen-saver mode. Auto head align" on the printer. Close the inner cover and click the RESUME button on page 75. Press the OK button to turn on the LCD again. * If you cannot print because the paper will not feed properly. 79...
iP6000D Quick Start Guide
Page 3
... Printing Accessing the Printer Driver 21 Adjusting Print Quality for Photographs 23 Using the Bundle Software 32 Printing Borderless Photographs 33 Printing Maintenance Replacing an Ink Tank 37 When Printing Becomes Faint or Colors are Incorrect 43 Printing the Nozzle Check Pattern 44 Print Head Cleaning 49 Print Head Deep Cleaning 53 Aligning the Print Head 57 Troubleshooting Cannot Install the Printer Driver 62 Print Quality is Poor or Contains Errors 63 Troubleshooting Printer Hardware 65 Paper Does Not Feed Properly 68 Paper Jams 69 Handling Error Messages 72 An Error...
... Printing Accessing the Printer Driver 21 Adjusting Print Quality for Photographs 23 Using the Bundle Software 32 Printing Borderless Photographs 33 Printing Maintenance Replacing an Ink Tank 37 When Printing Becomes Faint or Colors are Incorrect 43 Printing the Nozzle Check Pattern 44 Print Head Cleaning 49 Print Head Deep Cleaning 53 Aligning the Print Head 57 Troubleshooting Cannot Install the Printer Driver 62 Print Quality is Poor or Contains Errors 63 Troubleshooting Printer Hardware 65 Paper Does Not Feed Properly 68 Paper Jams 69 Handling Error Messages 72 An Error...
iP6000D Quick Start Guide
Page 23
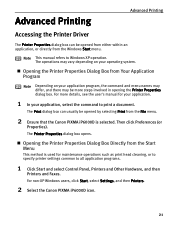
... Canon PIXMA iP6000D icon. 21 Advanced Printing Advanced Printing Accessing the Printer Driver The Printer Properties dialog box can usually be opened from either within an application, or directly from the Windows Start menu. Opening the Printer Properties Dialog Box Directly from the Start Menu This method is selected. The Print dialog box can be more details, see the user's manual for maintenance operations such as print head cleaning, or to specify printer settings common to print a document...
... Canon PIXMA iP6000D icon. 21 Advanced Printing Advanced Printing Accessing the Printer Driver The Printer Properties dialog box can usually be opened from either within an application, or directly from the Windows Start menu. Opening the Printer Properties Dialog Box Directly from the Start Menu This method is selected. The Print dialog box can be more details, see the user's manual for maintenance operations such as print head cleaning, or to specify printer settings common to print a document...
iP6000D Quick Start Guide
Page 25
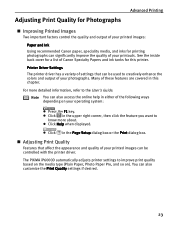
... Improving Printed Images Two important factors control the quality and output of your printed images: Paper and Ink Using recommended Canon paper, speciality media, and inks for this chapter. Note You can be controlled with the printer driver. See the inside back cover for a list of Canon Specialty Papers and ink tanks for printing photographs can also customize the Print Quality settings if desired. 23 You can significantly improve the quality of these features are covered in the Page Setup...
... Improving Printed Images Two important factors control the quality and output of your printed images: Paper and Ink Using recommended Canon paper, speciality media, and inks for this chapter. Note You can be controlled with the printer driver. See the inside back cover for a list of Canon Specialty Papers and ink tanks for printing photographs can also customize the Print Quality settings if desired. 23 You can significantly improve the quality of these features are covered in the Page Setup...
iP6000D Quick Start Guide
Page 45
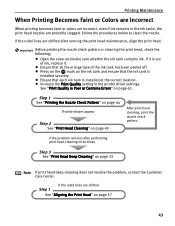
... After print head cleaning, print the nozzle check pattern. Step 1 See "Printing the Nozzle Check Pattern" on page 44 If white stripes appear Step 2 See "Print Head Cleaning" on page 57 43 If the problem remains after running the print head maintenance, align the print head. See "Print Quality is installed at the correct location. Open the cover and make sure whether the ink tank contains ink. Ensure that each ink tank is Poor or Contains Errors" on the ink tank and ensure that all the orange tape of ink, replace...
... After print head cleaning, print the nozzle check pattern. Step 1 See "Printing the Nozzle Check Pattern" on page 44 If white stripes appear Step 2 See "Print Head Cleaning" on page 57 43 If the problem remains after running the print head maintenance, align the print head. See "Print Quality is installed at the correct location. Open the cover and make sure whether the ink tank contains ink. Ensure that each ink tank is Poor or Contains Errors" on the ink tank and ensure that all the orange tape of ink, replace...
iP6000D Quick Start Guide
Page 48
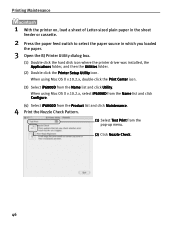
... click Maintenance. 4 Print the Nozzle Check Pattern. (1) Select Test Print from the Name list and click Utility. When using Mac OS X v.10.2.x, double-click the Print Center icon. (3) Select iP6000D from the pop-up menu. (2) Click Nozzle Check. 46 Printing Maintenance 1 With the printer on, load a sheet of Letter-sized plain paper in the sheet feeder or cassette. 2 Press the paper feed switch to select the paper source in which you loaded the paper. 3 Open the BJ Printer Utility dialog box. (1) Double-click the hard disk...
... click Maintenance. 4 Print the Nozzle Check Pattern. (1) Select Test Print from the Name list and click Utility. When using Mac OS X v.10.2.x, double-click the Print Center icon. (3) Select iP6000D from the pop-up menu. (2) Click Nozzle Check. 46 Printing Maintenance 1 With the printer on, load a sheet of Letter-sized plain paper in the sheet feeder or cassette. 2 Press the paper feed switch to select the paper source in which you loaded the paper. 3 Open the BJ Printer Utility dialog box. (1) Double-click the hard disk...
iP6000D Quick Start Guide
Page 65
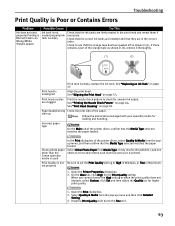
... Print head nozzles are firmly seated in Macintosh. It may resolve the problem. set the Print Quality setting to check for loading and handling. See "Printing the Nozzle Check Pattern" on page 57. See "Aligning the Print Head" on page 44. If ink tank is misaligned Align the print head. Paper loaded wrong Check the print side of the printer driver, select Quality & Media from the popup menu, and then confirm that the Media Type selected matches the paper loaded. Glossy photo paper other than the Canon specialty media is used In the Print dialog...
... Print head nozzles are firmly seated in Macintosh. It may resolve the problem. set the Print Quality setting to check for loading and handling. See "Printing the Nozzle Check Pattern" on page 57. See "Aligning the Print Head" on page 44. If ink tank is misaligned Align the print head. Paper loaded wrong Check the print side of the printer driver, select Quality & Media from the popup menu, and then confirm that the Media Type selected matches the paper loaded. Glossy photo paper other than the Canon specialty media is used In the Print dialog...
iP6000D Quick Start Guide
Page 66
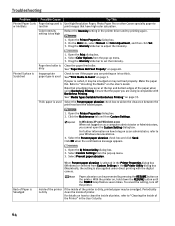
See "Paper Does Not Feed Properly" on , hold down the RESUME button until the POWER lamp flashes seven times. See "Print Media to "Cleaning the Inside of printer, refer to Avoid" on page 3. See "Media Types Suitable for Color Adjustment, and then click Set. 3. In Windows XP and Windows 2000 When not logged on as an administrator, refer to see if the paper you cannot open the Custom Setting dialog box. Select Prevent paper abrasion...
See "Paper Does Not Feed Properly" on , hold down the RESUME button until the POWER lamp flashes seven times. See "Print Media to "Cleaning the Inside of printer, refer to Avoid" on page 3. See "Media Types Suitable for Color Adjustment, and then click Set. 3. In Windows XP and Windows 2000 When not logged on as an administrator, refer to see if the paper you cannot open the Custom Setting dialog box. Select Prevent paper abrasion...
iP6000D Quick Start Guide
Page 68
... Status Monitor in Windows or Printer Setup Utility (or Print Center) in the Printer List. 4. In Windows Me or Windows 98 Click to select an undesired document and click . In Windows 2000, the print jobs may not be problems with paper feed switch on page 21. 2. Select Applications from Paper Source (Windows) or the Print dialog box (Macintosh) in the User's Guide. If Paper Feed Switch is open Close the inner cover and press the RESUME button. 66 When the confirmation message...
... Status Monitor in Windows or Printer Setup Utility (or Print Center) in the Printer List. 4. In Windows Me or Windows 98 Click to select an undesired document and click . In Windows 2000, the print jobs may not be problems with paper feed switch on page 21. 2. Select Applications from Paper Source (Windows) or the Print dialog box (Macintosh) in the User's Guide. If Paper Feed Switch is open Close the inner cover and press the RESUME button. 66 When the confirmation message...

iP6000D Quick Start Guide
Page 76
...) to the printer Check the printer port settings. 1. If successful, the problem may occur in the Easy Setup Instructions and reinstall the printer driver. 74 When the POWER lamp is selected correctly. Select the paper source with the cable(s). Faulty connection Ensure that the POWER lamp lights green. Click Start, and select All Programs (or Programs), Canon PIXMA iP6000D Manual, and Uninstall. 2. Follow the on-screen instructions to "Handling Error Messages" on page 72. If the POWER lamp is...
...) to the printer Check the printer port settings. 1. If successful, the problem may occur in the Easy Setup Instructions and reinstall the printer driver. 74 When the POWER lamp is selected correctly. Select the paper source with the cable(s). Faulty connection Ensure that the POWER lamp lights green. Click Start, and select All Programs (or Programs), Canon PIXMA iP6000D Manual, and Uninstall. 2. Follow the on-screen instructions to "Handling Error Messages" on page 72. If the POWER lamp is...
iP6000D Quick Start Guide
Page 77
.... 2. Check Paper Size on the User's Guide. To print on both sides of the Page" on the Page Setup tab in the printer. If successful, the problem may occur in the Printer Properties dialog box (Windows) or the Page Setup dialog box (Macintosh) to ensure that the printer is open when printing starts When using Windows Me or Windows 98, click the Device Manager tab. Replace the cable(s) and try printing again. Press the RESUME button to clear the error...
.... 2. Check Paper Size on the User's Guide. To print on both sides of the Page" on the Page Setup tab in the printer. If successful, the problem may occur in the Printer Properties dialog box (Windows) or the Page Setup dialog box (Macintosh) to ensure that the printer is open when printing starts When using Windows Me or Windows 98, click the Device Manager tab. Replace the cable(s) and try printing again. Press the RESUME button to clear the error...

iP6000D Quick Start Guide
Page 79
... Double-click on -screen instructions. 10 If prompted, restart your computer. 77 The printer driver will load automatically. 6 If the message "No other applications can be installed. Appendix Appendix Installing the Printer Driver when using Mac OS 9.x When using Mac OS 9.x, install the printer driver following the procedure below. 1 Turn on your Mac and insert the Setup Software & User's Guide CD-ROM. 2 Open the Mac OS 9.x folder on the CD-ROM, then double-click the Memory Card Utility folder. 9 Double-click the Memory Card Utility...
... Double-click on -screen instructions. 10 If prompted, restart your computer. 77 The printer driver will load automatically. 6 If the message "No other applications can be installed. Appendix Appendix Installing the Printer Driver when using Mac OS 9.x When using Mac OS 9.x, install the printer driver following the procedure below. 1 Turn on your Mac and insert the Setup Software & User's Guide CD-ROM. 2 Open the Mac OS 9.x folder on the CD-ROM, then double-click the Memory Card Utility folder. 9 Double-click the Memory Card Utility...

iP6000D Quick Start Guide
Page 81
...102 Envelopes Checking the Status of the Printer BJ Status Monitor Functions (Windows) Printer Setup Utility (Macintosh) Routine Maintenance Replacing an Ink Tank When Printing Becomes Faint or Colors are Incorrect Printing the Nozzle Check Pattern Print Head Cleaning Print Head Deep Cleaning Aligning Print Head Transporting Printer Troubleshooting Cannot Install Printer Driver Print Quality is Poor Printer Does Not Start or Stops During Print Jobs Paper Does Not Feed Properly Paper Jams The Power Lamp Flashes Orange An Error Message is Displayed on the Screen An Error Message is Displayed on...
...102 Envelopes Checking the Status of the Printer BJ Status Monitor Functions (Windows) Printer Setup Utility (Macintosh) Routine Maintenance Replacing an Ink Tank When Printing Becomes Faint or Colors are Incorrect Printing the Nozzle Check Pattern Print Head Cleaning Print Head Deep Cleaning Aligning Print Head Transporting Printer Troubleshooting Cannot Install Printer Driver Print Quality is Poor Printer Does Not Start or Stops During Print Jobs Paper Does Not Feed Properly Paper Jams The Power Lamp Flashes Orange An Error Message is Displayed on the Screen An Error Message is Displayed on...
iP6000D Quick Start Guide
Page 91
... Adjusting the Print Quality for Borderless Printing 33 Memory Card Utility 65 N Nozzle Check 44, 46 Nozzle Check Pattern examining 47 printing 44 O Opening the Printer Properties Dialog Box Directly from the Start Menu 21 Opening the Printer Properties Dialog Box from Your Application Program 21 P Page Setup 16, 18 Page Setup (Macintosh 67 Page Setup dialog box (Macintosh 67 Paper Does Not Feed Properly 68 Paper Feed Roller 68 Paper Feed Switch 4 Paper Jams 69, 70, 71 Paper Size 18 Paper Support Load Limit 13 Photo Noise Reduction 28 Photo Optimizer PRO...
... Adjusting the Print Quality for Borderless Printing 33 Memory Card Utility 65 N Nozzle Check 44, 46 Nozzle Check Pattern examining 47 printing 44 O Opening the Printer Properties Dialog Box Directly from the Start Menu 21 Opening the Printer Properties Dialog Box from Your Application Program 21 P Page Setup 16, 18 Page Setup (Macintosh 67 Page Setup dialog box (Macintosh 67 Paper Does Not Feed Properly 68 Paper Feed Roller 68 Paper Feed Switch 4 Paper Jams 69, 70, 71 Paper Size 18 Paper Support Load Limit 13 Photo Noise Reduction 28 Photo Optimizer PRO...

iP6000D Easy Setup Instructions
Page 1
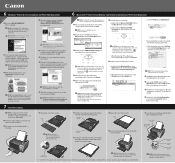
... ink, never press on side two. PIXMA iP6000D Series Photo Printer Documentation and Software Kit PIXMA iP6000D Series Print Head Power Cord Ink Tanks BCI-6C Cyan BCI-6PC PhotoCyan BCI-6BK Black 2 Prepare the Printer 1 Remove the shipping tape from the box. Cover Paper Output Tray Inner Cover 4 The print head holder automatically moves to register the product. Press down the serial number located to the right of the printer and connect the other to the color guide on the print head lock lever). Series Photo Printer 5 Connect the Printer and Load Paper...
... ink, never press on side two. PIXMA iP6000D Series Photo Printer Documentation and Software Kit PIXMA iP6000D Series Print Head Power Cord Ink Tanks BCI-6C Cyan BCI-6PC PhotoCyan BCI-6BK Black 2 Prepare the Printer 1 Remove the shipping tape from the box. Cover Paper Output Tray Inner Cover 4 The print head holder automatically moves to register the product. Press down the serial number located to the right of the printer and connect the other to the color guide on the print head lock lever). Series Photo Printer 5 Connect the Printer and Load Paper...
iP6000D Easy Setup Instructions
Page 2
... printer port being used. NOTE: When the "Authenticate" screen appears, enter your product. 7 When the "Print Head Alignment" screen appears, ensure that letter size paper is selected, then click Restart. 6 Macintosh® Printer Driver/Memory Card Utility Installation and Print Head Alignment Macintosh NOTE: For Mac OS 9.x printer driver instructions, refer to Windows as an Administrator before continuing. 6 Install the memory card utility. b.When the Printer List screen appears, select iP6000D, then click the Utility icon. QA7-3384-V01 © 2004 Canon, Inc. Cover...
... printer port being used. NOTE: When the "Authenticate" screen appears, enter your product. 7 When the "Print Head Alignment" screen appears, ensure that letter size paper is selected, then click Restart. 6 Macintosh® Printer Driver/Memory Card Utility Installation and Print Head Alignment Macintosh NOTE: For Mac OS 9.x printer driver instructions, refer to Windows as an Administrator before continuing. 6 Install the memory card utility. b.When the Printer List screen appears, select iP6000D, then click the Utility icon. QA7-3384-V01 © 2004 Canon, Inc. Cover...


