iP6000D Diect Print Guide
Page 2
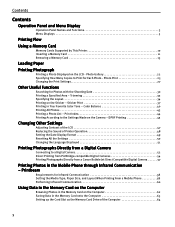
...52 Direct Printing from PictBridge-compatible Digital Cameras 54 Printing Photographs Directly from a Canon Bubble Jet Direct Compatible Digital Camera 57 Printing Photos in Your Favorite Color Tone - Photo Print 25 Changing the Print Settings 27 Other Useful Functions Searching for Infrared ... Printbeam Requirements for Photos with the Shooting Date 30 Printing a Specified Area - Contents Contents Operation Panel and Menu Display Operation Panel Names and Functions 3 Menu Displays 5 Printing Flow Using a Memory Card Memory Cards Supported by This Printer 10 Inserting a ...
...52 Direct Printing from PictBridge-compatible Digital Cameras 54 Printing Photographs Directly from a Canon Bubble Jet Direct Compatible Digital Camera 57 Printing Photos in Your Favorite Color Tone - Photo Print 25 Changing the Print Settings 27 Other Useful Functions Searching for Infrared ... Printbeam Requirements for Photos with the Shooting Date 30 Printing a Specified Area - Contents Contents Operation Panel and Menu Display Operation Panel Names and Functions 3 Menu Displays 5 Printing Flow Using a Memory Card Memory Cards Supported by This Printer 10 Inserting a ...
iP6000D Diect Print Guide
Page 4
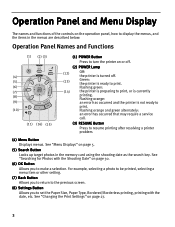
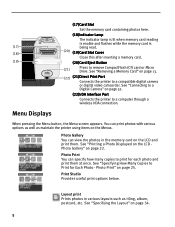
...a service call. (3) RESUME Button Press to resume printing after resolving a printer problem. (4) Menu Button Displays menus. See "Searching for Photos with the date, etc. For example, selecting a photo to be printed, selecting a menu item or other setting. (7) Back ... you to make a selection. Flashing orange: an error has occurred and the printer is currently printing. See "Menu Displays" on page 27. 3 See "Changing the Print Settings" on page 5. (5) Search Button Looks up target photos in the menus are described below: Operation Panel Names and Functions (1) (2) (3)...
...a service call. (3) RESUME Button Press to resume printing after resolving a printer problem. (4) Menu Button Displays menus. See "Searching for Photos with the date, etc. For example, selecting a photo to be printed, selecting a menu item or other setting. (7) Back ... you to make a selection. Flashing orange: an error has occurred and the printer is currently printing. See "Menu Displays" on page 27. 3 See "Changing the Print Settings" on page 5. (5) Search Button Looks up target photos in the menus are described below: Operation Panel Names and Functions (1) (2) (3)...
iP6000D Diect Print Guide
Page 5
...the sheet feeder and cassette. (13)Trimming Button Allows you to scroll the screen. (10)Easy-PhotoPrint Startup Button Starts Easy-PhotoPrint. See "Browsing Photos in the memory card onto the computer's hard disk. See "Printing a Specified Area - Trimming" on page 32. (14) Buttons Press to ...to the settings displayed on page 63. (12)Paper Feed Switch Selects the paper source. If this button is pressed during printing, the printer aborts printing. (16)Print Button Press to start printing according to Print." See "Trimming and Rotating the Sections you have made. Press this...
...the sheet feeder and cassette. (13)Trimming Button Allows you to scroll the screen. (10)Easy-PhotoPrint Startup Button Starts Easy-PhotoPrint. See "Browsing Photos in the memory card onto the computer's hard disk. See "Printing a Specified Area - Trimming" on page 32. (14) Buttons Press to ...to the settings displayed on page 63. (12)Paper Feed Switch Selects the paper source. If this button is pressed during printing, the printer aborts printing. (16)Print Button Press to start printing according to Print." See "Trimming and Rotating the Sections you have made. Press this...
iP6000D Diect Print Guide
Page 6
...wireless IrDA connection. Print Studio Provides useful print options below. Photo Print You can view the photos in various layouts such as maintain the printer using items on page 13. (22) (21)Direct Print Port Connects the printer to a Digital Camera" on page 25. See "Specifying... the Layout" on page 22. See "Connecting to a compatible digital camera or digital video camcorder. Photo Print" on page 52. (22)IrDA Interface Port Connects the printer to remove CompactFlash (CF)...
...wireless IrDA connection. Print Studio Provides useful print options below. Photo Print You can view the photos in various layouts such as maintain the printer using items on page 13. (22) (21)Direct Print Port Connects the printer to a Digital Camera" on page 25. See "Specifying... the Layout" on page 22. See "Connecting to a compatible digital camera or digital video camcorder. Photo Print" on page 52. (22)IrDA Interface Port Connects the printer to remove CompactFlash (CF)...
iP6000D Diect Print Guide
Page 7
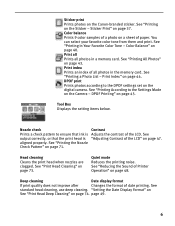
... All Photos" on the Canon-branded sticker. Head cleaning Cleans the print head when nozzles are clogged. Sticker print Prints photos on page 43. Color balance Prints 9 color samples of a photo on the Camera - Print all Prints all photos in Your Favorite Color Tone - DPOF print Prints photos according to..."Adjusting Contrast of Printer Operation" on page 47. See "Print Head Cleaning" on page 71. See "Reducing the Sound of the LCD" on page 48. Deep cleaning Date display format If print quality does not improve after Changes the format of all photos in a memory ...
... All Photos" on the Canon-branded sticker. Head cleaning Cleans the print head when nozzles are clogged. Sticker print Prints photos on page 43. Color balance Prints 9 color samples of a photo on the Camera - Print all Prints all photos in Your Favorite Color Tone - DPOF print Prints photos according to..."Adjusting Contrast of Printer Operation" on page 47. See "Print Head Cleaning" on page 71. See "Reducing the Sound of the LCD" on page 48. Deep cleaning Date display format If print quality does not improve after Changes the format of all photos in a memory ...
iP6000D Diect Print Guide
Page 9
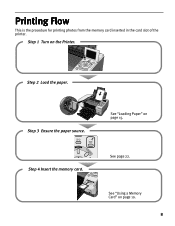
Step 2 Load the paper. See "Loading Paper" on page 10. 8 Printing Flow This is the procedure for printing photos from the memory card inserted in the card slot of the printer. Step 4 Insert the memory card. See "Using a Memory Card" on page 15. Step 3 Ensure the paper source. See page 22. Step 1 Turn on the Printer.
Step 2 Load the paper. See "Loading Paper" on page 10. 8 Printing Flow This is the procedure for printing photos from the memory card inserted in the card slot of the printer. Step 4 Insert the memory card. See "Using a Memory Card" on page 15. Step 3 Ensure the paper source. See page 22. Step 1 Turn on the Printer.
iP6000D Diect Print Guide
Page 11
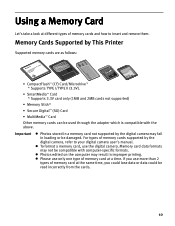
Photos edited on the computer may fail in improper printing. If you use more than 2 types of memory card at the same time, you could lose ... formats. Memory Cards Supported by the digital camera may result in loading or be read incorrectly from the cards. 10 Important Photos stored in a memory card not supported by This Printer Supported memory cards are as follows: • CompactFlash™ (CF) Card/Microdrive™ * Supports TYPE I/TYPE II (3.3V). • SmartMedia™...
Photos edited on the computer may fail in improper printing. If you use more than 2 types of memory card at the same time, you could lose ... formats. Memory Cards Supported by the digital camera may result in loading or be read incorrectly from the cards. 10 Important Photos stored in a memory card not supported by This Printer Supported memory cards are as follows: • CompactFlash™ (CF) Card/Microdrive™ * Supports TYPE I/TYPE II (3.3V). • SmartMedia™...
iP6000D Diect Print Guide
Page 12
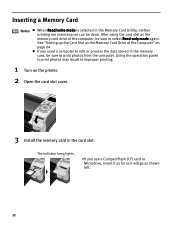
.../write mode is selected in the Memory Card Utility, neither printing nor maintenance can be sure to print photos may result in improper printing. 1 Turn on page 64. Using the operation panel to print photos from the computer. After using the card slot as shown left. 11 If you use a CompactFlash (...CF) card or Microdrive, insert it as far as it will go as the memory card drive of the Computer" on the printer. 2 Open the card slot cover. 3 ...
.../write mode is selected in the Memory Card Utility, neither printing nor maintenance can be sure to print photos may result in improper printing. 1 Turn on page 64. Using the operation panel to print photos from the computer. After using the card slot as shown left. 11 If you use a CompactFlash (...CF) card or Microdrive, insert it as far as it will go as the memory card drive of the Computer" on the printer. 2 Open the card slot cover. 3 ...
iP6000D Diect Print Guide
Page 16
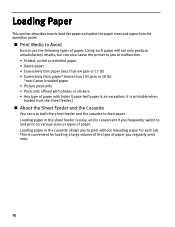
... the paper and select the paper sizes and types from the sheet feeder.) About the Sheet Feeder and the Cassette You can also cause the printer to jam or malfunction. • Folded, curled or wrinkled paper • Damp paper • Excessively thin paper (less than 64 gsm or 17 lb) •...; Excessively thick paper* (more than 105 gsm or 28 lb) *non-Canon branded paper • Picture postcards • Postcards affixed with photos or stickers • Any type of paper with holes (Loose-leaf paper is an exception; it is printable when loaded from...
... the paper and select the paper sizes and types from the sheet feeder.) About the Sheet Feeder and the Cassette You can also cause the printer to jam or malfunction. • Folded, curled or wrinkled paper • Damp paper • Excessively thin paper (less than 64 gsm or 17 lb) •...; Excessively thick paper* (more than 105 gsm or 28 lb) *non-Canon branded paper • Picture postcards • Postcards affixed with photos or stickers • Any type of paper with holes (Loose-leaf paper is an exception; it is printable when loaded from...
iP6000D Diect Print Guide
Page 17
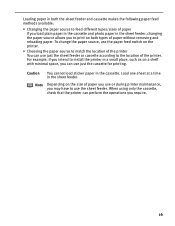
... according to the location of paper you use or during printer maintenance, you require. 16 When using only the cassette, check that the printer can use the sheet feeder. For example, if you load plain paper in the cassette and photo paper in the cassette. Caution You cannot load sticker paper... in the sheet feeder, changing the paper source allows you to print on the size of the printer. Note Depending on both the sheet feeder and cassette makes the...
... according to the location of paper you use or during printer maintenance, you require. 16 When using only the cassette, check that the printer can use the sheet feeder. For example, if you load plain paper in the cassette and photo paper in the cassette. Caution You cannot load sticker paper... in the sheet feeder, changing the paper source allows you to print on the size of the printer. Note Depending on both the sheet feeder and cassette makes the...

iP6000D Diect Print Guide
Page 18
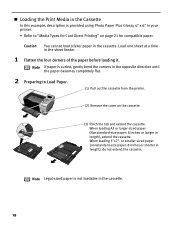
Note If paper is curled, gently bend the corners in your printer. • Refer to Load Paper. (1) Open and pull out the paper support. (3) Press the paper feed switch so that the sheet feeder lamp is lit. (2) .... 1 Flatten the four corners of the paper before loading it. Loading the Print Media in the Sheet Feeder In this example, description is provided using Photo Paper Plus Glossy 4" x 6" in the opposite direction until the paper becomes completely flat.
Note If paper is curled, gently bend the corners in your printer. • Refer to Load Paper. (1) Open and pull out the paper support. (3) Press the paper feed switch so that the sheet feeder lamp is lit. (2) .... 1 Flatten the four corners of the paper before loading it. Loading the Print Media in the Sheet Feeder In this example, description is provided using Photo Paper Plus Glossy 4" x 6" in the opposite direction until the paper becomes completely flat.
iP6000D Diect Print Guide
Page 20
Loading the Print Media in the Cassette In this example, description is provided using Photo Paper Plus Glossy 4" x 6" in your printer. • Refer to Load Paper. (1) Pull out the cassette from the printer. (2) Remove the cover on page 21 for Card Direct Printing" on the cassette. (3) Pinch the tab and extend the cassette. Load...
Loading the Print Media in the Cassette In this example, description is provided using Photo Paper Plus Glossy 4" x 6" in your printer. • Refer to Load Paper. (1) Pull out the cassette from the printer. (2) Remove the cover on page 21 for Card Direct Printing" on the cassette. (3) Pinch the tab and extend the cassette. Load...
iP6000D Diect Print Guide
Page 23
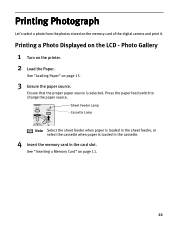
..." on the memory card of the digital camera and print it. Printing Photograph Let's select a photo from the photos stored on page 15. 3 Ensure the paper source. See "Inserting a Memory Card" on the printer. 2 Load the Paper. Photo Gallery 1 Turn on page 11. 22 Press the paper feed switch to change the paper source... proper paper source is loaded in the cassette. 4 Insert the memory card in the sheet feeder, or select the cassette when paper is selected. Printing a Photo Displayed on the LCD -
..." on the memory card of the digital camera and print it. Printing Photograph Let's select a photo from the photos stored on page 15. 3 Ensure the paper source. See "Inserting a Memory Card" on the printer. 2 Load the Paper. Photo Gallery 1 Turn on page 11. 22 Press the paper feed switch to change the paper source... proper paper source is loaded in the cassette. 4 Insert the memory card in the sheet feeder, or select the cassette when paper is selected. Printing a Photo Displayed on the LCD -
iP6000D Diect Print Guide
Page 24
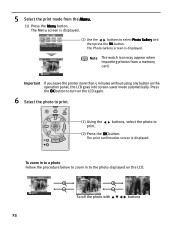
...the OK button to turn on the LCD again. 6 Select the photo to the photo displayed on the operation panel, the LCD goes into screen-saver mode automatically. Scroll the photo with buttons 23 Important If you leave the printer more than 5 minutes without using any button on the LCD. To ...zoom in to a photo Follow the procedure below to zoom in to print. (1) Using the print. ...
...the OK button to turn on the LCD again. 6 Select the photo to the photo displayed on the operation panel, the LCD goes into screen-saver mode automatically. Scroll the photo with buttons 23 Important If you leave the printer more than 5 minutes without using any button on the LCD. To ...zoom in to a photo Follow the procedure below to zoom in to print. (1) Using the print. ...
iP6000D Diect Print Guide
Page 26
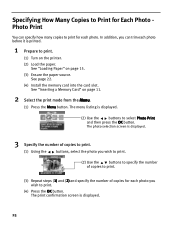
... the memory card into the card slot. The menu listing is displayed. 3 Specify the number of copies to print. (1) Using the buttons, select the photo you wish to print. (2) Use the buttons to specify the number of copies to print. (3) Repeat steps (1) and (2) and specify the number of ...In addition, you wish to print. (4) Press the OK button. Specifying How Many Copies to Print for Each Photo Photo Print You can trim each photo before it is printed. 1 Prepare to print. (1) Turn on the printer. (2) Load the paper. See "Inserting a Memory Card" on page 15. (3) Ensure the paper source. ...
... the memory card into the card slot. The menu listing is displayed. 3 Specify the number of copies to print. (1) Using the buttons, select the photo you wish to print. (2) Use the buttons to specify the number of copies to print. (3) Repeat steps (1) and (2) and specify the number of ...In addition, you wish to print. (4) Press the OK button. Specifying How Many Copies to Print for Each Photo Photo Print You can trim each photo before it is printed. 1 Prepare to print. (1) Turn on the printer. (2) Load the paper. See "Inserting a Memory Card" on page 15. (3) Ensure the paper source. ...
iP6000D Diect Print Guide
Page 33
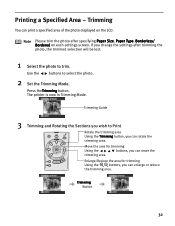
... If you change the settings after specifying Paper Size, Paper Type, Borderless/ Bordered on the LCD. Use the buttons to Print. The printer is now in Trimming Mode. Move the area for trimming Using the buttons, you can rotate the trimming area. Trimming Button 32 Trimming ...Guide 3 Trimming and Rotating the Sections you can move the trimming area. Note Please trim the photo after trimming the photo, the trimmed selection will be lost. 1 Select the photo to trim. Rotate the trimming area Using the Trimming button, you wish to select the...
... If you change the settings after specifying Paper Size, Paper Type, Borderless/ Bordered on the LCD. Use the buttons to Print. The printer is now in Trimming Mode. Move the area for trimming Using the buttons, you can rotate the trimming area. Trimming Button 32 Trimming ...Guide 3 Trimming and Rotating the Sections you can move the trimming area. Note Please trim the photo after trimming the photo, the trimmed selection will be lost. 1 Select the photo to trim. Rotate the trimming area Using the Trimming button, you wish to select the...
iP6000D Diect Print Guide
Page 35
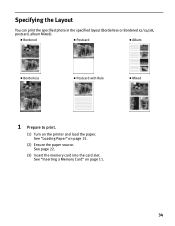
See page 22. (3) Insert the memory card into the card slot. See "Loading Paper" on page 11. 34 See "Inserting a Memory Card" on page 15. (2) Ensure the paper source. Bordered Postcard Album Borderless Postcard with Rule Mixed 1 Prepare to print. (1) Turn on the printer and load the paper. Specifying the Layout You can print the specified photo in the specified layout (Borderless or Bordered x2/x4/x8, postcard, album Mixed).
See page 22. (3) Insert the memory card into the card slot. See "Loading Paper" on page 11. 34 See "Inserting a Memory Card" on page 15. (2) Ensure the paper source. Bordered Postcard Album Borderless Postcard with Rule Mixed 1 Prepare to print. (1) Turn on the printer and load the paper. Specifying the Layout You can print the specified photo in the specified layout (Borderless or Bordered x2/x4/x8, postcard, album Mixed).

iP6000D Diect Print Guide
Page 38
...the Sticker - The Menu screen is displayed. (1) Press the buttons to select Select Print Studio and then press the OK button. Printing on the printer and load a sheet of sticker paper in the sheet feeder. Load one sheet at a time in the cassette. The Print Studio screen is ...selected as the paper source. You can print your favorite photo on the Canon-Brand sticker. 1 Prepare to select Sticker print and then press the OK button. The photo selection screen is displayed. 37 See "Loading Paper" on the LCD. (2) Press the OK button...
...the Sticker - The Menu screen is displayed. (1) Press the buttons to select Select Print Studio and then press the OK button. Printing on the printer and load a sheet of sticker paper in the sheet feeder. Load one sheet at a time in the cassette. The Print Studio screen is ...selected as the paper source. You can print your favorite photo on the Canon-Brand sticker. 1 Prepare to select Sticker print and then press the OK button. The photo selection screen is displayed. 37 See "Loading Paper" on the LCD. (2) Press the OK button...
iP6000D Quick Start Guide
Page 2
...warranted, and they be understood to change without the prior written consent of Canon U.S.A., Inc. © 2004 Canon U.S.A., Inc. Trademarks • Canon is a registered trademark of Canon Inc. • BJ is a trademark of Canon Inc. • PIXMA is a trademark of Apple Computer, Inc., registered in order that this product... Business Machines Corporation. • All other countries. • Microsoft® and Windows® are not intended to your Canon PIXMA iP6000D Photo Printer. Canon U.S.A., Inc. Under the copyright laws, this manual and in any form, in whole or in the...
...warranted, and they be understood to change without the prior written consent of Canon U.S.A., Inc. © 2004 Canon U.S.A., Inc. Trademarks • Canon is a registered trademark of Canon Inc. • BJ is a trademark of Canon Inc. • PIXMA is a trademark of Apple Computer, Inc., registered in order that this product... Business Machines Corporation. • All other countries. • Microsoft® and Windows® are not intended to your Canon PIXMA iP6000D Photo Printer. Canon U.S.A., Inc. Under the copyright laws, this manual and in any form, in whole or in the...

iP6000D Easy Setup Instructions
Page 1
...). Protective Tape 5 Write down until the POWER lamp displays a steady green light before the printer is ready. 1 TURN THE PRINTER OFF. 2 Connect one end of the printer and connect the other to the color guide on side two. click 4 Insert the remaining five ink tanks into the holder. Lift... into place. Wait until the ink tank clicks into the sheet feeder, then slide the paper guide toward the left . PIXMA iP6000D Series Photo Printer Documentation and Software Kit PIXMA iP6000D Series Print Head Power Cord Ink Tanks BCI-6C Cyan BCI-6PC PhotoCyan BCI-6BK Black 2 Prepare the...
...). Protective Tape 5 Write down until the POWER lamp displays a steady green light before the printer is ready. 1 TURN THE PRINTER OFF. 2 Connect one end of the printer and connect the other to the color guide on side two. click 4 Insert the remaining five ink tanks into the holder. Lift... into place. Wait until the ink tank clicks into the sheet feeder, then slide the paper guide toward the left . PIXMA iP6000D Series Photo Printer Documentation and Software Kit PIXMA iP6000D Series Print Head Power Cord Ink Tanks BCI-6C Cyan BCI-6PC PhotoCyan BCI-6BK Black 2 Prepare the...


