Quick Start Guide
Page 5
... Turning on the Printer 2 Turning off the Printer 3 Loading Paper 4 Using Specialty Media 9 Printing with Windows 11 Printing with Macintosh 13 Cancel Printing 15 Advanced Printing Accessing the Printer Driver 16 Using the Bundled Software 18 Printing Maintenance When Printing Becomes Faint or Colors are Incorrect 19 ... 50 Printer Does Not Start or Stops During Print Jobs 53 Paper Does Not Feed Properly 54 Paper Jams 55 The ALARM Lamp Flashes 56 An Error Message Appears on the Screen 58 Appendix Specifications 60 Safety Precautions 62 Regulatory Information 64 CANON U.S.A., ...
... Turning on the Printer 2 Turning off the Printer 3 Loading Paper 4 Using Specialty Media 9 Printing with Windows 11 Printing with Macintosh 13 Cancel Printing 15 Advanced Printing Accessing the Printer Driver 16 Using the Bundled Software 18 Printing Maintenance When Printing Becomes Faint or Colors are Incorrect 19 ... 50 Printer Does Not Start or Stops During Print Jobs 53 Paper Does Not Feed Properly 54 Paper Jams 55 The ALARM Lamp Flashes 56 An Error Message Appears on the Screen 58 Appendix Specifications 60 Safety Precautions 62 Regulatory Information 64 CANON U.S.A., ...
Quick Start Guide
Page 11
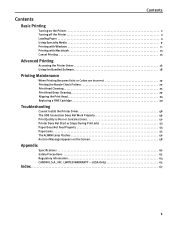
... the envelope with its flap facing down on page 13. 7 Env. #10 (Windows) / #10 Envelope (Macintosh) in Page Size. (4) Select Portrait in the wrong way round. For the printer driver setting, refer to "Printing with Windows" on page 11, or "Printing with sticker flaps. • Select either European ...Macintosh" on the left side of the envelope (next to the flap). A maximum of the Auto Sheet Feeder. Env. #10 (Windows) / #10 Envelope (Macintosh) in the printer driver according to the envelope size you are using a special paper to the right. • When using . • If you do ...
... the envelope with its flap facing down on page 13. 7 Env. #10 (Windows) / #10 Envelope (Macintosh) in Page Size. (4) Select Portrait in the wrong way round. For the printer driver setting, refer to "Printing with Windows" on page 11, or "Printing with sticker flaps. • Select either European ...Macintosh" on the left side of the envelope (next to the flap). A maximum of the Auto Sheet Feeder. Env. #10 (Windows) / #10 Envelope (Macintosh) in the printer driver according to the envelope size you are using a special paper to the right. • When using . • If you do ...
Quick Start Guide
Page 12
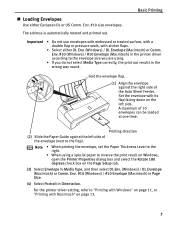
Regardless to "Printing with Windows" on page 11, or "Printing with Macintosh" on 4" x 6" size papers. (1) Align the paper against the left side of the papers. (3) Select 4 x 6 in 101.6 x 152.4 mm in the printer. A maximum of 20 sheets of size in 4" x 6" paper can print on page 13. 8 For the printer driver setting, refer to the actual...
Regardless to "Printing with Windows" on page 11, or "Printing with Macintosh" on 4" x 6" size papers. (1) Align the paper against the left side of the papers. (3) Select 4 x 6 in 101.6 x 152.4 mm in the printer. A maximum of 20 sheets of size in 4" x 6" paper can print on page 13. 8 For the printer driver setting, refer to the actual...
Quick Start Guide
Page 20
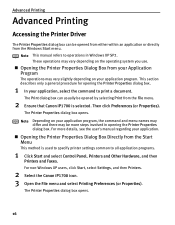
... the Printer Driver The Printer Properties dialog box can usually be opened from either within an application or directly from the Windows Start menu. The Printer Properties dialog box opens. 16 This section describes only a general procedure for opening the Printer Properties dialog box. For non-Windows XP users, click Start, select Settings, and then Printers. 2 Select the Canon iP1700...
... the Printer Driver The Printer Properties dialog box can usually be opened from either within an application or directly from the Windows Start menu. The Printer Properties dialog box opens. 16 This section describes only a general procedure for opening the Printer Properties dialog box. For non-Windows XP users, click Start, select Settings, and then Printers. 2 Select the Canon iP1700...
Quick Start Guide
Page 21
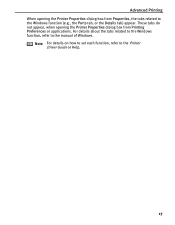
Advanced Printing When opening the Printer Properties dialog box from Properties, the tabs related to the Windows function (e.g., the Ports tab, or the Details tab) appear. For details about the tabs related to the Windows function, refer to the Printer Driver Guide or Help. 17 These tabs do not appear, when opening the Printer Properties dialog box from Printing Preferences or applications. Note For details on how to set each function, refer to the manual of Windows.
Advanced Printing When opening the Printer Properties dialog box from Properties, the tabs related to the Windows function (e.g., the Ports tab, or the Details tab) appear. For details about the tabs related to the Windows function, refer to the Printer Driver Guide or Help. 17 These tabs do not appear, when opening the Printer Properties dialog box from Printing Preferences or applications. Note For details on how to set each function, refer to the manual of Windows.
Quick Start Guide
Page 52
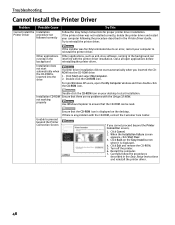
... Screen Ensure that the CD-ROM can interfere with the Setup CD-ROM. For non-Windows XP users, open applications before reinstalling the printer driver. Restart the computer. 7. If the printer driver was forcibly terminated due to an error, restart your desktop to ensure that the CD-ROM icon is inserted into the CD-ROM...
... Screen Ensure that the CD-ROM can interfere with the Setup CD-ROM. For non-Windows XP users, open applications before reinstalling the printer driver. Restart the computer. 7. If the printer driver was forcibly terminated due to an error, restart your desktop to ensure that the CD-ROM icon is inserted into the CD-ROM...
Quick Start Guide
Page 54
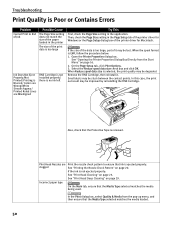
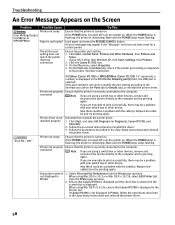
... Cause The Page Size setting does not match the size of the paper loaded in the printer The size of the print data is too large Ink Does Not Eject Properly/Not Printed/Printing is Blurred/ Colors are Wrong/White Streaks Appear/ Printed Ruled Lines are Print the nozzle check pattern to... box. When Reduce spool data size is no ink left Try This First, check the Page Size setting in the Page Setup tab of the printer driver for Windows or the Page Setup dialog box of it . Print Head Nozzles are Misaligned FINE Cartridge is not installed properly/ there is selected, the print...
... Cause The Page Size setting does not match the size of the paper loaded in the printer The size of the print data is too large Ink Does Not Eject Properly/Not Printed/Printing is Blurred/ Colors are Wrong/White Streaks Appear/ Printed Ruled Lines are Print the nozzle check pattern to... box. When Reduce spool data size is no ink left Try This First, check the Page Size setting in the Page Setup tab of the printer driver for Windows or the Page Setup dialog box of it . Print Head Nozzles are Misaligned FINE Cartridge is not installed properly/ there is selected, the print...
Quick Start Guide
Page 62
... or other than Windows XP, click Start, Settings, then Printers. 2. Wait until the POWER lamp stops flashing. If the port setting is not correct, modify the port setting according to the interface you are using Mac OS X v.10.2.8, ensure that Canon iP1700 is displayed in the Easy Setup Instructions and reinstall the printer driver. If you...
... or other than Windows XP, click Start, Settings, then Printers. 2. Wait until the POWER lamp stops flashing. If the port setting is not correct, modify the port setting according to the interface you are using Mac OS X v.10.2.8, ensure that Canon iP1700 is displayed in the Easy Setup Instructions and reinstall the printer driver. If you...
Easy Setup Instructions
Page 2
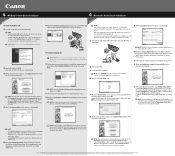
... or print quality is shown in the Quick Start Guide. 4 Windows® Printer Driver Installation Windows 1 TURN THE PRINTER OFF. 2 Turn the computer on -screen instructions to register your product. 10 When the Installation completed successfully screen appears, click Restart. QT5-0296-V01 © 2006 Canon Inc. Specifications subject to "Aligning the Print Head" instructions in...
... or print quality is shown in the Quick Start Guide. 4 Windows® Printer Driver Installation Windows 1 TURN THE PRINTER OFF. 2 Turn the computer on -screen instructions to register your product. 10 When the Installation completed successfully screen appears, click Restart. QT5-0296-V01 © 2006 Canon Inc. Specifications subject to "Aligning the Print Head" instructions in...


