CONSOLE_V1-1_ENG.pdf
Page 3
...added to the computer, the computer may not recognize the camcorder properly. Select [Always On] in 24F (NTSC only). Canon camcorder compatible with CONSOLE. XH G1 XH A1 XL H1* *Unable to use some functions XL2* Required Accessories Canon digital camcorder compatible with HDV recordings, regardless of the operations, the... CONSOLE, proper operation is not guaranteed after recovering. When dealing with CONSOLE IEEE1394 (DV) Cable Check the manual of your computer has an IEEE1394 (DV) board/card in the United States and/or other language in any form, by any...
...added to the computer, the computer may not recognize the camcorder properly. Select [Always On] in 24F (NTSC only). Canon camcorder compatible with CONSOLE. XH G1 XH A1 XL H1* *Unable to use some functions XL2* Required Accessories Canon digital camcorder compatible with HDV recordings, regardless of the operations, the... CONSOLE, proper operation is not guaranteed after recovering. When dealing with CONSOLE IEEE1394 (DV) Cable Check the manual of your computer has an IEEE1394 (DV) board/card in the United States and/or other language in any form, by any...
CONSOLE_V1-1_ENG.pdf
Page 8
...8226; Do not deactivate the DV CONTROL function while the camcorder is connected to the computer. • Refer to the computer manual for the location of the camcorder can be used. - HDV/DV terminal on the camcorder DV cable IEEE1394 port on and activate the DV CONTROL ...on the computer • Follow the procedure below to confirm if the camcorder is properly connected. Your camcorder is correctly connected if you see items described in step 4 in SD mode: [Canon DV camcorder], [Canon Camera Storage Device] and [Canon Virtual VCR] are shown. • When connecting to a computer in...
...8226; Do not deactivate the DV CONTROL function while the camcorder is connected to the computer. • Refer to the computer manual for the location of the camcorder can be used. - HDV/DV terminal on the camcorder DV cable IEEE1394 port on and activate the DV CONTROL ...on the computer • Follow the procedure below to confirm if the camcorder is properly connected. Your camcorder is correctly connected if you see items described in step 4 in SD mode: [Canon DV camcorder], [Canon Camera Storage Device] and [Canon Virtual VCR] are shown. • When connecting to a computer in...

CONSOLE_V1-1_ENG.pdf
Page 18
...from [MPEG2TS] or [MPEG2ES]. The size of the recording picture will not be changed . 4 Select whether or not you need to the instruction manual of the software. 2 Select the [Preview resolution] of the preview image. For details, refer to the same file each time you press the ...sound files. 1 Select the recording file type. You can properly read 24F MXF files recorded by CONSOLE; When the audio mode is set to the camcorder. When [All pictures] or [I picture and P picture] is compatible with your editing software. When the color of the software or consult...
...from [MPEG2TS] or [MPEG2ES]. The size of the recording picture will not be changed . 4 Select whether or not you need to the instruction manual of the software. 2 Select the [Preview resolution] of the preview image. For details, refer to the same file each time you press the ...sound files. 1 Select the recording file type. You can properly read 24F MXF files recorded by CONSOLE; When the audio mode is set to the camcorder. When [All pictures] or [I picture and P picture] is compatible with your editing software. When the color of the software or consult...
CONSOLE_V1-1_ENG.pdf
Page 29
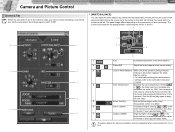
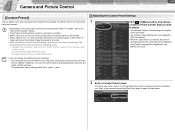
...XH G1 or XH A1. 12 3 7 8 1 6 4 5 1 Auto Automated adjustment of the white balance. 2 / Preset A/B Adjust the white balance to the Camera mode, you cannot control all settings on the camcorder...Playback the Recorded Files Camera and Picture Control 4-29 [Control] Tab When the camcorder is being selected, clicking on this button registers the white balance setting. - Clicking...levels (1 level: approximately 100K). 5 7 Outdoor (5600K) Bright sunlight. Set the camcorder's recording program to the right; The screen shot below will be adjusted when connecting ...
...XH G1 or XH A1. 12 3 7 8 1 6 4 5 1 Auto Automated adjustment of the white balance. 2 / Preset A/B Adjust the white balance to the Camera mode, you cannot control all settings on the camcorder...Playback the Recorded Files Camera and Picture Control 4-29 [Control] Tab When the camcorder is being selected, clicking on this button registers the white balance setting. - Clicking...levels (1 level: approximately 100K). 5 7 Outdoor (5600K) Bright sunlight. Set the camcorder's recording program to the right; The screen shot below will be adjusted when connecting ...

CONSOLE_V1-1_ENG.pdf
Page 30
... and focus position moves slowly when the slider is set to auto, Tv, Av or manual mode. When you are using XL2 and set the camcorder's frame rate to 24F or 30F (NTSC) or 25F (PAL) the camcorder's gain setting can only go up to +12dB even you set to AF, or... cursor on the keyboard after clicking the slider with mouse. When you are using a manual video lens and selecting [Manual], you cannot control the zoom function from CONSOLE. When the focus switch of the camcorder by moving the slider. left clicking the mouse turns the pointer to the left . [AE SHIFT...
... and focus position moves slowly when the slider is set to auto, Tv, Av or manual mode. When you are using XL2 and set the camcorder's frame rate to 24F or 30F (NTSC) or 25F (PAL) the camcorder's gain setting can only go up to +12dB even you set to AF, or... cursor on the keyboard after clicking the slider with mouse. When you are using a manual video lens and selecting [Manual], you cannot control the zoom function from CONSOLE. When the focus switch of the camcorder by moving the slider. left clicking the mouse turns the pointer to the left . [AE SHIFT...

CONSOLE_V1-1_ENG.pdf
Page 34
... the following values as an approximate reference: 0=purple, 3=red, 6=orange, 9=green, 12=blue. • [Chroma]: Adjust the color saturation for the color to the camcorder instruction manual. • The area that will be activated. • To set color. • [Color Phase]: Select the basic color phase (0-15) of the detected area. of...
... the following values as an approximate reference: 0=purple, 3=red, 6=orange, 9=green, 12=blue. • [Chroma]: Adjust the color saturation for the color to the camcorder instruction manual. • The area that will be activated. • To set color. • [Color Phase]: Select the basic color phase (0-15) of the detected area. of...

CONSOLE_V1-1_ENG.pdf
Page 35
...] ( 4-34). • The area that will be corrected will appear as they are managed on the [Detail] window. Click of [B Area Review] to the camcorder instruction manual. „ Setting the Skin Detail Area 1 Click the [Detail] tab and of [Area Select]. For details about each parameter, refer to finish the B area settings...
...] ( 4-34). • The area that will be corrected will appear as they are managed on the [Detail] window. Click of [B Area Review] to the camcorder instruction manual. „ Setting the Skin Detail Area 1 Click the [Detail] tab and of [Area Select]. For details about each parameter, refer to finish the B area settings...
CONSOLE_V1-1_ENG.pdf
Page 37
... ] or [Tab] key, and go back to the camcorder instruction manual. The [Custom Preset] window cannot be saved in the [Memory No.] box. 2 Enter a Custom Preset name. To enter a new name, click on the camcorder connected, some parameters differ. For details, refer to the ...or [Shift] + [Tab] keys. Changing the camcorder mode from Camera mode to apply the new name. Changing the position of [Memory No.] and choose a Custom Preset number that you need to set the camcorder's recording program to the camcorder instruction manual. Depending on the [Preset Name] box...
... ] or [Tab] key, and go back to the camcorder instruction manual. The [Custom Preset] window cannot be saved in the [Memory No.] box. 2 Enter a Custom Preset name. To enter a new name, click on the camcorder connected, some parameters differ. For details, refer to the ...or [Shift] + [Tab] keys. Changing the camcorder mode from Camera mode to apply the new name. Changing the position of [Memory No.] and choose a Custom Preset number that you need to set the camcorder's recording program to the camcorder instruction manual. Depending on the [Preset Name] box...
CONSOLE_V1-1_ENG.pdf
Page 41
... files created by XL2 and XL H1 are mutually compatible and the files created by XH G1 and XH A1 are not compatible to XH G1/XH A1 and vice versa. [Preparations] Insert the card to the camcorder that is set the camcorder to the Camera mode. 4 Import the file saved on the card (previously exported) ...5 Adjust the Custom Preset file. ( 4-37) For details about the steps 3 to 6, refer to "Inserting/Removing a Memory Card" and "Using the Custom Preset" on the camcorder instruction manual. 1 Adjust the Custom Preset settings. 2 Export (save) the adjusted Custom Preset file to both the card and the...
... files created by XL2 and XL H1 are mutually compatible and the files created by XH G1 and XH A1 are not compatible to XH G1/XH A1 and vice versa. [Preparations] Insert the card to the camcorder that is set the camcorder to the Camera mode. 4 Import the file saved on the card (previously exported) ...5 Adjust the Custom Preset file. ( 4-37) For details about the steps 3 to 6, refer to "Inserting/Removing a Memory Card" and "Using the Custom Preset" on the camcorder instruction manual. 1 Adjust the Custom Preset settings. 2 Export (save) the adjusted Custom Preset file to both the card and the...
CONSOLE_V1-1_ENG.pdf
Page 59
... different board's/card's terminal. Delete files to the instruction manual of your camcorder is supported by connection] from the [View] menu. 4) Look for the IEEE1394 controller with [Canon Virtual VCR]. 5) Confirm that [AV/C Tape Device] or [Canon DV Camcorder] is in use with sufficient capacity. For details, refer... by clicking the [Appearance and Themes] icon followed by IEEE1394, recording onto the hard disk cannot be started . ÎWhen using XH G1, XH A1 or XL H1: If you have more disk space. ÎThe [Option Settings] window is open, or performance check is set ...
... different board's/card's terminal. Delete files to the instruction manual of your camcorder is supported by connection] from the [View] menu. 4) Look for the IEEE1394 controller with [Canon Virtual VCR]. 5) Confirm that [AV/C Tape Device] or [Canon DV Camcorder] is in use with sufficient capacity. For details, refer... by clicking the [Appearance and Themes] icon followed by IEEE1394, recording onto the hard disk cannot be started . ÎWhen using XH G1, XH A1 or XL H1: If you have more disk space. ÎThe [Option Settings] window is open, or performance check is set ...

CONSOLE_V1-1_ENG.pdf
Page 62
PUB.DIE-272 © CANON INC. 2006 The information on this manual is verified as of July 1st, 2006.
PUB.DIE-272 © CANON INC. 2006 The information on this manual is verified as of July 1st, 2006.
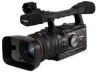
XH G1 XH A1 Instruction Manual
Page 2
...presence of copyrighted materials may be contrary to the equipment unless otherwise specified in a particular installation. One Canon Plaza, Lake Success, NY 11042, U.S.A. WARNING: TO REDUCE THE RISK OF ELECTRIC SHOCK AND TO REDUCE...Canon U.S.A. Do not make any interference received, including interference that may infringe on a circuit different from that interference will not occur in the manual. Inc. COPYRIGHT WARNING: Unauthorized recording of uninsulated "dangerous voltage" within an equilateral triangle, is required to persons. Digital Video Camcorder, XH G1 A/XH A1...
...presence of copyrighted materials may be contrary to the equipment unless otherwise specified in a particular installation. One Canon Plaza, Lake Success, NY 11042, U.S.A. WARNING: TO REDUCE THE RISK OF ELECTRIC SHOCK AND TO REDUCE...Canon U.S.A. Do not make any interference received, including interference that may infringe on a circuit different from that interference will not occur in the manual. Inc. COPYRIGHT WARNING: Unauthorized recording of uninsulated "dangerous voltage" within an equilateral triangle, is required to persons. Digital Video Camcorder, XH G1 A/XH A1...
XH G1 XH A1 Instruction Manual
Page 3
... For added protection of this product during a lightning storm, or when it is grounded so as battery power, refer to instructions in this manual. 11. Refer all its accessories. 1. All warnings on the marking label. Accessories - Do not use the camera close to TV transmitters... Grounding - Water and Moisture - IMPORTANT SAFETY INSTRUCTIONS In these safety instructions the word "product" refers to the Canon HD Video Camera Recorder XH G1 A/XH A1 A and all servicing to qualified service personnel. 3 Pay particular attention to lightning and power-line surges. 15.
... For added protection of this product during a lightning storm, or when it is grounded so as battery power, refer to instructions in this manual. 11. Refer all its accessories. 1. All warnings on the marking label. Accessories - Do not use the camera close to TV transmitters... Grounding - Water and Moisture - IMPORTANT SAFETY INSTRUCTIONS In these safety instructions the word "product" refers to the Canon HD Video Camera Recorder XH G1 A/XH A1 A and all servicing to qualified service personnel. 3 Pay particular attention to lightning and power-line surges. 15.
XH G1 XH A1 Instruction Manual
Page 5
...The time zone setting appears. Turn the SELECT/SET dial to buttons on the camcorder or the wireless controller. Brackets [ ] and capital letters are used in the manual show the XH G1. "Screen" refers to the LCD screen and the viewfinder screen....Manual : Precautions related to the camcorder operation. : Additional topics that complement the basic operating procedures. : Reference page number. Capital letters are used to refer to select the setting option that applies or is New York. 4. To adjust for purchasing the Canon XH G1/XH A1...
...The time zone setting appears. Turn the SELECT/SET dial to buttons on the camcorder or the wireless controller. Brackets [ ] and capital letters are used in the manual show the XH G1. "Screen" refers to the LCD screen and the viewfinder screen....Manual : Precautions related to the camcorder operation. : Additional topics that complement the basic operating procedures. : Reference page number. Capital letters are used to refer to select the setting option that applies or is New York. 4. To adjust for purchasing the Canon XH G1/XH A1...
XH G1 XH A1 Instruction Manual
Page 6
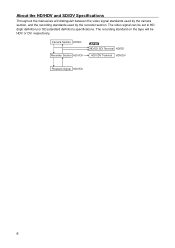
Camera Section HD/SD Recorder Section HDV/DV HD/SD SDI Terminal HD/SD HDV/DV Terminal HDV/DV Playback Signal HDV/DV 6 The recording standard on the tape will distinguish between the video signal standards used by the camera section, and the recording standards used by the recorder section. About the HD/HDV and SD/DV Specifications Throughout the manual we will be set to HD (high definition) or SD (standard definition) specifications. The video signal can be HDV or DV, respectively.
Camera Section HD/SD Recorder Section HDV/DV HD/SD SDI Terminal HD/SD HDV/DV Terminal HDV/DV Playback Signal HDV/DV 6 The recording standard on the tape will distinguish between the video signal standards used by the camera section, and the recording standards used by the recorder section. About the HD/HDV and SD/DV Specifications Throughout the manual we will be set to HD (high definition) or SD (standard definition) specifications. The video signal can be HDV or DV, respectively.
XH G1 XH A1 Instruction Manual
Page 7
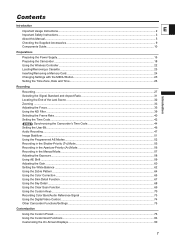
Contents Introduction Important Usage Instructions...2 E Important Safety Instructions...3 About this Manual...5 Checking the Supplied Accessories ...9 Components Guide...10 Preparations Preparing the Power Supply...15 Preparing the Camcorder ...18 Using the Wireless Controller ...22 Loading/Removing a Cassette ...23 Inserting/Removing a Memory...the Focus ...35 Using the ND Filter ...39 Selecting the Frame Rate...40 Setting the Time Code ...42 Synchronizing the Camcorder's Time Code 44 Setting the User Bit...46 Audio Recording ...47 Image Stabilizer ...51 Using the Programmed AE Modes ...
Contents Introduction Important Usage Instructions...2 E Important Safety Instructions...3 About this Manual...5 Checking the Supplied Accessories ...9 Components Guide...10 Preparations Preparing the Power Supply...15 Preparing the Camcorder ...18 Using the Wireless Controller ...22 Loading/Removing a Cassette ...23 Inserting/Removing a Memory...the Focus ...35 Using the ND Filter ...39 Selecting the Frame Rate...40 Setting the Time Code ...42 Synchronizing the Camcorder's Time Code 44 Setting the User Bit...46 Audio Recording ...47 Image Stabilizer ...51 Using the Programmed AE Modes ...

XH G1 XH A1 Instruction Manual
Page 10
Components Guide XH G1/XH A1 Left side view POWER dial External control mode VCR/PLAY mode Power off Auto Shutter-Priority Aperture-Priority Manual Spotlight Night Easy Recording Recording programs DISP. (display) button ( 29) PEAKING button ( 37) MAGN. (magnification) button ( 37) (record review) button ( 30) POSITION PRESET switch ( 34, ...
Components Guide XH G1/XH A1 Left side view POWER dial External control mode VCR/PLAY mode Power off Auto Shutter-Priority Aperture-Priority Manual Spotlight Night Easy Recording Recording programs DISP. (display) button ( 29) PEAKING button ( 37) MAGN. (magnification) button ( 37) (record review) button ( 30) POSITION PRESET switch ( 34, ...
XH G1 XH A1 Instruction Manual
Page 31
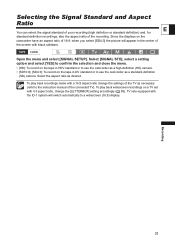
... and select [YES] to confirm the selection and close the menu. • [HD]: To record on the tape in HDV standard or to use the camcorder as a high-definition (HD) camera. • [SD16:9], [SD4:3]: To record on a TV set with 4:3 aspect ratio, change the settings of the TV as ...necessary (refer to the instruction manual of the connected TV). Select the aspect ratio as a standard-definition (SD) camera. Since the displays on the camcorder have an aspect ratio of 16:9, when you select [SD4:3] the picture will switch automatically ...
... and select [YES] to confirm the selection and close the menu. • [HD]: To record on the tape in HDV standard or to use the camcorder as a high-definition (HD) camera. • [SD16:9], [SD4:3]: To record on a TV set with 4:3 aspect ratio, change the settings of the TV as ...necessary (refer to the instruction manual of the connected TV). Select the aspect ratio as a standard-definition (SD) camera. Since the displays on the camcorder have an aspect ratio of 16:9, when you select [SD4:3] the picture will switch automatically ...

XH G1 XH A1 Instruction Manual
Page 35
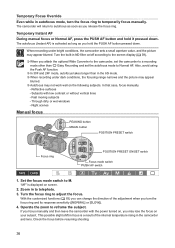
...set when the focus mode switch is useful even when recording in this mode making it easier to allow for a temporary autofocus while focusing manually. The camcorder focuses on the subject in .) (at wide-angle from the front of the lens barrel) to . Adjusting the Focus The...8226; INSTANT AF Open the menu and select [CAMERA SETUP]. Only the TTL system is made at the highest speed. The camcorder has also a Push-AF function to focus manually, you can also make it appropriate for focusing. [NORMAL AF]: The autofocus adjustment is used combined with the optional Wide Converter...
...set when the focus mode switch is useful even when recording in this mode making it easier to allow for a temporary autofocus while focusing manually. The camcorder focuses on the subject in .) (at wide-angle from the front of the lens barrel) to . Adjusting the Focus The...8226; INSTANT AF Open the menu and select [CAMERA SETUP]. Only the TTL system is made at the highest speed. The camcorder has also a Push-AF function to focus manually, you can also make it appropriate for focusing. [NORMAL AF]: The autofocus adjustment is used combined with the optional Wide Converter...
XH G1 XH A1 Instruction Manual
Page 36
...2. Reflective surfaces - Through dirty or wet windows - This possible slight shift in focus is activated as long as you focus manually and then leave the camcorder with low contrast or without vertical lines - Temporary Focus Override Even while in autofocus mode, turn the focus ring and its ...mode to a recording mode other than in the 60i mode. When recording under bright conditions, the camcorder sets a small aperture value, and the picture may appear blurred. Night scenes Manual focus PEAKING button MAGN. "MF" is displayed on /off according to the screen display ( 39). ...
...2. Reflective surfaces - Through dirty or wet windows - This possible slight shift in focus is activated as long as you focus manually and then leave the camcorder with low contrast or without vertical lines - Temporary Focus Override Even while in autofocus mode, turn the focus ring and its ...mode to a recording mode other than in the 60i mode. When recording under bright conditions, the camcorder sets a small aperture value, and the picture may appear blurred. Night scenes Manual focus PEAKING button MAGN. "MF" is displayed on /off according to the screen display ( 39). ...

