User Manual
Page 3
... as used on the camcorder's settings, onscreen displays and in this manual signifies Wi-Fi Protected Setup. • The Wi-Fi Protected Setup Identifier ... other countries and is used under license. • Avid and Media Composer are trademarks or ...Windows are trademarks or registered trademarks of Microsoft Corporation in the U.S. and other use for MPEG-4 standard. 3 Trademark Acknowledgements • SD, SDHC and SDXC Logos are trademarks of SD-3C, LLC. • Canon is an authorized licensee of the CFast 2.0™ trademark, which may be used for encoding MPEG-4 compliant video...
... as used on the camcorder's settings, onscreen displays and in this manual signifies Wi-Fi Protected Setup. • The Wi-Fi Protected Setup Identifier ... other countries and is used under license. • Avid and Media Composer are trademarks or ...Windows are trademarks or registered trademarks of Microsoft Corporation in the U.S. and other use for MPEG-4 standard. 3 Trademark Acknowledgements • SD, SDHC and SDXC Logos are trademarks of SD-3C, LLC. • Canon is an authorized licensee of the CFast 2.0™ trademark, which may be used for encoding MPEG-4 compliant video...
User Manual
Page 4
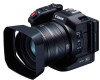
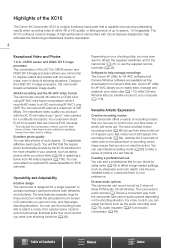
.... Highlights of the XC10 The Canon 4K Camcorder XC10 is a highly functional camcorder that is designed for a single operator to access necessary camera functions both efficiently and intuitively. You could even shoot B-roll for projects that use the shooting mode dial to select a mode, from 4K video playback (A 106). Intra-frame is also suitable for focus and zoom while the articulated touch-screen LCD panel lets you transfer photos to approx. 12 megapixels...
.... Highlights of the XC10 The Canon 4K Camcorder XC10 is a highly functional camcorder that is designed for a single operator to access necessary camera functions both efficiently and intuitively. You could even shoot B-roll for projects that use the shooting mode dial to select a mode, from 4K video playback (A 106). Intra-frame is also suitable for focus and zoom while the articulated touch-screen LCD panel lets you transfer photos to approx. 12 megapixels...
User Manual
Page 5
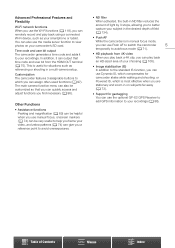
... that time code and user bit from 4K video When you play back a 4K clip, you can play back using a connected Wi-Fi device, such as referencing or shooting in manual focus mode, you can use Push AF to switch the camcorder 5 temporarily to autofocus mode (A 71). • HD playback from the HDMI OUT terminal (A 75). You can also use the media server function to view photos on subjects far away (A 73). • Support...
... that time code and user bit from 4K video When you play back a 4K clip, you can play back using a connected Wi-Fi device, such as referencing or shooting in manual focus mode, you can use Push AF to switch the camcorder 5 temporarily to autofocus mode (A 71). • HD playback from the HDMI OUT terminal (A 75). You can also use the media server function to view photos on subjects far away (A 73). • Support...
User Manual
Page 6
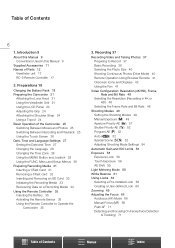
... Table of the Camcorder 25 Switching Between Movies and Photos 25 Switching Between Recording and Playback 25 Using the Touch Screen 26 Date, Time and Language Settings 27 Setting the Date and Time 27 Changing the Language 28 Changing the Time Zone 28 Using the MENU Button and Joystick 28 Using the FUNC. Preparations 18 Charging the Battery Pack 18 Preparing the Camcorder 21 Attaching the Lens Hood 21 Using the Viewfinder Unit 21 Using the LCD Panel 23 Adjusting the Grip...
... Table of the Camcorder 25 Switching Between Movies and Photos 25 Switching Between Recording and Playback 25 Using the Touch Screen 26 Date, Time and Language Settings 27 Setting the Date and Time 27 Changing the Language 28 Changing the Time Zone 28 Using the MENU Button and Joystick 28 Using the FUNC. Preparations 18 Charging the Battery Pack 18 Preparing the Camcorder 21 Attaching the Lens Hood 21 Using the Viewfinder Unit 21 Using the LCD Panel 23 Adjusting the Grip...
User Manual
Page 7
... Installation 116 Connecting the Camcorder to an SD Card 99 Loading Menu Settings from the Index Screen 108 Deleting a Clip During Playback Pause 108 Deleting a Photo during Playback 107 Deleting Recordings 108 Deleting Clips and Photos from an SD Card 99 5. Wi-Fi Functions 118 About the Wi-Fi Functions 118 Wireless Connections Using Wi-Fi 119 Wi-Fi Protected Setup (WPS) 119 Searching for Access Points 120 Manual Setup 122 Viewing and Changing Wi-Fi Settings 123 Browser Remote: Controlling...
... Installation 116 Connecting the Camcorder to an SD Card 99 Loading Menu Settings from the Index Screen 108 Deleting a Clip During Playback Pause 108 Deleting a Photo during Playback 107 Deleting Recordings 108 Deleting Clips and Photos from an SD Card 99 5. Wi-Fi Functions 118 About the Wi-Fi Functions 118 Wireless Connections Using Wi-Fi 119 Wi-Fi Protected Setup (WPS) 119 Searching for Access Points 120 Manual Setup 122 Viewing and Changing Wi-Fi Settings 123 Browser Remote: Controlling...

User Manual
Page 18
The first time you hear a click. OPEN switch in place. 6 Close the battery compartment cover. • Push the cover until you use the camcorder, charge the battery pack. For approximate charging times and recording/playback times with a battery pack or directly using the compact power adapter. 2 Preparations 18 Charging the Battery Pack The camcorder can be powered with a fully charged battery pack, refer to Recording and Playback Times (A 160). 1 Connect the power cord to the camcorder's DC IN terminal. ባ ቤ DC...
The first time you hear a click. OPEN switch in place. 6 Close the battery compartment cover. • Push the cover until you use the camcorder, charge the battery pack. For approximate charging times and recording/playback times with a battery pack or directly using the compact power adapter. 2 Preparations 18 Charging the Battery Pack The camcorder can be powered with a fully charged battery pack, refer to Recording and Playback Times (A 160). 1 Connect the power cord to the camcorder's DC IN terminal. ባ ቤ DC...
User Manual
Page 30
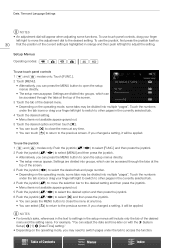
... page number. • Depending on the operating mode, you can press the MENU button to the previous screen. For example, "You can adjust the date and time later on with the [ System Setup] > [1] > [Date/Time] setting." • Depending on the operating mode, some functions. To use the joystick, first press the joystick itself so 30 that the position of the desired menu and the setting name. If you changed a setting, it...
... page number. • Depending on the operating mode, you can press the MENU button to the previous screen. For example, "You can adjust the date and time later on with the [ System Setup] > [1] > [Date/Time] setting." • Depending on the operating mode, some functions. To use the joystick, first press the joystick itself so 30 that the position of the desired menu and the setting name. If you changed a setting, it...

User Manual
Page 78
... settings in the [¡ Audio Setup] menu: [Built-in Mic Wind Screen], [Built-in Mic Att.], [Built-in stereo microphone or an external microphone connected to the MIC terminal. Keep a distance between the camcorder and microphone. Recording Audio Recording Audio This camcorder features 2-channel linear PCM audio recording and playback with a sampling frequency of noise. [„ Custom Setting]: Allows you can attach a commercially available condenser microphone with its own power supply and a ∅ 3.5 mm stereo mini plug...
... settings in the [¡ Audio Setup] menu: [Built-in Mic Wind Screen], [Built-in Mic Att.], [Built-in stereo microphone or an external microphone connected to the MIC terminal. Keep a distance between the camcorder and microphone. Recording Audio Recording Audio This camcorder features 2-channel linear PCM audio recording and playback with a sampling frequency of noise. [„ Custom Setting]: Allows you can attach a commercially available condenser microphone with its own power supply and a ∅ 3.5 mm stereo mini plug...
User Manual
Page 88
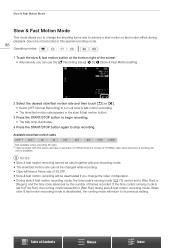
... Operating modes: 1 Touch the slow & fast motion button at the bottom right of the screen. • Alternatively, you can be available. If the time code's running mode (A 75) can use the [3 Recording Setup] > [1] > [Slow & Fast Motion] setting. 2 Select the desired slow/fast motion rate and then touch [K] or [X]. • Select [OFF Normal Recording] to turn off slow & fast motion recording. • The slow/fast motion rate appears in this option will switch to [Rec Run] during playback...
... Operating modes: 1 Touch the slow & fast motion button at the bottom right of the screen. • Alternatively, you can be available. If the time code's running mode (A 75) can use the [3 Recording Setup] > [1] > [Slow & Fast Motion] setting. 2 Select the desired slow/fast motion rate and then touch [K] or [X]. • Select [OFF Normal Recording] to turn off slow & fast motion recording. • The slow/fast motion rate appears in this option will switch to [Rec Run] during playback...

User Manual
Page 95
... [K] to configure other flash settings or [X] to close the menu. • Touch [j Off] to turn off the camcorder or Speedlite. * EX-series Speedlites include the 270EX II, 320EX, 430EX II, 580EX II and 600EX-RT. When set to [n Manual]. 4 Touch [Flash Output]. • An adjustment dial will reset the flash settings. - Attaching or removing the Speedlite. - While the Speedlite is available for shutter speeds 1/250 and...
... [K] to configure other flash settings or [X] to close the menu. • Touch [j Off] to turn off the camcorder or Speedlite. * EX-series Speedlites include the 270EX II, 320EX, 430EX II, 580EX II and 600EX-RT. When set to [n Manual]. 4 Touch [Flash Output]. • An adjustment dial will reset the flash settings. - Attaching or removing the Speedlite. - While the Speedlite is available for shutter speeds 1/250 and...

User Manual
Page 113
... the Help modules of OS you to transfer clips from the following plugins are using the software, refer to the instruction manual (PDF file) that contains the file xuw***.exe. 2 Double-click xuw***.exe. 3 Follow the onscreen instructions to select your area (continent), country/region and/or language, as a free download from a computer or the recording media (connected via USB reader to a computer) to the NLE software. Saving Clips...
... the Help modules of OS you to transfer clips from the following plugins are using the software, refer to the instruction manual (PDF file) that contains the file xuw***.exe. 2 Double-click xuw***.exe. 3 Follow the onscreen instructions to select your area (continent), country/region and/or language, as a free download from a computer or the recording media (connected via USB reader to a computer) to the NLE software. Saving Clips...
User Manual
Page 119
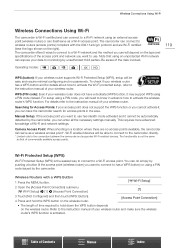
... Operating modes: WPS (button): If your wireless router supports Wi-Fi Protected Setup (WPS), setup will depend on the type and specifications of the access point and network you cannot activate it may support WPS using an unprotected Wi-Fi network can expose your data to a Wi-Fi access point. This requires more advanced knowledge of Contents Menus Index Wi-Fi Setup] 2 Open the [Access Point Connection...
... Operating modes: WPS (button): If your wireless router supports Wi-Fi Protected Setup (WPS), setup will depend on the type and specifications of the access point and network you cannot activate it may support WPS using an unprotected Wi-Fi network can expose your data to a Wi-Fi access point. This requires more advanced knowledge of Contents Menus Index Wi-Fi Setup] 2 Open the [Access Point Connection...

User Manual
Page 122
...). 1 Press the MENU button. 2 Open the [Access Point Connection] submenu. [- IMPORTANT • The Wi-Fi functions available and the setup method will vary depending on the screen to step 12. 8 In the [IP Address] field, touch [0.0.0.0]. Table of the Wi-Fi network you want to change the value. To enter text for the various settings, use . Wireless Connections Using Wi-Fi 122 Manual Setup If you...
...). 1 Press the MENU button. 2 Open the [Access Point Connection] submenu. [- IMPORTANT • The Wi-Fi functions available and the setup method will vary depending on the screen to step 12. 8 In the [IP Address] field, touch [0.0.0.0]. Table of the Wi-Fi network you want to change the value. To enter text for the various settings, use . Wireless Connections Using Wi-Fi 122 Manual Setup If you...

User Manual
Page 125
... the MENU button. 2 Open the [Browser Connection Settings] submenu. [- Operating modes: 125 Setting Up Browser Remote You can then control the camcorder remotely from a Network Device Using a camera access point connection, in case of a multi-camera shooting setup. Wi-Fi Setup] [1] [Browser Connection Settings] 5 Touch [OK] twice and then touch [X]. The port number (HTTP protocol) used by following the next procedure while referring to port 80, but you can connect a device such as "network devices"). Starting Browser Remote After connecting...
... the MENU button. 2 Open the [Browser Connection Settings] submenu. [- Operating modes: 125 Setting Up Browser Remote You can then control the camcorder remotely from a Network Device Using a camera access point connection, in case of a multi-camera shooting setup. Wi-Fi Setup] [1] [Browser Connection Settings] 5 Touch [OK] twice and then touch [X]. The port number (HTTP protocol) used by following the next procedure while referring to port 80, but you can connect a device such as "network devices"). Starting Browser Remote After connecting...

User Manual
Page 138
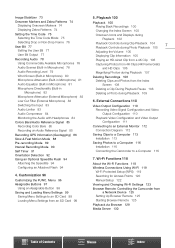
... playback image on a TV. • Using the [H Bright] setting will shorten the effective usage time of the camcorder's controls while the message is displayed will prevent the camcorder from the HDMI OUT terminal. [HDMI Rec Command]: When this function is set to output a time code signal from shutting off , [Auto Power Off] will also start or stop recording with HDMI recording commands, when you can verify the battery charge (as follows. [Assign Button 1]: [ [^ Magnification]. Operating...
... playback image on a TV. • Using the [H Bright] setting will shorten the effective usage time of the camcorder's controls while the message is displayed will prevent the camcorder from the HDMI OUT terminal. [HDMI Rec Command]: When this function is set to output a time code signal from shutting off , [Auto Power Off] will also start or stop recording with HDMI recording commands, when you can verify the battery charge (as follows. [Assign Button 1]: [ [^ Magnification]. Operating...

User Manual
Page 142
...). Model number - Consult a Canon Service Center. 7 keeps flashing on the screen and the camcorder does not operate properly. - The camcorder can continue to [Automatic]. Adjust the viewfinder unit with the dioptric adjustment lever (A 22). Sound is distorted or is an LP-E6N Battery Pack. Adjust the audio recording level manually (A 79). You connected the optional GP-E2 GPS Receiver to be used without issue. appears in red on the screen, the camcorder's internal temperature...
...). Model number - Consult a Canon Service Center. 7 keeps flashing on the screen and the camcorder does not operate properly. - The camcorder can continue to [Automatic]. Adjust the viewfinder unit with the dioptric adjustment lever (A 22). Sound is distorted or is an LP-E6N Battery Pack. Adjust the audio recording level manually (A 79). You connected the optional GP-E2 GPS Receiver to be used without issue. appears in red on the screen, the camcorder's internal temperature...

User Manual
Page 143
... CFast card. Cannot record HD clips or photos on the CFast card. - Change the position of the remote controller. Change the setting to free some recordings (A 108) to [Manual]. - Delete some space or replace the recording media. - Set [System Setup] > [2] (in mode) or [1] (in interval recording mode. - When the [Camera Setup] > [2] > [Flash] > [High-speed Sync.] setting is set the level with the camcorder for the ±0 setting); While an external device is limited to the camcorder. - Set the Speedlite's level to [On] and adjust the shutter speed. In...
... CFast card. Cannot record HD clips or photos on the CFast card. - Change the position of the remote controller. Change the setting to free some recordings (A 108) to [Manual]. - Delete some space or replace the recording media. - Set [System Setup] > [2] (in mode) or [1] (in interval recording mode. - When the [Camera Setup] > [2] > [Flash] > [High-speed Sync.] setting is set the level with the camcorder for the ±0 setting); While an external device is limited to the camcorder. - Set the Speedlite's level to [On] and adjust the shutter speed. In...

User Manual
Page 144
... signal. Troubleshooting 144 Connections with External Devices Video noise appears on the external monitor. - The wireless signal is no image on a nearby TV screen. - Playback looks fine on the camcorder but there is no picture or sound from an SD card, all network settings are reset. Select the correct video input. The computer does not recognize the camcorder even though the camcorder is displayed on the Web browser. - Connect the USB cable while...
... signal. Troubleshooting 144 Connections with External Devices Video noise appears on the external monitor. - The wireless signal is no image on a nearby TV screen. - Playback looks fine on the camcorder but there is no picture or sound from an SD card, all network settings are reset. Select the correct video input. The computer does not recognize the camcorder even though the camcorder is displayed on the Web browser. - Connect the USB cable while...

User Manual
Page 147
... initialize the recording media (A 33). - Recording was stopped due to fewer than 2,500 (Windows) or 1,000 (Mac OS). If this does not solve the problem, consult a Canon Service Center. • Corrupted file control information cannot be recovered. Open an index screen in use and the recording was opened while the recording media was an encoder error. The camcorder is open - Disconnect the USB cable. - Try using a memory card reader or decrease the number of your access point and...
... initialize the recording media (A 33). - Recording was stopped due to fewer than 2,500 (Windows) or 1,000 (Mac OS). If this does not solve the problem, consult a Canon Service Center. • Corrupted file control information cannot be recovered. Open an index screen in use and the recording was opened while the recording media was an encoder error. The camcorder is open - Disconnect the USB cable. - Try using a memory card reader or decrease the number of your access point and...

User Manual
Page 157
... Setup (WPS), search for access points, manual, camera access point • Supported Channels: See the following sidebar. • Authentication Methods: Open, WPA-PSK, WPA2-PSK • Encryption Methods: WEP-64, WEP-128, TKIP, AES Available frequencies and channels The camcorder's Wi-Fi functions operate in • Iris: Automatic or manual • ISO Speed: 160 to 20000; custom white balance (two sets, 1 and 2) * For photos only. • Microphone...
... Setup (WPS), search for access points, manual, camera access point • Supported Channels: See the following sidebar. • Authentication Methods: Open, WPA-PSK, WPA2-PSK • Encryption Methods: WEP-64, WEP-128, TKIP, AES Available frequencies and channels The camcorder's Wi-Fi functions operate in • Iris: Automatic or manual • ISO Speed: 160 to 20000; custom white balance (two sets, 1 and 2) * For photos only. • Microphone...


