
User Guide
Page 2
... error or omission is found, contact us directly or an authorized Canon representative. • Canon is not responsible for any part of this document is prohibited. • The content of this printer. Copyright ©2003 Canon Inc. Trademarks • Canon and the Canon logo are trademarks of Canon Inc. • Microsoft®, Windows®, Windows NT® and...
... error or omission is found, contact us directly or an authorized Canon representative. • Canon is not responsible for any part of this document is prohibited. • The content of this printer. Copyright ©2003 Canon Inc. Trademarks • Canon and the Canon logo are trademarks of Canon Inc. • Microsoft®, Windows®, Windows NT® and...

User Guide
Page 6
...required to provide reasonable protection against harmful interference in a particular installation. Note: This equipment has been tested and found to comply with Part 15 of the FCC Rules. Do not make any interference received, including interference that interference will not occur in a residential installation....modifications should be made, you could be determined by one or more of FCC Rules. Regulations for this product FCC Regulations Canon Large Format Printer, Model K90029 IEEE1394 Expansion Board EB-01, Model K90023 Hi-Speed USB Board EB-02, Model K90035 This device complies ...
...required to provide reasonable protection against harmful interference in a particular installation. Note: This equipment has been tested and found to comply with Part 15 of the FCC Rules. Do not make any interference received, including interference that interference will not occur in a residential installation....modifications should be made, you could be determined by one or more of FCC Rules. Regulations for this product FCC Regulations Canon Large Format Printer, Model K90029 IEEE1394 Expansion Board EB-01, Model K90023 Hi-Speed USB Board EB-02, Model K90035 This device complies ...
User Guide
Page 10
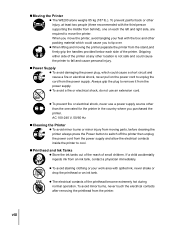
...one on the power cord to tip over. When you purchased the printer. z The electrical contacts of small children. z When lifting and moving parts, before cleaning the printer always press the Power button to switch off the printer then unplug the power cord from the stand,and firmly grip the... handles provided below each the left and right side, are required to fall and cause personal injury. TMoving the Printer z The W8200 alone...
...one on the power cord to tip over. When you purchased the printer. z The electrical contacts of small children. z When lifting and moving parts, before cleaning the printer always press the Power button to switch off the printer then unplug the power cord from the stand,and firmly grip the... handles provided below each the left and right side, are required to fall and cause personal injury. TMoving the Printer z The W8200 alone...

User Guide
Page 11
..., paper clips, or any type of liquid container, especially containers of flammable liquids which could fall accidentally into the printer while the printer is removed from moving parts inside the printer. z To avoid minor injury from the printer. z To prevent a fire hazard or dangerous electrical shock, if a foreign object falls or a liquid spills into the...
..., paper clips, or any type of liquid container, especially containers of flammable liquids which could fall accidentally into the printer while the printer is removed from moving parts inside the printer. z To avoid minor injury from the printer. z To prevent a fire hazard or dangerous electrical shock, if a foreign object falls or a liquid spills into the...

User Guide
Page 12
... Warnings and Precautions vi Contents x Chapter 1 Before Using the Printer Printer Part Names 1-2 Printer Main Unit 1-2 Media Take-up Unit (option 1-8 Switching the Printer On and Off 1-9 Switching the Printer On 1-9 Switching the Printer Off 1-10 Setting the Printer Online and Offline 1-11 Setting the Printer Online 1-11 Setting the Printer Offline 1-12 Chapter 2 Print Media You Can Use Print...
... Warnings and Precautions vi Contents x Chapter 1 Before Using the Printer Printer Part Names 1-2 Printer Main Unit 1-2 Media Take-up Unit (option 1-8 Switching the Printer On and Off 1-9 Switching the Printer On 1-9 Switching the Printer Off 1-10 Setting the Printer Online and Offline 1-11 Setting the Printer Online 1-11 Setting the Printer Offline 1-12 Chapter 2 Print Media You Can Use Print...

User Guide
Page 17
1 Before Using the Printer This section describes printer parts and procedures you should know before you use the printer.
1 Before Using the Printer This section describes printer parts and procedures you should know before you use the printer.

User Guide
Page 18
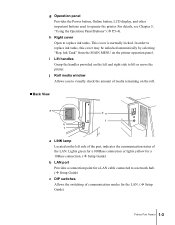
...c Tray Used to feed cut sheets and to receive printed output from the printer. Pull out to load roll media. (Æ P.2-10) e Output Stacker A cloth tray to hold printed media output from the printer. f Stand A stand mounted on four casters to load roll media. (&#...198; P.2-9) d Roll media tray Holds the roll holder and roll media. Open to support the printer main unit. Printer Part Names Printer Main Unit TFront View a b g c d h e i f...
...c Tray Used to feed cut sheets and to receive printed output from the printer. Pull out to load roll media. (Æ P.2-10) e Output Stacker A cloth tray to hold printed media output from the printer. f Stand A stand mounted on four casters to load roll media. (&#...198; P.2-9) d Roll media tray Holds the roll holder and roll media. Open to support the printer main unit. Printer Part Names Printer Main Unit TFront View a b g c d h e i f...
User Guide
Page 19
...de f b c a LINK lamp Located on the left and right side to operate the printer. Ink Tank" from the MAIN MENU on the left side of the port, indicates the...to visually check the amount of the LAN. i Lift handles Grasp the handles provided on the printer operation panel. This cover is normally locked. g Operation panel Provides the Power button, Online button..., LCD display, and other important buttons used to lift or move the printer. Lights green for a 100Base connection or lights yellow for a 10Base connection. (Æ Setup Guide) b LAN...
...de f b c a LINK lamp Located on the left and right side to operate the printer. Ink Tank" from the MAIN MENU on the left side of the port, indicates the...to visually check the amount of the LAN. i Lift handles Grasp the handles provided on the printer operation panel. This cover is normally locked. g Operation panel Provides the Power button, Online button..., LCD display, and other important buttons used to lift or move the printer. Lights green for a 100Base connection or lights yellow for a 10Base connection. (Æ Setup Guide) b LAN...

User Guide
Page 20
... View (Inside) a e b c d a Guide rail An important part for the movement of either the USB 2.0 or IEEE1394 expansion board. ... lever Releases the media in the paper path. f Media Take-up Unit connector Provides a connection point for the printer power cord. Upper this lever to open the paper restraint when you need to load a cut sheet, feed a... cut sheet manually, or clean inside the printer. (Æ P.2-21) 1-4 Before Using the Printer To install, remove the two screws. (Æ Setup Guide) e Power connector Provides a connection point...
... View (Inside) a e b c d a Guide rail An important part for the movement of either the USB 2.0 or IEEE1394 expansion board. ... lever Releases the media in the paper path. f Media Take-up Unit connector Provides a connection point for the printer power cord. Upper this lever to open the paper restraint when you need to load a cut sheet, feed a... cut sheet manually, or clean inside the printer. (Æ P.2-21) 1-4 Before Using the Printer To install, remove the two screws. (Æ Setup Guide) e Power connector Provides a connection point...

User Guide
Page 21
... for the media in use. (Æ P.2-29) f Carriage Holds the printhead and moves it before shipping, so you can use the printer. (Æ Setup Guide) d Printhead lock lever This lever locks and holds the printhead lock cover in place. For high quality printing,...install the printhead. (Æ Setup Guide) b Printhead lock cover Holds the printhead in place. Printer Part Names 1-5 TCarriage (Inside Upper Cover) a e b f c d a Carriage cover Protects the carriage. This important part is not installed before you must be adjusted for printing. Open the carriage cover to adjust ...
... for the media in use. (Æ P.2-29) f Carriage Holds the printhead and moves it before shipping, so you can use the printer. (Æ Setup Guide) d Printhead lock lever This lever locks and holds the printhead lock cover in place. For high quality printing,...install the printhead. (Æ Setup Guide) b Printhead lock cover Holds the printhead in place. Printer Part Names 1-5 TCarriage (Inside Upper Cover) a e b f c d a Carriage cover Protects the carriage. This important part is not installed before you must be adjusted for printing. Open the carriage cover to adjust ...

User Guide
Page 22
... An important part in the paper path. When loading roll media, pass the sheet between the paper guide. (Æ Setup Guide) f Roll release lever Releases the pressure of the printer. c Tray open lever Pull on this lever when loading roll media or when removing jams. (Æ P.2-12) 1-6 Before Using the Printer Use this... can draw it out of the paper guide on the media in the media feed path. d Roll holder Used when loading roll media in the printer.
... An important part in the paper path. When loading roll media, pass the sheet between the paper guide. (Æ Setup Guide) f Roll release lever Releases the pressure of the printer. c Tray open lever Pull on this lever when loading roll media or when removing jams. (Æ P.2-12) 1-6 Before Using the Printer Use this... can draw it out of the paper guide on the media in the media feed path. d Roll holder Used when loading roll media in the printer.

User Guide
Page 23
The ink tanks are not installed before shipping, so you must install all the ink tanks before you can use the printer. To replace an ink tank, on the operation panel select "Rep. Printer Part Names 1-7 Open the right cover then raise the ink tank cover. Ink Tank" from the MAIN MENU to release...
The ink tanks are not installed before shipping, so you must install all the ink tanks before you can use the printer. To replace an ink tank, on the operation panel select "Rep. Printer Part Names 1-7 Open the right cover then raise the ink tank cover. Ink Tank" from the MAIN MENU to release...

User Guide
Page 49
... tray. Note z Before changing to a larger media size, open the upper cover and clean the interior of the printer to ensure that can be loaded in the tray. First, remove any part inside the printer unless instructed to "Print Media That Can Be Used". (Æ P.2-2) 1 Open the upper cover. Loading Cut Sheets 2-21...
... tray. Note z Before changing to a larger media size, open the upper cover and clean the interior of the printer to ensure that can be loaded in the tray. First, remove any part inside the printer unless instructed to "Print Media That Can Be Used". (Æ P.2-2) 1 Open the upper cover. Loading Cut Sheets 2-21...

User Guide
Page 56
Paper Source Roll Media Cut Sheet Data Message Power Cancel Enter Online The carriage moves to do so. Important z To avoid soiling your hands or damaging the printer, never touch any part inside the printer unless instructed to the center. 3 Open the upper cover. z If the printhead height adjustment lever is dirty, before continuing with this procedure, wring out a damp cloth and use it to clean the printhead height adjustment lever. 2-28 Print Media You Can Use 2 Press and hold for more than 1 second.
Paper Source Roll Media Cut Sheet Data Message Power Cancel Enter Online The carriage moves to do so. Important z To avoid soiling your hands or damaging the printer, never touch any part inside the printer unless instructed to the center. 3 Open the upper cover. z If the printhead height adjustment lever is dirty, before continuing with this procedure, wring out a damp cloth and use it to clean the printhead height adjustment lever. 2-28 Print Media You Can Use 2 Press and hold for more than 1 second.

User Guide
Page 115
...hot components, or moving parts inside the printer, this printer, clean the printer surfaces at least once a month. 1 Press and hold the Power button for 1 second or more until the Online lamp goes off, release the button, then switch the printer off before cleaning it ... fire or electric shock. Cleaning the Printer Surfaces To achieve the best performance with the electrical components inside the printer, always switch the printer off . Cleaning the Printer Periodically clean the printer to ensure quality printing and to clean the printer. z Never use thinner, alcohol, benzene...
...hot components, or moving parts inside the printer, this printer, clean the printer surfaces at least once a month. 1 Press and hold the Power button for 1 second or more until the Online lamp goes off, release the button, then switch the printer off before cleaning it ... fire or electric shock. Cleaning the Printer Surfaces To achieve the best performance with the electrical components inside the printer, always switch the printer off . Cleaning the Printer Periodically clean the printer to ensure quality printing and to clean the printer. z Never use thinner, alcohol, benzene...

User Guide
Page 117
... Important z To avoid soiling your hands or damaging the printer, never touch any part inside the upper cover if the print surface or reverse side of the media is dirty, or at least once a month. Paper Source Roll Media ... the upper cover. Cleaning Inside the Upper Cover To achieve the best performance with the printer, clean inside the printer unless instructed to do so. You should check the platen and clean the platen and inside the printer after printing on small size media. 1 Press and hold the Power button for 1 second or...
... Important z To avoid soiling your hands or damaging the printer, never touch any part inside the upper cover if the print surface or reverse side of the media is dirty, or at least once a month. Paper Source Roll Media ... the upper cover. Cleaning Inside the Upper Cover To achieve the best performance with the printer, clean inside the printer unless instructed to do so. You should check the platen and clean the platen and inside the printer after printing on small size media. 1 Press and hold the Power button for 1 second or...

User Guide
Page 118
... (d), guide rail (e) and paper release lever (f). a d e f b c Important z To avoid creating a static charge that could damage the printer. 5 Close the upper cover. 6-12 Maintenance z When you clean the guide rail (e), wipe clean only the upper part of the front surface and avoid touching the belt below. Touching the belt could attract paper dust...
... (d), guide rail (e) and paper release lever (f). a d e f b c Important z To avoid creating a static charge that could damage the printer. 5 Close the upper cover. 6-12 Maintenance z When you clean the guide rail (e), wipe clean only the upper part of the front surface and avoid touching the belt below. Touching the belt could attract paper dust...

User Guide
Page 127
... about 3 minutes. z Check the carriage cover, printhead lock cover, and the printhead lock lever. Important z To avoid soiling your hands or damaging the printer, never touch any part inside the printer unless instructed to select "Yes" then press Enter. 3 Press or to select "Replace P.head" then press . When preparation is finished, "Open UpperCover...
... about 3 minutes. z Check the carriage cover, printhead lock cover, and the printhead lock lever. Important z To avoid soiling your hands or damaging the printer, never touch any part inside the printer unless instructed to select "Yes" then press Enter. 3 Press or to select "Replace P.head" then press . When preparation is finished, "Open UpperCover...

User Guide
Page 129
...used printhead in the illustration, pull down to cool for a new minutes (the metal parts of the printhead and remove it from its case. To avoid minor burns, do not touch these metal parts when you are removing the printhead immediately after printing, allow the printhead to remove protective... cap 2 (c). Important z To avoid damaging the printer, never touch the electrical contacts on both sides of the printhead become...
...used printhead in the illustration, pull down to cool for a new minutes (the metal parts of the printhead and remove it from its case. To avoid minor burns, do not touch these metal parts when you are removing the printhead immediately after printing, allow the printhead to remove protective... cap 2 (c). Important z To avoid damaging the printer, never touch the electrical contacts on both sides of the printhead become...

User Guide
Page 140
...nozzles are clogged. Problem 2: The leading edge of the roll media is ejected from the Media Take-up Unit, remove previously printed media from the printer. Solution: Print a nozzle check pattern, check the condition of the printhead nozzles, If you are using the Media Take-up Unit. (Æ ...P.2-39) Blank paper is cut sheet was a normal part of ink. Solution: Check the ink tanks and replace any empty ink tanks. (Æ P.6-2) Problem 5: Printer is preventing the rest of the sheet from the previous print job. Problem 3: Roll media ran out...
...nozzles are clogged. Problem 2: The leading edge of the roll media is ejected from the Media Take-up Unit, remove previously printed media from the printer. Solution: Print a nozzle check pattern, check the condition of the printhead nozzles, If you are using the Media Take-up Unit. (Æ ...P.2-39) Blank paper is cut sheet was a normal part of ink. Solution: Check the ink tanks and replace any empty ink tanks. (Æ P.6-2) Problem 5: Printer is preventing the rest of the sheet from the previous print job. Problem 3: Roll media ran out...


