
ZoomBrowser EX 6.5 for Windows Instruction Manual
Page 3
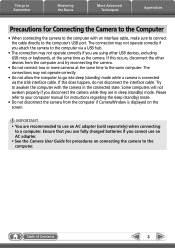
... adapter. • See the Camera User Guide for procedures on the screen. IMPORTANT • You are recommended to use fully charged batteries if you disconnect the camera while they are using other USB devices, excluding USB mice or keyboards, at the same time to the same computer. The connections may not operate correctly. • Do not allow the computer to go into sleep (standby) mode while a camera is displayed on connecting...
... adapter. • See the Camera User Guide for procedures on the screen. IMPORTANT • You are recommended to use fully charged batteries if you disconnect the camera while they are using other USB devices, excluding USB mice or keyboards, at the same time to the same computer. The connections may not operate correctly. • Do not allow the computer to go into sleep (standby) mode while a camera is displayed on connecting...
ZoomBrowser EX 6.5 for Windows Instruction Manual
Page 5
... Buttons...51 Appendices...52 List of Available Functions...52 Supported Image Types...54 Uninstalling the Software...55 Memory Card Folder Structure 56 Troubleshooting...57 5 Things to Remember Mastering the Basics More Advanced Techniques Appendices Exporting...33 Changing Image (Stills) Sizes and Types 33 Changing Movie Sizes and Types 33 Extracting Stills from Movies...34 Exporting Shooting Information 34 Creating Computer Screen Saver Images 35 Creating Computer Wallpaper Images 35 Saving to CDs...36 Uploading Movies...
... Buttons...51 Appendices...52 List of Available Functions...52 Supported Image Types...54 Uninstalling the Software...55 Memory Card Folder Structure 56 Troubleshooting...57 5 Things to Remember Mastering the Basics More Advanced Techniques Appendices Exporting...33 Changing Image (Stills) Sizes and Types 33 Changing Movie Sizes and Types 33 Extracting Stills from Movies...34 Exporting Shooting Information 34 Creating Computer Screen Saver Images 35 Creating Computer Wallpaper Images 35 Saving to CDs...36 Uploading Movies...
ZoomBrowser EX 6.5 for Windows Instruction Manual
Page 32
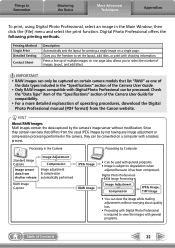
... Print Detailed Setting Contact Sheet Description Automatically sets the layout for compatibility. • For a more detailed explanation of operating procedures, download the Digital Photo Professional manual (PDF format) from the Canon website. HINT About RAW Images RAW images contain the data captured by not having any image adjustment or compression processing performed in the Camera Processing by Computer Standard Image Capture Image sensor data from the usual JPEG images by the camera's image sensor without...
... Print Detailed Setting Contact Sheet Description Automatically sets the layout for compatibility. • For a more detailed explanation of operating procedures, download the Digital Photo Professional manual (PDF format) from the Canon website. HINT About RAW Images RAW images contain the data captured by not having any image adjustment or compression processing performed in the Camera Processing by Computer Standard Image Capture Image sensor data from the usual JPEG images by the camera's image sensor without...
ZoomBrowser EX 6.5 for Windows Instruction Manual
Page 53
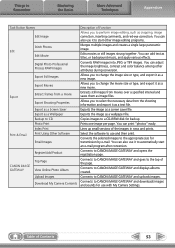
... Button Names Edit Image Edit Export Print & Email Stitch Photos Edit Movie Digital Photo Professional Process RAW Images Export Still Images Export Movies Extract frames from a movie Export Shooting Properties Export as a Screen Saver Export as a Wallpaper Backup to CD Photo Print Index Print Print Using Other Software Email Images Register/Add Product CANON iMAGE GATEWAY Top Page View Online Photo Album Upload Images Download My Camera Contents Description of Function Allows you to change the image size or type...
... Button Names Edit Image Edit Export Print & Email Stitch Photos Edit Movie Digital Photo Professional Process RAW Images Export Still Images Export Movies Extract frames from a movie Export Shooting Properties Export as a Screen Saver Export as a Wallpaper Backup to CD Photo Print Index Print Print Using Other Software Email Images Register/Add Product CANON iMAGE GATEWAY Top Page View Online Photo Album Upload Images Download My Camera Contents Description of Function Allows you to change the image size or type...
HG10 Product Brochure
Page 2
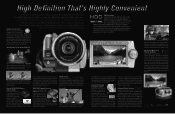
... manual focus mode) provides critical video zoom and peaking (enhanced image contours) to 24p. Color reproduction is extremely accurate, especially in playback mode or on Multi-Angle Vivid LCD. World-renowned Canon optics give you the brightness information you 're shooting video, simply press the photo button to a hard disk drive (HDD) for ultimate clarity. Advanced Photo Features The HG10 Camcorder is minimized for longer recording time, ultimate HD quality, and superior ease in viewing...
... manual focus mode) provides critical video zoom and peaking (enhanced image contours) to 24p. Color reproduction is extremely accurate, especially in playback mode or on Multi-Angle Vivid LCD. World-renowned Canon optics give you the brightness information you 're shooting video, simply press the photo button to a hard disk drive (HDD) for ultimate clarity. Advanced Photo Features The HG10 Camcorder is minimized for longer recording time, ultimate HD quality, and superior ease in viewing...
HG10 Product Brochure
Page 3
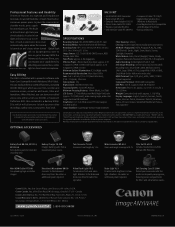
... to change without notice. Supports USB 2.0 Hi-Speed Dimensions (W x H x D): approx. 3.2 x 3.0 x 5.1 in Ultra Video Light light or directional microphone. Battery Charger CB-2LW Charges battery packs from Corel (compatible with this product is a Backup Utility Disc which you shoot subjects in color in low light at 0.7x. Canon Mexicana S. With the Advanced Accessory Shoe, you can easily perform a variety of functions, including AVCHD Editing in type (electronically opens and closes) AE Mode: Program AE: AUTO...
... to change without notice. Supports USB 2.0 Hi-Speed Dimensions (W x H x D): approx. 3.2 x 3.0 x 5.1 in Ultra Video Light light or directional microphone. Battery Charger CB-2LW Charges battery packs from Corel (compatible with this product is a Backup Utility Disc which you shoot subjects in color in low light at 0.7x. Canon Mexicana S. With the Advanced Accessory Shoe, you can easily perform a variety of functions, including AVCHD Editing in type (electronically opens and closes) AE Mode: Program AE: AUTO...

HG10 Instruction Manual
Page 18
Introduction Screen Displays Recording Movies Playing Movies (During Playback) Operating mode ( 24) Recording program ( 51, 54) White balance ( 58) Image effect ( 59) Digital effects ( 60) Recording mode ( 34) Still image quality/size (simultaneous recording) ( 74) Recording reminder Instant AF ( 45), MF Manual focus ( 56) 24F progressive frame rate Hard disk operation Time code/Playback time (hours : minutes : seconds) Remaining recording time on the hard disk Backlight correction ( 57) Headphones output ( 38) Image stabilizer ( 46) Wind screen off ( 47) Drop sensor off ( 47) Level marker ( ...
Introduction Screen Displays Recording Movies Playing Movies (During Playback) Operating mode ( 24) Recording program ( 51, 54) White balance ( 58) Image effect ( 59) Digital effects ( 60) Recording mode ( 34) Still image quality/size (simultaneous recording) ( 74) Recording reminder Instant AF ( 45), MF Manual focus ( 56) 24F progressive frame rate Hard disk operation Time code/Playback time (hours : minutes : seconds) Remaining recording time on the hard disk Backlight correction ( 57) Headphones output ( 38) Image stabilizer ( 46) Wind screen off ( 47) Drop sensor off ( 47) Level marker ( ...

HG10 Instruction Manual
Page 32
... camcorder to shooting movies, including recording, playback, menu options, and hard disk operations. WHEN YOU HAVE FINISHED RECORDING 1 Make sure that the HDD access indicator is on . In extreme cases, the playback of fast zooms and panning can also press START/STOP on the LCD panel. Video This chapter covers functions related to vibrations or strong impacts. - Recording Shooting Video 3 Press START/STOP to pause the recording. • You can result in CAMERA mode. press START/STOP...
... camcorder to shooting movies, including recording, playback, menu options, and hard disk operations. WHEN YOU HAVE FINISHED RECORDING 1 Make sure that the HDD access indicator is on . In extreme cases, the playback of fast zooms and panning can also press START/STOP on the LCD panel. Video This chapter covers functions related to vibrations or strong impacts. - Recording Shooting Video 3 Press START/STOP to pause the recording. • You can result in CAMERA mode. press START/STOP...

HG10 Instruction Manual
Page 40
... an External Video Recorder ( 86). For a detailed explanation, refer to Copying your Recordings to the Corel Application Disc Installation Guide and User Manual. Transferring Movies from a Computer After you transfer movies to a computer, you backed up using the software on the camcorder's built-in hard disk. If you can use the supplied Corel Application Disc software to select movies and transfer them to a computer. For a detailed explanation, refer to the software's instruction manual (electronic version on PDF file). Recordings made...
... an External Video Recorder ( 86). For a detailed explanation, refer to Copying your Recordings to the Corel Application Disc Installation Guide and User Manual. Transferring Movies from a Computer After you transfer movies to a computer, you backed up using the software on the camcorder's built-in hard disk. If you can use the supplied Corel Application Disc software to select movies and transfer them to a computer. For a detailed explanation, refer to the software's instruction manual (electronic version on PDF file). Recordings made...

HG10 Instruction Manual
Page 48
DATA CODE ( 42) [ DATE], [ TIME], [ DATE & TIME], [ CAMERA DATA] Displays the date and/or time when the scene was recorded. [ CAMERA DATA]: Displays the aperture (f-stop) and shutter speed used when recording the image. MARKERS [ OFF], [ LEVEL(WHT)], [ LEVEL(GRY)], [ GRID(WHT)], [ GRID(GRY)] You can display a grid or a horizontal line at the center of the screen. TV SCREEN [ ON], [ OFF] When set to [ ON], the camcorder's on-screen displays will not affect the recordings on the screen of a TV or monitor connected using the...
DATA CODE ( 42) [ DATE], [ TIME], [ DATE & TIME], [ CAMERA DATA] Displays the date and/or time when the scene was recorded. [ CAMERA DATA]: Displays the aperture (f-stop) and shutter speed used when recording the image. MARKERS [ OFF], [ LEVEL(WHT)], [ LEVEL(GRY)], [ GRID(WHT)], [ GRID(GRY)] You can display a grid or a horizontal line at the center of the screen. TV SCREEN [ ON], [ OFF] When set to [ ON], the camcorder's on-screen displays will not affect the recordings on the screen of a TV or monitor connected using the...
HG10 Instruction Manual
Page 88
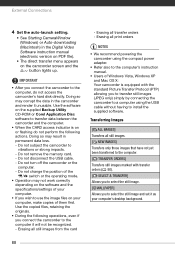
... you connect the camcorder to use the image files on or flashing do not access the camcorder's hard disk directly. Do not turn off the camcorder or the computer. - Do not disconnect the USB cable. - Doing so may corrupt the data in the Digital Video Software instruction manual (electronic version on PDF file). • The direct transfer menu appears on the camcorder screen and the button lights up. Erasing all still images from the card - External Connections 4 Set the auto-launch setting. • See Starting CameraWindow (Windows) or Auto-downloading (Macintosh...
... you connect the camcorder to use the image files on or flashing do not access the camcorder's hard disk directly. Do not turn off the camcorder or the computer. - Do not disconnect the USB cable. - Doing so may corrupt the data in the Digital Video Software instruction manual (electronic version on PDF file). • The direct transfer menu appears on the camcorder screen and the button lights up. Erasing all still images from the card - External Connections 4 Set the auto-launch setting. • See Starting CameraWindow (Windows) or Auto-downloading (Macintosh...

HG10 Instruction Manual
Page 94
... take photos while recording a video. Cancel the protection. 75 94 Adjust the volume with the function guide in the FUNC. screen. Memory Card Operation Problem Solution Memory card cannot be played back. Memory card was not facing the correct direction. The still image simultaneous recording setting in 37 mode. Image is full. No sound from the playback scene when [TV TYPE] 50 is set to [RESET] and insert a new memory card. menu is set to the playlist. - Set [TV TYPE] to mode. 67 Image cannot be captured...
... take photos while recording a video. Cancel the protection. 75 94 Adjust the volume with the function guide in the FUNC. screen. Memory Card Operation Problem Solution Memory card cannot be played back. Memory card was not facing the correct direction. The still image simultaneous recording setting in 37 mode. Image is full. No sound from the playback scene when [TV TYPE] 50 is set to [RESET] and insert a new memory card. menu is set to the playlist. - Set [TV TYPE] to mode. 67 Image cannot be captured...

HG10 Instruction Manual
Page 98
... print from a memory card that was edited on the memory card has been marked with the button. Select [STOP] to the printer's instruction manual and contact the appropriate customer support center or service center. Or, you are printing using the button, check the print settings. Close the printer cover securely. No still image on a computer. Check the printer status. Cancel printing, disconnect the USB cable and turn off the...
... print from a memory card that was edited on the memory card has been marked with the button. Select [STOP] to the printer's instruction manual and contact the appropriate customer support center or service center. Or, you are printing using the button, check the print settings. Close the printer cover securely. No still image on a computer. Check the printer status. Cancel printing, disconnect the USB cable and turn off the...
HG10 Instruction Manual
Page 111
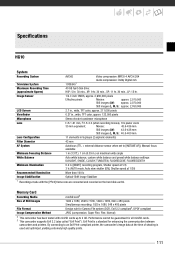
... condenser microphone Lens f=6.1-61 mm, F/1.8-3.0 (when recording movies), 10x power zoom 35 mm equivalent: Movies: 43.6-436 mm Still images (LW): 43.6-436 mm Still images (L, M, S): 40.0-400 mm Lens Configuration 11 elements in .) on maximum wide angle White Balance Auto white balance, custom white balance and preset white balance settings: DAYLIGHT, SHADE, CLOUDY, TUNGSTEN, FLUORESCENT, FLUORESCENT H Minimum Illumination 0.2 lx ([NIGHT] recording program, Shutter speed at 1/2) 3 lx (AUTO mode, Auto slow shutter [ON], Shutter speed at the time of Still Images File Format 1920...
... condenser microphone Lens f=6.1-61 mm, F/1.8-3.0 (when recording movies), 10x power zoom 35 mm equivalent: Movies: 43.6-436 mm Still images (LW): 43.6-436 mm Still images (L, M, S): 40.0-400 mm Lens Configuration 11 elements in .) on maximum wide angle White Balance Auto white balance, custom white balance and preset white balance settings: DAYLIGHT, SHADE, CLOUDY, TUNGSTEN, FLUORESCENT, FLUORESCENT H Minimum Illumination 0.2 lx ([NIGHT] recording program, Shutter speed at 1/2) 3 lx (AUTO mode, Auto slow shutter [ON], Shutter speed at the time of Still Images File Format 1920...

HG10 Instruction Manual
Page 113
... Definition TV (HDTV) . . . .84 D Data code 42 Date and time 27 Date format 51 Daylight saving time 28 Time zone 28 Deleting/Erasing Movies 36, 41 Still images 67, 69 Digital effects 60 Direct print 77 Direct transfer 87 Drive mode 71 Drop sensor 47 E Error messages 95 Exposure 57 F File numbers 50 Fireworks (recording program 53 Flash 70 Focus Assist functions 46, 56 Automatic 45 Focus priority 72 Manual 56 Frame rate 46 FUNC. Auto exposure bracketing . . . . . .71 AF...
... Definition TV (HDTV) . . . .84 D Data code 42 Date and time 27 Date format 51 Daylight saving time 28 Time zone 28 Deleting/Erasing Movies 36, 41 Still images 67, 69 Digital effects 60 Direct print 77 Direct transfer 87 Drive mode 71 Drop sensor 47 E Error messages 95 Exposure 57 F File numbers 50 Fireworks (recording program 53 Flash 70 Focus Assist functions 46, 56 Automatic 45 Focus priority 72 Manual 56 Frame rate 46 FUNC. Auto exposure bracketing . . . . . .71 AF...

HG10 Instruction Manual
Page 114
...Memory card 30, 101 Microphone 61 Mini video light 55 miniSD card 30 Mode switch 33 N Navigation buttons 25 Night (recording program 53 O Onscreen display selection 42 Original recordings 63 P P (recording program 54 R Recording Movies 32 Still images 65 Recording data 42 Recording mode 43 Recording programs 54 Recording reminder 20 Remote sensor 23 RESET 92 Reviewing Movies (Record review 36 Still images (Review 46 S Screen icons 18 Searching scenes by date 40 Self timer 56 Serial number 16 Setup menus 26, 44 Shutter speed 54 Simultaneous recording (hard disk/memory...
...Memory card 30, 101 Microphone 61 Mini video light 55 miniSD card 30 Mode switch 33 N Navigation buttons 25 Night (recording program 53 O Onscreen display selection 42 Original recordings 63 P P (recording program 54 R Recording Movies 32 Still images 65 Recording data 42 Recording mode 43 Recording programs 54 Recording reminder 20 Remote sensor 23 RESET 92 Reviewing Movies (Record review 36 Still images (Review 46 S Screen icons 18 Searching scenes by date 40 Self timer 56 Serial number 16 Setup menus 26, 44 Shutter speed 54 Simultaneous recording (hard disk/memory...

Digital Video Software (Windows) Ver.27 Instruction Manual
Page 20
.... You must have authorization as the [Scanner and Camera Wizard] start ] menu. 2) Right-click the CD-ROM icon and select [Open] from the displayed menu. 3) Double-click the [SETUP.EXE] icon. 20 Installing the Digital Video Software Follow the instructions in the [User Account Control] window that appears after connecting the camcorder, until you to download still images by simply connecting the camcorder to a computer with the standard Picture Transfer Protocol (PTP).
.... You must have authorization as the [Scanner and Camera Wizard] start ] menu. 2) Right-click the CD-ROM icon and select [Open] from the displayed menu. 3) Double-click the [SETUP.EXE] icon. 20 Installing the Digital Video Software Follow the instructions in the [User Account Control] window that appears after connecting the camcorder, until you to download still images by simply connecting the camcorder to a computer with the standard Picture Transfer Protocol (PTP).

Digital Video Software (Windows) Ver.27 Instruction Manual
Page 38
... image(s) in fullscreen mode]: Displays downloaded images in full screen mode. - [Launch ZoomBrowser EX]: Starts ZoomBrowser EX after downloading the images. - [Show Window]: The Camera Control window appears when you connect the camcorder to specify the destination folder. Destination Folder Click this button to the computer. 2 Press the button on the camcorder screen and press the button. • See your camcorder instruction manual for how to set and operate the camcorder to transfer images. • The button cannot be used...
... image(s) in fullscreen mode]: Displays downloaded images in full screen mode. - [Launch ZoomBrowser EX]: Starts ZoomBrowser EX after downloading the images. - [Show Window]: The Camera Control window appears when you connect the camcorder to specify the destination folder. Destination Folder Click this button to the computer. 2 Press the button on the camcorder screen and press the button. • See your camcorder instruction manual for how to set and operate the camcorder to transfer images. • The button cannot be used...
Digital Video Software (Windows) Ver.27 Instruction Manual
Page 86
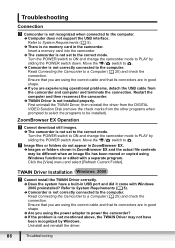
... the USB cable from the other programs when prompted to select the programs to power the camcorder? Î If the problem is not mentioned above, the TWAIN Driver may be installed). Insert a memory card into the camcorder. Î The camcorder is not set to the correct mode. ZoomBrowser EX Operation Cannot download still images. Î The camcorder is not set to the correct mode. Read Connecting the Camcorder to . Move the / switch...
... the USB cable from the other programs when prompted to select the programs to power the camcorder? Î If the problem is not mentioned above, the TWAIN Driver may be installed). Insert a memory card into the camcorder. Î The camcorder is not set to the correct mode. ZoomBrowser EX Operation Cannot download still images. Î The camcorder is not set to the correct mode. Read Connecting the Camcorder to . Move the / switch...

Digital Video Software (Macintosh) Ver.27 Instruction Manual
Page 35
3 Specify the destination folder settings and click [Finish]. Macintosh Downloading Still Images (ImageBrowser) 35 Destination Folder Click this button to transfer images. • The button cannot be used when it is not lighted. 2 Press the button on the camcorder. Select to specify the name of the subfolder. „ Direct Transfer 1 Set the direct transfer settings on the camcorder screen after starting the Camera Control window. • See your camcorder instruction manual for how to set and operate the camcorder to specify the destination folder.
3 Specify the destination folder settings and click [Finish]. Macintosh Downloading Still Images (ImageBrowser) 35 Destination Folder Click this button to transfer images. • The button cannot be used when it is not lighted. 2 Press the button on the camcorder. Select to specify the name of the subfolder. „ Direct Transfer 1 Set the direct transfer settings on the camcorder screen after starting the Camera Control window. • See your camcorder instruction manual for how to set and operate the camcorder to specify the destination folder.


