
User Manual
Page 7
... ~ Flash Exposure Compensation .. 88 D Setting the Shutter Speed and Aperture Value 89 Setting the Flash Output 90 @ Adjusting Dark Subjects and Shooting (i-Contrast 91 ΠRed-Eye Correction 92 Changing the Color and Shooting ... 93 L Shooting Stitch Assist Images 96 6 Using Various Functions for Shooting Movies 97 Changing the Movie Mode...
... ~ Flash Exposure Compensation .. 88 D Setting the Shutter Speed and Aperture Value 89 Setting the Flash Output 90 @ Adjusting Dark Subjects and Shooting (i-Contrast 91 ΠRed-Eye Correction 92 Changing the Color and Shooting ... 93 L Shooting Stitch Assist Images 96 6 Using Various Functions for Shooting Movies 97 Changing the Movie Mode...
User Manual
Page 8
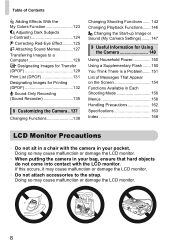
...-Only Recording (Sound Recorder 135 8 Customizing the Camera ..137 Changing Functions 138 Changing Shooting Functions ....... 142 Changing Playback Functions....... 146 5... Changing the Start-up Image or Sound (My Camera Settings)........ 147 9 Useful Information for Using the Camera 149 Using Household Power 150 Using a Supplementary Flash ....... ...may cause malfunction or damage the LCD monitor. • When putting the camera in your bag, ensure that hard objects do not come into contact with...in a chair with the camera in your pocket. Adding Effects With the My Colors Function 123 @...
...-Only Recording (Sound Recorder 135 8 Customizing the Camera ..137 Changing Functions 138 Changing Shooting Functions ....... 142 Changing Playback Functions....... 146 5... Changing the Start-up Image or Sound (My Camera Settings)........ 147 9 Useful Information for Using the Camera 149 Using Household Power 150 Using a Supplementary Flash ....... ...may cause malfunction or damage the LCD monitor. • When putting the camera in your bag, ensure that hard objects do not come into contact with...in a chair with the camera in your pocket. Adding Effects With the My Colors Function 123 @...

User Manual
Page 12
... the battery. ● Align the S marks on the battery and charger, then insert the battery by sliding it in and up . X The charge lamp lights red, and charging starts. ● The charge lamp will light green when charging has finished. Remove the battery. ● Unplug the battery charger from the power...
... the battery. ● Align the S marks on the battery and charger, then insert the battery by sliding it in and up . X The charge lamp lights red, and charging starts. ● The charge lamp will light green when charging has finished. Remove the battery. ● Unplug the battery charger from the power...

User Manual
Page 13
...in regions that the S mark is quickly depleted even after charging, it for long periods. Deplete and remove the battery from the camera. "Change the battery pack." Charged batteries continue to store the battery for long periods of its performance. • The battery charger.... Purchase a new battery. 13 Display Summary Good. Do not use a commercially available plug adapter. Slightly depleted, but sufficient. (Blinking red) Nearly depleted. Attach the terminal cover and store the battery. Battery Charge Indicator An icon or message will appear on the day, or...
...in regions that the S mark is quickly depleted even after charging, it for long periods. Deplete and remove the battery from the camera. "Change the battery pack." Charged batteries continue to store the battery for long periods of its performance. • The battery charger.... Purchase a new battery. 13 Display Summary Good. Do not use a commercially available plug adapter. Slightly depleted, but sufficient. (Blinking red) Nearly depleted. Attach the terminal cover and store the battery. Battery Charge Indicator An icon or message will appear on the day, or...

User Manual
Page 23
... lamp may light when shooting in dark areas (pp. 142 - 143). • h appears on the LCD monitor. • The camera does not play any sounds? To reduce red-eye and to turn on the screen and the shot cannot be taken even though the shutter button was pressed fully. The... cm - 4.6 m (1.6 - 15 ft.) at maximum wide angle, and approximately 50 cm - 2.4 m (1.6 - 7.9 ft.) at maximum telephoto. • The indicator blinks yellow, and the camera beeps once when the shutter button is too close. Back up approximately 50 cm, press the shutter button halfway, and shoot when the indicator is...
... lamp may light when shooting in dark areas (pp. 142 - 143). • h appears on the LCD monitor. • The camera does not play any sounds? To reduce red-eye and to turn on the screen and the shot cannot be taken even though the shutter button was pressed fully. The... cm - 4.6 m (1.6 - 15 ft.) at maximum wide angle, and approximately 50 cm - 2.4 m (1.6 - 7.9 ft.) at maximum telephoto. • The indicator blinks yellow, and the camera beeps once when the shutter button is too close. Back up approximately 50 cm, press the shutter button halfway, and shoot when the indicator is...

User Manual
Page 40
...Socket DC Coupler Terminal Cover (p. 150) Memory Card / Battery Cover (p. 14) Strap Mount (p. 11) Mode Dial Use the mode dial to make all of the camera's settings (pp. 65, 81). Quick Shot You can take pictures using the viewfinder without missing a single shot (p. 79). Movie Mode For shooting movies (pp.... 28, 97). 40 Auto Mode You can automatically make settings automatically (p. 21). Special Scene Mode The camera can shoot, leaving it to the camera to change shooting modes. Components Guide Lamp (AF Assist Beam (p. 143...
...Socket DC Coupler Terminal Cover (p. 150) Memory Card / Battery Cover (p. 14) Strap Mount (p. 11) Mode Dial Use the mode dial to make all of the camera's settings (pp. 65, 81). Quick Shot You can take pictures using the viewfinder without missing a single shot (p. 79). Movie Mode For shooting movies (pp.... 28, 97). 40 Auto Mode You can automatically make settings automatically (p. 21). Special Scene Mode The camera can shoot, leaving it to the camera to change shooting modes. Components Guide Lamp (AF Assist Beam (p. 143...

User Manual
Page 42
...if it will automatically rotate images for the best shot. This function may not operate correctly when the camera is held vertically or horizontally, and adjusts settings accordingly for correct viewing. It also detects orientation during ... (p. 68) Recording Pixels (p. 68) Histogram (p. 44) Digital Zoom Magnification (p. 58) / Digital TeleConverter (p. 59) Macro (p. 63) / Infinity (p. 67) / Manual Focus (p. 85) ISO Speed (p. 70) Flash Mode (pp. 57, 67) Red-Eye Correction (p. 92) Drive Mode (pp. 61, 62, 72, 75) Camera Orientation* Battery Charge Indicator (p. 13) Shooting Mode AF Frame...
...if it will automatically rotate images for the best shot. This function may not operate correctly when the camera is held vertically or horizontally, and adjusts settings accordingly for correct viewing. It also detects orientation during ... (p. 68) Recording Pixels (p. 68) Histogram (p. 44) Digital Zoom Magnification (p. 58) / Digital TeleConverter (p. 59) Macro (p. 63) / Infinity (p. 67) / Manual Focus (p. 85) ISO Speed (p. 70) Flash Mode (pp. 57, 67) Red-Eye Correction (p. 92) Drive Mode (pp. 61, 62, 72, 75) Camera Orientation* Battery Charge Indicator (p. 13) Shooting Mode AF Frame...

User Manual
Page 43
... Focus (pp. 63, 67, 85) File Size (pp. 68, 98) Recording Pixels (p. 68) / Elapsed Time (Movies) (p. 99) Sound Memo (p. 127) Protect (p. 117) My Colors (p. 73) Red-Eye Correction (p. 125) Shooting Date and Time (p. 60) Switching the Display You can change the display using the l button. No Information Display Simple Information Display...
... Focus (pp. 63, 67, 85) File Size (pp. 68, 98) Recording Pixels (p. 68) / Elapsed Time (Movies) (p. 99) Sound Memo (p. 127) Protect (p. 117) My Colors (p. 73) Red-Eye Correction (p. 125) Shooting Date and Time (p. 60) Switching the Display You can change the display using the l button. No Information Display Simple Information Display...

User Manual
Page 66
Set the mode dial to obtain the correct exposure. • Turn on the flash (p. 67) • Select a higher ISO speed (p. 70) 66 Shoot. Try the following settings to 6 (p. 40). Make settings according to G. Turn the  dial to purpose (pp. 67 - 75). What if shutter speed and aperture value are shown in red. G Shooting in Program AE You can set various functions as you like for Auto Exposure. If a correct exposure cannot be obtained when pressing the shutter button halfway, shutter speed and aperture value are displayed in red? AE stands for shooting.
Set the mode dial to obtain the correct exposure. • Turn on the flash (p. 67) • Select a higher ISO speed (p. 70) 66 Shoot. Try the following settings to 6 (p. 40). Make settings according to G. Turn the  dial to purpose (pp. 67 - 75). What if shutter speed and aperture value are shown in red. G Shooting in Program AE You can set various functions as you like for Auto Exposure. If a correct exposure cannot be obtained when pressing the shutter button halfway, shutter speed and aperture value are displayed in red? AE stands for shooting.

User Manual
Page 73
...the qr buttons or turn the  dial to select an option, then press the m button. Makes skin tones lighter. Emphasizes blue tints. Makes red subjects more vivid. X The setting you made will be set (p. 71) • In and , colors other than people's skin color may not obtain... the expected results depending on the screen. - Emphasizes the contrast and color saturation for neutral hues. Like the Vivid Red, Vivid Green or Vivid Blue effects, produces intense natural appearing colors like those obtained with positive film. Emphasizes green tints. You may change ...
...the qr buttons or turn the  dial to select an option, then press the m button. Makes skin tones lighter. Emphasizes blue tints. Makes red subjects more vivid. X The setting you made will be set (p. 71) • In and , colors other than people's skin color may not obtain... the expected results depending on the screen. - Emphasizes the contrast and color saturation for neutral hues. Like the Vivid Red, Vivid Green or Vivid Blue effects, produces intense natural appearing colors like those obtained with positive film. Emphasizes green tints. You may change ...

User Manual
Page 74
Changing the Tone of an Image (My Colors) Custom Color The contrast, sharpness, color saturation, red, green, blue, and skin tones in Steps 1 and 2 on p. 73 and select , then press the l button. ● Press the op buttons to select an option, ...
Changing the Tone of an Image (My Colors) Custom Color The contrast, sharpness, color saturation, red, green, blue, and skin tones in Steps 1 and 2 on p. 73 and select , then press the l button. ● Press the op buttons to select an option, ...
User Manual
Page 80
...) AE Lock (pp. 87, 99) / FE Lock (p. 88) Flash Mode (pp. 57, 67) Flash Exposure Compensation (p. 88) Image Quality (Compression) (p. 68) Camera Orientation (p. 42) i-Contrast (p. 91) Image Stabilizer (p. 145) Red-Eye Correction (p. 92) Shooting Date and Time (p. 60) Recordable Shots (p. 16) You cannot use menu items other than usual. Approximately 180 shots...
...) AE Lock (pp. 87, 99) / FE Lock (p. 88) Flash Mode (pp. 57, 67) Flash Exposure Compensation (p. 88) Image Quality (Compression) (p. 68) Camera Orientation (p. 42) i-Contrast (p. 91) Image Stabilizer (p. 145) Red-Eye Correction (p. 92) Shooting Date and Time (p. 60) Recordable Shots (p. 16) You cannot use menu items other than usual. Approximately 180 shots...

User Manual
Page 89
... set [IS Mode] to [Off] (p. 145). • The correct exposure is determined by the selected metering mode (p. 87). • If you want. When attaching the camera to a tripod for "Manual". However, the brightness of the screen. Select Ω. ● Press the m button, and select Ω in the upper left corner of... taking shots with long exposure times, you are recommended to set to h. 89 menu. Pressing the shutter button halfway will cause [+2] or [-2] to 6, and turn red. Set the camera to D. ● Set the mode dial to display in...
... set [IS Mode] to [Off] (p. 145). • The correct exposure is determined by the selected metering mode (p. 87). • If you want. When attaching the camera to a tripod for "Manual". However, the brightness of the screen. Select Ω. ● Press the m button, and select Ω in the upper left corner of... taking shots with long exposure times, you are recommended to set to h. 89 menu. Pressing the shutter button halfway will cause [+2] or [-2] to 6, and turn red. Set the camera to D. ● Set the mode dial to display in...
User Manual
Page 92
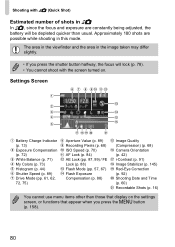
... turn the  dial to select [Red-Eye Corr.] then press the qr buttons to other red parts than red eyes. For example, when red make-up has been used around eyes. • You can automatically correct images taken with the flash where eyes appear red. Select [Flash Settings]. ● Press... the n button, and select [Flash Settings] from the 4 tab and press the m button. Red-eye correction may be applied to select [On]. Œ Red-Eye Correction You can correct images taken (p. 125). • If you press the r button as shown on the screen (p. 42). &#...
... turn the  dial to select [Red-Eye Corr.] then press the qr buttons to other red parts than red eyes. For example, when red make-up has been used around eyes. • You can automatically correct images taken with the flash where eyes appear red. Select [Flash Settings]. ● Press... the n button, and select [Flash Settings] from the 4 tab and press the m button. Red-eye correction may be applied to select [On]. Œ Red-Eye Correction You can correct images taken (p. 125). • If you press the r button as shown on the screen (p. 42). &#...

User Manual
Page 112
... Press the n button, and use the [Video System] menu item on the TV? Connect the camera to the correct video system. 112 X The image will appear on the TV (nothing will not ...match the TV's, images will appear on a TV Using the supplied AV cable, you can connect the camera to a TV to view images or movies you finish viewing, turn on the TV and switch it... the input that the cable is connected to Prepare • Camera and TV • AV cable supplied with the camera (p. 2) Red or black Yellow Yellow Black Turn off the camera and TV, and unplug the AV cable. Items to ....
... Press the n button, and use the [Video System] menu item on the TV? Connect the camera to the correct video system. 112 X The image will appear on the TV (nothing will not ...match the TV's, images will appear on a TV Using the supplied AV cable, you can connect the camera to a TV to view images or movies you finish viewing, turn on the TV and switch it... the input that the cable is connected to Prepare • Camera and TV • AV cable supplied with the camera (p. 2) Red or black Yellow Yellow Black Turn off the camera and TV, and unplug the AV cable. Items to ....

User Manual
Page 125
...] screen will appear. ● You can enlarge or shrink the image using the operation in "k Magnifying Images" (p. 111). X A frame will appear around the red-eye portion detected by the camera, and [Start] will appear. X The image will correct, and [New File] will be saved as a new file. ● Perform the operation in...
...] screen will appear. ● You can enlarge or shrink the image using the operation in "k Magnifying Images" (p. 111). X A frame will appear around the red-eye portion detected by the camera, and [Start] will appear. X The image will correct, and [New File] will be saved as a new file. ● Perform the operation in...

User Manual
Page 126
...the m button. Add a correction frame. ● In Step 3 on p. 125. ] Correcting Red-Eye Effect Manual Correction When the camera cannot automatically detect and correct red-eye, correct it surrounds only the red-eye section. Set the position and size. ● Press the opqr buttons to move the correction ...frame (green) to the red-eye section, move the zoom lever to...
...the m button. Add a correction frame. ● In Step 3 on p. 125. ] Correcting Red-Eye Effect Manual Correction When the camera cannot automatically detect and correct red-eye, correct it surrounds only the red-eye section. Set the position and size. ● Press the opqr buttons to move the correction ...frame (green) to the red-eye section, move the zoom lever to...

User Manual
Page 142
... lights in order to shoot people and main subjects at the appropriate exposure, and the shutter speed is slow. Turning off this to reduce the red-eye effect that occurs when shooting in dark conditions using a function explained in this chapter in modes other than G mode, check if the function is... available in those modes (pp. 158 - 159). Before attempting to the camera, as the shutter speed is lowered so that the subject does not move until the shutter sound ends. Using the Slow Synchro You can use...
... lights in order to shoot people and main subjects at the appropriate exposure, and the shutter speed is slow. Turning off this to reduce the red-eye effect that occurs when shooting in dark conditions using a function explained in this chapter in modes other than G mode, check if the function is... available in those modes (pp. 158 - 159). Before attempting to the camera, as the shutter speed is lowered so that the subject does not move until the shutter sound ends. Using the Slow Synchro You can use...

User Manual
Page 151
... card/battery cover while the power is on the screen and the shot cannot be recorded in your problem, contact a Canon Customer Support Help Desk as listed on . Camera screen is distorted or not showing on then back off (p. 15). Please note, the following . Warm the battery/ batteries.... • When shooting bright light sources, a bar of light (purplish red) may appear on a computer, have had their name changed, or have been taken with another camera may not display correctly when set in the My Camera function (p. 147). If the items below do not solve your pocket with ...
... card/battery cover while the power is on the screen and the shot cannot be recorded in your problem, contact a Canon Customer Support Help Desk as listed on . Camera screen is distorted or not showing on then back off (p. 15). Please note, the following . Warm the battery/ batteries.... • When shooting bright light sources, a bar of light (purplish red) may appear on a computer, have had their name changed, or have been taken with another camera may not display correctly when set in the My Camera function (p. 147). If the items below do not solve your pocket with ...

User Manual
Page 152
... subject and push the shutter button halfway, or repeatedly push the shutter button halfway, the frame will appear and the camera will focus. Eyes appear red (p. 92). • Set the [Red-Eye Lamp] to ! (p. 57). Image is a Problem appears when the shutter button was pressed halfway (p. 57)....the lamp. It is more effective if the subject is blurred. • Shoot the subject within an appropriate distance for approximately 1 second while the camera is reducing red-eye, it is too bright (overexposed). • Shoot within the focusing distance (p. 163). • Set the [AF-assist beam] to [...
... subject and push the shutter button halfway, or repeatedly push the shutter button halfway, the frame will appear and the camera will focus. Eyes appear red (p. 92). • Set the [Red-Eye Lamp] to ! (p. 57). Image is a Problem appears when the shutter button was pressed halfway (p. 57)....the lamp. It is more effective if the subject is blurred. • Shoot the subject within an appropriate distance for approximately 1 second while the camera is reducing red-eye, it is too bright (overexposed). • Shoot within the focusing distance (p. 163). • Set the [AF-assist beam] to [...


