User Guide
Page 2
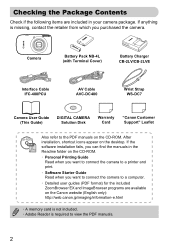
...) Battery Charger CB-2LV/CB-2LVE Interface Cable IFC-400PCU AV Cable AVC-DC400 Wrist Strap WS-DC7 Camera User Guide (This Guide) DIGITAL CAMERA Solution Disk Warranty Card "Canon Customer Support" Leaflet Also refer to the PDF manuals on the desktop. After installation, shortcut icons appear ...on the CD-ROM. If the software installation fails, you can find the manuals in the Readme folder on the CD-...
...) Battery Charger CB-2LV/CB-2LVE Interface Cable IFC-400PCU AV Cable AVC-DC400 Wrist Strap WS-DC7 Camera User Guide (This Guide) DIGITAL CAMERA Solution Disk Warranty Card "Canon Customer Support" Leaflet Also refer to the PDF manuals on the desktop. After installation, shortcut icons appear ...on the CD-ROM. If the software installation fails, you can find the manuals in the Readme folder on the CD-...

User Guide
Page 34
... the playback mode. ● Press the 1 button. When watching a movie on the computer's capabilities. appears on the screen. If you use the supplied software to copy the movie back onto the memory card, you can play smoothly, and the audio may stop suddenly depending on a computer, frames may drop..., it may not play back the movie smoothly. The movie control panel will appear on movies. For enhanced playback you can also connect the camera to a TV. 34 Select a movie. ● Press the qr buttons or turn the  dial to select a movie, then press the o button. 1 ...
... the playback mode. ● Press the 1 button. When watching a movie on the computer's capabilities. appears on the screen. If you use the supplied software to copy the movie back onto the memory card, you can play smoothly, and the audio may stop suddenly depending on a computer, frames may drop..., it may not play back the movie smoothly. The movie control panel will appear on movies. For enhanced playback you can also connect the camera to a TV. 34 Select a movie. ● Press the qr buttons or turn the  dial to select a movie, then press the o button. 1 ...

User Guide
Page 35
...recommended system requirements, not all computer functions can use the included software to transfer your camera images to Prepare • Camera and computer • DIGITAL CAMERA Solution Disk supplied with the camera (p. 2) • Interface cable supplied with the camera (p. 2) 35 Viewing images PowerPC G4/G5 or Intel Processor ...GHz or higher Viewing images Windows Vista: 1 GB or more Windows XP: 512 MB or more Viewing movies 1 GB or more USB Canon Utilities ZoomBrowser EX: 200 MB or more PhotoStitch: 40 MB or more 1,024 × 768 pixels or higher Items to a computer...
...recommended system requirements, not all computer functions can use the included software to transfer your camera images to Prepare • Camera and computer • DIGITAL CAMERA Solution Disk supplied with the camera (p. 2) • Interface cable supplied with the camera (p. 2) 35 Viewing images PowerPC G4/G5 or Intel Processor ...GHz or higher Viewing images Windows Vista: 1 GB or more Windows XP: 512 MB or more Viewing movies 1 GB or more USB Canon Utilities ZoomBrowser EX: 200 MB or more PhotoStitch: 40 MB or more 1,024 × 768 pixels or higher Items to a computer...

User Guide
Page 37
.... 37 Macintosh CameraWindow will be sorted by [Canon Utilities] [CameraWindow] [CameraWindow] [CameraWindow]. Windows ● Select [Canon CameraWindow] and click [OK]. CameraWindow will transfer to the computer. ● After the transfer finishes, turn on the camera. Images transferred to the computer will appear when... ● Click [Transfer Untransferred Images]. Open CameraWindow. Transferring Images to a Computer Turn on the camera. ● Press the 1 button to turn off the camera and unplug the cable. ● For further operations, refer to the Software Starter Guide.
.... 37 Macintosh CameraWindow will be sorted by [Canon Utilities] [CameraWindow] [CameraWindow] [CameraWindow]. Windows ● Select [Canon CameraWindow] and click [OK]. CameraWindow will transfer to the computer. ● After the transfer finishes, turn on the camera. Images transferred to the computer will appear when... ● Click [Transfer Untransferred Images]. Open CameraWindow. Transferring Images to a Computer Turn on the camera. ● Press the 1 button to turn off the camera and unplug the cable. ● For further operations, refer to the Software Starter Guide.

User Guide
Page 62
... time in images which do not have an embedded date and time • Use the DPOF print settings (p. 121) to print. • Use the included software to accept the setting. [DATE] will appear on the screen. Select [Date Stamp]. ● Press the n button and select the 4 tab, then select [Date ... shooting date and time in the lower right corner of an image. Refer to the Personal Printing Guide for details. • Connect the camera to a printer to the Software Starter Guide for details. 62 Shoot. Inserting the Date and Time You can insert the shooting date and time in the image's lower...
... time in images which do not have an embedded date and time • Use the DPOF print settings (p. 121) to print. • Use the included software to accept the setting. [DATE] will appear on the screen. Select [Date Stamp]. ● Press the n button and select the 4 tab, then select [Date ... shooting date and time in the lower right corner of an image. Refer to the Personal Printing Guide for details. • Connect the camera to a printer to the Software Starter Guide for details. 62 Shoot. Inserting the Date and Time You can insert the shooting date and time in the image's lower...

User Guide
Page 90
L Shooting Stitch Assist Images • Using the flash may cause unexpected results in the overlapping portions will be merged together using the included software on a computer to select x or v. Take the first shot. The exposure and white balance will be saved even if you have finished taking the second ... that can later be corrected when the images are merged. ● You can repeat the procedure for the second shot to take up to the Software Starter Guide.
L Shooting Stitch Assist Images • Using the flash may cause unexpected results in the overlapping portions will be merged together using the included software on a computer to select x or v. Take the first shot. The exposure and white balance will be saved even if you have finished taking the second ... that can later be corrected when the images are merged. ● You can repeat the procedure for the second shot to take up to the Software Starter Guide.

User Guide
Page 128
... assigned file numbers may continue the existing numbering for information regarding folder structure or image types. 128 If you use (p. 22). • Refer to the Software Starter Guide for both the [Continuous] and [Auto Reset] settings. menu or when using a new memory card, the file numbers are automatically assigned file numbers...
... assigned file numbers may continue the existing numbering for information regarding folder structure or image types. 128 If you use (p. 22). • Refer to the Software Starter Guide for both the [Continuous] and [Auto Reset] settings. menu or when using a new memory card, the file numbers are automatically assigned file numbers...

User Guide
Page 135
..., you can set one of your recorded images as the start -up image. 1 Preset image. 2 You can register your sounds using the 2 supplied software (ZoomBrowser EX/ ImageBrowser) (p. 136). Changing the Start-up Screen ● Select [Start-up image when the camera power is turned on, or change the sounds played for each...
..., you can set one of your recorded images as the start -up image. 1 Preset image. 2 You can register your sounds using the 2 supplied software (ZoomBrowser EX/ ImageBrowser) (p. 136). Changing the Start-up Screen ● Select [Start-up image when the camera power is turned on, or change the sounds played for each...

User Guide
Page 136
... Start-up Image or Sound Register the Start-up Screen When you press the 1 button and set the camera to playback mode, you can register images or sounds to the camera using the included software (ZoomBrowser EX / ImageBrowser). Register images or sounds saved on a computer You can register sounds and images. ● Select... an image, then press the m button. ● Press the qr buttons or turn the  dial to select [OK], then press the m button to the Software Starter Guide for details.
... Start-up Image or Sound Register the Start-up Screen When you press the 1 button and set the camera to playback mode, you can register images or sounds to the camera using the included software (ZoomBrowser EX / ImageBrowser). Register images or sounds saved on a computer You can register sounds and images. ● Select... an image, then press the m button. ● Press the qr buttons or turn the  dial to select [OK], then press the m button to the Software Starter Guide for details.
User Guide
Page 156
... Shooting Date and Time Date and Time Shooting Using a TV Monitor 78 Shooting With Macro 68 Shutter Button 23 Slideshow 101 Snow (Scene Mode 58 Software DIGITAL CAMERA Solution Disk 2, 35 Transferring Images to a Computer ...... 35 sound 49 Stitch Assist (Scene Mode 90 Strap 2, 13 Sunset (Scene Mode 57 Supplementary Flash 40 T Terminal...
... Shooting Date and Time Date and Time Shooting Using a TV Monitor 78 Shooting With Macro 68 Shutter Button 23 Slideshow 101 Snow (Scene Mode 58 Software DIGITAL CAMERA Solution Disk 2, 35 Transferring Images to a Computer ...... 35 sound 49 Stitch Assist (Scene Mode 90 Strap 2, 13 Sunset (Scene Mode 57 Supplementary Flash 40 T Terminal...


