User Guide
Page 2
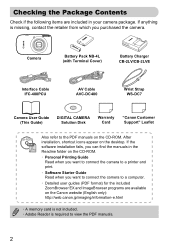
...-4L (with Terminal Cover) Battery Charger CB-2LV/CB-2LVE Interface Cable IFC-400PCU AV Cable AVC-DC400 Wrist Strap WS-DC7 Camera User Guide (This Guide) DIGITAL CAMERA Solution Disk Warranty Card "Canon Customer Support" Leaflet Also refer to view the PDF manuals. 2 If the software... installation fails, you can find the manuals in your camera package. Checking the Package Contents ...
...-4L (with Terminal Cover) Battery Charger CB-2LV/CB-2LVE Interface Cable IFC-400PCU AV Cable AVC-DC400 Wrist Strap WS-DC7 Camera User Guide (This Guide) DIGITAL CAMERA Solution Disk Warranty Card "Canon Customer Support" Leaflet Also refer to view the PDF manuals. 2 If the software... installation fails, you can find the manuals in your camera package. Checking the Package Contents ...
User Guide
Page 3
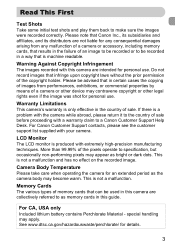
.... special handling may become warm. Warning Against Copyright Infringement The images recorded with a warranty claim to a Canon Customer Support Help Desk. For Canon Customer Support contacts, please see the customer support list supplied with extremely high-precision manufacturing techniques. This is...the pixels operate to make sure the images were recorded correctly. For CA, USA only Included lithium battery contains Perchlorate Material - Warranty Limitations This camera's warranty is machine readable. LCD Monitor The LCD monitor is not a malfunction. Read This First ...
.... special handling may become warm. Warning Against Copyright Infringement The images recorded with a warranty claim to a Canon Customer Support Help Desk. For Canon Customer Support contacts, please see the customer support list supplied with extremely high-precision manufacturing techniques. This is...the pixels operate to make sure the images were recorded correctly. For CA, USA only Included lithium battery contains Perchlorate Material - Warranty Limitations This camera's warranty is machine readable. LCD Monitor The LCD monitor is not a malfunction. Read This First ...

User Guide
Page 6
... the Sound Settings ......... 49 Changing the Screen Brightness .... 50 Returning the Camera to Default Settings 51 Low Level Memory Card Formatting 52 Power Saving Function ...as you read each chapter. Turning the Flash Off 59 Zooming in More Closely on Subjects (Digital Zoom 60 Inserting the Date and Time 62 Ò Using the Self-Timer 63 " Using... frequently used functions of this Guide ........8 Safety Precautions 9 1 Getting Started 13 Charging the Battery 14 Inserting the Battery and Memory Card 16 Setting the Date and Time 19 Setting the Display Language..........21 Formatting...
... the Sound Settings ......... 49 Changing the Screen Brightness .... 50 Returning the Camera to Default Settings 51 Low Level Memory Card Formatting 52 Power Saving Function ...as you read each chapter. Turning the Flash Off 59 Zooming in More Closely on Subjects (Digital Zoom 60 Inserting the Date and Time 62 Ò Using the Self-Timer 63 " Using... frequently used functions of this Guide ........8 Safety Precautions 9 1 Getting Started 13 Charging the Battery 14 Inserting the Battery and Memory Card 16 Setting the Date and Time 19 Setting the Display Language..........21 Formatting...
User Guide
Page 9
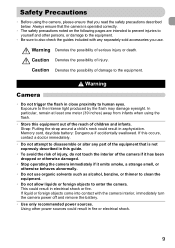
... as alcohol, benzine, or thinner to clean the equipment. • Do not allow liquids or foreign objects to enter the camera. Memory card, day/date battery: Dangerous if accidentally swallowed. If this occurs, contact a doctor immediately. • Do not attempt to disassemble or alter any...Using other persons, or damage to the equipment. • Be sure to also check the guides included with the camera interior, immediately turn the camera power off and remove the battery. • Use only recommended power sources. Safety Precautions • Before using the flash. • Store this guide...
... as alcohol, benzine, or thinner to clean the equipment. • Do not allow liquids or foreign objects to enter the camera. Memory card, day/date battery: Dangerous if accidentally swallowed. If this occurs, contact a doctor immediately. • Do not attempt to disassemble or alter any...Using other persons, or damage to the equipment. • Be sure to also check the guides included with the camera interior, immediately turn the camera power off and remove the battery. • Use only recommended power sources. Safety Precautions • Before using the flash. • Store this guide...

User Guide
Page 10
... lens. It is also possible to suffer hearing loss from the outlet and consult your camera distributor or the closest Canon Customer Support Help Desk. • Use only the specified battery charger to the surroundings. In the event that a battery leaks and the eyes, mouth, skin or clothing contacts these substances, immediately flush with...
... lens. It is also possible to suffer hearing loss from the outlet and consult your camera distributor or the closest Canon Customer Support Help Desk. • Use only the specified battery charger to the surroundings. In the event that a battery leaks and the eyes, mouth, skin or clothing contacts these substances, immediately flush with...
User Guide
Page 11
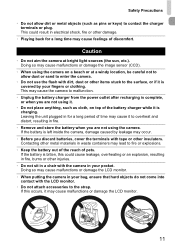
... by leakage may cause malfunctions or damage the image sensor (CCD). • When using the camera on top of the battery charger while it is bitten, this occurs, it is left inside the camera, damage caused by your pocket. If this could result in for a long time may lead ... in your fingers or clothing. Contacting other injuries. • Do not sit in a chair with the camera in fire. • Remove and store the battery when you are not using the camera. If the battery is charging. Leaving the unit plugged in electrical shock, fire or other damage. • Playing back for...
... by leakage may cause malfunctions or damage the image sensor (CCD). • When using the camera on top of the battery charger while it is bitten, this occurs, it is left inside the camera, damage caused by your pocket. If this could result in for a long time may lead ... in your fingers or clothing. Contacting other injuries. • Do not sit in a chair with the camera in fire. • Remove and store the battery when you are not using the camera. If the battery is charging. Leaving the unit plugged in electrical shock, fire or other damage. • Playing back for...
User Guide
Page 14
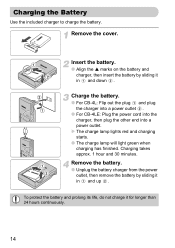
.... Remove the cover. Charging the Battery Use the included charger to charge the battery. Remove the battery. ● Unplug the battery charger from the power outlet, then remove the battery by sliding it in and down . Insert the battery. ● Align the marks on the battery and charger, then insert the battery by sliding it in and up...
.... Remove the cover. Charging the Battery Use the included charger to charge the battery. Remove the battery. ● Unplug the battery charger from the power outlet, then remove the battery by sliding it in and down . Insert the battery. ● Align the marks on the battery and charger, then insert the battery by sliding it in and up...
User Guide
Page 15
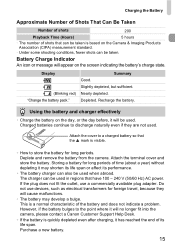
... span or affect its life span. Attach the terminal cover and store the battery. However, if the battery bulges to discharge naturally even if they will no longer fit into the camera, please contact a Canon Customer Support Help Desk. • If the battery is quickly depleted even after charging, it may develop a bulge. Slightly depleted...
... span or affect its life span. Attach the terminal cover and store the battery. However, if the battery bulges to discharge naturally even if they will no longer fit into the camera, please contact a Canon Customer Support Help Desk. • If the battery is quickly depleted even after charging, it may develop a bulge. Slightly depleted...

User Guide
Page 16
...locked position. Slide the tab up until you will not properly lock into the camera. Inserting the Battery and Memory Card Insert the included battery and a memory card into place. Insert the battery. ● Insert the battery as shown until it . Terminals Terminals Insert the memory card. ● ...Insert the memory card as shown until it will not be able to insert the battery in the wrong direction could damage the camera. 16 Check the card's write-protect tab. ● If the memory card has a write-protect tab, you hear ...
...locked position. Slide the tab up until you will not properly lock into the camera. Inserting the Battery and Memory Card Insert the included battery and a memory card into place. Insert the battery. ● Insert the battery as shown until it . Terminals Terminals Insert the memory card. ● ...Insert the memory card as shown until it will not be able to insert the battery in the wrong direction could damage the camera. 16 Check the card's write-protect tab. ● If the memory card has a write-protect tab, you hear ...

User Guide
Page 17
until you hear a click, then slowly release it Removing the Battery and Memory Card Remove the battery. ● Open the cover and press the battery lock in the direction of the arrow. The battery will pop up . The memory card will pop up . 17 Remove the memory card. ● Push the memory card in until it . Inserting the Battery and Memory Card Close the cover. ● Close the cover , and slide it locks into place with a click.
until you hear a click, then slowly release it Removing the Battery and Memory Card Remove the battery. ● Open the cover and press the battery lock in the direction of the arrow. The battery will pop up . The memory card will pop up . 17 Remove the memory card. ● Push the memory card in until it . Inserting the Battery and Memory Card Close the cover. ● Close the cover , and slide it locks into place with a click.
User Guide
Page 18
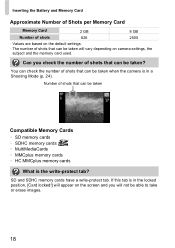
... shots that can be taken? Number of shots that can be taken will not be taken when the camera is the write-protect tab? If this tab is in a Shooting Mode (p. 24). Inserting the Battery and Memory Card Approximate Number of Shots per Memory Card Memory Card 2 GB 8 GB Number of shots...
... shots that can be taken? Number of shots that can be taken will not be taken when the camera is the write-protect tab? If this tab is in a Shooting Mode (p. 24). Inserting the Battery and Memory Card Approximate Number of Shots per Memory Card Memory Card 2 GB 8 GB Number of shots...

User Guide
Page 20
...p. 19 to set the date and time. 20 Date/Time battery • The camera has a built-in date/time battery (backup battery) that allows the date/time settings to be retained about three weeks after the battery pack has been removed. • By inserting a charged battery or connecting an AC adapter kit (sold separately, p. 40... change the current date and time settings. Select [Date/Time] in about 4 hours even if the camera is not turned on. • If the date/time battery is depleted, the Date/Time menu will appear when you turn the  dial to select the 3 tab. ● Press the op ...
...p. 19 to set the date and time. 20 Date/Time battery • The camera has a built-in date/time battery (backup battery) that allows the date/time settings to be retained about three weeks after the battery pack has been removed. • By inserting a charged battery or connecting an AC adapter kit (sold separately, p. 40... change the current date and time settings. Select [Date/Time] in about 4 hours even if the camera is not turned on. • If the date/time battery is depleted, the Date/Time menu will appear when you turn the  dial to select the 3 tab. ● Press the op ...

User Guide
Page 38
Accessories Supplied with Camera Wrist Strap WS-DC7 Battery Pack NB-4L (with Terminal Cover)*1 Battery Charger CB-2LV/CB-2LVE*1 Interface Cable IFC-400PCU*1 AV Cable AVC-DC400*1 DIGITAL CAMERA Solution Disk AC Adapter Kit ACK-DC10 DC Coupler DR-DC10 Power Cord Compact Power Adapter CA-DC10 Waterproof Case WP-DC32 *1 Also available for purchase separately. *2 See the user guide supplied with the printer for more information on the printer and interface cables. 38
Accessories Supplied with Camera Wrist Strap WS-DC7 Battery Pack NB-4L (with Terminal Cover)*1 Battery Charger CB-2LV/CB-2LVE*1 Interface Cable IFC-400PCU*1 AV Cable AVC-DC400*1 DIGITAL CAMERA Solution Disk AC Adapter Kit ACK-DC10 DC Coupler DR-DC10 Power Cord Compact Power Adapter CA-DC10 Waterproof Case WP-DC32 *1 Also available for purchase separately. *2 See the user guide supplied with the printer for more information on the printer and interface cables. 38
User Guide
Page 39
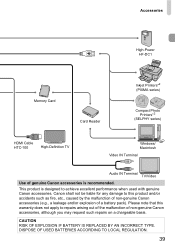
...BY AN INCORRECT TYPE. DISPOSE OF USED BATTERIES ACCORDING TO LOCAL REGULATION. 39 Please note that this product and/or accidents such as fire, etc., caused by the malfunction of non-genuine Canon accessories (e.g., a leakage and/or explosion of non-genuine Canon accessories, although you may request such ...TV Windows/ Macintosh Video IN Terminal Audio IN Terminal TV/Video Use of genuine Canon accessories is designed to repairs arising out of the malfunction of a battery pack). This product is recommended. Canon shall not be liable for any damage to this warranty does not apply to ...
...BY AN INCORRECT TYPE. DISPOSE OF USED BATTERIES ACCORDING TO LOCAL REGULATION. 39 Please note that this product and/or accidents such as fire, etc., caused by the malfunction of non-genuine Canon accessories (e.g., a leakage and/or explosion of non-genuine Canon accessories, although you may request such ...TV Windows/ Macintosh Video IN Terminal Audio IN Terminal TV/Video Use of genuine Canon accessories is designed to repairs arising out of the malfunction of a battery pack). This product is recommended. Canon shall not be liable for any damage to this warranty does not apply to ...

User Guide
Page 40
... subjects that have 100 - 240 V (50/60 Hz) AC power. Recommended for powering the camera for an extended period of time or when connecting to charge the battery inside the camera. • Battery Charger CB-2LV/CB-2LVE An adapter for the light from the built-in regions that are too... distant for charging Battery Pack NB-4L. • Battery Pack NB-4L Rechargeable lithium-ion battery. Other Accessories • HDMI Cable HTC-100 Use this cable to connect the camera to the HDMI™ terminal on a high-definition TV set. •...
... subjects that have 100 - 240 V (50/60 Hz) AC power. Recommended for powering the camera for an extended period of time or when connecting to charge the battery inside the camera. • Battery Charger CB-2LV/CB-2LVE An adapter for the light from the built-in regions that are too... distant for charging Battery Pack NB-4L. • Battery Pack NB-4L Rechargeable lithium-ion battery. Other Accessories • HDMI Cable HTC-100 Use this cable to connect the camera to the HDMI™ terminal on a high-definition TV set. •...
User Guide
Page 42
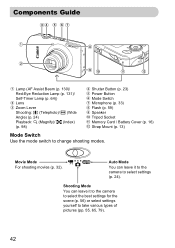
Shooting Mode You can leave it to the camera to select the best settings for the scene (p. 56) or select settings yourself to change shooting modes. Components Guide Lamp (AF Assist Beam (p. 130)/ Red-... Shooting: i (Telephoto)/ j (Wide Angle) (p. 24) Playback: k (Magnify)/ g (Index) (p. 98) Shutter Button (p. 23) Power Button Mode Switch Microphone (p. 33) Flash (p. 59) Speaker Tripod Socket Memory Card / Battery Cover (p. 16) Strap Mount (p. 13) Mode Switch Use the mode switch to take various types of pictures (pp. 55, 65, 79). 42 Movie Mode For...
Shooting Mode You can leave it to the camera to select the best settings for the scene (p. 56) or select settings yourself to change shooting modes. Components Guide Lamp (AF Assist Beam (p. 130)/ Red-... Shooting: i (Telephoto)/ j (Wide Angle) (p. 24) Playback: k (Magnify)/ g (Index) (p. 98) Shutter Button (p. 23) Power Button Mode Switch Microphone (p. 33) Flash (p. 59) Speaker Tripod Socket Memory Card / Battery Cover (p. 16) Strap Mount (p. 13) Mode Switch Use the mode switch to take various types of pictures (pp. 55, 65, 79). 42 Movie Mode For...
User Guide
Page 44
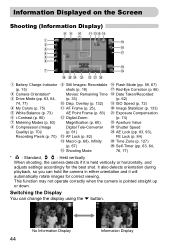
This function may not operate correctly when the camera is held vertically or horizontally, and adjusts settings accordingly for correct viewing. Overlay (p. 132) AF Frame (p. 25), AE Point Frame (p. 83) Digital Zoom Magnification (p. 60), Digital Tele-Converter (p. 61) AF Lock (p. 82) Macro (p. 68), ... either orientation and it is pointed straight up or down. Information Displayed on the Screen Shooting (Information Display) Battery Charge Indicator (p. 15) Camera Orientation* Drive Mode (pp. 63, 64, 74, 77) My Colors (p. 75) White Balance (p. 73) i-Contrast (p. 85) Metering...
This function may not operate correctly when the camera is held vertically or horizontally, and adjusts settings accordingly for correct viewing. Overlay (p. 132) AF Frame (p. 25), AE Point Frame (p. 83) Digital Zoom Magnification (p. 60), Digital Tele-Converter (p. 61) AF Lock (p. 82) Macro (p. 68), ... either orientation and it is pointed straight up or down. Information Displayed on the Screen Shooting (Information Display) Battery Charge Indicator (p. 15) Camera Orientation* Drive Mode (pp. 63, 64, 74, 77) My Colors (p. 75) White Balance (p. 73) i-Contrast (p. 85) Metering...
User Guide
Page 45
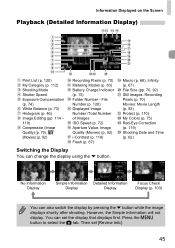
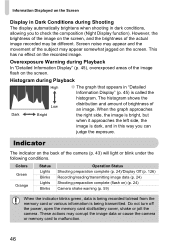
... Exposure Compensation (p. 74) White Balance (p. 73) Histogram (p. 46) Image Editing (pp. 114 - 119) Compression (Image Quality) (p. 70), (Movies) (p. 92) Recording Pixels (p. 70) Metering Modes (p. 83) Battery Charge Indicator (p. 15) Folder Number - File Number (p. 128) Displayed Image Number /Total Number of Images ISO Speed (p. 72) Aperture Value, Image Quality (Movies) (p. 92) i-Contrast...
... Exposure Compensation (p. 74) White Balance (p. 73) Histogram (p. 46) Image Editing (pp. 114 - 119) Compression (Image Quality) (p. 70), (Movies) (p. 92) Recording Pixels (p. 70) Metering Modes (p. 83) Battery Charge Indicator (p. 15) Folder Number - File Number (p. 128) Displayed Image Number /Total Number of Images ISO Speed (p. 72) Aperture Value, Image Quality (Movies) (p. 92) i-Contrast...
User Guide
Page 46
... card or various information is called the histogram. Do not turn off the power, open the memory card slot/battery cover, shake or jolt the camera. Overexposure Warning during Playback High ● The graph that appears in this way you to malfunction. 46 Histogram during... Playback In "Detailed Information Display" (p. 45), overexposed areas of the camera (p. 43) will light or blink under the following conditions. These actions may be different. Information Displayed on the screen. However, the ...
... card or various information is called the histogram. Do not turn off the power, open the memory card slot/battery cover, shake or jolt the camera. Overexposure Warning during Playback High ● The graph that appears in this way you to malfunction. 46 Histogram during... Playback In "Detailed Information Display" (p. 45), overexposed areas of the camera (p. 43) will light or blink under the following conditions. These actions may be different. Information Displayed on the screen. However, the ...
User Guide
Page 53
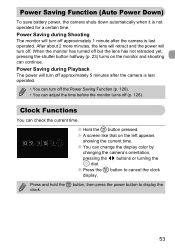
Power Saving Function (Auto Power Down) To save battery power, the camera shuts down automatically when it is last operated. • You can turn off the Power Saving Function (p. 126). • You can change the display color by changing the camera's orientation, pressing the qr buttons or turning the ...on the left appears showing the current time. ● You can adjust the time before the monitor turns off approximately 5 minutes after the camera is last operated. Power Saving during Playback The power will turn off (p. 126). Clock Functions You can continue. A screen like that on...
Power Saving Function (Auto Power Down) To save battery power, the camera shuts down automatically when it is last operated. • You can turn off the Power Saving Function (p. 126). • You can change the display color by changing the camera's orientation, pressing the qr buttons or turning the ...on the left appears showing the current time. ● You can adjust the time before the monitor turns off approximately 5 minutes after the camera is last operated. Power Saving during Playback The power will turn off (p. 126). Clock Functions You can continue. A screen like that on...


