User Guide
Page 4
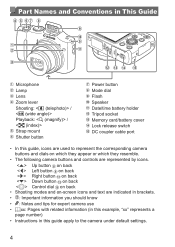
..." represents a page number) • Instructions in This Guide Microphone Lamp Lens Zoom lever Shooting: / Playback: / Strap mount Shutter button Power button Mode dial Flash Speaker Date/time battery holder Tripod socket Memory card/battery cover Lock release switch DC coupler cable port • In this guide apply to the camera under default...
..." represents a page number) • Instructions in This Guide Microphone Lamp Lens Zoom lever Shooting: / Playback: / Strap mount Shutter button Power button Mode dial Flash Speaker Date/time battery holder Tripod socket Memory card/battery cover Lock release switch DC coupler cable port • In this guide apply to the camera under default...
User Guide
Page 7
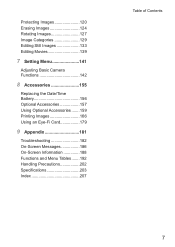
Protecting Images 120 Erasing Images 124 Rotating Images 127 Image Categories 129 Editing Still Images 133 Editing Movies 139 7 Setting Menu 141 Adjusting Basic Camera Functions 142 8 Accessories 155 Replacing the Date/Time Battery 156 Optional Accessories 157 Using Optional Accessories........159 Printing Images 166 Using an Eye-Fi Card 179 9 Appendix 181 Troubleshooting 182 On-Screen Messages 186 On-Screen Information 188 Functions and Menu Tables........192 Handling Precautions 202 Specifications 203 Index 207 Table of Contents 7
Protecting Images 120 Erasing Images 124 Rotating Images 127 Image Categories 129 Editing Still Images 133 Editing Movies 139 7 Setting Menu 141 Adjusting Basic Camera Functions 142 8 Accessories 155 Replacing the Date/Time Battery 156 Optional Accessories 157 Using Optional Accessories........159 Printing Images 166 Using an Eye-Fi Card 179 9 Appendix 181 Troubleshooting 182 On-Screen Messages 186 On-Screen Information 188 Functions and Menu Tables........192 Handling Precautions 202 Specifications 203 Index 207 Table of Contents 7

User Guide
Page 10
... been dropped or otherwise damaged. • Stop using the product immediately if it emits smoke, a strange smell, or otherwise behaves abnormally. • Do not use . Date/time battery: Dangerous if swallowed. Safety Precautions • Before using the product, please ensure that the product is used correctly. • The safety precautions noted on...
... been dropped or otherwise damaged. • Stop using the product immediately if it emits smoke, a strange smell, or otherwise behaves abnormally. • Do not use . Date/time battery: Dangerous if swallowed. Safety Precautions • Before using the product, please ensure that the product is used correctly. • The safety precautions noted on...
User Guide
Page 17
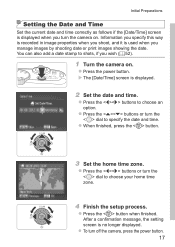
...image properties when you manage images by shooting date or print images showing the date. zzPress the buttons or turn the camera on . zzPress the buttons to specify the date and time. zzPress the button when finished. XXThe [Date/Time] screen is used when you shoot, and ...it is displayed. 2 Set the date and time. After a confirmation message, the setting screen is displayed when you wish...
...image properties when you manage images by shooting date or print images showing the date. zzPress the buttons or turn the camera on . zzPress the buttons to specify the date and time. zzPress the button when finished. XXThe [Date/Time] screen is used when you shoot, and ...it is displayed. 2 Set the date and time. After a confirmation message, the setting screen is displayed when you wish...
User Guide
Page 18
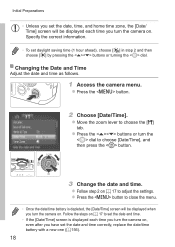
... 17 to set the date and time. • If the [Date/Time] screen is depleted, the [Date/Time] screen will be displayed when you turn the camera on. Initial Preparations • Unless you set the date, time, and home time zone, the [Date/ Time] screen will be displayed each time you turn the camera ...on, even after you turn the camera on. zzPress the button to choose [Date/Time], and then press the button. 3 Change the date and time. zzPress the buttons or...
... 17 to set the date and time. • If the [Date/Time] screen is depleted, the [Date/Time] screen will be displayed when you turn the camera on. Initial Preparations • Unless you set the date, time, and home time zone, the [Date/ Time] screen will be displayed each time you turn the camera ...on, even after you turn the camera on. zzPress the button to choose [Date/Time], and then press the button. 3 Change the date and time. zzPress the buttons or...

User Guide
Page 52
... before recording begins, but the [Shots] setting has no effect. • When you take many shots. However, note that date stamps cannot be edited or removed, so confirm beforehand that the date and time are determined by the first shot. XXAs you specify multiple shots, image brightness and white balance are correct (=17...
... before recording begins, but the [Shots] setting has no effect. • When you take many shots. However, note that date stamps cannot be edited or removed, so confirm beforehand that the date and time are determined by the first shot. XXAs you specify multiple shots, image brightness and white balance are correct (=17...

User Guide
Page 110
zzTo view the previous image, press the button or turn the dial to step 3. ] icon. In this time. To 110 zzPress and hold the buttons to single-image display, press the button. Images appear grainy at this mode, turn the dial ...zzTo return to browse through images quickly. zzTo browse images grouped by a [ play movies, go to browse through your images. zzMovies are identified by shooting date, press the buttons in Scroll Display mode. XXYour last shot is displayed. 2 Browse through images. zzTo access Scroll Display mode, turn the dial clockwise....
zzTo view the previous image, press the button or turn the dial to step 3. ] icon. In this time. To 110 zzPress and hold the buttons to single-image display, press the button. Images appear grainy at this mode, turn the dial ...zzTo return to browse through images quickly. zzTo browse images grouped by a [ play movies, go to browse through your images. zzMovies are identified by shooting date, press the buttons in Scroll Display mode. XXYour last shot is displayed. 2 Browse through images. zzTo access Scroll Display mode, turn the dial clockwise....

User Guide
Page 150
... 2 Switch to change the Date/ Time setting manually. zzPress the buttons or turn the dial to choose [ World], and then press the button. zzTo set the date and time in "Setting the Date and Time" (=17) and your home time zone. 1 Specify your [ Home] time and date. 150 zzPress the buttons or ... the button. XX[ ] is now shown on the shooting screen ("On-Screen Information" (=188)). • Adjusting the date or time while in [ ] mode (=17) will have the correct local date and time when you travel abroad, simply register the destination in advance and switch to set daylight saving...
... 2 Switch to change the Date/ Time setting manually. zzPress the buttons or turn the dial to choose [ World], and then press the button. zzTo set the date and time in "Setting the Date and Time" (=17) and your home time zone. 1 Specify your [ Home] time and date. 150 zzPress the buttons or ... the button. XX[ ] is now shown on the shooting screen ("On-Screen Information" (=188)). • Adjusting the date or time while in [ ] mode (=17) will have the correct local date and time when you travel abroad, simply register the destination in advance and switch to set daylight saving...

User Guide
Page 151
Adjusting Basic Camera Functions Changing the Date and Time Adjust the date and time as needed. zzChoose [Certification Logo Display], and then press the button. 151 Other certification ...buttons or turning the dial. Metric/Non-Metric Display Change the unit of measurement shown in as follows. 1 Access the [Date/Time] screen. zzChoose [Units], and then choose [ft/in this guide, on the camera packaging, or on the screen. ... adjust the setting, either by the camera can be viewed on the camera body. zzChoose [Date/Time], and then press the button. 2 Configure the setting.
Adjusting Basic Camera Functions Changing the Date and Time Adjust the date and time as needed. zzChoose [Certification Logo Display], and then press the button. 151 Other certification ...buttons or turning the dial. Metric/Non-Metric Display Change the unit of measurement shown in as follows. 1 Access the [Date/Time] screen. zzChoose [Units], and then choose [ft/in this guide, on the camera packaging, or on the screen. ... adjust the setting, either by the camera can be viewed on the camera body. zzChoose [Date/Time], and then press the button. 2 Configure the setting.

User Guide
Page 153
Adjusting Basic Camera Functions • The following functions are not restored to default settings. - [3] tab settings [Date/Time] (=17), [Language ] (=19), [Time Zone] (=150), [Video System] (=163), and the image assigned to [Start-up Image] (=144) - The movie mode (=77) 153 Custom white balance data you have recorded (=85) - Shooting mode chosen in (=67) or < > (=71) mode -
Adjusting Basic Camera Functions • The following functions are not restored to default settings. - [3] tab settings [Date/Time] (=17), [Language ] (=19), [Time Zone] (=150), [Video System] (=163), and the image assigned to [Start-up Image] (=144) - The movie mode (=77) 153 Custom white balance data you have recorded (=85) - Shooting mode chosen in (=67) or < > (=71) mode -

User Guide
Page 156
zzInsert the battery with the (+) and (-) sides facing the correct way. 4 Insert the battery holder. 5 Insert the battery and close the cover. 6 Turn the camera on , replace the date/time battery with a new one (CR1220). 1 Make sure the camera is displayed every time you turn the camera on and set the date and time (=17). 156 Replacing the Date/Time Battery The date/time battery (back-up battery) will last about three years. If the Date/Time screen is off. 2 Remove the date/time battery holder. 3 Replace the battery.
zzInsert the battery with the (+) and (-) sides facing the correct way. 4 Insert the battery holder. 5 Insert the battery and close the cover. 6 Turn the camera on , replace the date/time battery with a new one (CR1220). 1 Make sure the camera is displayed every time you turn the camera on and set the date and time (=17). 156 Replacing the Date/Time Battery The date/time battery (back-up battery) will last about three years. If the Date/Time screen is off. 2 Remove the date/time battery holder. 3 Replace the battery.

User Guide
Page 168
...under optimal settings. Uses information from the time of copies to print. Specify the paper size, layout, and other details (= 170). 168 Both Off Default Off On Red-Eye 1 Matches current printer settings. Prints images with both the date and file number added. - No. ...Prints images with the date added. Cropping Paper Settings - Default Date File No. zzPress the buttons or turn the dial to access the screen at left. ...
...under optimal settings. Uses information from the time of copies to print. Specify the paper size, layout, and other details (= 170). 168 Both Off Default Off On Red-Eye 1 Matches current printer settings. Prints images with both the date and file number added. - No. ...Prints images with the date added. Cropping Paper Settings - Default Date File No. zzPress the buttons or turn the dial to access the screen at left. ...
User Guide
Page 174
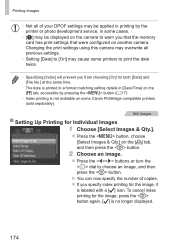
... Images 1 Choose [Select Images & Qty.]. Still Images Setting Up Printing for both [Date] and [File No.] at the same time. • The date is printed in a format matching setting details in [Date/Time] on the [3] tab, accessible by the printer or photo development service, in printing ...by pressing the button (=17). • Index printing is not available on some Canon PictBridge-compatible printers ...
... Images 1 Choose [Select Images & Qty.]. Still Images Setting Up Printing for both [Date] and [File No.] at the same time. • The date is printed in a format matching setting details in [Date/Time] on the [3] tab, accessible by the printer or photo development service, in printing ...by pressing the button (=17). • Index printing is not available on some Canon PictBridge-compatible printers ...
User Guide
Page 182
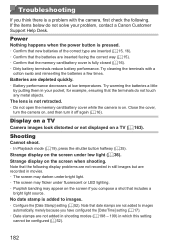
... not retracted. • Do not open the memory card/battery cover while the camera is added to images automatically, merely because you have configured the [Date/Time] setting (=17). • Date stamps are recorded in your problem, contact a Canon Customer Support Help Desk. No date stamp is on , and then turn it off again (=16).
... not retracted. • Do not open the memory card/battery cover while the camera is added to images automatically, merely because you have configured the [Date/Time] setting (=17). • Date stamps are recorded in your problem, contact a Canon Customer Support Help Desk. No date stamp is on , and then turn it off again (=16).

User Guide
Page 188
...connection status (=179) Still image compression (= 101), Resolution (=55) Still images: Recordable shots (= 204) Grid lines (=59) Movie resolution (= 57) Movies: Remaining time (=204) Digital zoom magnification (=49), Digital tele-converter (= 92) Focusing range (= 90) Shooting mode (=192), Scene icon (=46) Flash mode (= 98) 188 ...Red-eye correction (= 56) Flash exposure compensation / Flash output level (=99, 107) Spot AE point frame (= 82) AF frame (=92) Date stamp (= 52) ISO speed (=82) AE lock (=81), FE lock (=100) Exposure shift bar Shutter speed (=104, 106) Aperture value (=105, 106)
...connection status (=179) Still image compression (= 101), Resolution (=55) Still images: Recordable shots (= 204) Grid lines (=59) Movie resolution (= 57) Movies: Remaining time (=204) Digital zoom magnification (=49), Digital tele-converter (= 92) Focusing range (= 90) Shooting mode (=192), Scene icon (=46) Flash mode (= 98) 188 ...Red-eye correction (= 56) Flash exposure compensation / Flash output level (=99, 107) Spot AE point frame (= 82) AF frame (=92) Date stamp (= 52) ISO speed (=82) AE lock (=81), FE lock (=100) Exposure shift bar Shutter speed (=104, 106) Aperture value (=105, 106)

User Guide
Page 190
...) Flash (=98), Flash exposure compensation (= 99) Focusing range (= 90) File size Still images: Resolution (=204) Movies: Playback time (=204) Protection (=120) Favorites (=129) My Colors (=86, 136) Red-eye correction (=56, 138) Shooting date/time (= 17) 190 On-Screen Information Playback (Detailed Information Display) My Category (= 130) Shooting mode (= 192) ISO speed (=82...
...) Flash (=98), Flash exposure compensation (= 99) Focusing range (= 90) File size Still images: Resolution (=204) Movies: Playback time (=204) Protection (=120) Favorites (=129) My Colors (=86, 136) Red-eye correction (=56, 138) Shooting date/time (= 17) 190 On-Screen Information Playback (Detailed Information Display) My Category (= 130) Shooting mode (= 192) ISO speed (=82...

User Guide
Page 198
... Review Info (=64) Off/Detailed/Focus Check Blink Detection (=61) On Off Grid Lines (=59) On/Off IS Mode (=101) Off/Continuous Shoot Only Date Stamp (=52) Off Date / Date & Time - OOOO OOOO OOOO - OO - O O - - - OOO OOOO OOOO OOOO - OOO OOO - Functions and Menu Tables Shooting Mode D BM G Function Flash Settings (=56, 62, 99...
... Review Info (=64) Off/Detailed/Focus Check Blink Detection (=61) On Off Grid Lines (=59) On/Off IS Mode (=101) Off/Continuous Shoot Only Date Stamp (=52) Off Date / Date & Time - OOOO OOOO OOOO - OO - O O - - - OOO OOOO OOOO OOOO - OOO OOO - Functions and Menu Tables Shooting Mode D BM G Function Flash Settings (=56, 62, 99...
User Guide
Page 200
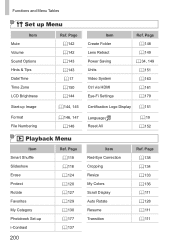
... Cropping Resize My Colors Scroll Display Auto Rotate Resume Transition Ref. Functions and Menu Tables 3 Set up Menu Item Mute Volume Sound Options Hints & Tips Date/Time Time Zone LCD Brightness Start-up i-Contrast Ref. Page = 138 = 134 = 133 = 136 = 111 = 128 = 111 = 111 Page = 148 = 149 =34, 149 = 151 = 163 = 161 = 179...
... Cropping Resize My Colors Scroll Display Auto Rotate Resume Transition Ref. Functions and Menu Tables 3 Set up Menu Item Mute Volume Sound Options Hints & Tips Date/Time Time Zone LCD Brightness Start-up i-Contrast Ref. Page = 138 = 134 = 133 = 136 = 111 = 128 = 111 = 111 Page = 148 = 149 =34, 149 = 151 = 163 = 161 = 179...
User Guide
Page 207
... lock 97 Aspect ratio 54 AUTO mode (shooting mode)... 20, 36, 42 Av (shooting mode 105 B Batteries 15, 157 " Date/time (date/time battery) Battery and charger kit 157 Level 189 Power saving 34 Battery and charger kit 157 Black and white images 86 Blink detection 61... ratio (image quality)...... 101 Continuous shooting 88 Creative filters (shooting mode 71 Cropping 134 Custom white balance 85 D Date/time Adding date stamps 52 Changing 18 Date/time battery 156 Setting 17 World clock 150 DC coupler 157 Defaults " Reset all DIGITAL CAMERA Solution Disk 2 Digital tele...
... lock 97 Aspect ratio 54 AUTO mode (shooting mode)... 20, 36, 42 Av (shooting mode 105 B Batteries 15, 157 " Date/time (date/time battery) Battery and charger kit 157 Level 189 Power saving 34 Battery and charger kit 157 Black and white images 86 Blink detection 61... ratio (image quality)...... 101 Continuous shooting 88 Creative filters (shooting mode 71 Cropping 134 Custom white balance 85 D Date/time Adding date stamps 52 Changing 18 Date/time battery 156 Setting 17 World clock 150 DC coupler 157 Defaults " Reset all DIGITAL CAMERA Solution Disk 2 Digital tele...
User Guide
Page 209
... 50 2-second self-timer 51 Customizing the self-timer 51 Face self-timer (shooting mode).... 69 Sepia tone images 86 Servo AF 95 Shooting Shooting date/time " Date/time Shooting information 188 Slideshow 118 Smart Shuffle 119 Snow (shooting mode 68 Software DIGITAL CAMERA Solution Disk..... 2 Installation 27 Saving images to a computer 27 Screen...
... 50 2-second self-timer 51 Customizing the self-timer 51 Face self-timer (shooting mode).... 69 Sepia tone images 86 Servo AF 95 Shooting Shooting date/time " Date/time Shooting information 188 Slideshow 118 Smart Shuffle 119 Snow (shooting mode 68 Software DIGITAL CAMERA Solution Disk..... 2 Installation 27 Saving images to a computer 27 Screen...


