User Guide
Page 2
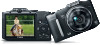
...). Camera AA Alkaline Batteries (x2) Interface Cable IFC-400PCU Wrist Strap WS-800 DIGITAL CAMERA Solution Disk* (CD-ROM) Getting Started * Contains software and PDF manuals (=25). • A memory card is not guaranteed to support Eye-Fi card functions (including wireless transfer). If anything is required to work with the card...
...). Camera AA Alkaline Batteries (x2) Interface Cable IFC-400PCU Wrist Strap WS-800 DIGITAL CAMERA Solution Disk* (CD-ROM) Getting Started * Contains software and PDF manuals (=25). • A memory card is not guaranteed to support Eye-Fi card functions (including wireless transfer). If anything is required to work with the card...
User Guide
Page 5
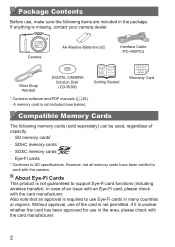
Part Names and Conventions in This Guide Screen (LCD monitor) button / button Movie button button HDMITM terminal DIGITAL terminal < (ISO speed)> / < (Filter image display)> / Up button / / Left button Control dial FUNC./SET button / Right button / Down button Indicator button button zzTurning the control dial is used for still images, movies, or both. Most of these operations are also possible with the buttons. • For convenience, all supported memory cards are simply referred to choose setting items, switch images, and perform other operations. Still Images Movies ...
Part Names and Conventions in This Guide Screen (LCD monitor) button / button Movie button button HDMITM terminal DIGITAL terminal < (ISO speed)> / < (Filter image display)> / Up button / / Left button Control dial FUNC./SET button / Right button / Down button Indicator button button zzTurning the control dial is used for still images, movies, or both. Most of these operations are also possible with the buttons. • For convenience, all supported memory cards are simply referred to choose setting items, switch images, and perform other operations. Still Images Movies ...
User Guide
Page 6
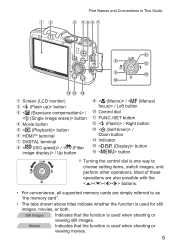
... This Guide 4 Table of Contents 6 Contents: Basic Operations............8 Safety Precautions 10 Basic Guide 13 Initial Preparations 14 Trying the Camera Out 20 Included Software, PDF Manuals 25 Accessories 32 Advanced Guide 33 1 Camera Basics 33 On/Off 34 Shutter Button 35 Shooting Modes 36 Shooting Display Options 36 FUNC. Table of...
... This Guide 4 Table of Contents 6 Contents: Basic Operations............8 Safety Precautions 10 Basic Guide 13 Initial Preparations 14 Trying the Camera Out 20 Included Software, PDF Manuals 25 Accessories 32 Advanced Guide 33 1 Camera Basics 33 On/Off 34 Shutter Button 35 Shooting Modes 36 Shooting Display Options 36 FUNC. Table of...

User Guide
Page 25
... you can do the following things on a computer with instructions for a more in-depth understanding of included software (some software excluded). PDF Manuals Camera User Guide zzRefer to use this function. • Internet access is required to this guide for installation, and saving images to this...and any ISP account charges and access fees must be accessed from the help system of camera operation. Included Software, PDF Manuals The software and PDF manuals on the included DIGITAL CAMERA Solution Disk (CD-ROM) (=2) are introduced below, with an Internet connection so you can use...
... you can do the following things on a computer with instructions for a more in-depth understanding of included software (some software excluded). PDF Manuals Camera User Guide zzRefer to use this function. • Internet access is required to this guide for installation, and saving images to this...and any ISP account charges and access fees must be accessed from the help system of camera operation. Included Software, PDF Manuals The software and PDF manuals on the included DIGITAL CAMERA Solution Disk (CD-ROM) (=2) are introduced below, with an Internet connection so you can use...

User Guide
Page 26
... Requirements The included software can be installed. Adobe Reader is required to view the PDF manuals. Operating System Windows Windows 7 SP1 Windows Vista SP2 Windows XP SP3 Macintosh Mac OS X 10.6 - 10.7 Computer Computers running one of the above operating systems (... MB) must be installed, and in Windows XP, Microsoft .NET Framework 3.0 or later (max. 500 MB) must be used on computer performance. • Check the Canon website for the latest system requirements, including supported OS versions. 26 Installation may take some time, depending on the following computers.
... Requirements The included software can be installed. Adobe Reader is required to view the PDF manuals. Operating System Windows Windows 7 SP1 Windows Vista SP2 Windows XP SP3 Macintosh Mac OS X 10.6 - 10.7 Computer Computers running one of the above operating systems (... MB) must be installed, and in Windows XP, Microsoft .NET Framework 3.0 or later (max. 500 MB) must be used on computer performance. • Check the Canon website for the latest system requirements, including supported OS versions. 26 Installation may take some time, depending on the following computers.
User Guide
Page 27
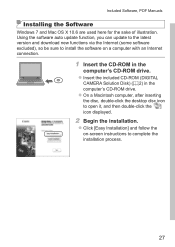
.... zzClick [Easy Installation] and follow the on a computer with an Internet connection. 1 Insert the CD-ROM in the computer's CD-ROM drive. Included Software, PDF Manuals Installing the Software Windows 7 and Mac OS X 10.6 are used here for the sake of illustration. zzOn a Macintosh computer, after inserting the disc, double-click...
.... zzClick [Easy Installation] and follow the on a computer with an Internet connection. 1 Insert the CD-ROM in the computer's CD-ROM drive. Included Software, PDF Manuals Installing the Software Windows 7 and Mac OS X 10.6 are used here for the sake of illustration. zzOn a Macintosh computer, after inserting the disc, double-click...

User Guide
Page 28
...screen after installation and remove the CDROM when the desktop is displayed prompting you to connect the camera, connect it to the computer user manual. 4 Install the files. Installation may take some time, depending on -screen instructions to the latest version and download new functions. ...off , open the cover ( ). zzInsert the larger plug of the included interface cable (=2) in the computer's USB port. Included Software, PDF Manuals 3 When a message is displayed. zzWith the camera turned off and disconnect the cable. 28 zzTurn the camera on, and follow the on computer...
...screen after installation and remove the CDROM when the desktop is displayed prompting you to connect the camera, connect it to the computer user manual. 4 Install the files. Installation may take some time, depending on -screen instructions to the latest version and download new functions. ...off , open the cover ( ). zzInsert the larger plug of the included interface cable (=2) in the computer's USB port. Included Software, PDF Manuals 3 When a message is displayed. zzWith the camera turned off and disconnect the cable. 28 zzTurn the camera on, and follow the on computer...

User Guide
Page 29
... Mac OS X 10.6 are the following limitations. - zzOn a Macintosh computer, CameraWindow is displayed when a connection is established between the camera and computer. Included Software, PDF Manuals • When not connected to the Internet, there are used here for each camera will ensure that displays, click the [ ] link to modify the program...
... Mac OS X 10.6 are the following limitations. - zzOn a Macintosh computer, CameraWindow is displayed when a connection is established between the camera and computer. Included Software, PDF Manuals • When not connected to the Internet, there are used here for each camera will ensure that displays, click the [ ] link to modify the program...
User Guide
Page 30
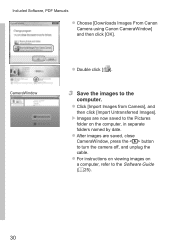
zzFor instructions on viewing images on the computer, in separate folders named by date. Included Software, PDF Manuals zzChoose [Downloads Images From Canon Camera using Canon CameraWindow] and then click [OK]. zzClick [Import Images from Camera], and then click [Import Untransferred Images]. XXImages are saved, close CameraWindow, press the button to the Pictures folder on a computer, refer to the computer. CameraWindow zzDouble click [ ]. 3 Save the images to the Software Guide (= 25). 30 zzAfter images are now saved to turn the camera off, and unplug the cable.
zzFor instructions on viewing images on the computer, in separate folders named by date. Included Software, PDF Manuals zzChoose [Downloads Images From Canon Camera using Canon CameraWindow] and then click [OK]. zzClick [Import Images from Camera], and then click [Import Untransferred Images]. XXImages are saved, close CameraWindow, press the button to the Pictures folder on a computer, refer to the computer. CameraWindow zzDouble click [ ]. 3 Save the images to the Software Guide (= 25). 30 zzAfter images are now saved to turn the camera off, and unplug the cable.

User Guide
Page 31
... start CameraWindow in Windows Vista or XP, click [Downloads Images From Canon Camera using the included software, the following limitations apply. - Image protection settings may not be possible to install the PDF manuals on computers that supports Adobe Reader by connecting your camera to the ...computer without using Canon CameraWindow] on the screen displayed when you turn the camera on the computer. 31 ...
... start CameraWindow in Windows Vista or XP, click [Downloads Images From Canon Camera using the included software, the following limitations apply. - Image protection settings may not be possible to install the PDF manuals on computers that supports Adobe Reader by connecting your camera to the ...computer without using Canon CameraWindow] on the screen displayed when you turn the camera on the computer. 31 ...

User Guide
Page 35
... the camera still until the shutter sound ends. • Images may take longer in focus, always press the shutter button lightly (halfway) initially. In this manual, shutter button operations are described as a shutter sound is in focus. 2 Press all the way down . (From the halfway position, press fully to shoot. It...
... the camera still until the shutter sound ends. • Images may take longer in focus, always press the shutter button lightly (halfway) initially. In this manual, shutter button operations are described as a shutter sound is in focus. 2 Press all the way down . (From the halfway position, press fully to shoot. It...
User Guide
Page 84
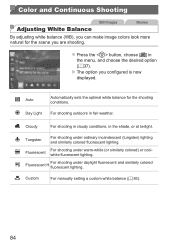
... white balance for the scene you configured is now displayed. Cloudy For shooting in cloudy conditions, in fair weather. fluorescent and similarly colored Custom For manually setting a custom white balance (=85). 84 zzPress the button, choose [ ] in the menu, and choose the desired option (=37). XXThe option you are shooting. Tungsten...
... white balance for the scene you configured is now displayed. Cloudy For shooting in cloudy conditions, in fair weather. fluorescent and similarly colored Custom For manually setting a custom white balance (=85). 84 zzPress the button, choose [ ] in the menu, and choose the desired option (=37). XXThe option you are shooting. Tungsten...
User Guide
Page 88
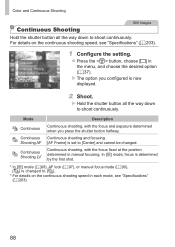
... Continuous shooting and focusing. In [t] mode, focus is determined by the first shot. * In [t] mode (=68), AF lock (=97), or manual focus mode (=90), [ ] is changed . Shooting AF [AF Frame] is now displayed. 2 Shoot. For details on the continuous shooting speed... "Specifications" (=203). 1 Configure the setting. Mode Description W Continuous Continuous shooting, with the focus fixed at the position determined in manual focusing. Color and Continuous Shooting Still Images Continuous Shooting Hold the shutter button all the way down to shoot continuously. Continuous Shooting LV*...
... Continuous shooting and focusing. In [t] mode, focus is determined by the first shot. * In [t] mode (=68), AF lock (=97), or manual focus mode (=90), [ ] is changed . Shooting AF [AF Frame] is now displayed. 2 Shoot. For details on the continuous shooting speed... "Specifications" (=203). 1 Configure the setting. Mode Description W Continuous Continuous shooting, with the focus fixed at the position determined in manual focusing. Color and Continuous Shooting Still Images Continuous Shooting Hold the shutter button all the way down to shoot continuously. Continuous Shooting LV*...
User Guide
Page 90
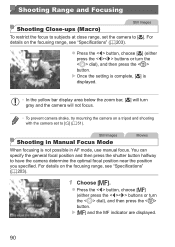
Still Images Shooting in AF mode, use manual focus. zzPress the button, choose [e] (either press the buttons or turn the dial), and then press the button. You can specify the general focal position ... the button, choose [f] (either press the buttons or turn the dial), and then press the button. XXOnce the setting is complete, [e] is not possible in Manual Focus Mode Movies When focusing is displayed. • In the yellow bar display area below the zoom bar, [e] will turn gray and the camera will...
Still Images Shooting in AF mode, use manual focus. zzPress the button, choose [e] (either press the buttons or turn the dial), and then press the button. You can specify the general focal position ... the button, choose [f] (either press the buttons or turn the dial), and then press the button. XXOnce the setting is complete, [e] is not possible in Manual Focus Mode Movies When focusing is displayed. • In the yellow bar display area below the zoom bar, [e] will turn gray and the camera will...

User Guide
Page 91
.... • To hide the magnified display area, press the button and set [MF- If you want to change the AF frame mode or size, cancel manual focus mode first. • Focusing is pressed halfway, press the button and set [Safety MF] on -screen MF indicator bar (which shows the distance and... turn the dial to have the camera fine-tune the focal position (Safety MF). • AF frame mode or size cannot be changed while focusing manually (=92). zzPress the shutter button halfway to specify the general focal position, and then press the button. 3 Fine-tune the focus.
.... • To hide the magnified display area, press the button and set [MF- If you want to change the AF frame mode or size, cancel manual focus mode first. • Focusing is pressed halfway, press the button and set [Safety MF] on -screen MF indicator bar (which shows the distance and... turn the dial to have the camera fine-tune the focal position (Safety MF). • AF frame mode or size cannot be changed while focusing manually (=92). zzPress the shutter button halfway to specify the general focal position, and then press the button. 3 Fine-tune the focus.
User Guide
Page 93
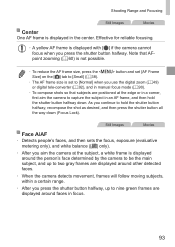
... the AF frame size, press the button and set to [Normal] when you use the digital zoom (=49) or digital tele-converter (=92), and in manual focus mode (=90). • To compose shots so that subjects are displayed around other detected faces. • When the camera detects movement, frames will follow...
... the AF frame size, press the button and set to [Normal] when you use the digital zoom (=49) or digital tele-converter (=92), and in manual focus mode (=90). • To compose shots so that subjects are displayed around other detected faces. • When the camera detects movement, frames will follow...

User Guide
Page 107
Still Images 1 Enter mode. zzSet the mode dial to [Manual]. • You can set the flash level by accessing (=38) and choosing [Flash Output] in mode. Adjusting the Flash Output Choose from the three flash ... menu, and adjust the setting by accessing (=38), choosing [Flash Settings] on the specified metering method (= 82). Specific Shutter Speeds and Aperture Values ( Mode) • : Manual • Calculation of standard exposure is based on the [4] tab, and then setting [Flash Mode] to . 2 Configure the setting.
Still Images 1 Enter mode. zzSet the mode dial to [Manual]. • You can set the flash level by accessing (=38) and choosing [Flash Output] in mode. Adjusting the Flash Output Choose from the three flash ... menu, and adjust the setting by accessing (=38), choosing [Flash Settings] on the specified metering method (= 82). Specific Shutter Speeds and Aperture Values ( Mode) • : Manual • Calculation of standard exposure is based on the [4] tab, and then setting [Flash Mode] to . 2 Configure the setting.

User Guide
Page 150
... ahead), press the buttons to choose [ World], and then press the button. zzPress the buttons or turn the dial to change the Date/ Time setting manually. zzTo set the date and time in advance and switch to the destination time zone. This convenient feature eliminates the need to choose the destination...
... ahead), press the buttons to choose [ World], and then press the button. zzPress the buttons or turn the dial to change the Date/ Time setting manually. zzTo set the date and time in advance and switch to the destination time zone. This convenient feature eliminates the need to choose the destination...

User Guide
Page 159
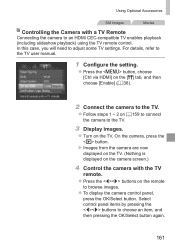
... the TV, insert the cable plug fully into the camera terminal. 159 For details on connection or how to switch inputs, refer to the TV manual. • Some information may not be viewed in high-definition. 1 Make sure the camera and TV are off. 2 Connect the camera to an HDTV with...
... the TV, insert the cable plug fully into the camera terminal. 159 For details on connection or how to switch inputs, refer to the TV manual. • Some information may not be viewed in high-definition. 1 Make sure the camera and TV are off. 2 Connect the camera to an HDTV with...
User Guide
Page 161
... browse images. Using Optional Accessories Still Images Movies Controlling the Camera with the TV remote. In this case, you will need to the TV user manual. 1 Configure the setting. XXImages from the camera are now displayed on the TV. (Nothing is displayed on the camera screen.) 4 Control the camera with a TV...
... browse images. Using Optional Accessories Still Images Movies Controlling the Camera with the TV remote. In this case, you will need to the TV user manual. 1 Configure the setting. XXImages from the camera are now displayed on the TV. (Nothing is displayed on the camera screen.) 4 Control the camera with a TV...


