
User Manual
Page 18
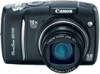
... button fully (all the way) to the memory card. To Shoot Images in green on the LCD monitor for approximately 2 seconds immediately after shooting (Rec. Review). Getting Started 16 Shooting Still Images 5. You can shoot by pressing the shutter button even when an image is referred as "pressing halfway".
... button fully (all the way) to the memory card. To Shoot Images in green on the LCD monitor for approximately 2 seconds immediately after shooting (Rec. Review). Getting Started 16 Shooting Still Images 5. You can shoot by pressing the shutter button even when an image is referred as "pressing halfway".
User Manual
Page 53
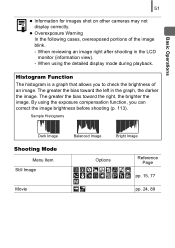
... of an image. The greater the bias toward the left in the LCD monitor (information view). - By using the detailed display mode during playback. When reviewing an image right after shooting in the graph, the darker the image. Sample Histograms Dark Image Shooting Mode Menu Item Still Image Movie Balanced Image...
... of an image. The greater the bias toward the left in the LCD monitor (information view). - By using the detailed display mode during playback. When reviewing an image right after shooting in the graph, the darker the image. Sample Histograms Dark Image Shooting Mode Menu Item Still Image Movie Balanced Image...
User Manual
Page 56
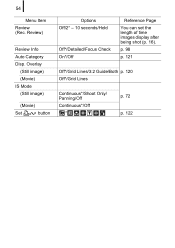
p. 98 p. 121 Off*/Grid Lines/3:2 Guide/Both p. 120 Off*/Grid Lines Continuous*/Shoot Only/ Panning/Off Continuous*/Off * p. 72 p. 122 Review) Review Info Auto Category Disp. 54 Menu Item Review (Rec. Overlay (Still image) (Movie) IS Mode (Still image) (Movie) Set button Options Off/2* - 10 seconds/Hold Off*/Detailed/Focus Check On*/Off Reference Page You can set the length of time images display after being shot (p. 16).
p. 98 p. 121 Off*/Grid Lines/3:2 Guide/Both p. 120 Off*/Grid Lines Continuous*/Shoot Only/ Panning/Off Continuous*/Off * p. 72 p. 122 Review) Review Info Auto Category Disp. 54 Menu Item Review (Rec. Overlay (Still image) (Movie) IS Mode (Still image) (Movie) Set button Options Off/2* - 10 seconds/Hold Off*/Detailed/Focus Check On*/Off Reference Page You can set the length of time images display after being shot (p. 16).
User Manual
Page 60
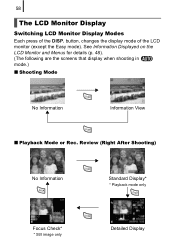
See Information Displayed on the LCD Monitor and Menus for details (p. 48). (The following are the screens that display when shooting in mode.) „ Shooting Mode No Information Information View „ Playback Mode or Rec. button, changes the display mode of the DISP. Review (Right After Shooting) No Information Standard Display* * Playback mode only Focus Check* * Still image only Detailed Display 58 The LCD Monitor Display Switching LCD Monitor Display Modes Each press of the LCD monitor (except the Easy mode).
See Information Displayed on the LCD Monitor and Menus for details (p. 48). (The following are the screens that display when shooting in mode.) „ Shooting Mode No Information Information View „ Playback Mode or Rec. button, changes the display mode of the DISP. Review (Right After Shooting) No Information Standard Display* * Playback mode only Focus Check* * Still image only Detailed Display 58 The LCD Monitor Display Switching LCD Monitor Display Modes Each press of the LCD monitor (except the Easy mode).

User Manual
Page 96
... modes, will not be displayed in and modes. To Cancel Continuous Shooting: Follow procedure 1 to record successive images while the shutter button is held down. Review (p. 16) will not display ( can be selected). z The interval between shots lengthens because the flash must charge. 94 2 Shoot. • The camera will be set...
... modes, will not be displayed in and modes. To Cancel Continuous Shooting: Follow procedure 1 to record successive images while the shutter button is held down. Review (p. 16) will not display ( can be selected). z The interval between shots lengthens because the flash must charge. 94 2 Shoot. • The camera will be set...

User Manual
Page 100
... - It is set to [Face Detect] (p. 101). In the menu, use . - Use the or button to [Hold] in the menu in advance. 1 Select [Review Info]. 1. When the digital zoom is being used as the display. Press the MENU button. The AF frame cannot be zoomed under the following circumstances...: - You are recommended to set to [Face Detect] and a face is not detected, or when the face is set [Review] to select [Focus Check]. 2. When the camera cannot focus. - When a TV is in relation to check people's expressions and look for closed eyes ...
... - It is set to [Face Detect] (p. 101). In the menu, use . - Use the or button to [Hold] in the menu in advance. 1 Select [Review Info]. 1. When the digital zoom is being used as the display. Press the MENU button. The AF frame cannot be zoomed under the following circumstances...: - You are recommended to set to [Face Detect] and a face is not detected, or when the face is set [Review] to select [Focus Check]. 2. When the camera cannot focus. - When a TV is in relation to check people's expressions and look for closed eyes ...
User Manual
Page 101
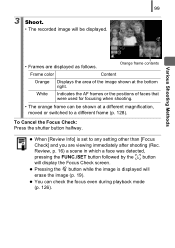
99 3 Shoot. • The recorded image will display the Focus Check screen. z When [Review Info] is displayed will erase the image (p. 19). z Pressing the button while the image is set to a different frame (p. 128). White Indicates the AF frames ... the positions of the image shown at a different magnification, moved or switched to any setting other than [Focus Check] and you are displayed as follows. Review, p. 16) a scene in which a face was detected, pressing the FUNC./SET button followed by the button will be shown at the bottom right. z You can...
99 3 Shoot. • The recorded image will display the Focus Check screen. z When [Review Info] is displayed will erase the image (p. 19). z Pressing the button while the image is set to a different frame (p. 128). White Indicates the AF frames ... the positions of the image shown at a different magnification, moved or switched to any setting other than [Focus Check] and you are displayed as follows. Review, p. 16) a scene in which a face was detected, pressing the FUNC./SET button followed by the button will be shown at the bottom right. z You can...
User Manual
Page 211
Pressing Fully 16 Pressing Halfway 15 Print List 21 Print Method 57 Print/Share Button 42, 122 Printing 20 Program AE 82 Protect 146 R Rec. Review 16 Recording Pixel 70, 92 Red-Eye Corr 95 Red-Eye Correction 137 Red-Eye Lamp 95 Reset All 162 Resize 142 Resume 18 Resume ...Playback 18 Review 54 Review Info 54 Rotate 134 S Safety FE 95 Safety MF 109 Safety Shift 84 Safety Zoom 62 Self-Timer 68 Shooting Mode 77 Functions Available...
Pressing Fully 16 Pressing Halfway 15 Print List 21 Print Method 57 Print/Share Button 42, 122 Printing 20 Program AE 82 Protect 146 R Rec. Review 16 Recording Pixel 70, 92 Red-Eye Corr 95 Red-Eye Correction 137 Red-Eye Lamp 95 Reset All 162 Resize 142 Resume 18 Resume ...Playback 18 Review 54 Review Info 54 Rotate 134 S Safety FE 95 Safety MF 109 Safety Shift 84 Safety Zoom 62 Self-Timer 68 Shooting Mode 77 Functions Available...

User Manual
Page 226
review) (p. 54) Review Info (p. 54) Off Detailed/Focus Check Auto Category (p. 121) Off Disp. Overlay (p. 120) Grid Lines 3:2 Guide/Both Off IS Mode (p. 72) Continuous Shoot Only/Panning ... Timer) (p. 69) Safety Shift (p. 84) Auto ISO Shift (p. 75) MF-Point Zoom (p. 108) Safety MF (p. 109) AF Mode (p. 100) Continuous Single AF-assist Beam (p. 53) Review (Rec.
review) (p. 54) Review Info (p. 54) Off Detailed/Focus Check Auto Category (p. 121) Off Disp. Overlay (p. 120) Grid Lines 3:2 Guide/Both Off IS Mode (p. 72) Continuous Shoot Only/Panning ... Timer) (p. 69) Safety Shift (p. 84) Auto ISO Shift (p. 75) MF-Point Zoom (p. 108) Safety MF (p. 109) AF Mode (p. 100) Continuous Single AF-assist Beam (p. 53) Review (Rec.


