
Software Starter Guide Ver.16
Page 16
...click [Yes] if you consent to select programs individually for your operating system). •Windows 2000/Windows 98: Canon Camera TWAIN Driver •Windows Me: Canon Camera WIA Driver With Windows XP, the USB driver supplied with an interface cable. Follow the onscreen instructions to... the computer with the Windows operating system is used so there is connected to proceed. Select [Custom Installation] to all the conditions. 8 Review the installation...
...click [Yes] if you consent to select programs individually for your operating system). •Windows 2000/Windows 98: Canon Camera TWAIN Driver •Windows Me: Canon Camera WIA Driver With Windows XP, the USB driver supplied with an interface cable. Follow the onscreen instructions to... the computer with the Windows operating system is used so there is connected to proceed. Select [Custom Installation] to all the conditions. 8 Review the installation...
Software Starter Guide Ver.16
Page 52
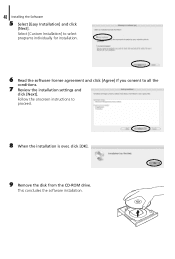
This concludes the software installation. Select [Custom Installation] to select programs individually for installation. 6 Read the software license agreement and click [Agree] if you consent to proceed. 8 When the installation is over, click [OK]. 9 Remove the disk from the CD-ROM drive. 48 Installing the Software 5 Select [Easy Installation] and click [Next]. Follow the onscreen instructions to all the conditions. 7 Review the installation settings and click [Next].
This concludes the software installation. Select [Custom Installation] to select programs individually for installation. 6 Read the software license agreement and click [Agree] if you consent to proceed. 8 When the installation is over, click [OK]. 9 Remove the disk from the CD-ROM drive. 48 Installing the Software 5 Select [Easy Installation] and click [Next]. Follow the onscreen instructions to all the conditions. 7 Review the installation settings and click [Next].

PowerShot Pro1 Quick Start Guide
Page 3
... click [Next]. a. USB port 1. If iPhoto or Image Capture are not guaranteed. Double-click the [Canon ImageBrowser] icon on in USB ports. b. Proceed with the installation while reviewing installation settings. ■ Macintosh OS Computer Model CPU RAM Interface Free Hard Disk Space Display Mac OS ...d. b. 6 Preparing to Download Images to a Computer ➜ Software Starter Guide Never connect the camera to close the application. Place the Canon Digital Camera Solution Disk in the Explorer View section. ■ Mac OS 9 a. c. PowerPC Mac OS 9.0 - 9.2: 64 MB or...
... click [Next]. a. USB port 1. If iPhoto or Image Capture are not guaranteed. Double-click the [Canon ImageBrowser] icon on in USB ports. b. Proceed with the installation while reviewing installation settings. ■ Macintosh OS Computer Model CPU RAM Interface Free Hard Disk Space Display Mac OS ...d. b. 6 Preparing to Download Images to a Computer ➜ Software Starter Guide Never connect the camera to close the application. Place the Canon Digital Camera Solution Disk in the Explorer View section. ■ Mac OS 9 a. c. PowerPC Mac OS 9.0 - 9.2: 64 MB or...

PowerShot Pro1 Camera User Guide
Page 5
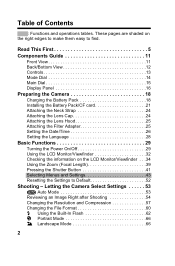
... Explains how to transfer images to edit movies. Connecting Explains how to customize the camera using the camera's various shooting features. Shooting Explains how to review recorded images or select playback settings, how to protect images or erase them, Playback, Erasing and how to a computer. Also explains how to set for...
... Explains how to transfer images to edit movies. Connecting Explains how to customize the camera using the camera's various shooting features. Shooting Explains how to review recorded images or select playback settings, how to protect images or erase them, Playback, Erasing and how to a computer. Also explains how to set for...
PowerShot Pro1 Camera User Guide
Page 6
Letting the Camera Select Settings 53 Auto Mode 53 Reviewing an Image Right after Shooting 54 Changing the Resolution and Compression 57 Changing the File Format 60 Using the Built-In Flash 62 Portrait Mode ...
Letting the Camera Select Settings 53 Auto Mode 53 Reviewing an Image Right after Shooting 54 Changing the Resolution and Compression 57 Changing the File Format 60 Using the Built-In Flash 62 Portrait Mode ...

PowerShot Pro1 Camera User Guide
Page 38
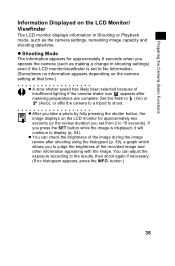
... as follows. Checking the information on the LCD monitor's position, the information view may not display. button. To do so, while the image is being reviewed right after being taken, press the SET button, then INFO. button the LCD monitor (or the viewfinder) cycles to Playback mode.
... as follows. Checking the information on the LCD monitor's position, the information view may not display. button. To do so, while the image is being reviewed right after being taken, press the SET button, then INFO. button the LCD monitor (or the viewfinder) cycles to Playback mode.
PowerShot Pro1 Camera User Guide
Page 39
... image capacity and shooting date/time. You can check the brightness of the image during the image review after metering preparations are complete. z Shooting Mode The information appears for approximately two seconds (or the review duration you to judge the brightness of the recorded image and other information appearing with the image...
... image capacity and shooting date/time. You can check the brightness of the image during the image review after metering preparations are complete. z Shooting Mode The information appears for approximately two seconds (or the review duration you to judge the brightness of the recorded image and other information appearing with the image...

PowerShot Pro1 Camera User Guide
Page 43
... Histogram The histogram is a graph that allows you turn the zoom ring. Similarly, adjust the exposure compensation to a negative number if the image is being reviewed on the LCD monitor (Information view) or in (telephoto) and zoom out (wide angle) by turning the zoom ring. The zoom bar appears during the...
... Histogram The histogram is a graph that allows you turn the zoom ring. Similarly, adjust the exposure compensation to a negative number if the image is being reviewed on the LCD monitor (Information view) or in (telephoto) and zoom out (wide angle) by turning the zoom ring. The zoom bar appears during the...

PowerShot Pro1 Camera User Guide
Page 52
Selecting Menus and Settings (continued) Menu Item Converter Review Color Space Reverse Disp. Rotates images 90 or 270 degrees clockwise in an automated slide show. Sets whether still images are recorded in the Rec. z (...
Selecting Menus and Settings (continued) Menu Item Converter Review Color Space Reverse Disp. Rotates images 90 or 270 degrees clockwise in an automated slide show. Sets whether still images are recorded in the Rec. z (...

PowerShot Pro1 Camera User Guide
Page 58
..., you can change the length of time images appear on displaying regardless of the review duration setting if one of the shutter when the shutter activates. z Keeping the shutter button pressed The image continues to appear on the LCD monitor ... for two seconds. To let the camera return to Shooting mode, press the shutter button halfway. Reviewing an Image Right after Shooting (continued) 6 Press the shutter button all . (p. 56) Reviewing an Image Right after Shooting Mode Dial Reviewing the Image After a photo is taken, the image appears on the LCD monitor (or in...
..., you can change the length of time images appear on displaying regardless of the review duration setting if one of the shutter when the shutter activates. z Keeping the shutter button pressed The image continues to appear on the LCD monitor ... for two seconds. To let the camera return to Shooting mode, press the shutter button halfway. Reviewing an Image Right after Shooting (continued) 6 Press the shutter button all . (p. 56) Reviewing an Image Right after Shooting Mode Dial Reviewing the Image After a photo is taken, the image appears on the LCD monitor (or in...

PowerShot Pro1 Camera User Guide
Page 59
... in Detailed Display mode (p. 34) • Changing the recording format (p. 60) • Attaching sound memos (p. 131) Changing the Recording Format Right after shooting.* You can review the image. The display will switch to the LCD monitor and you can shoot an image using the viewfinder and automatically let the camera display... the monitor while shooting, this feature, you can easily process images saved in the viewfinder. 3 Press the button. From the next shooting session and onward, review images will be saved. 55
... in Detailed Display mode (p. 34) • Changing the recording format (p. 60) • Attaching sound memos (p. 131) Changing the Recording Format Right after shooting.* You can review the image. The display will switch to the LCD monitor and you can shoot an image using the viewfinder and automatically let the camera display... the monitor while shooting, this feature, you can easily process images saved in the viewfinder. 3 Press the button. From the next shooting session and onward, review images will be saved. 55

PowerShot Pro1 Camera User Guide
Page 60
...shutter button is already selected as the recording format. z The image is released. z See Selecting Menus and Settings (p. 44). 2 Select a Review setting and press the MENU button. z With the [2 sec.] to [10 sec.] options, the image will not automatically display. Changing the ...Image Display Duration The length of the Review setting. Reviewing an Image Right after Shooting (continued) 1 Right after a photo has been taken can be changed anywhere from 2 seconds to 10 seconds ...
...shutter button is already selected as the recording format. z The image is released. z See Selecting Menus and Settings (p. 44). 2 Select a Review setting and press the MENU button. z With the [2 sec.] to [10 sec.] options, the image will not automatically display. Changing the ...Image Display Duration The length of the Review setting. Reviewing an Image Right after Shooting (continued) 1 Right after a photo has been taken can be changed anywhere from 2 seconds to 10 seconds ...

PowerShot Pro1 Camera User Guide
Page 135
.... z To stop playback, press the SET button. Attaching Sound Memos to Images In playback mode (including single image playback, index playback, magnified playback and the review immediately after shooting in the viewfinder). z You can add as many sound memos as you can be rotated to the vertical position when viewed on...
.... z To stop playback, press the SET button. Attaching Sound Memos to Images In playback mode (including single image playback, index playback, magnified playback and the review immediately after shooting in the viewfinder). z You can add as many sound memos as you can be rotated to the vertical position when viewed on...

PowerShot Pro1 Camera User Guide
Page 201
... Protect 48, 137 R RAW File Format . . . 55, 57, 60 Red-eye Reduction . . . . 46, 64 Remote Sensor 11, 169 Reset 52 Reverse Display 33, 48 Review 48, 54, 56 Rotate 48, 130 S Safety Shift . . . . 47, 83, 85, 86 Saturation 97 Save Settings 48 Self-Timer 47, 77 Sound 49, 51, 154... Sharpness 97 Shooting Checking Images (Reviewing) . . 48, 54, 56 Using a TV for Viewing 153 Shooting Mode 29, 31 Functions Available . . 202 Shutter Button 41, 169 Shutter Sound . 41, 51, 54, ...
... Protect 48, 137 R RAW File Format . . . 55, 57, 60 Red-eye Reduction . . . . 46, 64 Remote Sensor 11, 169 Reset 52 Reverse Display 33, 48 Review 48, 54, 56 Rotate 48, 130 S Safety Shift . . . . 47, 83, 85, 86 Saturation 97 Save Settings 48 Self-Timer 47, 77 Sound 49, 51, 154... Sharpness 97 Shooting Checking Images (Reviewing) . . 48, 54, 56 Using a TV for Viewing 153 Shooting Mode 29, 31 Functions Available . . 202 Shutter Button 41, 169 Shutter Sound . 41, 51, 54, ...


