
Software Starter Guide Ver.16
Page 16
... you consent to the software installed. Select [Custom Installation] to select programs individually for your operating system). •Windows 2000/Windows 98: Canon Camera TWAIN Driver •Windows Me: Canon Camera WIA Driver With Windows XP, the USB driver supplied with an interface cable. Follow the onscreen instructions to the computer with... and click [Yes] if you select a USB driver from below (the appropriate one for installation. The items displayed here differ according to all the conditions. 8 Review the installation settings and click [Next].
... you consent to the software installed. Select [Custom Installation] to select programs individually for your operating system). •Windows 2000/Windows 98: Canon Camera TWAIN Driver •Windows Me: Canon Camera WIA Driver With Windows XP, the USB driver supplied with an interface cable. Follow the onscreen instructions to the computer with... and click [Yes] if you select a USB driver from below (the appropriate one for installation. The items displayed here differ according to all the conditions. 8 Review the installation settings and click [Next].
Software Starter Guide Ver.16
Page 52
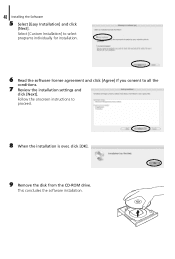
Select [Custom Installation] to select programs individually for installation. 6 Read the software license agreement and click [Agree] if you consent to proceed. 8 When the installation is over, click [OK]. 9 Remove the disk from the CD-ROM drive. This concludes the software installation. Follow the onscreen instructions to all the conditions. 7 Review the installation settings and click [Next]. 48 Installing the Software 5 Select [Easy Installation] and click [Next].
Select [Custom Installation] to select programs individually for installation. 6 Read the software license agreement and click [Agree] if you consent to proceed. 8 When the installation is over, click [OK]. 9 Remove the disk from the CD-ROM drive. This concludes the software installation. Follow the onscreen instructions to all the conditions. 7 Review the installation settings and click [Next]. 48 Installing the Software 5 Select [Easy Installation] and click [Next].

PowerShot Pro1 Quick Start Guide
Page 3
...right will automatically be able to Prepare ● Camera and computer ● Canon Digital Camera Solution Disk provided with the camera ● Interface cable (use the cable provided with the installation while reviewing installation settings. ■ Macintosh OS Computer Model CPU RAM Interface Free Hard ...Edition) Windows Me Windows 2000 Windows XP (Home Edition, Professional) The above OS should be pre-installed on in USB ports. Click [Canon Camera] in the computer's CD-ROM drive. Proceed with the camera) A. Connect the camera to the computer's USB port and the ...
...right will automatically be able to Prepare ● Camera and computer ● Canon Digital Camera Solution Disk provided with the camera ● Interface cable (use the cable provided with the installation while reviewing installation settings. ■ Macintosh OS Computer Model CPU RAM Interface Free Hard ...Edition) Windows Me Windows 2000 Windows XP (Home Edition, Professional) The above OS should be pre-installed on in USB ports. Click [Canon Camera] in the computer's CD-ROM drive. Proceed with the camera) A. Connect the camera to the computer's USB port and the ...

PowerShot Pro1 Camera User Guide
Page 5
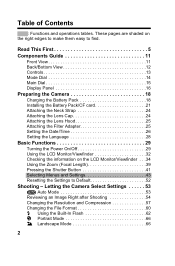
... Order, Transferring Explains how to transfer images to e-mail. You must read this section before connecting your camera to edit movies. Shooting Explains how to review recorded images or select playback settings, how to protect images or erase them, Playback, Erasing and how to a computer. Also explains how to customize the...
... Order, Transferring Explains how to transfer images to e-mail. You must read this section before connecting your camera to edit movies. Shooting Explains how to review recorded images or select playback settings, how to protect images or erase them, Playback, Erasing and how to a computer. Also explains how to customize the...
PowerShot Pro1 Camera User Guide
Page 6
Letting the Camera Select Settings 53 Auto Mode 53 Reviewing an Image Right after Shooting 54 Changing the Resolution and Compression 57 Changing the File Format 60 Using the Built-In Flash 62 Portrait Mode ...
Letting the Camera Select Settings 53 Auto Mode 53 Reviewing an Image Right after Shooting 54 Changing the Resolution and Compression 57 Changing the File Format 60 Using the Built-In Flash 62 Portrait Mode ...

PowerShot Pro1 Camera User Guide
Page 38
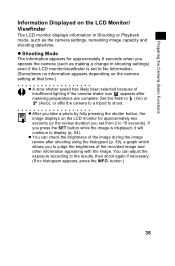
.... No Information Information View∗ * Depending on the LCD monitor's position, the information view may not display. To do so, while the image is being reviewed right after being taken, press the SET button, then INFO. Single Image Playback (p. 122): Standard Information View Detailed Information View No Information Index Playback (p. 124...
.... No Information Information View∗ * Depending on the LCD monitor's position, the information view may not display. To do so, while the image is being reviewed right after being taken, press the SET button, then INFO. Single Image Playback (p. 122): Standard Information View Detailed Information View No Information Index Playback (p. 124...
PowerShot Pro1 Camera User Guide
Page 39
... the camera shake icon appears after shooting using the histogram (p. 39), a graph which allows you to judge the brightness of the image during the image review after metering preparations are complete. If you set to No Information. (Sometimes no histogram appears, press the INFO. z Shooting Mode The information appears for approximately...
... the camera shake icon appears after shooting using the histogram (p. 39), a graph which allows you to judge the brightness of the image during the image review after metering preparations are complete. If you set to No Information. (Sometimes no histogram appears, press the INFO. z Shooting Mode The information appears for approximately...

PowerShot Pro1 Camera User Guide
Page 43
... to judge the brightness of the recorded image. The greater the bias toward to how fast you to a negative number if the image is being reviewed on the LCD monitor (Information view) or in the viewfinder. z When an image just shot is bright. (p. 92) Sample Histograms Dark Image Balanced Image Bright...
... to judge the brightness of the recorded image. The greater the bias toward to how fast you to a negative number if the image is being reviewed on the LCD monitor (Information view) or in the viewfinder. z When an image just shot is bright. (p. 92) Sample Histograms Dark Image Balanced Image Bright...

PowerShot Pro1 Camera User Guide
Page 52
... viewfinder) after the shutter button is attached 177 to the mode dial's 116 C1 or C2 mode. Selecting Menus and Settings (continued) Menu Item Converter Review Color Space Reverse Disp. None*/TC-DC58A/500D Sets the duration images display on the LCD monitor (or in the Rec.
... viewfinder) after the shutter button is attached 177 to the mode dial's 116 C1 or C2 mode. Selecting Menus and Settings (continued) Menu Item Converter Review Color Space Reverse Disp. None*/TC-DC58A/500D Sets the duration images display on the LCD monitor (or in the Rec.

PowerShot Pro1 Camera User Guide
Page 58
... image is displayed The image will continue to the normal size after that can be magnified and continue to appear on displaying regardless of the review duration setting if one of the following operations is released. To let the camera return to Shooting mode, press the shutter button halfway. z See... not appear at this mode. If you keep on the LCD monitor as long as you turn the zoom ring toward telephoto at all. (p. 56) Reviewing an Image Right after Shooting (continued) 6 Press the shutter button all the way (p. 41). z Keeping the shutter button pressed The image continues to ...
... image is displayed The image will continue to the normal size after that can be magnified and continue to appear on displaying regardless of the review duration setting if one of the following operations is released. To let the camera return to Shooting mode, press the shutter button halfway. z See... not appear at this mode. If you keep on the LCD monitor as long as you turn the zoom ring toward telephoto at all. (p. 56) Reviewing an Image Right after Shooting (continued) 6 Press the shutter button all the way (p. 41). z Keeping the shutter button pressed The image continues to ...

PowerShot Pro1 Camera User Guide
Page 59
... canceled. Letting the Camera Select Settings z Switching between the LCD monitor and viewfinder by pressing the SET button. From the next shooting session and onward, review images will be saved. 55 The display will switch to change the monitor while shooting, this setting will automatically appear on the LCD monitor (or... Mode Dial By following the instructions below, you can shoot an image using the viewfinder. 2 Pause the image by pressing the button. z If you can review the image.
... canceled. Letting the Camera Select Settings z Switching between the LCD monitor and viewfinder by pressing the SET button. From the next shooting session and onward, review images will be saved. 55 The display will switch to change the monitor while shooting, this setting will automatically appear on the LCD monitor (or... Mode Dial By following the instructions below, you can shoot an image using the viewfinder. 2 Pause the image by pressing the button. z If you can review the image.

PowerShot Pro1 Camera User Guide
Page 60
... for the time selected even if the shutter button is recorded in the RAW format. Changing the Image Display Duration The length of the Review setting. Reviewing an Image Right after Shooting (continued) 1 Right after a photo has been taken can be changed anywhere from 2 seconds to the shooting.... z When you press the shutter button halfway, the camera returns to 10 seconds or turned off. 1 In the [ (Rec.)] menu, select [Review]. button while the image is displayed. 56 z Another picture can continue to [10 sec.] options, the image will not automatically display. z The above...
... for the time selected even if the shutter button is recorded in the RAW format. Changing the Image Display Duration The length of the Review setting. Reviewing an Image Right after Shooting (continued) 1 Right after a photo has been taken can be changed anywhere from 2 seconds to the shooting.... z When you press the shutter button halfway, the camera returns to 10 seconds or turned off. 1 In the [ (Rec.)] menu, select [Review]. button while the image is displayed. 56 z Another picture can continue to [10 sec.] options, the image will not automatically display. z The above...

PowerShot Pro1 Camera User Guide
Page 135
.... z To stop playback, press the SET button. z Press the button to Images In playback mode (including single image playback, index playback, magnified playback and the review immediately after shooting in step 2 above. To stop recording, press the SET button. Playback, Erasing z Images can be rotated to the vertical position when viewed...
.... z To stop playback, press the SET button. z Press the button to Images In playback mode (including single image playback, index playback, magnified playback and the review immediately after shooting in step 2 above. To stop recording, press the SET button. Playback, Erasing z Images can be rotated to the vertical position when viewed...

PowerShot Pro1 Camera User Guide
Page 201
... Protect 48, 137 R RAW File Format . . . 55, 57, 60 Red-eye Reduction . . . . 46, 64 Remote Sensor 11, 169 Reset 52 Reverse Display 33, 48 Review 48, 54, 56 Rotate 48, 130 S Safety Shift . . . . 47, 83, 85, 86 Saturation 97 Save Settings 48 Self-Timer 47, 77 Sound 49, 51, 154... Sharpness 97 Shooting Checking Images (Reviewing) . . 48, 54, 56 Using a TV for Viewing 153 Shooting Mode 29, 31 Functions Available . . 202 Shutter Button 41, 169 Shutter Sound . 41, 51, 54, ...
... Protect 48, 137 R RAW File Format . . . 55, 57, 60 Red-eye Reduction . . . . 46, 64 Remote Sensor 11, 169 Reset 52 Reverse Display 33, 48 Review 48, 54, 56 Rotate 48, 130 S Safety Shift . . . . 47, 83, 85, 86 Saturation 97 Save Settings 48 Self-Timer 47, 77 Sound 49, 51, 154... Sharpness 97 Shooting Checking Images (Reviewing) . . 48, 54, 56 Using a TV for Viewing 153 Shooting Mode 29, 31 Functions Available . . 202 Shutter Button 41, 169 Shutter Sound . 41, 51, 54, ...


