User Guide
Page 2
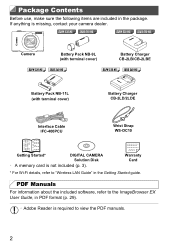
... Card * For Wi-Fi details, refer to view the PDF manuals. 2 ELPH 530 HS IXUS 510 HS ELPH 530 HS IXUS 510 HS Camera Battery Pack NB-9L (with terminal cover) Battery Charger CB-2LB/CB-2LBE ELPH 320 HS IXUS 240 HS ELPH 320 HS IXUS 240 HS Battery Pack NB-11L (with terminal cover) Battery Charger CB-2LD/2LDE Interface Cable IFC-400PCU Wrist Strap WS...
... Card * For Wi-Fi details, refer to view the PDF manuals. 2 ELPH 530 HS IXUS 510 HS ELPH 530 HS IXUS 510 HS Camera Battery Pack NB-9L (with terminal cover) Battery Charger CB-2LB/CB-2LBE ELPH 320 HS IXUS 240 HS ELPH 320 HS IXUS 240 HS Battery Pack NB-11L (with terminal cover) Battery Charger CB-2LD/2LDE Interface Cable IFC-400PCU Wrist Strap WS...
User Guide
Page 4
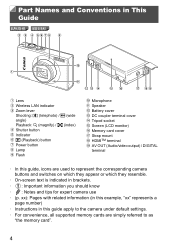
... which they resemble. • On-screen text is indicated in This Guide ELPH 530 HS IXUS 510 HS Lens Wireless LAN indicator Zoom lever Shooting: i (telephoto) / j (wide angle) Playback: k (magnify) / g (index) Shutter button Indicator 1 (Playback) button Power button Lamp Flash Microphone Speaker Battery cover DC coupler terminal cover Tripod socket Screen (LCD monitor) Memory card...
... which they resemble. • On-screen text is indicated in This Guide ELPH 530 HS IXUS 510 HS Lens Wireless LAN indicator Zoom lever Shooting: i (telephoto) / j (wide angle) Playback: k (magnify) / g (index) Shutter button Indicator 1 (Playback) button Power button Lamp Flash Microphone Speaker Battery cover DC coupler terminal cover Tripod socket Screen (LCD monitor) Memory card...
User Guide
Page 5
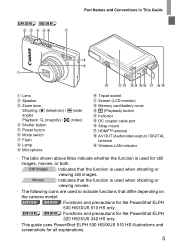
... uses PowerShot ELPH 530 HS/IXUS 510 HS illustrations and screenshots for still images, movies, or both. ELPH 320 HS IXUS 240 HS Part Names and Conventions in This Guide Lens Speaker Zoom lever Shooting: i (telephoto) / j (wide angle) Playback: k (magnify) / g (index) Shutter button Power button Mode switch Flash Lamp Microphone Tripod socket Screen (LCD monitor) Memory card/battery cover...
... uses PowerShot ELPH 530 HS/IXUS 510 HS illustrations and screenshots for still images, movies, or both. ELPH 320 HS IXUS 240 HS Part Names and Conventions in This Guide Lens Speaker Zoom lever Shooting: i (telephoto) / j (wide angle) Playback: k (magnify) / g (index) Shutter button Power button Mode switch Flash Lamp Microphone Tripod socket Screen (LCD monitor) Memory card/battery cover...
User Guide
Page 10
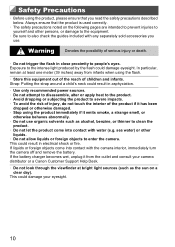
... • Do not trigger the flash in electrical shock or fire. Strap: Putting the strap around a child's neck could damage eyesight. If the battery charger becomes wet, unplug it emits smoke, a strange smell, or otherwise behaves abnormally. • Do not use . Exposure to the intense light ...apply heat to the product. • Avoid dropping or subjecting the product to enter the camera. This could damage your camera distributor or a Canon Customer Support Help Desk. • Do not look through the viewfinder at least one meter (39 inches) away from infants when using the flash...
... • Do not trigger the flash in electrical shock or fire. Strap: Putting the strap around a child's neck could damage eyesight. If the battery charger becomes wet, unplug it emits smoke, a strange smell, or otherwise behaves abnormally. • Do not use . Exposure to the intense light ...apply heat to the product. • Avoid dropping or subjecting the product to enter the camera. This could damage your camera distributor or a Canon Customer Support Help Desk. • Do not look through the viewfinder at least one meter (39 inches) away from infants when using the flash...
User Guide
Page 11
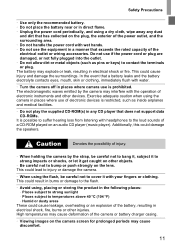
... or wiring accessories. Caution Denotes the possibility of injury. • When holding the camera by the camera may cause deformation of the camera or battery charger casing. • Viewing images on the plug, the exterior of the power outlet, and the surrounding area. • Do not handle...careful not to cover it get caught on other devices. This could damage the speakers. Safety Precautions • Use only the recommended battery. • Do not place the battery near or in direct flame. • Unplug the power cord periodically, and using a dry cloth, wipe away any CD player...
... or wiring accessories. Caution Denotes the possibility of injury. • When holding the camera by the camera may cause deformation of the camera or battery charger casing. • Viewing images on the plug, the exterior of the power outlet, and the surrounding area. • Do not handle...careful not to cover it get caught on other devices. This could damage the speakers. Safety Precautions • Use only the recommended battery. • Do not place the battery near or in direct flame. • Unplug the power cord periodically, and using a dry cloth, wipe away any CD player...
User Guide
Page 12
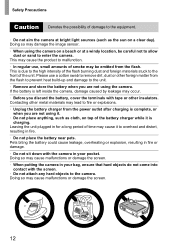
...smoke may cause malfunctions or damage the screen. • When putting the camera in fire. • Do not place the battery near pets. Contacting other insulators. Pets biting the battery could cause leakage, overheating or explosion, resulting in fire or damage. • Do not sit down with tape or other ... use a cotton swab to remove dirt, dust or other foreign matter from the power outlet after charging is complete, or when you discard the battery, cover the terminals with the camera in your bag, ensure that hard objects do not come into contact with the screen. • Do not...
...smoke may cause malfunctions or damage the screen. • When putting the camera in fire. • Do not place the battery near pets. Contacting other insulators. Pets biting the battery could cause leakage, overheating or explosion, resulting in fire or damage. • Do not sit down with tape or other ... use a cotton swab to remove dirt, dust or other foreign matter from the power outlet after charging is complete, or when you discard the battery, cover the terminals with the camera in your bag, ensure that hard objects do not come into contact with the screen. • Do not...
User Guide
Page 16
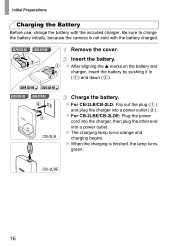
...green. ELPH 320 HS IXUS 240 HS ELPH 530 HS IXUS 510 HS CB-2LB Charge the battery. X The charging lamp turns orange and charging begins. Insert the battery. z For CB-2LB/CB-2LD: Flip out the plug ( ) and plug the charger into a power outlet. CB-2LBE 16 ELPH 530 HS IXUS 510 HS Remove... the cover. z For CB-2LBE/CB-2LDE: Plug the power cord into the charger, then plug the other end into a power outlet ( ). Initial Preparations Charging the Battery Before use, charge the battery with the battery charged. z After ...
...green. ELPH 320 HS IXUS 240 HS ELPH 530 HS IXUS 510 HS CB-2LB Charge the battery. X The charging lamp turns orange and charging begins. Insert the battery. z For CB-2LB/CB-2LD: Flip out the plug ( ) and plug the charger into a power outlet. CB-2LBE 16 ELPH 530 HS IXUS 510 HS Remove... the cover. z For CB-2LBE/CB-2LDE: Plug the power cord into the charger, then plug the other end into a power outlet ( ). Initial Preparations Charging the Battery Before use, charge the battery with the battery charged. z After ...

User Guide
Page 17
... HS • To protect the battery and keep it in optimal condition, do not attach the charger or cord to the product. • For details on charging time and the number of shots and recording time possible with a fully charged battery, see "Specifications" in ( ) and up ( ). ELPH 320 HS IXUS 240 HS CB-2LD Initial Preparations ELPH 530 HS...
... HS • To protect the battery and keep it in optimal condition, do not attach the charger or cord to the product. • For details on charging time and the number of shots and recording time possible with a fully charged battery, see "Specifications" in ( ) and up ( ). ELPH 320 HS IXUS 240 HS CB-2LD Initial Preparations ELPH 530 HS...
User Guide
Page 18
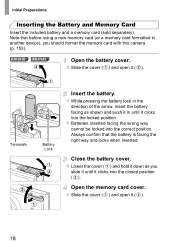
ELPH 530 HS IXUS 510 HS Open the battery cover. Terminals Battery Lock Insert the battery. z Slide the cover ( ) and open it ( ). 18 Open the memory card cover. z Slide the cover ( ) and open it ( ). z While pressing the battery lock in the direction of the arrow, insert the battery facing as ...it in another device), you slide it until it clicks into the closed position ( ). Initial Preparations Inserting the Battery and Memory Card Insert the included battery and a memory card (sold separately). Always confirm that before using a new memory card (or a memory ...
ELPH 530 HS IXUS 510 HS Open the battery cover. Terminals Battery Lock Insert the battery. z Slide the cover ( ) and open it ( ). 18 Open the memory card cover. z Slide the cover ( ) and open it ( ). z While pressing the battery lock in the direction of the arrow, insert the battery facing as ...it in another device), you slide it until it clicks into the closed position ( ). Initial Preparations Inserting the Battery and Memory Card Insert the included battery and a memory card (sold separately). Always confirm that before using a new memory card (or a memory ...
User Guide
Page 19
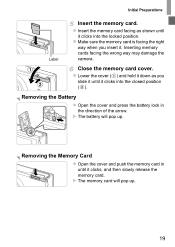
...Make sure the memory card is facing the right way when you slide it until it clicks into the locked position. Removing the Battery z Open the cover and press the battery lock in until it . Close the memory card cover. Removing the Memory Card z Open the cover and push the memory ... the direction of the arrow. z Lower the cover ( ) and hold it down as shown until it clicks into the closed position ( ). X The battery will pop up . Inserting memory cards facing the wrong way may damage the camera. Initial Preparations Label Insert the memory card. z Insert the memory card...
...Make sure the memory card is facing the right way when you slide it until it clicks into the locked position. Removing the Battery z Open the cover and press the battery lock in until it . Close the memory card cover. Removing the Memory Card z Open the cover and push the memory ... the direction of the arrow. z Lower the cover ( ) and hold it down as shown until it clicks into the closed position ( ). X The battery will pop up . Inserting memory cards facing the wrong way may damage the camera. Initial Preparations Label Insert the memory card. z Insert the memory card...
User Guide
Page 20
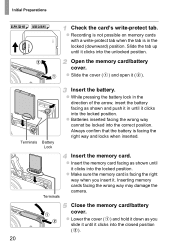
... camera. z Lower the cover ( ) and hold it down as shown until it clicks into the unlocked position. Open the memory card/battery cover. z Batteries inserted facing the wrong way cannot be locked into the locked position. z Insert the memory card facing as you insert it clicks into the...the arrow, insert the battery facing as shown and push it in the locked (downward) position. z Recording is not possible on memory cards with a write-protect tab when the tab is facing the right way and locks when inserted. Initial Preparations ELPH 320 HS IXUS 240 HS Check the card's ...
... camera. z Lower the cover ( ) and hold it down as shown until it clicks into the unlocked position. Open the memory card/battery cover. z Batteries inserted facing the wrong way cannot be locked into the locked position. z Insert the memory card facing as you insert it clicks into the...the arrow, insert the battery facing as shown and push it in the locked (downward) position. z Recording is not possible on memory cards with a write-protect tab when the tab is facing the right way and locks when inserted. Initial Preparations ELPH 320 HS IXUS 240 HS Check the card's ...

User Guide
Page 21
...the direction of the arrow. Setting the Date and Time A screen for dates and times added to your images. Finish the setup process. X The battery will pop up . z Press the power button. z Touch the option to configure, and then touch op to specify the date and time, which... Be sure to specify the date and time. z Open the cover and press the battery lock in until it clicks, and then slowly release it. z When finished, touch ^. Initial Preparations Removing the Battery and Memory Card Remove the battery. X The memory card will pop up . Remove the memory card. X The [Date...
...the direction of the arrow. Setting the Date and Time A screen for dates and times added to your images. Finish the setup process. X The battery will pop up . z Press the power button. z Touch the option to configure, and then touch op to specify the date and time, which... Be sure to specify the date and time. z Open the cover and press the battery lock in until it clicks, and then slowly release it. z When finished, touch ^. Initial Preparations Removing the Battery and Memory Card Remove the battery. X The memory card will pop up . Remove the memory card. X The [Date...

User Guide
Page 22
... choose [Date/Time]. z Double-touch ^ to close the menu. • Date/time settings can be retained for about 4 hours once you insert a charged battery or connect the camera to set the date and time. 22 z Touch the 3 tab. Initial Preparations • Unless you set the date and time, the.... • To set daylight saving time (1 hour ahead), touch and choose in about 3 weeks by the camera's built-in date/time battery (backup battery) after the battery pack is depleted, the [Date/Time] screen will be displayed when you turn the camera on. Follow the steps on p. 21 to an...
... choose [Date/Time]. z Double-touch ^ to close the menu. • Date/time settings can be retained for about 4 hours once you insert a charged battery or connect the camera to set the date and time. 22 z Touch the 3 tab. Initial Preparations • Unless you set the date and time, the.... • To set daylight saving time (1 hour ahead), touch and choose in about 3 weeks by the camera's built-in date/time battery (backup battery) after the battery pack is depleted, the [Date/Time] screen will be displayed when you turn the camera on. Follow the steps on p. 21 to an...
User Guide
Page 36
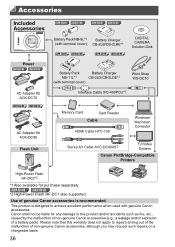
... ELPH 530 HS IXUS 510 HS ELPH 530 HS IXUS 510 HS Battery Pack NB-9L*1 Battery Charger (with terminal cover) CB-2LB/CB-2LBE*1 ELPH 320 HS IXUS 240 HS ELPH 320 HS IXUS 240 HS DIGITAL CAMERA Solution Disk Battery Pack Battery Charger NB-11L*1 CB-2LD/CB-2LDE*1 (with genuine Canon accessories. Canon shall not be liable for purchase separately. Use of a battery pack). This product is recommended. ELPH 530 HS...
... ELPH 530 HS IXUS 510 HS ELPH 530 HS IXUS 510 HS Battery Pack NB-9L*1 Battery Charger (with terminal cover) CB-2LB/CB-2LBE*1 ELPH 320 HS IXUS 240 HS ELPH 320 HS IXUS 240 HS DIGITAL CAMERA Solution Disk Battery Pack Battery Charger NB-11L*1 CB-2LD/CB-2LDE*1 (with genuine Canon accessories. Canon shall not be liable for purchase separately. Use of a battery pack). This product is recommended. ELPH 530 HS...

User Guide
Page 38
Power-Saving Features (Auto Power Down) As a way to conserve battery power, the camera automatically deactivates the screen and then turns itself off automatically after a specific period of inactivity. • You can deactivate these power-saving ... camera off , press the power button again. In about one minute once the camera is still out, press the shutter button halfway (p. 39). On/Off ELPH 530 HS IXUS 510 HS ELPH 320 HS IXUS 240 HS Shooting Mode z Press the power button to turn the camera on and view your shots.
Power-Saving Features (Auto Power Down) As a way to conserve battery power, the camera automatically deactivates the screen and then turns itself off automatically after a specific period of inactivity. • You can deactivate these power-saving ... camera off , press the power button again. In about one minute once the camera is still out, press the shutter button halfway (p. 39). On/Off ELPH 530 HS IXUS 510 HS ELPH 320 HS IXUS 240 HS Shooting Mode z Press the power button to turn the camera on and view your shots.
User Guide
Page 43
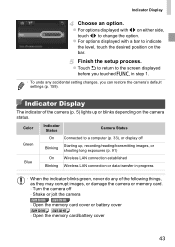
Shake or jolt the camera ELPH 530 HS IXUS 510 HS - z For options displayed with qr on either side, touch qr to the screen displayed before you touched H in progress • When the indicator blinks green, ... Connected to indicate the level, touch the desired position on the camera status. Finish the setup process. Open the memory card cover or battery cover ELPH 320 HS IXUS 240 HS - z Touch ^ to return to change the option. Turn the camera off Starting up or blinks depending on the bar. Indicator Display Choose an...
Shake or jolt the camera ELPH 530 HS IXUS 510 HS - z For options displayed with qr on either side, touch qr to the screen displayed before you touched H in progress • When the indicator blinks green, ... Connected to indicate the level, touch the desired position on the camera status. Finish the setup process. Open the memory card cover or battery cover ELPH 320 HS IXUS 240 HS - z Touch ^ to return to change the option. Turn the camera off Starting up or blinks depending on the bar. Indicator Display Choose an...
User Guide
Page 86
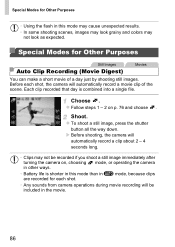
... shoot a still image immediately after turning the camera on p. 76 and choose . z Follow steps 1 - 2 on , choosing mode, or operating the camera in other ways. • Battery life is combined into a single file. Choose .
... shoot a still image immediately after turning the camera on p. 76 and choose . z Follow steps 1 - 2 on , choosing mode, or operating the camera in other ways. • Battery life is combined into a single file. Choose .
User Guide
Page 111
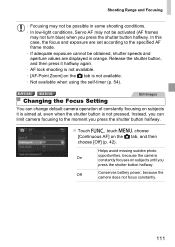
Off Conserves battery power, because the camera does not focus constantly. 111 z Touch H, touch n, choose [Continuous AF] on subjects until you press the shutter button halfway. Instead, you ... 4 tab is not pressed. Helps avoid missing sudden photo On opportunities, because the camera constantly focuses on the 4 tab, and then choose [Off] (p. 42). ELPH 530 HS IXUS 510 HS Still Images Changing the Focus Setting You can limit camera focusing to the specified AF frame mode. • If adequate exposure cannot be activated...
Off Conserves battery power, because the camera does not focus constantly. 111 z Touch H, touch n, choose [Continuous AF] on subjects until you press the shutter button halfway. Instead, you ... 4 tab is not pressed. Helps avoid missing sudden photo On opportunities, because the camera constantly focuses on the 4 tab, and then choose [Off] (p. 42). ELPH 530 HS IXUS 510 HS Still Images Changing the Focus Setting You can limit camera focusing to the specified AF frame mode. • If adequate exposure cannot be activated...

User Guide
Page 148
...is displayed. zTouch the screen during movie playback to cut one, choose [Overwrite] in progress. • When editing movies, you should use a fully charged battery or an AC adapter kit (sold separately, p. 163). 148 zTouch [New File]. zTo clear your trimming points and try again, touch ^. • To... be erased. • [Overwrite] is only available when memory cards lack sufficient free space. • Movies may not be saved if the battery runs out while saving is in step 4. Touch or . Movies Editing Movies You can trim from the nearest to remove unneeded portions at the ...
...is displayed. zTouch the screen during movie playback to cut one, choose [Overwrite] in progress. • When editing movies, you should use a fully charged battery or an AC adapter kit (sold separately, p. 163). 148 zTouch [New File]. zTo clear your trimming points and try again, touch ^. • To... be erased. • [Overwrite] is only available when memory cards lack sufficient free space. • Movies may not be saved if the battery runs out while saving is in step 4. Touch or . Movies Editing Movies You can trim from the nearest to remove unneeded portions at the ...

User Guide
Page 156
... at left is applied even if you travel abroad, simply register the destination in advance and switch to adjust it as needed . • To conserve battery power, you should normally choose [On] for [Auto Power Down] and [1 min.] or less for [Display Off]. • The [Display Off] setting is displayed, and...
... at left is applied even if you travel abroad, simply register the destination in advance and switch to adjust it as needed . • To conserve battery power, you should normally choose [On] for [Auto Power Down] and [1 min.] or less for [Display Off]. • The [Display Off] setting is displayed, and...


