User Guide
Page 3
...affect recorded images. • The LCD monitor may be used over an extended period, it may contravene copyright or other devices such as red or black dots. This does not indicate damage. 3 Preliminary Notes and Legal Information • Take and review some pixels may be ... test shots initially to work with a thin plastic film for protection against scratches during shipment. If covered, remove the film before contacting a Canon Customer Support Help Desk. • Although the LCD monitor is machine readable. • Images recorded by the camera are supported on copyright law...
...affect recorded images. • The LCD monitor may be used over an extended period, it may contravene copyright or other devices such as red or black dots. This does not indicate damage. 3 Preliminary Notes and Legal Information • Take and review some pixels may be ... test shots initially to work with a thin plastic film for protection against scratches during shipment. If covered, remove the film before contacting a Canon Customer Support Help Desk. • Although the LCD monitor is machine readable. • Images recorded by the camera are supported on copyright law...
User Guide
Page 46
... if you have accidentally deactivated it (by camera shake. For details on the flash range, see "Specifications" in the Getting Started guide. • To reduce red-eye and to assist in focusing, the lamp may be played when the Sleeping and Babies (Sleeping) icons (p. 49) are dark despite the flash firing...
... if you have accidentally deactivated it (by camera shake. For details on the flash range, see "Specifications" in the Getting Started guide. • To reduce red-eye and to assist in focusing, the lamp may be played when the Sleeping and Babies (Sleeping) icons (p. 49) are dark despite the flash firing...

User Guide
Page 69
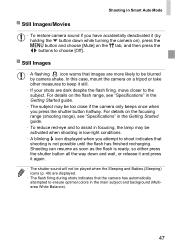
... setting. z To restore the original setting, repeat this process but choose [Off]. • Red-eye correction may be applied to image areas other than eyes (if the camera misinterprets red eye makeup as red pupils, for example). • You can also correct existing images (p. 156). • You.... z Press the n button, choose [Flash Settings] on the 4 tab, and then press the m button (p. 40). Image Customization Features Still Images Red-Eye Correction Red-eye that occurs in the flash photography can also access the screen in step 2 by pressing the r button and then the n button. 70
... setting. z To restore the original setting, repeat this process but choose [Off]. • Red-eye correction may be applied to image areas other than eyes (if the camera misinterprets red eye makeup as red pupils, for example). • You can also correct existing images (p. 156). • You.... z Press the n button, choose [Flash Settings] on the 4 tab, and then press the m button (p. 40). Image Customization Features Still Images Red-Eye Correction Red-eye that occurs in the flash photography can also access the screen in step 2 by pressing the r button and then the n button. 70

User Guide
Page 76
... reduction lamp that normally lights up to help you focus when you press the shutter button halfway in low-light shots. Deactivating the Red-Eye Reduction Lamp You can deactivate the lamp that lights up to reduce redeye when the flash is used in low-light conditions. z ..., repeat this process but choose [On]. 77 z Press the n button, choose [Flash Settings] on the 4 tab, and then choose [Off] (p. 40). z Choose [Red-Eye Lamp], and then choose [Off] (p. 40). Configure the setting. For instructions on the 4 tab of the menu as follows. z To restore the original setting...
... reduction lamp that normally lights up to help you focus when you press the shutter button halfway in low-light shots. Deactivating the Red-Eye Reduction Lamp You can deactivate the lamp that lights up to reduce redeye when the flash is used in low-light conditions. z ..., repeat this process but choose [On]. 77 z Press the n button, choose [Flash Settings] on the 4 tab, and then choose [Off] (p. 40). z Choose [Red-Eye Lamp], and then choose [Off] (p. 40). Configure the setting. For instructions on the 4 tab of the menu as follows. z To restore the original setting...

User Guide
Page 109
... menu, and choose the desired option (p. 39). Creates black and white images. Combines the effects of Vivid Blue, Vivid Green, and Vivid Red to sepia or black and white. Makes mountains, foliage, and other blue subjects more vivid. Lightens skin tones. Adjust contrast, sharpness, color ...-looking colors resembling images on positive film. X The option you configured is now displayed. z Press the m button, choose in images. Makes red subjects more vivid. These settings may be set in or modes. • With and modes, colors other than people's skin tone may not...
... menu, and choose the desired option (p. 39). Creates black and white images. Combines the effects of Vivid Blue, Vivid Green, and Vivid Red to sepia or black and white. Makes mountains, foliage, and other blue subjects more vivid. Lightens skin tones. Adjust contrast, sharpness, color ...-looking colors resembling images on positive film. X The option you configured is now displayed. z Press the m button, choose in images. Makes red subjects more vivid. These settings may be set in or modes. • With and modes, colors other than people's skin tone may not...

User Guide
Page 110
... value. Shoot. X The option you configured is now displayed. Color and Continuous Shooting Custom Color Choose the desired level of image contrast, sharpness, color saturation, red, green, blue, and skin tones in the menu, and choose the desired option (p. 39). z Press the n button to the left. z Press the m button, choose in...
... value. Shoot. X The option you configured is now displayed. Color and Continuous Shooting Custom Color Choose the desired level of image contrast, sharpness, color saturation, red, green, blue, and skin tones in the menu, and choose the desired option (p. 39). z Press the n button to the left. z Press the m button, choose in...
User Guide
Page 155
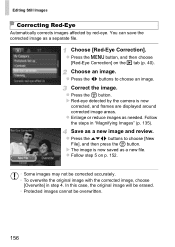
.... Save as a new file. X The image is now corrected, and frames are displayed around corrected image areas. Choose [Red-Eye Correction]. z Press the n button, and then choose [Red-Eye Correction] on p. 152. • Some images may not be overwritten. 156 z Enlarge or reduce images as a ...cannot be corrected accurately. • To overwrite the original image with the corrected image, choose [Overwrite] in "Magnifying Images" (p. 135). X Red-eye detected by red-eye. You can save the corrected image as needed. Follow the steps in step 4. z Follow step 5 on the 1 tab (p. 40)....
.... Save as a new file. X The image is now corrected, and frames are displayed around corrected image areas. Choose [Red-Eye Correction]. z Press the n button, and then choose [Red-Eye Correction] on p. 152. • Some images may not be overwritten. 156 z Enlarge or reduce images as a ...cannot be corrected accurately. • To overwrite the original image with the corrected image, choose [Overwrite] in "Magnifying Images" (p. 135). X Red-eye detected by red-eye. You can save the corrected image as needed. Follow the steps in step 4. z Follow step 5 on the 1 tab (p. 40)....
User Guide
Page 174
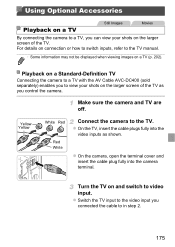
... to a TV, you can view your shots on the larger screen of the TV. Make sure the camera and TV are off. Yellow Yellow White Red Red White Connect the camera to video input. For details on connection or how to switch inputs, refer to in step 2. 175 Playback on a Standard-Definition...
... to a TV, you can view your shots on the larger screen of the TV. Make sure the camera and TV are off. Yellow Yellow White Red Red White Connect the camera to video input. For details on connection or how to switch inputs, refer to in step 2. 175 Playback on a Standard-Definition...

User Guide
Page 181
Default Date Matches current printer settings. Corrects red-eye. Specify a desired image area to choose an option. Configure the setting. File No. Uses information from the time of copies to print. - Trimming Paper ... buttons to print (p. 183). - Prints images with the file number added. Printing Images Configuring Print Settings Still Images Access the printing screen. Default Off On Red-Eye 1 Matches current printer settings. - Both Off Prints images with the date added. Prints images with both the date and file number added. - of Copies...
Default Date Matches current printer settings. Corrects red-eye. Specify a desired image area to choose an option. Configure the setting. File No. Uses information from the time of copies to print. - Trimming Paper ... buttons to print (p. 183). - Prints images with the file number added. Printing Images Configuring Print Settings Still Images Access the printing screen. Default Off On Red-Eye 1 Matches current printer settings. - Both Off Prints images with the date added. Prints images with both the date and file number added. - of Copies...
User Guide
Page 195
..."Specifications" in flash shots. This is displayed and shooting stops automatically. Troubleshooting Subjects are not available. • Available setting items vary by red-eye (p. 70). • Set [Red-Eye Lamp] to [On] (p. 77) to the actual recording time (p. 164). Menu", and "Shooting Menu" (pp. 204 - 209...quickly enough. Playback Playback is not possible. • Image or movie playback may look at closer range. • Edit images using red-eye correction (p. 156). Shooting settings or FUNC. Note that even if the elapsed time display is incorrect, the length of the ...
..."Specifications" in flash shots. This is displayed and shooting stops automatically. Troubleshooting Subjects are not available. • Available setting items vary by red-eye (p. 70). • Set [Red-Eye Lamp] to [On] (p. 77) to the actual recording time (p. 164). Menu", and "Shooting Menu" (pp. 204 - 209...quickly enough. Playback Playback is not possible. • Image or movie playback may look at closer range. • Edit images using red-eye correction (p. 156). Shooting settings or FUNC. Note that even if the elapsed time display is incorrect, the length of the ...
User Guide
Page 199
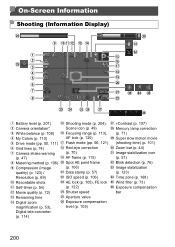
... Digital zoom magnification (p. 53), Digital tele-converter (p. 114) Shooting mode (p. 204), Scene icon (p. 49) Focusing range (p. 113), AF lock (p. 120) Flash mode (pp. 56, 121) Red-eye correction (p. 70) AF frame (p. 115) Spot AE point frame (p. 106) Date stamp (p. 57) ISO speed (p. 106) AE lock (p. 105), FE lock (p. 122) Shutter speed...
... Digital zoom magnification (p. 53), Digital tele-converter (p. 114) Shooting mode (p. 204), Scene icon (p. 49) Focusing range (p. 113), AF lock (p. 120) Flash mode (pp. 56, 121) Red-eye correction (p. 70) AF frame (p. 115) Spot AE point frame (p. 106) Date stamp (p. 57) ISO speed (p. 106) AE lock (p. 105), FE lock (p. 122) Shutter speed...

User Guide
Page 200
...-screen icon or message indicates the battery charge level. Orientation is pointed straight up or down. Display Details Sufficient charge Slightly depleted, but sufficient (Blinking red) Nearly depleted - On-Screen Information * : Regular orientation, : Held vertically The camera detects the shooting orientation and adjusts settings for optimal shots. charge the battery soon...
...-screen icon or message indicates the battery charge level. Orientation is pointed straight up or down. Display Details Sufficient charge Slightly depleted, but sufficient (Blinking red) Nearly depleted - On-Screen Information * : Regular orientation, : Held vertically The camera detects the shooting orientation and adjusts settings for optimal shots. charge the battery soon...
User Guide
Page 201
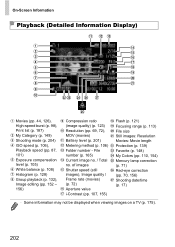
... (p. 121) Focusing range (p. 113) File size Still images: Resolution Movies: Movie length Protection (p. 139) Favorite (p. 148) My Colors (pp. 110, 154) Mercury lamp correction (p. 71) Red-eye correction (pp. 70, 156) Shooting date/time (p. 17) • Some information may not be displayed when viewing images on a TV (p. 175). 202 On-Screen...
... (p. 121) Focusing range (p. 113) File size Still images: Resolution Movies: Movie length Protection (p. 139) Favorite (p. 148) My Colors (pp. 110, 154) Mercury lamp correction (p. 71) Red-eye correction (pp. 70, 156) Shooting date/time (p. 17) • Some information may not be displayed when viewing images on a TV (p. 175). 202 On-Screen...

User Guide
Page 205
...) Still Image Aspect Ratio (p. 68) W *6 Resolution (p. 69) Compression (p. 123) Movie Quality (p. 72) *1 White balance is not available. *2 Set in a range of 1 - 5: contrast, sharpness, color saturation, red, green, blue, and skin tone. *3 Not available in x or v. *4 Cannot be set to 0 seconds in modes without selection of the number of shots. *5 One shot...
...) Still Image Aspect Ratio (p. 68) W *6 Resolution (p. 69) Compression (p. 123) Movie Quality (p. 72) *1 White balance is not available. *2 Set in a range of 1 - 5: contrast, sharpness, color saturation, red, green, blue, and skin tone. *3 Not available in x or v. *4 Cannot be set to 0 seconds in modes without selection of the number of shots. *5 One shot...

User Guide
Page 207
... (p. 118) Continuous AF (p. 119) AF-assist Beam (p. 77) Flash Settings (pp. 70, 77) i-Contrast (p. 107) On Off On Off*4 On Off On Off Red-Eye On Corr. Off Red-Eye On Lamp Off Auto Off Hg Lamp Corr. (p. 71) Wind Filter (p. 73) Review (p. 78) On/Off On/Off Off/2 - 10 sec./Hold...
... (p. 118) Continuous AF (p. 119) AF-assist Beam (p. 77) Flash Settings (pp. 70, 77) i-Contrast (p. 107) On Off On Off*4 On Off On Off Red-Eye On Corr. Off Red-Eye On Lamp Off Auto Off Hg Lamp Corr. (p. 71) Wind Filter (p. 73) Review (p. 78) On/Off On/Off Off/2 - 10 sec./Hold...
User Guide
Page 209
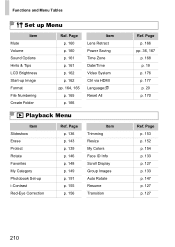
... p. 19 p. 176 p. 177 p. 20 p. 170 Ref. Functions and Menu Tables 3 Set up Menu Item Mute Volume Sound Options Hints & Tips LCD Brightness Start-up i-Contrast Red-Eye Correction Ref. Page p. 136 p. 143 p. 139 p. 146 p. 148 p. 149 p. 191 p. 155 p. 156 Item Trimming Resize My Colors Face ID Info Scroll Display Group Images...
... p. 19 p. 176 p. 177 p. 20 p. 170 Ref. Functions and Menu Tables 3 Set up Menu Item Mute Volume Sound Options Hints & Tips LCD Brightness Start-up i-Contrast Red-Eye Correction Ref. Page p. 136 p. 143 p. 139 p. 146 p. 148 p. 149 p. 191 p. 155 p. 156 Item Trimming Resize My Colors Face ID Info Scroll Display Group Images...
User Guide
Page 211
... DIGITAL CAMERA Solution Disk 2 Digital tele-converter 114 212 Digital zoom 53 Display language 20 DPOF 187 E Editing Cropping 153 i-Contrast 155 My Colors 154 Red-eye correction 156 Resizing images 152 Erasing 143 Erasing all 143 Error messages 198 Exposure AE lock 105 Compensation 105 FE lock 122 F Face detect...
... DIGITAL CAMERA Solution Disk 2 Digital tele-converter 114 212 Digital zoom 53 Display language 20 DPOF 187 E Editing Cropping 153 i-Contrast 155 My Colors 154 Red-eye correction 156 Resizing images 152 Erasing 143 Erasing all 143 Error messages 198 Exposure AE lock 105 Compensation 105 FE lock 122 F Face detect...
User Guide
Page 212
... mode 80 Poster effect (shooting mode 84 Powered IS 124 Power J Battery, AC adapter kit Power saving 36 Printing 180 Program AE 104 Protecting 139 R Red-eye correction 70, 156 Reset all 170 Resizing images 152 Resolution (image size 69 Rotating 146 S Screen Icons 200, 202 Language display 20 Menu J FUNC...
... mode 80 Poster effect (shooting mode 84 Powered IS 124 Power J Battery, AC adapter kit Power saving 36 Printing 180 Program AE 104 Protecting 139 R Red-eye correction 70, 156 Reset all 170 Resizing images 152 Resolution (image size 69 Rotating 146 S Screen Icons 200, 202 Language display 20 Menu J FUNC...


