
User Guide
Page 2
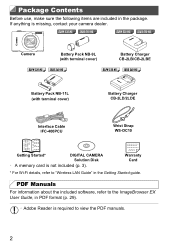
... included in PDF format (p. 29). • Adobe Reader is required to view the PDF manuals. 2 ELPH 530 HS IXUS 510 HS ELPH 530 HS IXUS 510 HS Camera Battery Pack NB-9L (with terminal cover) Battery Charger CB-2LB/CB-2LBE ELPH 320 HS IXUS 240 HS ELPH 320 HS IXUS 240 HS Battery Pack NB-11L (with terminal cover) Battery Charger CB-2LD/2LDE Interface Cable IFC-400PCU Wrist Strap WS-DC10 Getting Started* DIGITAL CAMERA Solution Disk • A memory card is missing...
... included in PDF format (p. 29). • Adobe Reader is required to view the PDF manuals. 2 ELPH 530 HS IXUS 510 HS ELPH 530 HS IXUS 510 HS Camera Battery Pack NB-9L (with terminal cover) Battery Charger CB-2LB/CB-2LBE ELPH 320 HS IXUS 240 HS ELPH 320 HS IXUS 240 HS Battery Pack NB-11L (with terminal cover) Battery Charger CB-2LD/2LDE Interface Cable IFC-400PCU Wrist Strap WS-DC10 Getting Started* DIGITAL CAMERA Solution Disk • A memory card is missing...
User Guide
Page 5
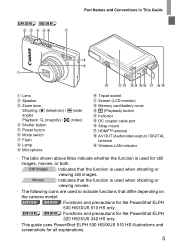
... the PowerShot ELPH 530 HS/IXUS 510 HS only. ELPH 320 HS IXUS 240 HS Part Names and Conventions in This Guide Lens Speaker Zoom lever Shooting: i (telephoto) / j (wide angle) Playback: k (magnify) / g (index) Shutter button Power button Mode switch Flash Lamp Microphone Tripod socket Screen (LCD monitor) Memory card/battery cover 1 (Playback) button Indicator DC coupler cable port Strap mount HDMITM terminal AV OUT (Audio/video output) / DIGITAL terminal Wireless LAN indicator • The tabs shown above titles indicate whether the function is used for still images, movies...
... the PowerShot ELPH 530 HS/IXUS 510 HS only. ELPH 320 HS IXUS 240 HS Part Names and Conventions in This Guide Lens Speaker Zoom lever Shooting: i (telephoto) / j (wide angle) Playback: k (magnify) / g (index) Shutter button Power button Mode switch Flash Lamp Microphone Tripod socket Screen (LCD monitor) Memory card/battery cover 1 (Playback) button Indicator DC coupler cable port Strap mount HDMITM terminal AV OUT (Audio/video output) / DIGITAL terminal Wireless LAN indicator • The tabs shown above titles indicate whether the function is used for still images, movies...

User Guide
Page 6
... Memory Cards 3 Part Names and Conventions in Program AE Mode (G Mode 98 Image Brightness (Exposure Compensation 99 Color and Continuous Shooting .... 102 Shooting Range and Focusing...... 106 Flash 114 Other Settings 116 5 Playback Mode 121 Viewing 122 Browsing and Filtering Images...... 127 Editing Face ID Information........... 130 Image Viewing Options 131 Protecting Images 134 Erasing Images 136 Rotating Images 138 Image Categories 139 Convenient Control: Touch Actions 141 Editing Still Images 143 Editing Movies 148 6 Menu 41 n Menu 42 Indicator Display 43 2 Smart Auto...
... Memory Cards 3 Part Names and Conventions in Program AE Mode (G Mode 98 Image Brightness (Exposure Compensation 99 Color and Continuous Shooting .... 102 Shooting Range and Focusing...... 106 Flash 114 Other Settings 116 5 Playback Mode 121 Viewing 122 Browsing and Filtering Images...... 127 Editing Face ID Information........... 130 Image Viewing Options 131 Protecting Images 134 Erasing Images 136 Rotating Images 138 Image Categories 139 Convenient Control: Touch Actions 141 Editing Still Images 143 Editing Movies 148 6 Menu 41 n Menu 42 Indicator Display 43 2 Smart Auto...

User Guide
Page 21
... first time you turn off the camera, press the power button. 21 X The [Date/Time] screen is no longer displayed. Remove the memory card. z Press the power button. z To turn the camera on . X The memory card will pop up . z When finished, touch ^. Turn the camera on . Setting the Date and Time A screen for dates and times added to specify the date and time. Finish the setup process. z Push the memory card in the direction of the arrow. z Open the cover and press the battery lock...
... first time you turn off the camera, press the power button. 21 X The [Date/Time] screen is no longer displayed. Remove the memory card. z Press the power button. z To turn the camera on . X The memory card will pop up . z When finished, touch ^. Turn the camera on . Setting the Date and Time A screen for dates and times added to specify the date and time. Finish the setup process. z Push the memory card in the direction of the arrow. z Open the cover and press the battery lock...
User Guide
Page 24
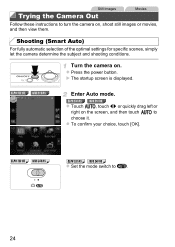
... then view them. z Press the power button. Shooting (Smart Auto) For fully automatic selection of the optimal settings for specific scenes, simply let the camera determine the subject and shooting conditions. ELPH 530 HS IXUS 510 HS Enter Auto mode. ELPH 320 HS IXUS 240 HS ELPH 320 HS IXUS 240 HS z Set the mode switch to choose it. Still Images Movies Trying the Camera Out Follow these instructions to turn the camera on . ELPH 530 HS IXUS 510 HS z Touch , touch qr or quickly...
... then view them. z Press the power button. Shooting (Smart Auto) For fully automatic selection of the optimal settings for specific scenes, simply let the camera determine the subject and shooting conditions. ELPH 530 HS IXUS 510 HS Enter Auto mode. ELPH 320 HS IXUS 240 HS ELPH 320 HS IXUS 240 HS z Set the mode switch to choose it. Still Images Movies Trying the Camera Out Follow these instructions to turn the camera on . ELPH 530 HS IXUS 510 HS z Touch , touch qr or quickly...
User Guide
Page 29
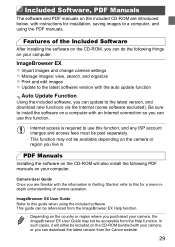
... bundled with your computer. This guide can do the following PDF manuals on your camera, or you live in Getting Started, refer to this for installation, saving images to a computer, and using the included software. ImageBrowser EX z Import images and change camera settings z Manage images: view, search, and organize z Print and edit images z Update to the latest software version with the auto update function Auto Update Function Using the included software, you can use this function. • Internet access is required...
... bundled with your computer. This guide can do the following PDF manuals on your camera, or you live in Getting Started, refer to this for installation, saving images to a computer, and using the included software. ImageBrowser EX z Import images and change camera settings z Manage images: view, search, and organize z Print and edit images z Update to the latest software version with the auto update function Auto Update Function Using the included software, you can use this function. • Internet access is required...
User Guide
Page 32
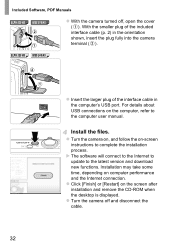
... computer user manual. Install the files. Installation may take some time, depending on the screen after installation and remove the CD-ROM when the desktop is displayed. z Click [Finish] or [Restart] on computer performance and the Internet connection. z Turn the camera off , open the cover ( ). For details about USB connections on -screen instructions to the latest version and download new functions. ELPH 320 HS IXUS 240 HS z Insert the larger plug of the included interface cable (p. 2) in...
... computer user manual. Install the files. Installation may take some time, depending on the screen after installation and remove the CD-ROM when the desktop is displayed. z Click [Finish] or [Restart] on computer performance and the Internet connection. z Turn the camera off , open the cover ( ). For details about USB connections on -screen instructions to the latest version and download new functions. ELPH 320 HS IXUS 240 HS z Insert the larger plug of the included interface cable (p. 2) in...
User Guide
Page 35
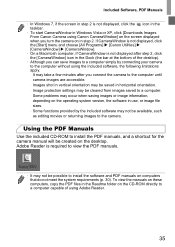
... Included Software, PDF Manuals • In Windows 7, if the screen in step 2 is not displayed, click the icon in the taskbar. • To start CameraWindow in Windows Vista or XP, click [Downloads Images From Canon Camera using Canon CameraWindow] on the screen displayed when you connect the camera to the computer until camera images are accessible. - Images shot in vertical orientation may occur when saving images or image information, depending on the operating system version, the software in...
... Included Software, PDF Manuals • In Windows 7, if the screen in step 2 is not displayed, click the icon in the taskbar. • To start CameraWindow in Windows Vista or XP, click [Downloads Images From Canon Camera using Canon CameraWindow] on the screen displayed when you connect the camera to the computer until camera images are accessible. - Images shot in vertical orientation may occur when saving images or image information, depending on the operating system version, the software in...
User Guide
Page 36
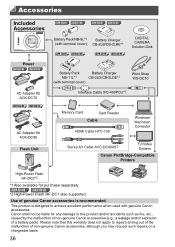
... Interface Cable IFC-400PCU*1 Memory Card Card Reader Cable HDMI Cable HTC-100 Windows/ Macintosh Computer Stereo AV Cable AVC-DC400ST TV/Video System Canon PictBridge-Compatible Printers High-Power Flash HF-DC2*2 *1 Also available for purchase separately. Accessories Included Accessories Power ELPH 530 HS IXUS 510 HS AC Adapter Kit ACK-DC70 ELPH 320 HS IXUS 240 HS AC Adapter Kit ACK-DC90 Flash Unit ELPH 530 HS IXUS 510 HS ELPH 530 HS IXUS 510 HS Battery Pack NB-9L*1 Battery Charger...
... Interface Cable IFC-400PCU*1 Memory Card Card Reader Cable HDMI Cable HTC-100 Windows/ Macintosh Computer Stereo AV Cable AVC-DC400ST TV/Video System Canon PictBridge-Compatible Printers High-Power Flash HF-DC2*2 *1 Also available for purchase separately. Accessories Included Accessories Power ELPH 530 HS IXUS 510 HS AC Adapter Kit ACK-DC70 ELPH 320 HS IXUS 240 HS AC Adapter Kit ACK-DC90 Flash Unit ELPH 530 HS IXUS 510 HS ELPH 530 HS IXUS 510 HS Battery Pack NB-9L*1 Battery Charger...

User Guide
Page 38
... switch to Shooting mode from Playback mode, press the shutter button halfway (p. 39). • The lens will be retracted after about one minute of inactivity. z To turn the camera off when the lens is still out, press the shutter button halfway (p. 39). Power Saving in Playback mode. On/Off ELPH 530 HS IXUS 510 HS ELPH 320 HS IXUS 240 HS Shooting Mode z Press the power button to turn the camera on and view your shots. Playback Mode z Press the 1 button to turn the camera off . Power Saving in Playback Mode...
... switch to Shooting mode from Playback mode, press the shutter button halfway (p. 39). • The lens will be retracted after about one minute of inactivity. z To turn the camera off when the lens is still out, press the shutter button halfway (p. 39). Power Saving in Playback mode. On/Off ELPH 530 HS IXUS 510 HS ELPH 320 HS IXUS 240 HS Shooting Mode z Press the power button to turn the camera on and view your shots. Playback Mode z Press the 1 button to turn the camera off . Power Saving in Playback Mode...
User Guide
Page 46
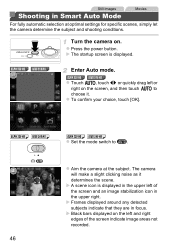
... the camera at optimal settings for specific scenes, simply let the camera determine the subject and shooting conditions. Still Images Movies Shooting in focus. z Press the power button. ELPH 320 HS IXUS 240 HS ELPH 320 HS IXUS 240 HS z Set the mode switch to choose it determines the scene. X A scene icon is displayed. z To confirm your choice, touch [OK]. The camera will make a slight clicking noise as it . ELPH 530 HS IXUS 510 HS Enter Auto mode. X Black bars displayed on the screen...
... the camera at optimal settings for specific scenes, simply let the camera determine the subject and shooting conditions. Still Images Movies Shooting in focus. z Press the power button. ELPH 320 HS IXUS 240 HS ELPH 320 HS IXUS 240 HS z Set the mode switch to choose it determines the scene. X A scene icon is displayed. z To confirm your choice, touch [OK]. The camera will make a slight clicking noise as it . ELPH 530 HS IXUS 510 HS Enter Auto mode. X Black bars displayed on the screen...

User Guide
Page 102
... recorded. • Colors may look natural under the light in the shade, or at a plain white subject, so that will illuminate your shot, adjust white balance to choose . Day Light For shooting outdoors in the menu, and choose the desired option (p. 41). Cloudy For shooting in cloudy conditions, in your shot. Auto Automatically sets the optimal white balance for the scene you are shooting. X The option you change camera settings after recording white balance data...
... recorded. • Colors may look natural under the light in the shade, or at a plain white subject, so that will illuminate your shot, adjust white balance to choose . Day Light For shooting outdoors in the menu, and choose the desired option (p. 41). Cloudy For shooting in cloudy conditions, in your shot. Auto Automatically sets the optimal white balance for the scene you are shooting. X The option you change camera settings after recording white balance data...
User Guide
Page 107
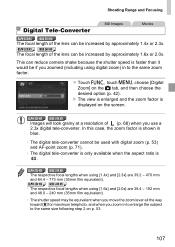
... the lens can be if you use a 2.3x digital tele-converter. X The view is enlarged and the zoom factor is displayed on the 4 tab, and then choose the desired option (p. 42). ELPH 320 HS IXUS 240 HS • The respective focal lengths when using [1.4x] and [2.3x] are 38.4 - 192 mm and 48.0 - 240 mm (35mm film equivalent). • The shutter speed may...
... the lens can be if you use a 2.3x digital tele-converter. X The view is enlarged and the zoom factor is displayed on the 4 tab, and then choose the desired option (p. 42). ELPH 320 HS IXUS 240 HS • The respective focal lengths when using [1.4x] and [2.3x] are 38.4 - 192 mm and 48.0 - 240 mm (35mm film equivalent). • The shutter speed may...

User Guide
Page 132
... menu screen during slideshows by using Touch Actions (p. 141). • In image search mode (p. 127), only images matching search conditions are played. Access the setting screen. Choose from a memory card as follows. Image Viewing Options Still Images Movies Viewing Slideshows Automatically play back images from six transition effects between images and the display duration of the camera gently (p. 123, Active Display). • Slideshows can change the transitions between images. Each image is displayed. z The slideshow will start playback...
... menu screen during slideshows by using Touch Actions (p. 141). • In image search mode (p. 127), only images matching search conditions are played. Access the setting screen. Choose from a memory card as follows. Image Viewing Options Still Images Movies Viewing Slideshows Automatically play back images from six transition effects between images and the display duration of the camera gently (p. 123, Active Display). • Slideshows can change the transitions between images. Each image is displayed. z The slideshow will start playback...
User Guide
Page 178
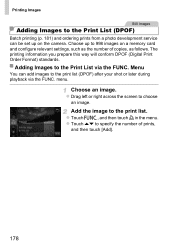
... (Digital Print Order Format) standards. Menu You can be set up to 998 images on the camera. z Touch op to specify the number of copies, as follows. menu. z Drag left or right across the screen to the print list. Adding Images to the Print List via the FUNC. Choose an image. Printing Images Still Images Adding Images to the Print List (DPOF) Batch printing (p. 181) and ordering prints from a photo development service can add images...
... (Digital Print Order Format) standards. Menu You can be set up to 998 images on the camera. z Touch op to specify the number of copies, as follows. menu. z Drag left or right across the screen to the print list. Adding Images to the Print List via the FUNC. Choose an image. Printing Images Still Images Adding Images to the Print List (DPOF) Batch printing (p. 181) and ordering prints from a photo development service can add images...

User Guide
Page 184
... instructions on preparing and using cards or resolving transfer problems. • When using an Eye-Fi card, always confirm that local use . • Camera operation may become hot, due to their transfer functions. • Battery power will be checked on the shooting screen (in regular information display mode) or playback screen (in simple information display mode). (Gray) Not connected (Blinking white) Connecting (White) Connected (Animated) Transfer in progress Interrupted Error acquiring Eye-Fi card information (Restart the camera. To resolve this icon may indicate...
... instructions on preparing and using cards or resolving transfer problems. • When using an Eye-Fi card, always confirm that local use . • Camera operation may become hot, due to their transfer functions. • Battery power will be checked on the shooting screen (in regular information display mode) or playback screen (in simple information display mode). (Gray) Not connected (Blinking white) Connecting (White) Connected (Animated) Transfer in progress Interrupted Error acquiring Eye-Fi card information (Restart the camera. To resolve this icon may indicate...

User Guide
Page 190
Troubleshooting White dots or similar image artifacts appear in some shooting modes may look distorted. Shots look grainy. • Lower the ISO speed (p. 100). • High ISO speeds in flash shots. • This is interrupted. • Use the camera to format the memory card, or switch to activate the red-eye reduction lamp (p. 4) in Each Shooting Mode", "FUNC. Subjects are affected by red-eye (p. 68). • Set [Red-Eye Lamp] to [On] (p. 73) to a card that the date/time are not...
Troubleshooting White dots or similar image artifacts appear in some shooting modes may look distorted. Shots look grainy. • Lower the ISO speed (p. 100). • High ISO speeds in flash shots. • This is interrupted. • Use the camera to format the memory card, or switch to activate the red-eye reduction lamp (p. 4) in Each Shooting Mode", "FUNC. Subjects are affected by red-eye (p. 68). • Set [Red-Eye Lamp] to [On] (p. 73) to a card that the date/time are not...
User Guide
Page 193
... folders cannot be created, and images cannot be saved correctly. A camera error was detected (error number) • If this error message is used in Protect (p. 134), Erase (p. 136), Favorites (p. 139), My Category (p. 140), Print List (p. 178), or Photobook Set-up (p. 182). In this case, contact a Canon Customer Support Help Desk. File Error • It may indicate camera damage. To transfer the images, use a commercially available USB card reader. To print, insert the memory card directly into the printer card slot. Choose 998 images...
... folders cannot be created, and images cannot be saved correctly. A camera error was detected (error number) • If this error message is used in Protect (p. 134), Erase (p. 136), Favorites (p. 139), My Category (p. 140), Print List (p. 178), or Photobook Set-up (p. 182). In this case, contact a Canon Customer Support Help Desk. File Error • It may indicate camera damage. To transfer the images, use a commercially available USB card reader. To print, insert the memory card directly into the printer card slot. Choose 998 images...

User Guide
Page 198
... 92), Shooting mode (p. 200) ISO speed (p. 100), Playback speed (pp. 81, 94) White balance (p. 102) Histogram (p. 125) Resolution (pp. 68, 70), MOV (movies) H (Function) (p. 41) Print list (p. 178) ELPH 320 HS IXUS 240 HS Transferred via Eye-Fi (p. 184) Battery level (p. 197) Metering method (p. 100) Folder number - of images Hide information (p. 125) Shutter speed (still images), Image quality / Frame rate (movies) (p. 70) Aperture value, Image quality (movies) (p. 70) Exposure compensation level (p. 99) Flash (p. 114) Focusing range (p. 106) i-Contrast (pp. 101, 146) File size l (Display...
... 92), Shooting mode (p. 200) ISO speed (p. 100), Playback speed (pp. 81, 94) White balance (p. 102) Histogram (p. 125) Resolution (pp. 68, 70), MOV (movies) H (Function) (p. 41) Print list (p. 178) ELPH 320 HS IXUS 240 HS Transferred via Eye-Fi (p. 184) Battery level (p. 197) Metering method (p. 100) Folder number - of images Hide information (p. 125) Shutter speed (still images), Image quality / Frame rate (movies) (p. 70) Aperture value, Image quality (movies) (p. 70) Exposure compensation level (p. 99) Flash (p. 114) Focusing range (p. 106) i-Contrast (pp. 101, 146) File size l (Display...

User Guide
Page 208
... adapter kit 163, 169, 170 Accessories 163 Active Display 123 AE lock 99 AF frames 25, 47, 108 AF J Focusing AF lock 113 Aspect ratio 67 AUTO mode (shooting mode 24, 46 AV cable 165 B Batteries J Date/time (date/time battery) Battery Charging 16 Level 197 Power saving 38 Battery charger 2, 163 Black and white images 103 Blink detection 72 C Camera Reset all 159 Camera shake 119 Color (white balance 102 Color Accent (shooting mode 84 Color Swap (shooting mode 85 Compression ratio (image quality 115 Continuous shooting 104 High-speed burst (shooting mode...
... adapter kit 163, 169, 170 Accessories 163 Active Display 123 AE lock 99 AF frames 25, 47, 108 AF J Focusing AF lock 113 Aspect ratio 67 AUTO mode (shooting mode 24, 46 AV cable 165 B Batteries J Date/time (date/time battery) Battery Charging 16 Level 197 Power saving 38 Battery charger 2, 163 Black and white images 103 Blink detection 72 C Camera Reset all 159 Camera shake 119 Color (white balance 102 Color Accent (shooting mode 84 Color Swap (shooting mode 85 Compression ratio (image quality 115 Continuous shooting 104 High-speed burst (shooting mode...


