User Guide
Page 14
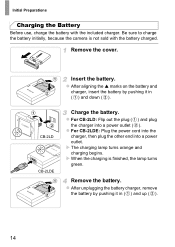
Be sure to charge the battery initially, because the camera is finished, the lamp turns green. X When the charging is not sold with the included charger. Remove the cover. CB-2LD CB-2LDE Charge the battery. z For CB-2LD: Flip out ...
Be sure to charge the battery initially, because the camera is finished, the lamp turns green. X When the charging is not sold with the included charger. Remove the cover. CB-2LD CB-2LDE Charge the battery. z For CB-2LD: Flip out ...

User Guide
Page 39
... color. z Press and hold the m button. Clock You can check the current time. X The current time appears. Color Indicator Status Camera Status Green On Blinking Connected to a computer (p. 29), or display off Starting up or blinks depending on the camera status. z Press the m button again ... the back of the camera (p. 5) lights up , recording/reading/transmitting images, or shooting long exposures (p. 95) • When the indicator blinks green, never turn the camera off , press and hold the m button, then press the power button to cancel the clock display. • When the...
... color. z Press and hold the m button. Clock You can check the current time. X The current time appears. Color Indicator Status Camera Status Green On Blinking Connected to a computer (p. 29), or display off Starting up or blinks depending on the camera status. z Press the m button again ... the back of the camera (p. 5) lights up , recording/reading/transmitting images, or shooting long exposures (p. 95) • When the indicator blinks green, never turn the camera off , press and hold the m button, then press the power button to cancel the clock display. • When the...
User Guide
Page 70
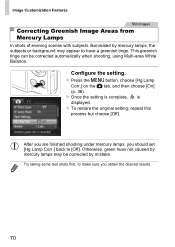
... corrected automatically when shooting, using Multi-area White Balance. z Press the n button, choose [Hg Lamp Corr.] on the 4 tab, and then choose [On] (p. 38). Otherwise, green hues not caused by mercury lamps may appear to [Off]. Image Customization Features Still Images Correcting Greenish Image Areas from Mercury Lamps In shots of...
... corrected automatically when shooting, using Multi-area White Balance. z Press the n button, choose [Hg Lamp Corr.] on the 4 tab, and then choose [On] (p. 38). Otherwise, green hues not caused by mercury lamps may appear to [Off]. Image Customization Features Still Images Correcting Greenish Image Areas from Mercury Lamps In shots of...
User Guide
Page 88
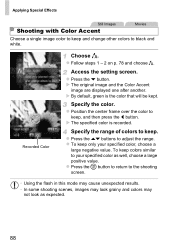
... specified color is the color that will be kept. To keep and change other colors to black and white. Access the setting screen. X By default, green is recorded. z Press the op buttons to keep. X The original image and the Color Accent image are displayed one after another. z Position the center frame...
... specified color is the color that will be kept. To keep and change other colors to black and white. Access the setting screen. X By default, green is recorded. z Press the op buttons to keep. X The original image and the Color Accent image are displayed one after another. z Position the center frame...
User Guide
Page 89
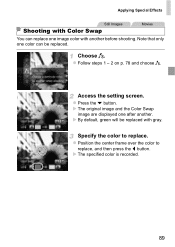
Note that only one color can replace one image color with gray. z Follow steps 1 - 2 on p. 78 and choose Y. Access the setting screen. Choose Y. X The original image and the Color Swap image are displayed one after another before shooting. Specify the color to replace, and then press the q button. z Position the center frame over the color to replace. X The specified color is recorded. 89 Applying Special Effects Still Images Movies Shooting with Color Swap You can be replaced with another . z Press the p button. X By default, green will be replaced.
Note that only one color can replace one image color with gray. z Follow steps 1 - 2 on p. 78 and choose Y. Access the setting screen. Choose Y. X The original image and the Color Swap image are displayed one after another before shooting. Specify the color to replace, and then press the q button. z Position the center frame over the color to replace. X The specified color is recorded. 89 Applying Special Effects Still Images Movies Shooting with Color Swap You can be replaced with another . z Press the p button. X By default, green will be replaced.
User Guide
Page 93
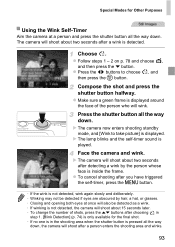
... opening both eyes at a person and press the shutter button all the way down . Compose the shot and press the shutter button halfway. z Make sure a green frame is displayed around the face of shots, press the op buttons after choosing in step 1. [Blink Detection] (p. 74) is only available for Other Purposes...
... opening both eyes at a person and press the shutter button all the way down . Compose the shot and press the shutter button halfway. z Make sure a green frame is displayed around the face of shots, press the op buttons after choosing in step 1. [Blink Detection] (p. 74) is only available for Other Purposes...

User Guide
Page 94
z Follow steps 1 - 2 on and white frames around other faces. z Make sure a green frame is displayed. z To cancel shooting after detecting that the face of another person (such as the photographer) has entered the shooting area (p. 112). Choose . ...
z Follow steps 1 - 2 on and white frames around other faces. z Make sure a green frame is displayed. z To cancel shooting after detecting that the face of another person (such as the photographer) has entered the shooting area (p. 112). Choose . ...
User Guide
Page 108
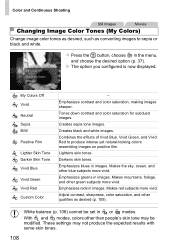
... skin tone may not produce the expected results with some skin tones. 108 Creates black and white images. Makes mountains, foliage, and other green subjects more vivid. Lightens skin tones. Makes the sky, ocean, and other qualities as converting images to produce intense yet natural-looking colors ... reds in images. Emphasizes contrast and color saturation, making images sharper. Tones down contrast and color saturation for subdued images. Emphasizes greens in images. My Colors Off Vivid Neutral Sepia B/W Positive Film Lighter Skin Tone Darker Skin Tone Vivid Blue Vivid...
... skin tone may not produce the expected results with some skin tones. 108 Creates black and white images. Makes mountains, foliage, and other green subjects more vivid. Lightens skin tones. Makes the sky, ocean, and other qualities as converting images to produce intense yet natural-looking colors ... reds in images. Emphasizes contrast and color saturation, making images sharper. Tones down contrast and color saturation for subdued images. Emphasizes greens in images. My Colors Off Vivid Neutral Sepia B/W Positive Film Lighter Skin Tone Darker Skin Tone Vivid Blue Vivid...
User Guide
Page 109
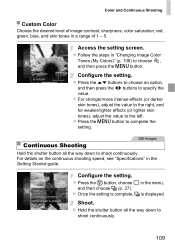
... all the way down to shoot continuously. 109 Color and Continuous Shooting Custom Color Choose the desired level of image contrast, sharpness, color saturation, red, green, blue, and skin tones in "Changing Image Color Tones (My Colors)" (p. 108) to complete the setting. Access the setting screen. z For stronger/more intense effects...
... all the way down to shoot continuously. 109 Color and Continuous Shooting Custom Color Choose the desired level of image contrast, sharpness, color saturation, red, green, blue, and skin tones in "Changing Image Color Tones (My Colors)" (p. 108) to complete the setting. Access the setting screen. z For stronger/more intense effects...
User Guide
Page 112
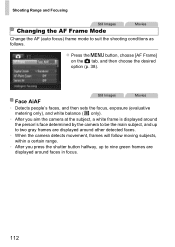
Shooting Range and Focusing Still Images Movies Changing the AF Frame Mode Change the AF (auto focus) frame mode to nine green frames are displayed around faces in focus. 112 Still Images Movies Face AiAF • Detects people's faces, and then sets the focus, exposure (evaluative metering ...
Shooting Range and Focusing Still Images Movies Changing the AF Frame Mode Change the AF (auto focus) frame mode to nine green frames are displayed around faces in focus. 112 Still Images Movies Face AiAF • Detects people's faces, and then sets the focus, exposure (evaluative metering ...

User Guide
Page 113
... the screen. Shooting Range and Focusing • If faces are not detected, or when only gray frames are displayed (without a white frame), up to nine green frames are displayed in the areas in focus when you press the shutter button halfway. • If faces are not detected when Servo AF (p. 115...
... the screen. Shooting Range and Focusing • If faces are not detected, or when only gray frames are displayed (without a white frame), up to nine green frames are displayed in the areas in focus when you press the shutter button halfway. • If faces are not detected when Servo AF (p. 115...
User Guide
Page 115
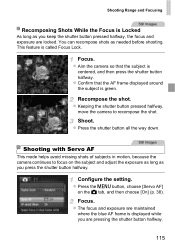
..., because the camera continues to recompose the shot. Focus. Configure the setting. z Aim the camera so that the AF frame displayed around the subject is green. Shoot. This feature is centered, and then press the shutter button halfway. z Press the n button, choose [Servo AF] on the subject and adjust the exposure...
..., because the camera continues to recompose the shot. Focus. Configure the setting. z Aim the camera so that the AF frame displayed around the subject is green. Shoot. This feature is centered, and then press the shutter button halfway. z Press the n button, choose [Servo AF] on the subject and adjust the exposure...

User Guide
Page 206
... Image Aspect Ratio (p. 67) Resolution (p. 68) Compression (p. 119) Movie Quality (p. 71) -------- *1 White balance is not available. *2 Set in a range of 1 - 5: contrast, sharpness, color saturation, red, green, blue, and skin tone. *3 Not available in x or v. *4 Cannot be set to 0 seconds in modes without selection of the number of shots. *5 One shot (cannot...
... Image Aspect Ratio (p. 67) Resolution (p. 68) Compression (p. 119) Movie Quality (p. 71) -------- *1 White balance is not available. *2 Set in a range of 1 - 5: contrast, sharpness, color saturation, red, green, blue, and skin tone. *3 Not available in x or v. *4 Cannot be set to 0 seconds in modes without selection of the number of shots. *5 One shot (cannot...


