
User Guide
Page 4
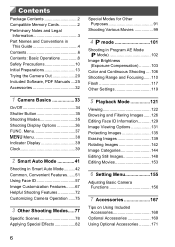
..." represents a page number) • Instructions in This Guide Lens Speaker Zoom lever Shooting: i (telephoto) / j (wide angle) Playback: k (magnify) / g (index) Shutter button Power button Mode switch Microphone Flash Lamp • : Important information you should know • : Notes and tips for still images, movies, or both. Still Images : Indicates that the function is used for expert camera use • (p. Part Names and Conventions in this guide apply to the camera under default settings. • For convenience, all supported memory cards are simply referred...
..." represents a page number) • Instructions in This Guide Lens Speaker Zoom lever Shooting: i (telephoto) / j (wide angle) Playback: k (magnify) / g (index) Shutter button Power button Mode switch Microphone Flash Lamp • : Important information you should know • : Notes and tips for still images, movies, or both. Still Images : Indicates that the function is used for expert camera use • (p. Part Names and Conventions in this guide apply to the camera under default settings. • For convenience, all supported memory cards are simply referred...
User Guide
Page 6
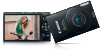
... Focusing...... 110 Flash 117 Other Settings 119 5 Playback Mode 121 Viewing 122 Browsing and Filtering Images...... 126 Editing Face ID Information........... 129 Image Viewing Options 131 Protecting Images 135 Erasing Images 139 Rotating Images 142 Image Categories 144 Editing Still Images 148 Editing Movies 153 6 Setting Menu 155 Adjusting Basic Camera Functions 156 7 Accessories 167 Tips on Using Included Accessories 168 Optional Accessories 169 Using Optional Accessories .......... 171 6 Menu 37 n Menu 38 Indicator Display 39 Clock 39 2 Smart Auto Mode 41 Shooting...
... Focusing...... 110 Flash 117 Other Settings 119 5 Playback Mode 121 Viewing 122 Browsing and Filtering Images...... 126 Editing Face ID Information........... 129 Image Viewing Options 131 Protecting Images 135 Erasing Images 139 Rotating Images 142 Image Categories 144 Editing Still Images 148 Editing Movies 153 6 Setting Menu 155 Adjusting Basic Camera Functions 156 7 Accessories 167 Tips on Using Included Accessories 168 Optional Accessories 169 Using Optional Accessories .......... 171 6 Menu 37 n Menu 38 Indicator Display 39 Clock 39 2 Smart Auto Mode 41 Shooting...
User Guide
Page 15
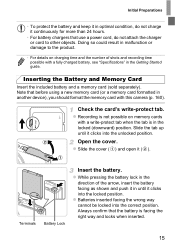
... possible on charging time and the number of shots and recording time possible with this camera (p. 160). Inserting the Battery and Memory Card Insert the included battery and a memory card (sold separately). Open the cover. Always confirm that before using a new memory card (or a memory card formatted in another device), you should format the memory card with a fully charged battery, see "Specifications" in the locked (downward) position. z Recording is in the Getting Started guide. z Slide the cover ( ) and open it ( ). z Batteries inserted...
... possible on charging time and the number of shots and recording time possible with this camera (p. 160). Inserting the Battery and Memory Card Insert the included battery and a memory card (sold separately). Open the cover. Always confirm that before using a new memory card (or a memory card formatted in another device), you should format the memory card with a fully charged battery, see "Specifications" in the locked (downward) position. z Recording is in the Getting Started guide. z Slide the cover ( ) and open it ( ). z Batteries inserted...
User Guide
Page 17
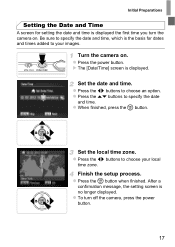
... your images. Turn the camera on . Set the local time zone. Initial Preparations Setting the Date and Time A screen for setting the date and time is the basis for dates and times added to your local time zone. Be sure to specify the date and time, which is displayed the first time you turn off the camera, press the power button. 17 X The [Date/Time] screen is no longer displayed. Finish the setup process. After a confirmation message, the setting screen is displayed...
... your images. Turn the camera on . Set the local time zone. Initial Preparations Setting the Date and Time A screen for setting the date and time is the basis for dates and times added to your local time zone. Be sure to specify the date and time, which is displayed the first time you turn off the camera, press the power button. 17 X The [Date/Time] screen is no longer displayed. Finish the setup process. After a confirmation message, the setting screen is displayed...

User Guide
Page 25
... software on a computer with the auto update function Auto Update Function Using the included software, you can update to a computer, and using the included software. In such cases, it will also install the following things on your computer. Included Software, PDF Manuals The software and PDF manuals on the included CD-ROM are familiar with the information in . Features of camera operation. ImageBrowser EX z Import images and change camera settings z Manage images: view, search, and organize z Print and edit images z Update...
... software on a computer with the auto update function Auto Update Function Using the included software, you can update to a computer, and using the included software. In such cases, it will also install the following things on your computer. Included Software, PDF Manuals The software and PDF manuals on the included CD-ROM are familiar with the information in . Features of camera operation. ImageBrowser EX z Import images and change camera settings z Manage images: view, search, and organize z Print and edit images z Update...
User Guide
Page 27
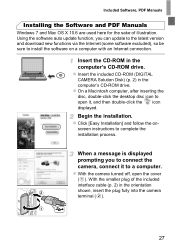
... included CD-ROM (DIGITAL CAMERA Solution Disk) (p. 2) in the computer's CD-ROM drive. When a message is displayed prompting you can update to the latest version and download new functions via the Internet (some software excluded), so be sure to complete the installation process. z With the camera turned off, open it to open the cover ( ). Included Software, PDF Manuals Installing the Software and PDF Manuals Windows 7 and Mac OS X 10.6 are used here for the sake...
... included CD-ROM (DIGITAL CAMERA Solution Disk) (p. 2) in the computer's CD-ROM drive. When a message is displayed prompting you can update to the latest version and download new functions via the Internet (some software excluded), so be sure to complete the installation process. z With the camera turned off, open it to open the cover ( ). Included Software, PDF Manuals Installing the Software and PDF Manuals Windows 7 and Mac OS X 10.6 are used here for the sake...

User Guide
Page 28
... you connect the camera to the computer, drivers will connect to the Internet to update to the computer user manual. z Click [Finish] or [Restart] on -screen instructions to complete the installation process. z Turn the camera on, and follow the on the included CD-ROMs, be installed. - Included Software, PDF Manuals z Insert the larger plug of the interface cable in step 3 will receive the correct updates and new functions via the auto update function...
... you connect the camera to the computer, drivers will connect to the Internet to update to the computer user manual. z Click [Finish] or [Restart] on -screen instructions to complete the installation process. z Turn the camera on, and follow the on the included CD-ROMs, be installed. - Included Software, PDF Manuals z Insert the larger plug of the interface cable in step 3 will receive the correct updates and new functions via the auto update function...
User Guide
Page 30
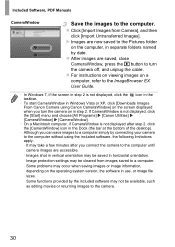
... images are saved, close CameraWindow, press the 1 button to the ImageBrowser EX User Guide. • In Windows 7, if the screen in step 2 is not displayed after you turn the camera off, and unplug the cable. z For instructions on viewing images on a computer, refer to turn the camera on in step 2. z Click [Import Images from images saved to the computer without using Canon CameraWindow] on the screen displayed when you connect the camera to the camera. 30 Some problems...
... images are saved, close CameraWindow, press the 1 button to the ImageBrowser EX User Guide. • In Windows 7, if the screen in step 2 is not displayed after you turn the camera off, and unplug the cable. z For instructions on viewing images on a computer, refer to turn the camera on in step 2. z Click [Import Images from images saved to the computer without using Canon CameraWindow] on the screen displayed when you connect the camera to the camera. 30 Some problems...
User Guide
Page 35
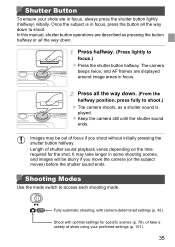
... the time required for specific scenes (p. 78), or take longer in focus, press the button all the way down . (From the halfway position, press fully to access each shooting mode. Press halfway. (Press lightly to shoot. Shooting Modes Use the mode switch to shoot.) X The camera shoots, as pressing the button halfway or all the way down to focus.) z Press the shutter button halfway. Shoot with camera-determined settings (p. 42). In this manual, shutter button operations are displayed around image...
... the time required for specific scenes (p. 78), or take longer in focus, press the button all the way down . (From the halfway position, press fully to access each shooting mode. Press halfway. (Press lightly to shoot. Shooting Modes Use the mode switch to shoot.) X The camera shoots, as pressing the button halfway or all the way down to focus.) z Press the shutter button halfway. Shoot with camera-determined settings (p. 42). In this manual, shutter button operations are displayed around image...
User Guide
Page 91
... each shot. • Any sounds from camera operations during movie recording will be included in the movie. • Movies created in mode are saved as separate movie files in other ways. • Battery life is protected (p. 135) - z To shoot a still image, press the shutter button all the way down. If the movie file size reaches about 2 - 4 seconds long. • Clips may not be recorded if you press the shutter button halfway, use camera controls, or trigger the self-timer...
... each shot. • Any sounds from camera operations during movie recording will be included in the movie. • Movies created in mode are saved as separate movie files in other ways. • Battery life is protected (p. 135) - z To shoot a still image, press the shutter button all the way down. If the movie file size reaches about 2 - 4 seconds long. • Clips may not be recorded if you press the shutter button halfway, use camera controls, or trigger the self-timer...
User Guide
Page 95
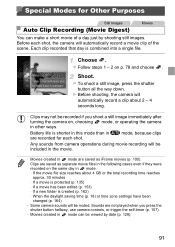
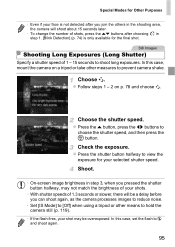
... available for the final shot. and shoot again. 95 Choose the shutter speed. z Press the shutter button halfway to view the exposure for your shots. • With shutter speeds of 1.3 seconds or slower, there will shoot about 15 seconds later. • To change the number of 1 - 15 seconds to choose the shutter speed, and then press the m button. In this case, set the flash to ! Special Modes for Other Purposes...
... available for the final shot. and shoot again. 95 Choose the shutter speed. z Press the shutter button halfway to view the exposure for your shots. • With shutter speeds of 1.3 seconds or slower, there will shoot about 15 seconds later. • To change the number of 1 - 15 seconds to choose the shutter speed, and then press the m button. In this case, set the flash to ! Special Modes for Other Purposes...
User Guide
Page 107
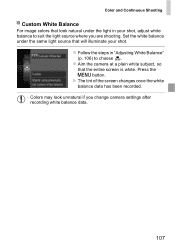
... n button. z Aim the camera at a plain white subject, so that will illuminate your shot, adjust white balance to choose . Color and Continuous Shooting Custom White Balance For image colors that look unnatural if you are shooting. X The tint of the screen changes once the white balance data has been recorded. • Colors may look natural under the same light source that the entire screen is white. z Follow the steps in your shot. Set the white balance under the light in "Adjusting White Balance...
... n button. z Aim the camera at a plain white subject, so that will illuminate your shot, adjust white balance to choose . Color and Continuous Shooting Custom White Balance For image colors that look unnatural if you are shooting. X The tint of the screen changes once the white balance data has been recorded. • Colors may look natural under the same light source that the entire screen is white. z Follow the steps in your shot. Set the white balance under the light in "Adjusting White Balance...
User Guide
Page 162
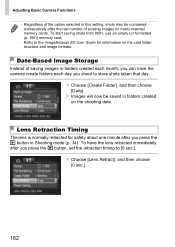
... Camera Functions • Regardless of the option selected in this setting, shots may be saved in Shooting mode (p. 34). z Choose [Create Folder], and then choose [Daily]. z Choose [Lens Retract], and then choose [0 sec.]. 162 To start saving shots from 0001, use an empty (or formatted (p. 160)) memory card. • Refer to [0 sec.]. Lens Retraction Timing The lens is normally retracted for information on the card folder structure and image formats. X Images will now be numbered...
... Camera Functions • Regardless of the option selected in this setting, shots may be saved in Shooting mode (p. 34). z Choose [Create Folder], and then choose [Daily]. z Choose [Lens Retract], and then choose [0 sec.]. 162 To start saving shots from 0001, use an empty (or formatted (p. 160)) memory card. • Refer to [0 sec.]. Lens Retraction Timing The lens is normally retracted for information on the card folder structure and image formats. X Images will now be numbered...
User Guide
Page 184
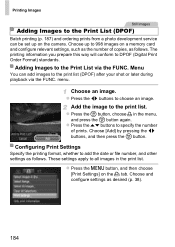
Choose up on the camera. menu. z Press the n button, and then choose [Print Settings] on a memory card and configure relevant settings, such as follows. Printing Images Still Images Adding Images to the Print List (DPOF) Batch printing (p. 187) and ordering prints from a photo development service can add images to the print list (DPOF) after your shot or later during playback via the FUNC. z Press the op buttons to DPOF (Digital Print Order Format) standards. Choose [Add...
Choose up on the camera. menu. z Press the n button, and then choose [Print Settings] on a memory card and configure relevant settings, such as follows. Printing Images Still Images Adding Images to the Print List (DPOF) Batch printing (p. 187) and ordering prints from a photo development service can add images to the print list (DPOF) after your shot or later during playback via the FUNC. z Press the op buttons to DPOF (Digital Print Order Format) standards. Choose [Add...
User Guide
Page 190
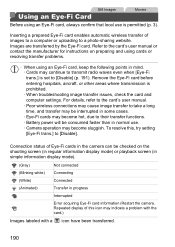
... display mode) or playback screen (in simple information display mode). (Gray) Not connected (Blinking white) Connecting (White) Connected (Animated) Transfer in progress Interrupted Error acquiring Eye-Fi card information (Restart the camera. For details, refer to the card's user manual. • Poor wireless connections may cause image transfer to take a long time, and transfer may be interrupted in some cases. • Eye-Fi cards may become hot, due to their transfer functions. • Battery power will be checked on preparing and using cards or resolving transfer problems...
... display mode) or playback screen (in simple information display mode). (Gray) Not connected (Blinking white) Connecting (White) Connected (Animated) Transfer in progress Interrupted Error acquiring Eye-Fi card information (Restart the camera. For details, refer to the card's user manual. • Poor wireless connections may cause image transfer to take a long time, and transfer may be interrupted in some cases. • Eye-Fi cards may become hot, due to their transfer functions. • Battery power will be checked on preparing and using cards or resolving transfer problems...
User Guide
Page 196
... make sure that supports high-speed recording (see "Specifications" in flash shots. Playback stops, or audio skips. • Switch to "Functions Available in face information (p. 57). Shooting settings or FUNC. The camera's internal memory buffer filled up as the camera could not record to rename files or alter the folder structure. Playback Playback is not possible. • Image or movie playback may look at closer range. • Edit images using red-eye correction (p. 152). Also try increasing the lighting...
... make sure that supports high-speed recording (see "Specifications" in flash shots. Playback stops, or audio skips. • Switch to "Functions Available in face information (p. 57). Shooting settings or FUNC. The camera's internal memory buffer filled up as the camera could not record to rename files or alter the folder structure. Playback Playback is not possible. • Image or movie playback may look at closer range. • Edit images using red-eye correction (p. 152). Also try increasing the lighting...
User Guide
Page 198
..., or images shot with enough free space (p. 15). No memory card • The memory card may be displayed. To shoot, insert a memory card facing the correct way (p. 16). Change the battery pack. (p. 15) No Image. • The memory card does not contain any images that starred (*) functions are not available for image selection (pp. 137, 140, 147, 186), you have inserted a formatted memory card facing the correct way, contact a Canon Customer Support Help Desk (p. 16...
..., or images shot with enough free space (p. 15). No memory card • The memory card may be displayed. To shoot, insert a memory card facing the correct way (p. 16). Change the battery pack. (p. 15) No Image. • The memory card does not contain any images that starred (*) functions are not available for image selection (pp. 137, 140, 147, 186), you have inserted a formatted memory card facing the correct way, contact a Canon Customer Support Help Desk (p. 16...
User Guide
Page 199
... [Auto Reset] (p. 161), or format the memory card (p. 160). In this case, write down the error number (Exx) and contact a Canon Customer Support Help Desk. Switch to Playback mode to choose more than 998 images were selected for the image. • Frequent display of this error message may indicate camera damage. If this error message is displayed when the setting is displayed immediately after a shot, the image may indicate camera damage. Print error • Check the paper size setting. Reduce the number of selected images and...
... [Auto Reset] (p. 161), or format the memory card (p. 160). In this case, write down the error number (Exx) and contact a Canon Customer Support Help Desk. Switch to Playback mode to choose more than 998 images were selected for the image. • Frequent display of this error message may indicate camera damage. If this error message is displayed when the setting is displayed immediately after a shot, the image may indicate camera damage. Print error • Check the paper size setting. Reduce the number of selected images and...

User Guide
Page 202
...) Focusing range (pp. 110, 111) File size Still images: Resolution Movies: Movie length Protection (p. 135) Favorite (p. 144) My Colors (pp. 108, 150) Mercury lamp correction (p. 70) Red-eye correction (pp. 69, 152) Shooting date/time (p. 17) • Some information may not be displayed when viewing images on a TV (p. 171). 202 On-Screen Information Playback (Detailed Information Display) Movies (pp. 42, 122), High-speed burst (p. 96), Print list (p. 184) My Category (p. 145) Shooting mode (p. 204) ISO speed (p. 104), Playback speed...
...) Focusing range (pp. 110, 111) File size Still images: Resolution Movies: Movie length Protection (p. 135) Favorite (p. 144) My Colors (pp. 108, 150) Mercury lamp correction (p. 70) Red-eye correction (pp. 69, 152) Shooting date/time (p. 17) • Some information may not be displayed when viewing images on a TV (p. 171). 202 On-Screen Information Playback (Detailed Information Display) Movies (pp. 42, 122), High-speed burst (p. 96), Print list (p. 184) My Category (p. 145) Shooting mode (p. 204) ISO speed (p. 104), Playback speed...
User Guide
Page 212
... J Focusing AF lock 116 Aspect ratio 67 AUTO mode (shooting mode 20, 42 AV cable 171 B Battery Charging 14 Level 201 Power saving 34 Battery charger 169 Black and white images 108 Blink detection 74 C Camera Reset all 166 Camera shake 119 Center (AF frame mode 114 Clock 39 Color (white balance 106 Color Accent (shooting mode 88 Color Swap (shooting mode 89 Compression ratio (image quality 119 Continuous shooting 109 High-speed burst (shooting mode) ..... 96 Cropping 149 Custom white balance 107 D Date/time Adding date/time to images 55 Changing 18 Setting 17...
... J Focusing AF lock 116 Aspect ratio 67 AUTO mode (shooting mode 20, 42 AV cable 171 B Battery Charging 14 Level 201 Power saving 34 Battery charger 169 Black and white images 108 Blink detection 74 C Camera Reset all 166 Camera shake 119 Center (AF frame mode 114 Clock 39 Color (white balance 106 Color Accent (shooting mode 88 Color Swap (shooting mode 89 Compression ratio (image quality 119 Continuous shooting 109 High-speed burst (shooting mode) ..... 96 Cropping 149 Custom white balance 107 D Date/time Adding date/time to images 55 Changing 18 Setting 17...


