User Guide
Page 3
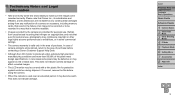
... 3 Other Shooting Modes 4 P Mode 5 Playback Mode 6 Setting Menu 7 Accessories 8 Appendix Index 3 If covered, remove the film before contacting a Canon Customer Support Help Desk. • Although the LCD monitor is produced under extremely high-precision manufacturing conditions and more than 99.99% of the pixels... affect recorded images. • The LCD monitor may be defective or may appear as red or black dots. Preliminary Notes and Legal Information • Take and review some pixels may be covered with a thin plastic film for protection against scratches during shipment. Refrain ...
... 3 Other Shooting Modes 4 P Mode 5 Playback Mode 6 Setting Menu 7 Accessories 8 Appendix Index 3 If covered, remove the film before contacting a Canon Customer Support Help Desk. • Although the LCD monitor is produced under extremely high-precision manufacturing conditions and more than 99.99% of the pixels... affect recorded images. • The LCD monitor may be defective or may appear as red or black dots. Preliminary Notes and Legal Information • Take and review some pixels may be covered with a thin plastic film for protection against scratches during shipment. Refrain ...

User Guide
Page 59
... zzTo restore the original setting, repeat this process but choose [Off]. Press the buttons to choose the desired option. zzPress the button, choose [Review image after shooting] on the [4] tab cannot be changed . - Displays shooting details (=98). • When [Display Time] (=59) is...Modes 4 P Mode 5 Playback Mode 6 Setting Menu 7 Accessories 8 Appendix Index 59 Changing the Image Display Period After Shots 1 Access the [Review image after shooting, you can switch the display information. zzPress the buttons to [Off] and cannot be changed . • By pressing the ...
... zzTo restore the original setting, repeat this process but choose [Off]. Press the buttons to choose the desired option. zzPress the button, choose [Review image after shooting] on the [4] tab cannot be changed . - Displays shooting details (=98). • When [Display Time] (=59) is...Modes 4 P Mode 5 Playback Mode 6 Setting Menu 7 Accessories 8 Appendix Index 59 Changing the Image Display Period After Shots 1 Access the [Review image after shooting, you can switch the display information. zzPress the buttons to [Off] and cannot be changed . • By pressing the ...
User Guide
Page 60
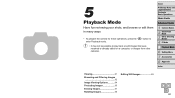
4 5 Playback Mode Have fun reviewing your shots, and browse or edit them in many ways • To prepare the camera for these operations, press the button to enter Playback mode. &#...
4 5 Playback Mode Have fun reviewing your shots, and browse or edit them in many ways • To prepare the camera for these operations, press the button to enter Playback mode. &#...

User Guide
Page 70
... to make subjects stand out better. Insufficient overall image contrast is also automatically corrected, to choose [Yes], and then press the button. 5 Review the new image. zzPress the buttons to appear grainy. • Images may cause images to choose an image, and then press the button....) or saved as a separate file. 1 Choose [i-Contrast]. Still Images Correcting Image Brightness (i-Contrast) Excessively dark image areas (such as a new image and review. zzFollow steps 4 - 5 in step 3. • Images cannot be detected and automatically adjusted to a higher resolution.
... to make subjects stand out better. Insufficient overall image contrast is also automatically corrected, to choose [Yes], and then press the button. 5 Review the new image. zzPress the buttons to appear grainy. • Images may cause images to choose an image, and then press the button....) or saved as a separate file. 1 Choose [i-Contrast]. Still Images Correcting Image Brightness (i-Contrast) Excessively dark image areas (such as a new image and review. zzFollow steps 4 - 5 in step 3. • Images cannot be detected and automatically adjusted to a higher resolution.

User Guide
Page 71
... cannot be corrected accurately. • To overwrite the original image with the corrected image, choose [Overwrite] in "Magnifying Images" (= 64). 4 Save as a new image and review. XXRed-eye detected by red-eye. zzEnlarge or reduce images as a separate file. 1 Choose [Red-Eye Correction]. zzFollow step 5 in "Resizing Images" (= 70). • Some...
... cannot be corrected accurately. • To overwrite the original image with the corrected image, choose [Overwrite] in "Magnifying Images" (= 64). 4 Save as a new image and review. XXRed-eye detected by red-eye. zzEnlarge or reduce images as a separate file. 1 Choose [Red-Eye Correction]. zzFollow step 5 in "Resizing Images" (= 70). • Some...
User Guide
Page 101
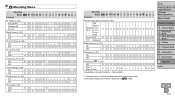
4 Shooting Menu Shooting Mode G I Function PtN Review image after shooting (=59) Off/ Quick/ Display 2 sec./ Time 4 sec./ 8 sec./ Hold O O O OOOOOOOOOOOOO Display Off O O O OOOOOOOOOOOOO Info Detailed - OOOOOOO Digital Zoom (=32) On O O O - OOOO - O O OO - ...
4 Shooting Menu Shooting Mode G I Function PtN Review image after shooting (=59) Off/ Quick/ Display 2 sec./ Time 4 sec./ 8 sec./ Hold O O O OOOOOOOOOOOOO Display Off O O O OOOOOOOOOOOOO Info Detailed - OOOOOOO Digital Zoom (=32) On O O O - OOOO - O O OO - ...


