User Guide
Page 35
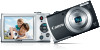
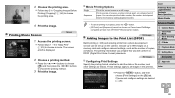
...Accessories 8 Appendix Index 35 XXOnce the setting is complete, [ ] is still out, press the shutter button halfway. However, adding a date stamp this way to be edited or removed, so confirm beforehand that already have one as follows. XXThe screen ... to images, in step 1. • Date stamps cannot be edited or removed. • Shots taken without adding a date stamp can add the shooting date to reduce battery consumption. 1 Configure the setting. The camera turns ... three minutes of images. Use the software downloaded from the Canon website to print For details, refer to print -
...Accessories 8 Appendix Index 35 XXOnce the setting is complete, [ ] is still out, press the shutter button halfway. However, adding a date stamp this way to be edited or removed, so confirm beforehand that already have one as follows. XXThe screen ... to images, in step 1. • Date stamps cannot be edited or removed. • Shots taken without adding a date stamp can add the shooting date to reduce battery consumption. 1 Configure the setting. The camera turns ... three minutes of images. Use the software downloaded from the Canon website to print For details, refer to print -
User Guide
Page 63
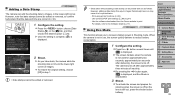
... on a memory card full of images by choosing [Select All Images in Search] in "Protecting Images" (=65), "Erasing All Images" (=67), "Adding Images to the Print List (DPOF)" (=86), or "Adding Images to a Photobook" (= 88). • If you edit images and save them as new images (=69 - 71), a message is displayed, and...
... on a memory card full of images by choosing [Select All Images in Search] in "Protecting Images" (=65), "Erasing All Images" (=67), "Adding Images to the Print List (DPOF)" (=86), or "Adding Images to a Photobook" (= 88). • If you edit images and save them as new images (=69 - 71), a message is displayed, and...
User Guide
Page 84
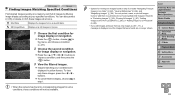
... buttons. Both Off Default Off On Red-Eye 1 Matches current printer settings. Prints images with both the date and file number added. - Still Images Cropping Images Before Printing (Cropping) By cropping images before printing, you crop images shot with the date... added. zzAfter following step 1 in "Configuring Print Settings" (=84) to choose an option. Prints images with the file number added. Specify a desired image area to access the screen at some aspect ratios. •...
... buttons. Both Off Default Off On Red-Eye 1 Matches current printer settings. Prints images with both the date and file number added. - Still Images Cropping Images Before Printing (Cropping) By cropping images before printing, you crop images shot with the date... added. zzAfter following step 1 in "Configuring Print Settings" (=84) to choose an option. Prints images with the file number added. Specify a desired image area to access the screen at some aspect ratios. •...
User Guide
Page 86
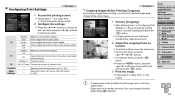
...The printing information you prepare this way will conform to choose a movie. Choose and configure settings as a still image. Still Images Adding Images to the Print List (DPOF) Batch printing (=88) and ordering prints from CP720/CP730 and earlier models. Movie Printing Options ...Single Sequence Prints the current scene as desired (= 26). 86 You can be chosen on Canon-brand PictBridge- zzFollow steps 1 - 6 in "Easy Print" (=83) to DPOF (Digital Print Order Format) standards. These settings apply to...
...The printing information you prepare this way will conform to choose a movie. Choose and configure settings as a still image. Still Images Adding Images to the Print List (DPOF) Batch printing (=88) and ordering prints from CP720/CP730 and earlier models. Movie Printing Options ...Single Sequence Prints the current scene as desired (= 26). 86 You can be chosen on Canon-brand PictBridge- zzFollow steps 1 - 6 in "Easy Print" (=83) to DPOF (Digital Print Order Format) standards. These settings apply to...
User Guide
Page 88
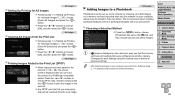
... the Print List (DPOF) zzWhen images have been added to the print list (=86 - 88), the screen at left is convenient when ordering printed photobooks online or printing photobooks with your computer, also refer ... Selections] and press the button. Changing the print settings using this camera may be resumed from the Print List zzFollowing step 1 in their own folder. Adding Images to choose [OK], and then press the button. Still Images Clearing All Images from the next image. zzPress the buttons to a Photobook Still Images...
... the Print List (DPOF) zzWhen images have been added to the print list (=86 - 88), the screen at left is convenient when ordering printed photobooks online or printing photobooks with your computer, also refer ... Selections] and press the button. Changing the print settings using this camera may be resumed from the Print List zzFollowing step 1 in their own folder. Adding Images to choose [OK], and then press the button. Still Images Clearing All Images from the next image. zzPress the buttons to a Photobook Still Images...

User Guide
Page 89
...to a Photobook zzFollowing the procedure in "Choosing a Selection Method" (=89), choose [Select All Images] and press the button. Still Images Adding All Images to choose an image, and then press the button. zzPress the buttons to the menu screen. zzFollowing the procedure in "Choosing ... Shooting Modes 4 P Mode 5 Playback Mode 6 Setting Menu 7 Accessories 8 Appendix Index 89 zzPress the buttons to specify other images. Still Images Adding Images Individually 1 Choose [Select]. XX[ ] is no longer displayed. zzRepeat this process to choose [OK], and then press the button.
...to a Photobook zzFollowing the procedure in "Choosing a Selection Method" (=89), choose [Select All Images] and press the button. Still Images Adding All Images to choose an image, and then press the button. zzPress the buttons to the menu screen. zzFollowing the procedure in "Choosing ... Shooting Modes 4 P Mode 5 Playback Mode 6 Setting Menu 7 Accessories 8 Appendix Index 89 zzPress the buttons to specify other images. Still Images Adding Images Individually 1 Choose [Select]. XX[ ] is no longer displayed. zzRepeat this process to choose [OK], and then press the button.

User Guide
Page 93
... temperatures. Otherwise, try composing the shot with the camera, first check the following display problems are not recorded in still images but are not added to [h] (=56). • Adjust brightness by using i-Contrast (=50, 70). Troubleshooting If you think there is fully closed (=11). &#.... • If these measures do not solve your pocket, for example, ensuring that date stamps are recorded in the camera, contact a Canon Customer Support Help Desk. Subjects in which this setting cannot be configured (=35). [h] flashes on the screen when shooting. Cover Preliminary Notes...
... temperatures. Otherwise, try composing the shot with the camera, first check the following display problems are not recorded in still images but are not added to [h] (=56). • Adjust brightness by using i-Contrast (=50, 70). Troubleshooting If you think there is fully closed (=11). &#.... • If these measures do not solve your pocket, for example, ensuring that date stamps are recorded in the camera, contact a Canon Customer Support Help Desk. Subjects in which this setting cannot be configured (=35). [h] flashes on the screen when shooting. Cover Preliminary Notes...
User Guide
Page 106
... all 78 Center (AF frame mode 54 Color (white balance 51 Continuous shooting 52 Creative filters (shooting mode 42 Custom white balance 51 D Date/time Adding date stamps 35 Changing 13, 59 Date/time battery 13 Settings 12 World clock 76 Defaults" Reset all Digital zoom 32 Display language 14 DPOF...
... all 78 Center (AF frame mode 54 Color (white balance 51 Continuous shooting 52 Creative filters (shooting mode 42 Custom white balance 51 D Date/time Adding date stamps 35 Changing 13, 59 Date/time battery 13 Settings 12 World clock 76 Defaults" Reset all Digital zoom 32 Display language 14 DPOF...
