iP6000D Diect Print Guide
Page 2
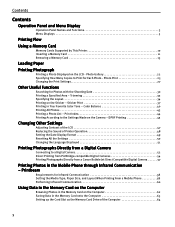
... Panel and Menu Display Operation Panel Names and Functions 3 Menu Displays 5 Printing Flow Using a Memory Card Memory Cards Supported by This Printer 10 Inserting a Memory Card 11 Removing a Memory Card 13 Loading Paper Printing Photograph Printing a Photo Displayed on the Computer 62 Saving... a Digital Camera Connecting to a Digital Camera 52 Direct Printing from PictBridge-compatible Digital Cameras 54 Printing Photographs Directly from a Canon Bubble Jet Direct Compatible Digital Camera 57 Printing Photos in Your Favorite Color Tone - Photo Gallery 22 Specifying How Many Copies ...
... Panel and Menu Display Operation Panel Names and Functions 3 Menu Displays 5 Printing Flow Using a Memory Card Memory Cards Supported by This Printer 10 Inserting a Memory Card 11 Removing a Memory Card 13 Loading Paper Printing Photograph Printing a Photo Displayed on the Computer 62 Saving... a Digital Camera Connecting to a Digital Camera 52 Direct Printing from PictBridge-compatible Digital Cameras 54 Printing Photographs Directly from a Canon Bubble Jet Direct Compatible Digital Camera 57 Printing Photos in Your Favorite Color Tone - Photo Gallery 22 Specifying How Many Copies ...
iP6000D Diect Print Guide
Page 4
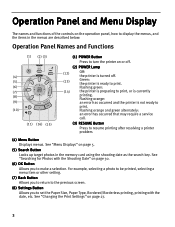
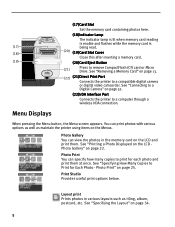
... an error has occurred that may require a service call. (3) RESUME Button Press to print, or is preparing to resume printing after resolving a printer problem. (4) Menu Button Displays menus. For example, selecting a photo to be printed, selecting a menu item or other setting. (7) Back Button...(1) (2) (3) (4) (5) (6) (7) (8) (9) (10) (11) (16) (15) (1) POWER Button Press to turn the printer on or off. (2) POWER Lamp (12) Off: the printer is turned off. (13) Green: the printer is not ready to print. See "Changing the Print Settings" on page 27. 3 Flashing orange: an error has...
... an error has occurred that may require a service call. (3) RESUME Button Press to print, or is preparing to resume printing after resolving a printer problem. (4) Menu Button Displays menus. For example, selecting a photo to be printed, selecting a menu item or other setting. (7) Back Button...(1) (2) (3) (4) (5) (6) (7) (8) (9) (10) (11) (16) (15) (1) POWER Button Press to turn the printer on or off. (2) POWER Lamp (12) Off: the printer is turned off. (13) Green: the printer is not ready to print. See "Changing the Print Settings" on page 27. 3 Flashing orange: an error has...
iP6000D Diect Print Guide
Page 5
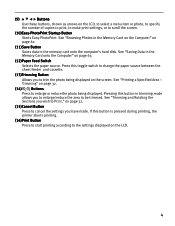
... or reduce the photo being displayed on page 63. (12)Paper Feed Switch Selects the paper source. Pressing this button is pressed during printing, the printer aborts printing. (16)Print Button Press to start printing according to the settings displayed on page 32. (14) Buttons Press to change the paper source...
... or reduce the photo being displayed on page 63. (12)Paper Feed Switch Selects the paper source. Pressing this button is pressed during printing, the printer aborts printing. (16)Print Button Press to start printing according to the settings displayed on page 32. (14) Buttons Press to change the paper source...
iP6000D Diect Print Guide
Page 6
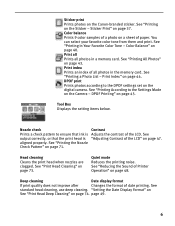
... album, postcard, etc. Photo Print You can view the photos in various layouts such as maintain the printer using items on page 52. (22)IrDA Interface Port Connects the printer to remove CompactFlash (CF) card or Micro Drive. Print Studio Provides useful print options below. Layout print... Layout" on page 25. See "Printing a Photo Displayed on the LCD Photo Gallery" on page 13. (22) (21)Direct Print Port Connects the printer to a Digital Camera" on the Menus. See "Removing a Memory Card" on page 22. See "Connecting to a compatible digital camera or digital video ...
... album, postcard, etc. Photo Print You can view the photos in various layouts such as maintain the printer using items on page 52. (22)IrDA Interface Port Connects the printer to remove CompactFlash (CF) card or Micro Drive. Print Studio Provides useful print options below. Layout print... Layout" on page 25. See "Printing a Photo Displayed on the LCD Photo Gallery" on page 13. (22) (21)Direct Print Port Connects the printer to a Digital Camera" on the Menus. See "Removing a Memory Card" on page 22. See "Connecting to a compatible digital camera or digital video ...
iP6000D Diect Print Guide
Page 7
.... 6 Head cleaning Cleans the print head when nozzles are clogged. See "Printing on page 44. Color balance Prints 9 color samples of a photo on a sheet of Printer Operation" on the digital camera. See "Printing a Photo List - DPOF Printing" on page 40. Color Balance" on page 45. See "Reducing the Sound of paper... Changes the format of all photos in a memory card. Sticker print Prints photos on the Camera - See "Printing According to the Settings Made on the Canon-branded sticker. See "Printing the Nozzle Check Pattern" on page 47.
.... 6 Head cleaning Cleans the print head when nozzles are clogged. See "Printing on page 44. Color balance Prints 9 color samples of a photo on a sheet of Printer Operation" on the digital camera. See "Printing a Photo List - DPOF Printing" on page 40. Color Balance" on page 45. See "Reducing the Sound of paper... Changes the format of all photos in a memory card. Sticker print Prints photos on the Camera - See "Printing According to the Settings Made on the Canon-branded sticker. See "Printing the Nozzle Check Pattern" on page 47.
iP6000D Diect Print Guide
Page 9
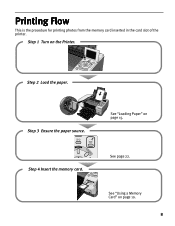
Step 3 Ensure the paper source. Step 4 Insert the memory card. See "Loading Paper" on page 10. 8 See "Using a Memory Card" on page 15. Step 1 Turn on the Printer. See page 22. Step 2 Load the paper. Printing Flow This is the procedure for printing photos from the memory card inserted in the card slot of the printer.
Step 3 Ensure the paper source. Step 4 Insert the memory card. See "Loading Paper" on page 10. 8 See "Using a Memory Card" on page 15. Step 1 Turn on the Printer. See page 22. Step 2 Load the paper. Printing Flow This is the procedure for printing photos from the memory card inserted in the card slot of the printer.
iP6000D Diect Print Guide
Page 11
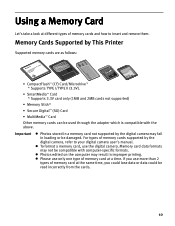
... card data formats may fail in loading or be used through the adapter which is compatible with computer-specific formats. Memory Cards Supported by This Printer Supported memory cards are as follows: • CompactFlash™ (CF) Card/Microdrive™ * Supports TYPE I/TYPE II (3.3V). • SmartMedia™ Card * Supports 3.3V card...
... card data formats may fail in loading or be used through the adapter which is compatible with computer-specific formats. Memory Cards Supported by This Printer Supported memory cards are as follows: • CompactFlash™ (CF) Card/Microdrive™ * Supports TYPE I/TYPE II (3.3V). • SmartMedia™ Card * Supports 3.3V card...
iP6000D Diect Print Guide
Page 12
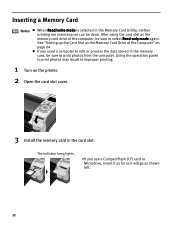
... you use a CompactFlash (CF) card or Microdrive, insert it as far as it will go as the memory card drive of the Computer" on the printer. 2 Open the card slot cover. 3 Install the memory card in the Memory Card Utility, neither printing nor maintenance can be done. After using the card...
... you use a CompactFlash (CF) card or Microdrive, insert it as far as it will go as the memory card drive of the Computer" on the printer. 2 Open the card slot cover. 3 Install the memory card in the Memory Card Utility, neither printing nor maintenance can be done. After using the card...
iP6000D Diect Print Guide
Page 14
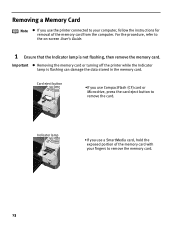
... you use CompactFlash (CF) card or Microdrive, press the card eject button to remove the card. Important Removing the memory card or turning off the printer while the Indicator lamp is not flashing, then remove the memory card. Indicator lamp •If you use a SmartMedia card, hold the exposed portion of... memory card with your computer, follow the instructions for removal of the memory card from the computer. Removing a Memory Card Note If you use the printer connected to your fingers to remove the memory card. 13
... you use CompactFlash (CF) card or Microdrive, press the card eject button to remove the card. Important Removing the memory card or turning off the printer while the Indicator lamp is not flashing, then remove the memory card. Indicator lamp •If you use a SmartMedia card, hold the exposed portion of... memory card with your computer, follow the instructions for removal of the memory card from the computer. Removing a Memory Card Note If you use the printer connected to your fingers to remove the memory card. 13
iP6000D Diect Print Guide
Page 16
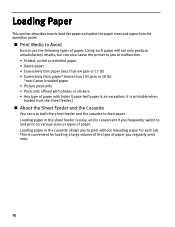
... the paper and select the paper sizes and types from the sheet feeder.) About the Sheet Feeder and the Cassette You can also cause the printer to jam or malfunction. • Folded, curled or wrinkled paper • Damp paper • Excessively thin paper (less than 64 gsm or 17 lb) &#...8226; Excessively thick paper* (more than 105 gsm or 28 lb) *non-Canon branded paper • Picture postcards • Postcards affixed with holes (Loose-leaf paper is convenient for each job. it is convenient if you regularly print...
... the paper and select the paper sizes and types from the sheet feeder.) About the Sheet Feeder and the Cassette You can also cause the printer to jam or malfunction. • Folded, curled or wrinkled paper • Damp paper • Excessively thin paper (less than 64 gsm or 17 lb) &#...8226; Excessively thick paper* (more than 105 gsm or 28 lb) *non-Canon branded paper • Picture postcards • Postcards affixed with holes (Loose-leaf paper is convenient for each job. it is convenient if you regularly print...
iP6000D Diect Print Guide
Page 17
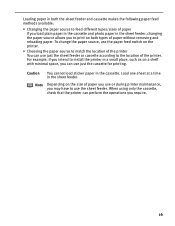
... perform the operations you can use just the sheet feeder or cassette according to the location of paper you use or during printer maintenance, you may have to feed different types/sizes of paper If you load plain paper in the cassette and photo paper in a small place, ...such as on the size of the printer. Load one sheet at a time in the cassette. To change the paper source, use the paper feed switch on both the sheet feeder and cassette...
... perform the operations you can use just the sheet feeder or cassette according to the location of paper you use or during printer maintenance, you may have to feed different types/sizes of paper If you load plain paper in the cassette and photo paper in a small place, ...such as on the size of the printer. Load one sheet at a time in the cassette. To change the paper source, use the paper feed switch on both the sheet feeder and cassette...

iP6000D Diect Print Guide
Page 18
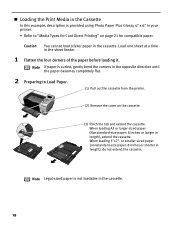
Note If paper is curled, gently bend the corners in your printer. • Refer to "Media Types for Card Direct Printing" on the User's Guide. 2 Preparing to "Uncurling the Media" on page 21 for compatible paper. 1 Flatten ...
Note If paper is curled, gently bend the corners in your printer. • Refer to "Media Types for Card Direct Printing" on the User's Guide. 2 Preparing to "Uncurling the Media" on page 21 for compatible paper. 1 Flatten ...
iP6000D Diect Print Guide
Page 20
Loading the Print Media in the Cassette In this example, description is provided using Photo Paper Plus Glossy 4" x 6" in your printer. • Refer to Load Paper. (1) Pull out the cassette from the printer. (2) Remove the cover on page 21 for compatible paper. When loading A5 or larger sized paper (Nonstandard-size paper: 8 inches...
Loading the Print Media in the Cassette In this example, description is provided using Photo Paper Plus Glossy 4" x 6" in your printer. • Refer to Load Paper. (1) Pull out the cassette from the printer. (2) Remove the cover on page 21 for compatible paper. When loading A5 or larger sized paper (Nonstandard-size paper: 8 inches...

iP6000D Diect Print Guide
Page 21
...to fit the loaded paper stack. 4 Insert the cassette into the printer. (1) Set the cover on the cassette. 5 Prepare the paper output tray. (2) Insert the cassette into the printer. Push the cassette all the way into the printer. Note Do not touch the printed surface until the ink dries. ...the cassette has been extended to the instructions packaged with the print side facing down. (2) Align the paper stack against the right side of the printer. 1 Cassette Lamp 2 (1) Open the paper output tray and pull out the extension completely. (2) Press the paper feed switch so that the ...
...to fit the loaded paper stack. 4 Insert the cassette into the printer. (1) Set the cover on the cassette. 5 Prepare the paper output tray. (2) Insert the cassette into the printer. Push the cassette all the way into the printer. Note Do not touch the printed surface until the ink dries. ...the cassette has been extended to the instructions packaged with the print side facing down. (2) Align the paper stack against the right side of the printer. 1 Cassette Lamp 2 (1) Open the paper output tray and pull out the extension completely. (2) Press the paper feed switch so that the ...
iP6000D Diect Print Guide
Page 23
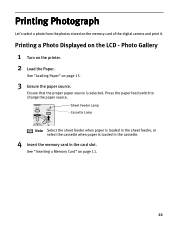
... 11. 22 Sheet Feeder Lamp Cassette Lamp Note Select the sheet feeder when paper is loaded in the card slot. Photo Gallery 1 Turn on the printer. 2 Load the Paper.
... 11. 22 Sheet Feeder Lamp Cassette Lamp Note Select the sheet feeder when paper is loaded in the card slot. Photo Gallery 1 Turn on the printer. 2 Load the Paper.
iP6000D Diect Print Guide
Page 24
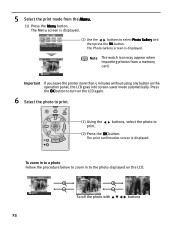
.... Scroll the photo with buttons 23 buttons, select the photo to select Photo Gallery and then press the OK button. Important If you leave the printer more than 5 minutes without using any button on the LCD again. 6 Select the photo to print. (1) Using the print. Press the OK button to the...
.... Scroll the photo with buttons 23 buttons, select the photo to select Photo Gallery and then press the OK button. Important If you leave the printer more than 5 minutes without using any button on the LCD again. 6 Select the photo to print. (1) Using the print. Press the OK button to the...
iP6000D Diect Print Guide
Page 26
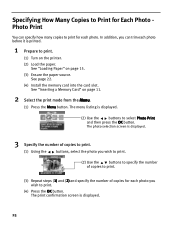
..." on page 11. 2 Select the print mode from the Menu. (1) Press the Menu button. The menu listing is printed. 1 Prepare to print. (1) Turn on the printer. (2) Load the paper. See page 22. (4) Install the memory card into the card slot. See "Inserting a Memory Card" on page 15. (3) Ensure the paper source...
..." on page 11. 2 Select the print mode from the Menu. (1) Press the Menu button. The menu listing is printed. 1 Prepare to print. (1) Turn on the printer. (2) Load the paper. See page 22. (4) Install the memory card into the card slot. See "Inserting a Memory Card" on page 15. (3) Ensure the paper source...
iP6000D Diect Print Guide
Page 33
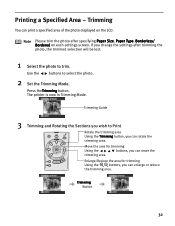
.... Rotate the trimming area Using the Trimming button, you can print a specified area of the photo displayed on each settings screen. Trimming Button 32 The printer is now in Trimming Mode. Note Please trim the photo after trimming the photo, the trimmed selection will be lost. 1 Select the photo to trim...
.... Rotate the trimming area Using the Trimming button, you can print a specified area of the photo displayed on each settings screen. Trimming Button 32 The printer is now in Trimming Mode. Note Please trim the photo after trimming the photo, the trimmed selection will be lost. 1 Select the photo to trim...
iP6000D Diect Print Guide
Page 35
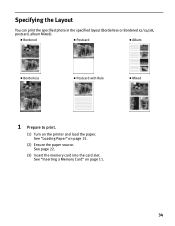
See "Inserting a Memory Card" on page 15. (2) Ensure the paper source. See "Loading Paper" on page 11. 34 Specifying the Layout You can print the specified photo in the specified layout (Borderless or Bordered x2/x4/x8, postcard, album Mixed). Bordered Postcard Album Borderless Postcard with Rule Mixed 1 Prepare to print. (1) Turn on the printer and load the paper. See page 22. (3) Insert the memory card into the card slot.
See "Inserting a Memory Card" on page 15. (2) Ensure the paper source. See "Loading Paper" on page 11. 34 Specifying the Layout You can print the specified photo in the specified layout (Borderless or Bordered x2/x4/x8, postcard, album Mixed). Bordered Postcard Album Borderless Postcard with Rule Mixed 1 Prepare to print. (1) Turn on the printer and load the paper. See page 22. (3) Insert the memory card into the card slot.

iP6000D Diect Print Guide
Page 38
... page 22. (3) Insert the memory card into the card slot. The Sticker print screen is displayed. 37 You can print your favorite photo on the Canon-Brand sticker. 1 Prepare to select Sticker print and then press the OK button. Printing on page 15. See "Loading Paper" on the Sticker -... is selected as the paper source. The Print Studio screen is displayed. 3 Specify the layout. (3) Use the buttons to print. (1) Turn on the printer and load a sheet of sticker paper in the cassette. Sticker Print You can only print in the sheet feeder. (2) Ensure the sheet feeder is displayed...
... page 22. (3) Insert the memory card into the card slot. The Sticker print screen is displayed. 37 You can print your favorite photo on the Canon-Brand sticker. 1 Prepare to select Sticker print and then press the OK button. Printing on page 15. See "Loading Paper" on the Sticker -... is selected as the paper source. The Print Studio screen is displayed. 3 Specify the layout. (3) Use the buttons to print. (1) Turn on the printer and load a sheet of sticker paper in the cassette. Sticker Print You can only print in the sheet feeder. (2) Ensure the sheet feeder is displayed...


