iP6000D Diect Print Guide
Page 4
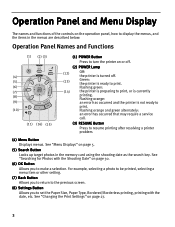
... in the menus are described below: Operation Panel Names and Functions (1) (2) (3) (4) (5) (6) (7) (8) (9) (10) (11) (16) (15) (1) POWER Button Press to turn the printer on or off. (2) POWER Lamp (12) Off: the printer is turned off. (13) Green: the printer is not ready to print. Operation Panel and Menu Display The names and functions...
... in the menus are described below: Operation Panel Names and Functions (1) (2) (3) (4) (5) (6) (7) (8) (9) (10) (11) (16) (15) (1) POWER Button Press to turn the printer on or off. (2) POWER Lamp (12) Off: the printer is turned off. (13) Green: the printer is not ready to print. Operation Panel and Menu Display The names and functions...
iP6000D Diect Print Guide
Page 9
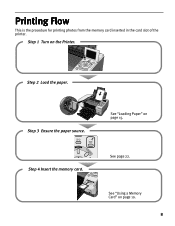
See "Using a Memory Card" on the Printer. Step 1 Turn on page 10. 8 Step 2 Load the paper. See page 22. Step 4 Insert the memory card. See "Loading Paper" on page 15. Step 3 Ensure the paper source. Printing Flow This is the procedure for printing photos from the memory card inserted in the card slot of the printer.
See "Using a Memory Card" on the Printer. Step 1 Turn on page 10. 8 Step 2 Load the paper. See page 22. Step 4 Insert the memory card. See "Loading Paper" on page 15. Step 3 Ensure the paper source. Printing Flow This is the procedure for printing photos from the memory card inserted in the card slot of the printer.
iP6000D Diect Print Guide
Page 12
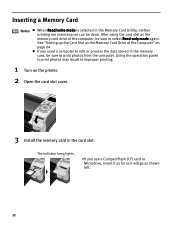
See "Setting up the Card Slot as the Memory Card Drive of the computer, be sure to print photos may result in improper printing. 1 Turn on page 64. Inserting a Memory Card Notes When Read/write mode is selected in the memory card, be sure to print photos from the computer. ...
See "Setting up the Card Slot as the Memory Card Drive of the computer, be sure to print photos may result in improper printing. 1 Turn on page 64. Inserting a Memory Card Notes When Read/write mode is selected in the memory card, be sure to print photos from the computer. ...
iP6000D Diect Print Guide
Page 14
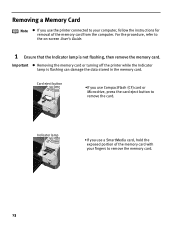
Important Removing the memory card or turning off the printer while the Indicator lamp is not flashing, then remove the memory card. Indicator lamp •If you use a SmartMedia card, hold the ...
Important Removing the memory card or turning off the printer while the Indicator lamp is not flashing, then remove the memory card. Indicator lamp •If you use a SmartMedia card, hold the ...
iP6000D Diect Print Guide
Page 23
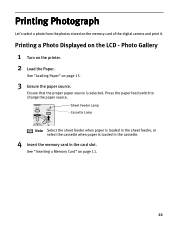
See "Loading Paper" on the printer. 2 Load the Paper. Press the paper feed switch to change the paper source. Photo Gallery 1 Turn on page 15. 3 Ensure the paper source. See "Inserting a Memory Card" on the memory card of the digital camera and print it. Printing Photograph Let's ...
See "Loading Paper" on the printer. 2 Load the Paper. Press the paper feed switch to change the paper source. Photo Gallery 1 Turn on page 15. 3 Ensure the paper source. See "Inserting a Memory Card" on the memory card of the digital camera and print it. Printing Photograph Let's ...
iP6000D Diect Print Guide
Page 24
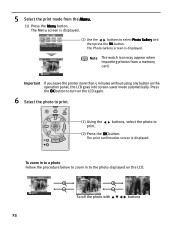
... Gallery and then press the OK button. The Menu screen is displayed. (2) Use the buttons to (2) Press the OK button. Press the OK button to turn on the LCD again. 6 Select the photo to the photo displayed on the operation panel, the LCD goes into screen-saver mode automatically. 5 Select the...
... Gallery and then press the OK button. The Menu screen is displayed. (2) Use the buttons to (2) Press the OK button. Press the OK button to turn on the LCD again. 6 Select the photo to the photo displayed on the operation panel, the LCD goes into screen-saver mode automatically. 5 Select the...
iP6000D Diect Print Guide
Page 26
... Card" on page 15. (3) Ensure the paper source. See page 22. (4) Install the memory card into the card slot. In addition, you wish to print. (1) Turn on the printer. (2) Load the paper. The menu listing is printed. 1 Prepare to print. (4) Press the OK button.
... Card" on page 15. (3) Ensure the paper source. See page 22. (4) Install the memory card into the card slot. In addition, you wish to print. (1) Turn on the printer. (2) Load the paper. The menu listing is printed. 1 Prepare to print. (4) Press the OK button.
iP6000D Diect Print Guide
Page 35
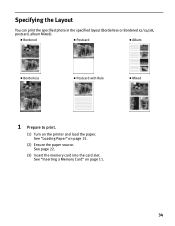
See page 22. (3) Insert the memory card into the card slot. See "Loading Paper" on the printer and load the paper. Bordered Postcard Album Borderless Postcard with Rule Mixed 1 Prepare to print. (1) Turn on page 15. (2) Ensure the paper source. See "Inserting a Memory Card" on page 11. 34 Specifying the Layout You can print the specified photo in the specified layout (Borderless or Bordered x2/x4/x8, postcard, album Mixed).
See page 22. (3) Insert the memory card into the card slot. See "Loading Paper" on the printer and load the paper. Bordered Postcard Album Borderless Postcard with Rule Mixed 1 Prepare to print. (1) Turn on page 15. (2) Ensure the paper source. See "Inserting a Memory Card" on page 11. 34 Specifying the Layout You can print the specified photo in the specified layout (Borderless or Bordered x2/x4/x8, postcard, album Mixed).

iP6000D Diect Print Guide
Page 38
... mode from the Menu. (1) Press the Menu button. The Menu screen is displayed. 37 The photo selection screen is displayed. (2) Use the buttons to print. (1) Turn on the Sticker - Sticker Print You can only print in the Stickers x16 layout though other layouts appear on the LCD. (2) Press the OK button..." on page 15. Printing on the printer and load a sheet of sticker paper in the sheet feeder. You can print your favorite photo on the Canon-Brand sticker. 1 Prepare to select Select Print Studio and then press the OK button.
... mode from the Menu. (1) Press the Menu button. The Menu screen is displayed. 37 The photo selection screen is displayed. (2) Use the buttons to print. (1) Turn on the Sticker - Sticker Print You can only print in the Stickers x16 layout though other layouts appear on the LCD. (2) Press the OK button..." on page 15. Printing on the printer and load a sheet of sticker paper in the sheet feeder. You can print your favorite photo on the Canon-Brand sticker. 1 Prepare to select Select Print Studio and then press the OK button.
iP6000D Diect Print Guide
Page 41
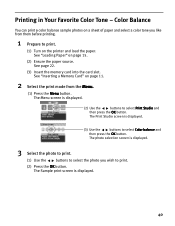
... photo selection screen is displayed. (3) Use the buttons to print. (2) Press the OK button. The Sample print screen is displayed. (2) Use the buttons to print. (1) Turn on a sheet of paper and select a color tone you wish to select Color balance and then press the OK button. See "Inserting a Memory Card" on...
... photo selection screen is displayed. (3) Use the buttons to print. (2) Press the OK button. The Sample print screen is displayed. (2) Use the buttons to print. (1) Turn on a sheet of paper and select a color tone you wish to select Color balance and then press the OK button. See "Inserting a Memory Card" on...

iP6000D Diect Print Guide
Page 44
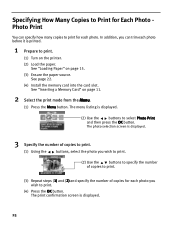
... will be printed. 43 The print confirmation screen is displayed. (3) Use the buttons to select Print all photos saved on a memory card. 1 Prepare to print. (1) Turn on the printer and load the paper. See "Loading Paper" on page 27. (2) Use the buttons to specify the number of the settings, press the...
... will be printed. 43 The print confirmation screen is displayed. (3) Use the buttons to select Print all photos saved on a memory card. 1 Prepare to print. (1) Turn on the printer and load the paper. See "Loading Paper" on page 27. (2) Use the buttons to specify the number of the settings, press the...

iP6000D Diect Print Guide
Page 45
... the paper source. The Menu screen is displayed. 3 Start printing. (1) Confirm the print settings. The print confirmation screen is displayed. (2) Use the buttons to print. (1) Turn on the memory card will be printed. 44 Print Index You can print an index of the settings, press the Settings button.
... the paper source. The Menu screen is displayed. 3 Start printing. (1) Confirm the print settings. The print confirmation screen is displayed. (2) Use the buttons to print. (1) Turn on the memory card will be printed. 44 Print Index You can print an index of the settings, press the Settings button.

iP6000D Diect Print Guide
Page 46
... DPOF settings: - Printing According to those settings. Standard:The photos for which you specified "Index" using the DPOF function are automatically scaled according to print. (1) Turn on the operation panel). - Image format:CIFF, Exif (JPEG), JFIF, and Exif (Tiff) - Other functions (addition of copies specified using the DPOF function are printed...
... DPOF settings: - Printing According to those settings. Standard:The photos for which you specified "Index" using the DPOF function are automatically scaled according to print. (1) Turn on the operation panel). - Image format:CIFF, Exif (JPEG), JFIF, and Exif (Tiff) - Other functions (addition of copies specified using the DPOF function are printed...
iP6000D Diect Print Guide
Page 48
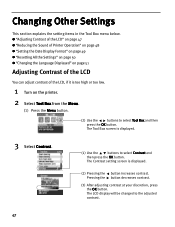
... Language Displayed" on page 51 Adjusting Contrast of the LCD You can adjust contrast of the LCD, if it is too high or too low. 1 Turn on the printer. 2 Select Tool Box from the Menu. (1) Press the Menu button. (2) Use the buttons to the adjusted contrast. 47 The LCD display will...
... Language Displayed" on page 51 Adjusting Contrast of the LCD You can adjust contrast of the LCD, if it is too high or too low. 1 Turn on the printer. 2 Select Tool Box from the Menu. (1) Press the Menu button. (2) Use the buttons to the adjusted contrast. 47 The LCD display will...

iP6000D Diect Print Guide
Page 49
.... (2) Use the buttons to select On and then press the OK button. 48 Important Print speed may be somewhat slower than in the Printer Driver. 1 Turn on the printer. 2 Select Tool Box from a digital camera connected to select Tool Box and then press the OK button. The following operations are effective...
.... (2) Use the buttons to select On and then press the OK button. 48 Important Print speed may be somewhat slower than in the Printer Driver. 1 Turn on the printer. 2 Select Tool Box from a digital camera connected to select Tool Box and then press the OK button. The following operations are effective...

iP6000D Diect Print Guide
Page 50
.... 49 The Date display format setting screen is printed in the selected format when you selected Date On in the DPOF setting from DPOF printing. 1 Turn on the printer. 2 Select Tool Box from the Menu. (1) Press the Menu button. (2) Use the buttons to select Tool Box and then press the OK...
.... 49 The Date display format setting screen is printed in the selected format when you selected Date On in the DPOF setting from DPOF printing. 1 Turn on the printer. 2 Select Tool Box from the Menu. (1) Press the Menu button. (2) Use the buttons to select Tool Box and then press the OK...

iP6000D Diect Print Guide
Page 51
Resetting All the Settings You can reset all settings, other than the display language and the print head position, to the initial state. 1 Turn on the printer. 2 Select Tool Box from the Menu. (1) Press the Menu button. (2) Use the buttons to select Yes and then press the OK button. 50 The Reset screen is displayed. 3 Select Reset. (1) Use the buttons to select Reset and then press the OK button. The Tool Box screen is displayed. (2) Use the buttons to select Tool Box and then press the OK button.
Resetting All the Settings You can reset all settings, other than the display language and the print head position, to the initial state. 1 Turn on the printer. 2 Select Tool Box from the Menu. (1) Press the Menu button. (2) Use the buttons to select Yes and then press the OK button. 50 The Reset screen is displayed. 3 Select Reset. (1) Use the buttons to select Reset and then press the OK button. The Tool Box screen is displayed. (2) Use the buttons to select Tool Box and then press the OK button.
iP6000D Diect Print Guide
Page 52
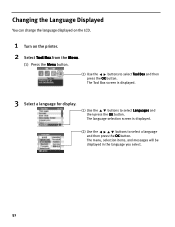
.... (2) Use the buttons to select Languages and then press the OK button. Changing the Language Displayed You can change the language displayed on the LCD. 1 Turn on the printer. 2 Select Tool Box from the Menu. (1) Press the Menu button. (2) Use the buttons to select Tool Box and then press the OK...
.... (2) Use the buttons to select Languages and then press the OK button. Changing the Language Displayed You can change the language displayed on the LCD. 1 Turn on the printer. 2 Select Tool Box from the Menu. (1) Press the Menu button. (2) Use the buttons to select Tool Box and then press the OK...
iP6000D Diect Print Guide
Page 53
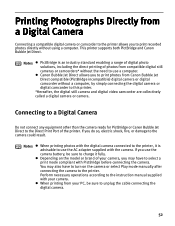
... your PC, be sure to the Direct Print Port of the printer. Notes When printing photos with the camera. You may have to turn on the model or brand of photos from compatible digital still cameras or camcorders* without the need to the printer, it fully. Depending... with PictBridge before connecting the camera. Connecting to a Digital Camera Do not connect any equipment other than the camera ready for PictBridge or Canon Bubble Jet Direct to unplug the cable connecting the digital camera. 52 If you to the printer. Perform necessary operations according to this printer...
... your PC, be sure to the Direct Print Port of the printer. Notes When printing photos with the camera. You may have to turn on the model or brand of photos from compatible digital still cameras or camcorders* without the need to the printer, it fully. Depending... with PictBridge before connecting the camera. Connecting to a Digital Camera Do not connect any equipment other than the camera ready for PictBridge or Canon Bubble Jet Direct to unplug the cable connecting the digital camera. 52 If you to the printer. Perform necessary operations according to this printer...

iP6000D Diect Print Guide
Page 54
... the digital camera to the printer. (1) Connect the camera to the printer using the USB cable (for connection to a computer) supplied with the camera. (2) Turn on the model or brand of the digital camera when the printer is PictBridge-compatible. Either of the following icons will display on the LCD... display of the camera. See "Loading Paper" on the printer. Make sure the camera is turned off. 2 Load the paper in the printer. 1 Turn on page 15. 3 Ensure the paper source. A Canon Bubble Jet Direct compatible digital camera. 53
... the digital camera to the printer. (1) Connect the camera to the printer using the USB cable (for connection to a computer) supplied with the camera. (2) Turn on the model or brand of the digital camera when the printer is PictBridge-compatible. Either of the following icons will display on the LCD... display of the camera. See "Loading Paper" on the printer. Make sure the camera is turned off. 2 Load the paper in the printer. 1 Turn on page 15. 3 Ensure the paper source. A Canon Bubble Jet Direct compatible digital camera. 53


