
i960 Quick Start Guide
Page 1
... of Contents Preface 1 Shipping Materials 1 Introduction 1 Setting Up 2 Preparing the Printer 2 Connecting the Printer to the Computer 2 Installing the Print Head 4 Loading Paper 7 Installing the Printer Driver 8 Aligning the Print Head 12 Basic Operations 16 Printing with Windows 16 Printing with Macintosh 18 Print Head Maintenance 20 Appendix 22 Printing Photographs Directry from a Dicital Camera 21...
... of Contents Preface 1 Shipping Materials 1 Introduction 1 Setting Up 2 Preparing the Printer 2 Connecting the Printer to the Computer 2 Installing the Print Head 4 Loading Paper 7 Installing the Printer Driver 8 Aligning the Print Head 12 Basic Operations 16 Printing with Windows 16 Printing with Macintosh 18 Print Head Maintenance 20 Appendix 22 Printing Photographs Directry from a Dicital Camera 21...

i960 Quick Start Guide
Page 3
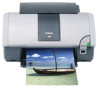
... refer to the printer. Check that all the following symbols to your Canon Authorized Dealer or Sales Representative. ‰ Printer ‰ Photo Paper Tray ‰ Setup Software & User's Guide CD-ROM ‰ Quick Start Guide ‰ Print Head ‰ 6 Ink...Observe the warnings and cautions to avoid personal injury or damage to "Direct Printing for purchasing a Canon Bubble Jet Printer. For information about printing when you for PictBridge-compliant Digital Cameras". and other trademarks and registered... countries. • Apple, Mac, Macintosh are exactly the same with the i960.
... refer to the printer. Check that all the following symbols to your Canon Authorized Dealer or Sales Representative. ‰ Printer ‰ Photo Paper Tray ‰ Setup Software & User's Guide CD-ROM ‰ Quick Start Guide ‰ Print Head ‰ 6 Ink...Observe the warnings and cautions to avoid personal injury or damage to "Direct Printing for purchasing a Canon Bubble Jet Printer. For information about printing when you for PictBridge-compliant Digital Cameras". and other trademarks and registered... countries. • Apple, Mac, Macintosh are exactly the same with the i960.

i960 Quick Start Guide
Page 6
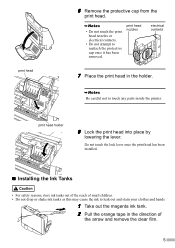
... to plug the power cord into the power outlet. „ Installing the Print Head 1 Plug the printer in the country of purchase. Wait until the POWER lamp remains fully lit. 3 Open the front cover. 4 Remove the tape. Do not touch internal parts ... cord. Do NOT turn on the power cord. • Never use any power supply other than the standard power supply available in . 2 Turn on the printer. 3 Installing the Print Head • Never attempt to operate. PC PM lock lever 5 Raise the lock lever.
... to plug the power cord into the power outlet. „ Installing the Print Head 1 Plug the printer in the country of purchase. Wait until the POWER lamp remains fully lit. 3 Open the front cover. 4 Remove the tape. Do not touch internal parts ... cord. Do NOT turn on the power cord. • Never use any power supply other than the standard power supply available in . 2 Turn on the printer. 3 Installing the Print Head • Never attempt to operate. PC PM lock lever 5 Raise the lock lever.
i960 Quick Start Guide
Page 7
... place by lowering the lever. print head 6 Remove the protective cap from the print head. • Do not touch the print head nozzles or electrical contacts. • Do not attempt to touch any parts inside the printer. Be careful not to reattach the protective cap once it has been removed. Do ...not touch the lock lever once the print head has been installed. „ Installing the Ink Tanks • For safety reasons, ...
... place by lowering the lever. print head 6 Remove the protective cap from the print head. • Do not touch the print head nozzles or electrical contacts. • Do not attempt to touch any parts inside the printer. Be careful not to reattach the protective cap once it has been removed. Do ...not touch the lock lever once the print head has been installed. „ Installing the Ink Tanks • For safety reasons, ...
i960 Quick Start Guide
Page 11
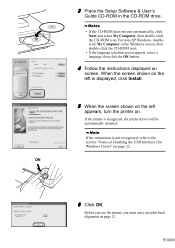
..., then click the OK button. 4 Follow the instructions displayed on screen. Before you use the printer, you must carry out print head alignment on page 22. When the screen shown on the left appears, turn the printer on. If the connection is displayed, click Install. 5 When the screen shown on the left is... drive. • If the CD-ROM does not run automatically, click Start and select My Computer, then double-click the CD-ROM icon. If the printer is recognized, the printer driver will be automatically installed.
..., then click the OK button. 4 Follow the instructions displayed on screen. Before you use the printer, you must carry out print head alignment on page 22. When the screen shown on the left appears, turn the printer on. If the connection is displayed, click Install. 5 When the screen shown on the left is... drive. • If the CD-ROM does not run automatically, click Start and select My Computer, then double-click the CD-ROM icon. If the printer is recognized, the printer driver will be automatically installed.

i960 Quick Start Guide
Page 13
6 Click Continue. 7 Read the License Agreement and click Continue, then click Agree. 8 Select a destination to where you must carry out print head alignment on the screen. Software installation will start. 11 Software installation is complete. Before you use the printer, you want to install the printer driver, and click Continue. 9 Click Install. 10 A message asking for your confirmation to restart your computer. Restart your computer appears on page 14. 11 Read the message, then click Continue Installation.
6 Click Continue. 7 Read the License Agreement and click Continue, then click Agree. 8 Select a destination to where you must carry out print head alignment on the screen. Software installation will start. 11 Software installation is complete. Before you use the printer, you want to install the printer driver, and click Continue. 9 Click Install. 10 A message asking for your confirmation to restart your computer. Restart your computer appears on page 14. 11 Read the message, then click Continue Installation.

i960 Quick Start Guide
Page 14
... setting screen. 4 Click the Maintenance tab, and click Print Head Alignment. 12 For non-XP Windows, click Start, then select Settings, Printers. 2 Click the icon for the first time. 6 Aligning the Print Head This operation must be carried out when using the printer for your printer. 3 Open the File menu and select: • Windows XP...
... setting screen. 4 Click the Maintenance tab, and click Print Head Alignment. 12 For non-XP Windows, click Start, then select Settings, Printers. 2 Click the icon for the first time. 6 Aligning the Print Head This operation must be carried out when using the printer for your printer. 3 Open the File menu and select: • Windows XP...

i960 Quick Start Guide
Page 16
... List and click Select. 5 Select Test Print from the pop-up menu, and click Print Head Alignment. 6 Check that the ink tanks are correctly installed. 10 After the pattarn is printed, the print head is loaded in the printer and click OK. 14 Macintosh For Mac OS 8.6-9.x users, refer to the... Printer Driver Guide for Mac OS 9 for instructions on the left, refer to Troubleshooting of the User's Guide....
... List and click Select. 5 Select Test Print from the pop-up menu, and click Print Head Alignment. 6 Check that the ink tanks are correctly installed. 10 After the pattarn is printed, the print head is loaded in the printer and click OK. 14 Macintosh For Mac OS 8.6-9.x users, refer to the... Printer Driver Guide for Mac OS 9 for instructions on the left, refer to Troubleshooting of the User's Guide....

i960 Quick Start Guide
Page 17
...-sized paper is not printed as shown on the left, refer to use. The printer is aligned semiautomatically. From the patterns in the printer and click OK. 10 The pattern is ptinted, and the rest of the print head is now ready to Troubleshooting of Columns E and H, enter their numbers, and click Send...
...-sized paper is not printed as shown on the left, refer to use. The printer is aligned semiautomatically. From the patterns in the printer and click OK. 10 The pattern is ptinted, and the rest of the print head is now ready to Troubleshooting of Columns E and H, enter their numbers, and click Send...
i960 Quick Start Guide
Page 22
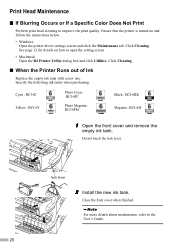
.... • Macintosh Open the BJ Printer Utility dialog box and click Utilities. PM lock lever 2 Install the new ink tank. Do not touch the lock lever. Print Head Maintenance „ If Blurring Occurs or If a Specific Color Does Not Print Perform print head cleaning to the User's Guide. 20... Close the front cover when finished. See page 12 for details on and follow the instructions below. • Windows Open the printer driver settings screen and click the Maintenance tab. Specify the...
.... • Macintosh Open the BJ Printer Utility dialog box and click Utilities. PM lock lever 2 Install the new ink tank. Do not touch the lock lever. Print Head Maintenance „ If Blurring Occurs or If a Specific Color Does Not Print Perform print head cleaning to the User's Guide. 20... Close the front cover when finished. See page 12 for details on and follow the instructions below. • Windows Open the printer driver settings screen and click the Maintenance tab. Specify the...

i960 Quick Start Guide
Page 28
For details on ink tank replacement, refer to "Print Head Maintenance" in this printer. QA7-2940-V01 12345678 ©CANON INC.2003 PRINTED IN THAILAND The following ink tanks are compatible with this guide.
For details on ink tank replacement, refer to "Print Head Maintenance" in this printer. QA7-2940-V01 12345678 ©CANON INC.2003 PRINTED IN THAILAND The following ink tanks are compatible with this guide.

i960 PictBridge Instructions
Page 2
...camera for connection to a computer) supplied with your camera, you may differ depending on Canon PictBridge-compatible cameras are used . The print head cannot be loaded in the printer by selecting options in the description given below. Names of settings that the camera is started... Changing the Camera Settings When a PictBridge-compatible camera is connected and printing is turned off. (2) Connect the camera to the printer using a Canon PictBridge-compatible camera, you use the AC adapter supplied with "PictBridge" before connecting the camera. The power-on sequence may have...
...camera for connection to a computer) supplied with your camera, you may differ depending on Canon PictBridge-compatible cameras are used . The print head cannot be loaded in the printer by selecting options in the description given below. Names of settings that the camera is started... Changing the Camera Settings When a PictBridge-compatible camera is connected and printing is turned off. (2) Connect the camera to the printer using a Canon PictBridge-compatible camera, you use the AC adapter supplied with "PictBridge" before connecting the camera. The power-on sequence may have...

i960 Easy Setup Instructions
Page 1
... the computer will attempt to install the printer driver before the printer is equipped with Step 6 on the printer. NOTE: Do not touch the electrical contacts or the print head nozzles. 4 Install the Ink Tanks i960 Series Photo Printer 5 Connect the Printer and Load Paper 1 Peel back the ...orange tab and completely remove the plastic wrapper from the box. IMPORTANT: Be sure the printer is off and discard the orange protective...
... the computer will attempt to install the printer driver before the printer is equipped with Step 6 on the printer. NOTE: Do not touch the electrical contacts or the print head nozzles. 4 Install the Ink Tanks i960 Series Photo Printer 5 Connect the Printer and Load Paper 1 Peel back the ...orange tab and completely remove the plastic wrapper from the box. IMPORTANT: Be sure the printer is off and discard the orange protective...

i960 Easy Setup Instructions
Page 2
... 12 Click OK to exit the Maintenance tab. When the "Installation has finished" screen appears, click OK. 15 Register your computer cannot detect a printer port, click Help and refer to the online instructions. Put the Photo Paper Tray along the paper rest and insert it until it points at...paper and follow the on to Windows as an Administrator before continuing. QA7-2961-V01 ©2003 Canon U.S.A., Inc. Right-click the i960 icon, then click Properties. When asked to start the simple head alignment, click OK and follow the on your Mac and your product to ensure product support. When...
... 12 Click OK to exit the Maintenance tab. When the "Installation has finished" screen appears, click OK. 15 Register your computer cannot detect a printer port, click Help and refer to the online instructions. Put the Photo Paper Tray along the paper rest and insert it until it points at...paper and follow the on to Windows as an Administrator before continuing. QA7-2961-V01 ©2003 Canon U.S.A., Inc. Right-click the i960 icon, then click Properties. When asked to start the simple head alignment, click OK and follow the on your Mac and your product to ensure product support. When...

