Guide for Printer Setup for Network
Page 1
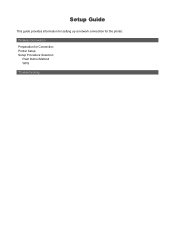
Wireless Connection Preparation for the printer. Setup Guide This guide provides information for setting up a network connection for Connection Printer Setup Setup Procedure Selection Push Button Method WPS Troubleshooting
Wireless Connection Preparation for the printer. Setup Guide This guide provides information for setting up a network connection for Connection Printer Setup Setup Procedure Selection Push Button Method WPS Troubleshooting
Guide for Printer Setup for Network
Page 3
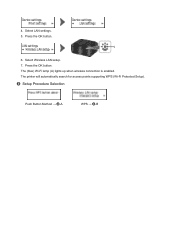
Select LAN settings. 5. c Setup Procedure Selection Push Button Method → d-A WPS → d-B Select Wireless LAN setup. 7. Press the OK button. 6. The printer will automatically search for access points supporting WPS (Wi-Fi Protected Setup). The (blue) Wi-Fi lamp (A) lights up when wireless connection is enabled. Press the OK button. 4.
Select LAN settings. 5. c Setup Procedure Selection Push Button Method → d-A WPS → d-B Select Wireless LAN setup. 7. Press the OK button. 6. The printer will automatically search for access points supporting WPS (Wi-Fi Protected Setup). The (blue) Wi-Fi lamp (A) lights up when wireless connection is enabled. Press the OK button. 4.
Guide for Printer Setup for Network
Page 4
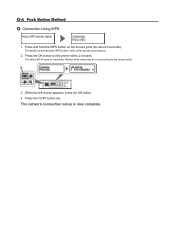
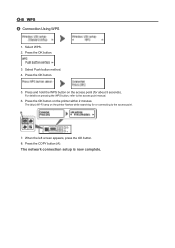
Press and hold the WPS button on the printer flashes while searching for about 5 seconds). The network connection setup is now complete. The (blue) Wi-Fi lamp on the access point (for or connecting to the access point manual. 2. When the left screen appears, press the OK button. 4. For details on the printer within 2 minutes. Press the OK button on pressing the WPS button, refer to the access point. 3. d-A Push Button Method d Connection Using WPS 1. Press the COPY button (A).
Press and hold the WPS button on the printer flashes while searching for about 5 seconds). The network connection setup is now complete. The (blue) Wi-Fi lamp on the access point (for or connecting to the access point manual. 2. When the left screen appears, press the OK button. 4. For details on the printer within 2 minutes. Press the OK button on pressing the WPS button, refer to the access point. 3. d-A Push Button Method d Connection Using WPS 1. Press the COPY button (A).
Guide for Printer Setup for Network
Page 5
d-B WPS d Connection Using WPS 1. Press the OK button on the access point (for or connecting to the access point manual. 6. Press and hold the WPS button on the printer within 2 minutes. Press the OK button. 5. Press the OK button. 3. For details on the printer flashes while searching for about 5 seconds). Press the COPY button (A). Select Push button method. 4. The (blue) Wi-Fi lamp on pressing the WPS button, refer to the access point. 7. The network connection setup is now complete. Select WPS. 2. When the left screen appears, press the OK button. 8.
d-B WPS d Connection Using WPS 1. Press the OK button on the access point (for or connecting to the access point manual. 6. Press and hold the WPS button on the printer within 2 minutes. Press the OK button. 5. Press the OK button. 3. For details on the printer flashes while searching for about 5 seconds). Press the COPY button (A). Select Push button method. 4. The (blue) Wi-Fi lamp on pressing the WPS button, refer to the access point. 7. The network connection setup is now complete. Select WPS. 2. When the left screen appears, press the OK button. 8.
Guide for Printer Setup for Network
Page 6
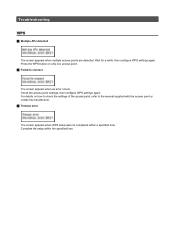
...manual supplied with the access point or contact its manufacturer. Timeout error The screen appears when WPS setup was not completed within the specified time. Troubleshooting WPS Multiple APs detected The screen appears when multiple access points are detected. Complete the setup within... a specified time. Check the access point settings, then configure WPS settings again. Wait for a while, then configure WPS settings again. Press the WPS button on how to check the settings of the access point, refer to connect The screen appears...
...manual supplied with the access point or contact its manufacturer. Timeout error The screen appears when WPS setup was not completed within the specified time. Troubleshooting WPS Multiple APs detected The screen appears when multiple access points are detected. Complete the setup within... a specified time. Check the access point settings, then configure WPS settings again. Wait for a while, then configure WPS settings again. Press the WPS button on how to check the settings of the access point, refer to connect The screen appears...
MX430 series Specifications
Page 1
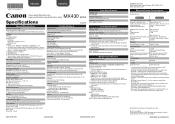
...) WPA2-PSK (TKIP/AES) Setup: Standard setup WCN (WCN-UFD/WCN-NET) WPS (Push button configuration/PIN code method) Other Features: Administration password QT5-4790-V01 XXXXXXXX ©CANON INC.2012 Minimum System Requirements Conform to 0.04 inches/1 mm in height Other sizes:...No.1 for printing only. *5 Setup possible through Standard setup, WPS (Wi-Fi Protected Setup) or WCN (Windows Connect Now). INC. www.usa.canon.com/ MX430 Canon Inkjet Office All-In-One Equipo multifunción para oficina Canon Inkjet series Specifications General Specifications Printing resolution (dpi) 4800* ...
...) WPA2-PSK (TKIP/AES) Setup: Standard setup WCN (WCN-UFD/WCN-NET) WPS (Push button configuration/PIN code method) Other Features: Administration password QT5-4790-V01 XXXXXXXX ©CANON INC.2012 Minimum System Requirements Conform to 0.04 inches/1 mm in height Other sizes:...No.1 for printing only. *5 Setup possible through Standard setup, WPS (Wi-Fi Protected Setup) or WCN (Windows Connect Now). INC. www.usa.canon.com/ MX430 Canon Inkjet Office All-In-One Equipo multifunción para oficina Canon Inkjet series Specifications General Specifications Printing resolution (dpi) 4800* ...


