Guide for Printer Setup for Network
Page 1
Wireless Connection Preparation for the printer. Setup Guide This guide provides information for setting up a network connection for Connection Printer Setup Setup Procedure Selection Push Button Method WPS Troubleshooting
Wireless Connection Preparation for the printer. Setup Guide This guide provides information for setting up a network connection for Connection Printer Setup Setup Procedure Selection Push Button Method WPS Troubleshooting
Guide for Printer Setup for Network
Page 2
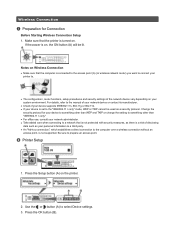
... . Use the or button (A) to prepare an access point. Make sure that the printer is connected to the access point (A) (or wireless network router) you want to connect your printer to. • The configuration, router functions, setup procedures and security settings ...If the power is on your system environment. Notes on Wireless Connection • Make sure that the computer is turned on the printer. 2. b Printer Setup 1. Change the security protocol for Connection Before Starting Wireless Connection Setup 1. Wireless Connection a Preparation for your device to something...
... . Use the or button (A) to prepare an access point. Make sure that the printer is connected to the access point (A) (or wireless network router) you want to connect your printer to. • The configuration, router functions, setup procedures and security settings ...If the power is on your system environment. Notes on Wireless Connection • Make sure that the computer is turned on the printer. 2. b Printer Setup 1. Change the security protocol for Connection Before Starting Wireless Connection Setup 1. Wireless Connection a Preparation for your device to something...
Guide for Printer Setup for Network
Page 3
Press the OK button. 6. The (blue) Wi-Fi lamp (A) lights up when wireless connection is enabled. 4. Select LAN settings. 5. Select Wireless LAN setup. 7. The printer will automatically search for access points supporting WPS (Wi-Fi Protected Setup). c Setup Procedure Selection Push Button Method → d-A WPS → d-B Press the OK button.
Press the OK button. 6. The (blue) Wi-Fi lamp (A) lights up when wireless connection is enabled. 4. Select LAN settings. 5. Select Wireless LAN setup. 7. The printer will automatically search for access points supporting WPS (Wi-Fi Protected Setup). c Setup Procedure Selection Push Button Method → d-A WPS → d-B Press the OK button.
Guide for Printer Setup for Network
Page 4
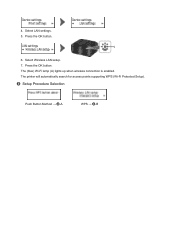
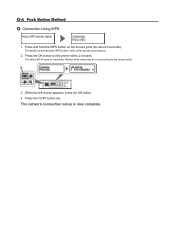
The (blue) Wi-Fi lamp on the access point (for or connecting to the access point manual. 2. Press the COPY button (A). When the left screen appears, press the OK button. 4. The network connection setup is now complete. d-A Push Button Method d Connection Using WPS 1. Press and hold the WPS button on the printer flashes while searching for about 5 seconds). For details on the printer within 2 minutes. Press the OK button on pressing the WPS button, refer to the access point. 3.
The (blue) Wi-Fi lamp on the access point (for or connecting to the access point manual. 2. Press the COPY button (A). When the left screen appears, press the OK button. 4. The network connection setup is now complete. d-A Push Button Method d Connection Using WPS 1. Press and hold the WPS button on the printer flashes while searching for about 5 seconds). For details on the printer within 2 minutes. Press the OK button on pressing the WPS button, refer to the access point. 3.
Guide for Printer Setup for Network
Page 5
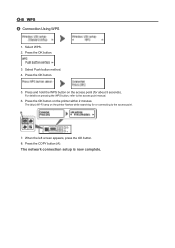
d-B WPS d Connection Using WPS 1. Select Push button method. 4. Press the OK button on the access point (for or connecting to the access point manual. 6. Press the COPY button (A). Press the OK button. 5. When the left screen appears, press the OK button. 8. The network connection setup is now complete. Press and hold the WPS button on the printer within 2 minutes. Press the OK button. 3. Select WPS. 2. For details on the printer flashes while searching for about 5 seconds). The (blue) Wi-Fi lamp on pressing the WPS button, refer to the access point. 7.
d-B WPS d Connection Using WPS 1. Select Push button method. 4. Press the OK button on the access point (for or connecting to the access point manual. 6. Press the COPY button (A). Press the OK button. 5. When the left screen appears, press the OK button. 8. The network connection setup is now complete. Press and hold the WPS button on the printer within 2 minutes. Press the OK button. 3. Select WPS. 2. For details on the printer flashes while searching for about 5 seconds). The (blue) Wi-Fi lamp on pressing the WPS button, refer to the access point. 7.
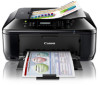
MX430 series Specifications
Page 1
...) are a theoretical maximum transmission speed between the printer and an equivalent network device, and do not indicate the actual transmission speed obtained. www.usa.canon.com/ MX430 Canon Inkjet Office All-In-One Equipo multifunción para oficina Canon Inkjet series Specifications General Specifications Printing resolution (dpi)...CD-ROM drive is required to setup the Wi-Fi connection if the push button method is fully upwardly compatible with the Canon inkjet printer before upgrading from Mac OS X 10.6 to Windows 7, then install the bundled software again. • Windows: Some ...
...) are a theoretical maximum transmission speed between the printer and an equivalent network device, and do not indicate the actual transmission speed obtained. www.usa.canon.com/ MX430 Canon Inkjet Office All-In-One Equipo multifunción para oficina Canon Inkjet series Specifications General Specifications Printing resolution (dpi)...CD-ROM drive is required to setup the Wi-Fi connection if the push button method is fully upwardly compatible with the Canon inkjet printer before upgrading from Mac OS X 10.6 to Windows 7, then install the bundled software again. • Windows: Some ...


