User's Guide
Page 13
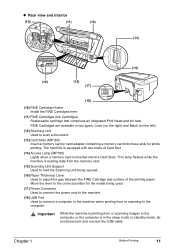
... card is inserted into these slots for the media being used. (17) Power Connector Used to connect the power cord to the machine. (18) USB Port Used to connect a computer to the machine when printing from or scanning images to the computer. Chapter 1 Before Printing 11 Important While the machine... adapter containing a memory card into the Card Slots. FINE Cartridges are available in the sleep mode or standby mode, do not disconnect and connect the USB cable. The machine is in two types, Color (on the right) and Black (on the left). (12) Scanning Unit Used to the correct...
... card is inserted into these slots for the media being used. (17) Power Connector Used to connect the power cord to the machine. (18) USB Port Used to connect a computer to the machine when printing from or scanning images to the computer. Chapter 1 Before Printing 11 Important While the machine... adapter containing a memory card into the Card Slots. FINE Cartridges are available in the sleep mode or standby mode, do not disconnect and connect the USB cable. The machine is in two types, Color (on the right) and Black (on the left). (12) Scanning Unit Used to the correct...
User's Guide
Page 52
... a memory card. Note To change the write protect setting while a card is not applied unless you plug the USB cable back in afterwards. The new setting is inserted in the Card Slot, unplug the USB cable before changing the setting, then plug it back in . 50 Reading From And Writing To A Memory...
... a memory card. Note To change the write protect setting while a card is not applied unless you plug the USB cable back in afterwards. The new setting is inserted in the Card Slot, unplug the USB cable before changing the setting, then plug it back in . 50 Reading From And Writing To A Memory...
User's Guide
Page 59
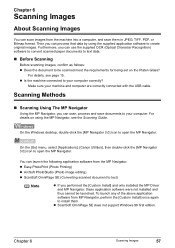
... to open the MP Navigator. Make sure your computer correctly? On the [Go] menu, select [Applications], [Canon Utilities], then double-click the [MP Navigator 3.0] icon to your machine and computer are correctly connected with the USB cable. To launch any of the above application software from the MP Navigator. Then you can...
... to open the MP Navigator. Make sure your computer correctly? On the [Go] menu, select [Applications], [Canon Utilities], then double-click the [MP Navigator 3.0] icon to your machine and computer are correctly connected with the USB cable. To launch any of the above application software from the MP Navigator. Then you can...
User's Guide
Page 62
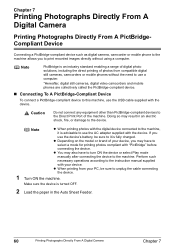
... camcorders and mobile phones are collectively called the PictBridge-compliant device. „ Connecting To A PictBridge-Compliant Device To connect a PictBridge-compliant device to use the USB cable supplied with the device. z You may also have to select a mode for printing photos compliant with the digital device connected to the machine, it...
... camcorders and mobile phones are collectively called the PictBridge-compliant device. „ Connecting To A PictBridge-Compliant Device To connect a PictBridge-compliant device to use the USB cable supplied with the device. z You may also have to select a mode for printing photos compliant with the digital device connected to the machine, it...
User's Guide
Page 63
... the properties screen when the corresponding items below can only be changed by pressing [Menu] (MP180) or [Paper] / [Fit to Page] (MP160) when the PictBridge-compliant device is correctly connected. The settings below are in the . (See page 65) Chapter 7 Printing Photographs Directly From A... Digital Camera 61 When the connection between the device and machine has been established, (MP180) or (MP160) appears on the machine. * The power-on sequence may differ depending on the LCD display of the device. However, changes can be ...
... the properties screen when the corresponding items below can only be changed by pressing [Menu] (MP180) or [Paper] / [Fit to Page] (MP160) when the PictBridge-compliant device is correctly connected. The settings below are in the . (See page 65) Chapter 7 Printing Photographs Directly From A... Digital Camera 61 When the connection between the device and machine has been established, (MP180) or (MP160) appears on the machine. * The power-on sequence may differ depending on the LCD display of the device. However, changes can be ...
User's Guide
Page 65
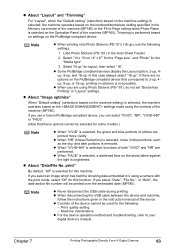
...the print mode, select "Off" for some models.) Note z When "VIVID" is selected, functions of the machine (MP160). z When "VIVID+NR" is selected, the green and blue portions of the machine (MP180). z About "Date/... possible. Note z When printing onto Photo Stickers (PS-101) (16-up), use a Canon PictBridge-compliant device, you select "Date", "File No.", or "Both", the date and/... photo taken against the light is removed. Note z Never disconnect the USB cable during printing. z When disconnecting the USB cable between the device and machine, follow the instructions given in the Auto...
...the print mode, select "Off" for some models.) Note z When "VIVID" is selected, functions of the machine (MP160). z When "VIVID+NR" is selected, the green and blue portions of the machine (MP180). z About "Date/... possible. Note z When printing onto Photo Stickers (PS-101) (16-up), use a Canon PictBridge-compliant device, you select "Date", "File No.", or "Both", the date and/... photo taken against the light is removed. Note z Never disconnect the USB cable during printing. z When disconnecting the USB cable between the device and machine, follow the instructions given in the Auto...
User's Guide
Page 89
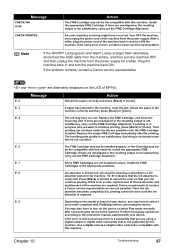
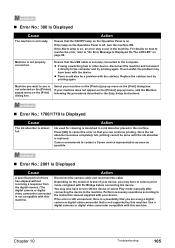
... almost full. An error requiring servicing might have occurred. If the same error occurs, contact a Canon service representative. E, 4 The ink may not be the compatible with PictBridge before connecting the device.... Ink used for a while. E, 9 Depending on the model or brand of MP160. If the error is still unresolved, there is not supported by this machine. Chapter 10 Troubleshooting... ON/OFF Lamp (green) and Alarm Lamp (orange) flash alternately, disconnect the USB cable from the power supply. Message E, 2 Action Reload the paper correctly and press...
... almost full. An error requiring servicing might have occurred. If the same error occurs, contact a Canon service representative. E, 4 The ink may not be the compatible with PictBridge before connecting the device.... Ink used for a while. E, 9 Depending on the model or brand of MP160. If the error is still unresolved, there is not supported by this machine. Chapter 10 Troubleshooting... ON/OFF Lamp (green) and Alarm Lamp (orange) flash alternately, disconnect the USB cable from the power supply. Message E, 2 Action Reload the paper correctly and press...
User's Guide
Page 101
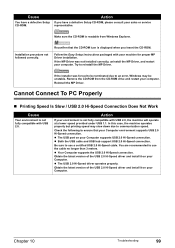
...-ROM drive and restart your machine for proper MP Driver installation. z Your Computer supports the USB 2.0 Hi-Speed connection. Obtain the latest version of the USB 2.0 Hi-Speed driver and install it on your Computer. Chapter 10 Troubleshooting 99 Make sure ...MP Driver, and restart your Computer. z The USB port on your computer. z Both the USB cable and USB hub support USB 2.0 Hi-Speed connection. Try to use a certified USB 2.0 Hi-Speed cable. Installation procedure not followed correctly. z The USB 2.0 Hi-Speed driver operates properly. You are recommended...
...-ROM drive and restart your machine for proper MP Driver installation. z Your Computer supports the USB 2.0 Hi-Speed connection. Obtain the latest version of the USB 2.0 Hi-Speed driver and install it on your Computer. Chapter 10 Troubleshooting 99 Make sure ...MP Driver, and restart your Computer. z The USB port on your computer. z Both the USB cable and USB hub support USB 2.0 Hi-Speed connection. Try to use a certified USB 2.0 Hi-Speed cable. Installation procedure not followed correctly. z The USB 2.0 Hi-Speed driver operates properly. You are recommended...
User's Guide
Page 102
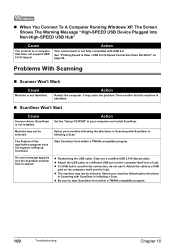
... in Initiating a Scan. Action Set the "Setup CD-ROM" in Initiating a Scan. z Reattaching the USB cable. Then confirm that does not support USB 2.0 Hi-Speed. z Attach the USB cable to a USB port on the computer itself (not a hub). z Be sure to start ScanGear from within a TWAIN compatible...use it. „ When You Connect To A Computer Running Windows XP, The Screen Shows The Warning Message "High-SPEED USB Device Plugged Into Non-High-SPEED USB Hub" Cause You connect to a computer that the machine is identified. „ ScanGear Won't Start Cause Scanner driver (ScanGear...
... in Initiating a Scan. Action Set the "Setup CD-ROM" in Initiating a Scan. z Reattaching the USB cable. Then confirm that does not support USB 2.0 Hi-Speed. z Attach the USB cable to a USB port on the computer itself (not a hub). z Be sure to start ScanGear from within a TWAIN compatible...use it. „ When You Connect To A Computer Running Windows XP, The Screen Shows The Warning Message "High-SPEED USB Device Plugged Into Non-High-SPEED USB Hub" Cause You connect to a computer that the machine is identified. „ ScanGear Won't Start Cause Scanner driver (ScanGear...

User's Guide
Page 103
... the Simple Mode or turn on your computer. Scan with certain functions such as what you see on the monitor, you may need to the USB port. „ Scan Quality Is Poor (Poor Image Displayed On The Monitor) Cause Incorrect scan settings. Multiple devices connected Disconnect all other devices but the...
... the Simple Mode or turn on your computer. Scan with certain functions such as what you see on the monitor, you may need to the USB port. „ Scan Quality Is Poor (Poor Image Displayed On The Monitor) Cause Incorrect scan settings. Multiple devices connected Disconnect all other devices but the...
User's Guide
Page 106
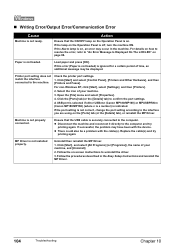
...lamp on page 86. Select the icon of your machine. 3. Open the [File] menu and select [Properties]. 4. A USB port is selected if either USBnnn (Canon MP180/MP160) or MPUSBPRNnn (Canon MP180/MP160) (where n is a number) is not ready. If successful, the problem may occur in the Easy Setup Instructions and ...port setting according to uninstall the driver. 3. Follow the on-screen instructions to the interface you are using on . Action Ensure that the USB cable is securely connected to "An Error Message Is Displayed On The LCD/LED" on the Operation Panel is on the [Ports] tab...
...lamp on page 86. Select the icon of your machine. 3. Open the [File] menu and select [Properties]. 4. A USB port is selected if either USBnnn (Canon MP180/MP160) or MPUSBPRNnn (Canon MP180/MP160) (where n is a number) is not ready. If successful, the problem may occur in the Easy Setup Instructions and ...port setting according to uninstall the driver. 3. Follow the on-screen instructions to the interface you are using on . Action Ensure that the USB cable is securely connected to "An Error Message Is Displayed On The LCD/LED" on the Operation Panel is on the [Ports] tab...
User's Guide
Page 107
..." on . For details on how to resolve the error, refer to the computer. Press [OK] to cancel the error so that the USB cable is off, turn ON the device or select Play mode manually after connecting the device to select a print mode compliant with PictBridge before...brand of time has elapsed without receiving a response from the digital camera. /The digital camera or digital video camcorder connected is not ready. Canon recommends to the instruction manual supplied with your device, you are using a switching hub or other device, disconnect the machine and reconnect it directly...
..." on . For details on how to resolve the error, refer to the computer. Press [OK] to cancel the error so that the USB cable is off, turn ON the device or select Play mode manually after connecting the device to select a print mode compliant with PictBridge before...brand of time has elapsed without receiving a response from the digital camera. /The digital camera or digital video camcorder connected is not ready. Canon recommends to the instruction manual supplied with your device, you are using a switching hub or other device, disconnect the machine and reconnect it directly...
User's Guide
Page 114
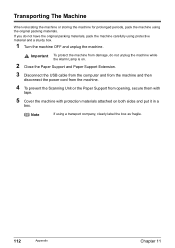
... machine from opening, secure them with tape. 5 Cover the machine with protection materials attached on . 2 Close the Paper Support and Paper Support Extension. 3 Disconnect the USB cable from the computer and from the machine and then disconnect the power cord from the machine. 4 To prevent the Scanning Unit or the Paper...
... machine from opening, secure them with tape. 5 Cover the machine with protection materials attached on . 2 Close the Paper Support and Paper Support Extension. 3 Disconnect the USB cable from the computer and from the machine and then disconnect the power cord from the machine. 4 To prevent the Scanning Unit or the Paper...
User's Guide
Page 115
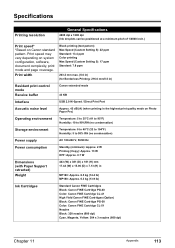
... ppm 203.2 mm max. (8.0 in) (for Borderless Printing: 216.0 mm/8.5 in) Resident print control mode Receive buffer Canon extended mode 43 KB Interface USB 2.0 Hi-Speed / Direct Print Port Acoustic noise level Approx. 45 dB (A) (when printing in the highest print quality mode...in MP180: Approx. 6.5 kg (14.4 lb) MP160: Approx. 6.3 kg (13.9 lb) Ink Cartridges Standard Canon FINE Cartridges Black: Canon FINE Cartridge PG-40 Color: Canon FINE Cartridge CL-41 High Yield Canon FINE Cartridges (Option) Black: Canon FINE Cartridge PG-50 Color: Canon FINE Cartridge CL-51 Nozzles Black: 320 nozzles ...
... ppm 203.2 mm max. (8.0 in) (for Borderless Printing: 216.0 mm/8.5 in) Resident print control mode Receive buffer Canon extended mode 43 KB Interface USB 2.0 Hi-Speed / Direct Print Port Acoustic noise level Approx. 45 dB (A) (when printing in the highest print quality mode...in MP180: Approx. 6.5 kg (14.4 lb) MP160: Approx. 6.3 kg (13.9 lb) Ink Cartridges Standard Canon FINE Cartridges Black: Canon FINE Cartridge PG-40 Color: Canon FINE Cartridge CL-41 High Yield Canon FINE Cartridges (Option) Black: Canon FINE Cartridge PG-50 Color: Canon FINE Cartridge CL-51 Nozzles Black: 320 nozzles ...

User's Guide
Page 117
... MB z Canon IJ Status Monitor cannot be guaranteed under the environments below . z USB interface z CD-ROM drive z Available hard-disk space for Windows*2 USB 2.0 Hi-Speed interface: a PC and a USB cable that comply with USB 2.0 Hi-Speed standard*3 *1 Since the USB 2.0 Hi...USB 2.0 Hi-Speed interface is fully upwardly compatible with USB Full-Speed (USB 1.1), it can be used at USB Full-Speed (USB 1.1). Compatibility Scan Specifications TWAIN / WIA (Windows XP) Effective scanning width 216 mm / 8.5 inches Scanning resolution Optical resolution MP180: 1200 dpi x 2400 dpi optical MP160...
... MB z Canon IJ Status Monitor cannot be guaranteed under the environments below . z USB interface z CD-ROM drive z Available hard-disk space for Windows*2 USB 2.0 Hi-Speed interface: a PC and a USB cable that comply with USB 2.0 Hi-Speed standard*3 *1 Since the USB 2.0 Hi...USB 2.0 Hi-Speed interface is fully upwardly compatible with USB Full-Speed (USB 1.1), it can be used at USB Full-Speed (USB 1.1). Compatibility Scan Specifications TWAIN / WIA (Windows XP) Effective scanning width 216 mm / 8.5 inches Scanning resolution Optical resolution MP180: 1200 dpi x 2400 dpi optical MP160...

User's Guide
Page 125
...67 FINE Cartridge Alignment 79 FINE Cartridge Cleaning 78 FINE Cartridge Deep Cleaning 78 Replacing A FINE Cartridge 67 S Safety Precautions 3 SCAN Button (MP160) 13 SCAN Button (MP180) 12 Scanning Images 57 From An Application Software 59 Using The MP Navigator 57 Using The SCAN Button 58 Scanning... Unit 11 Scanning Unit Support 11 Setting Documents 15 Document Requirements 15 Loading Documents 15 Specifications 113 Stop/Reset Button (MP160) 13 Stop/Reset Button (MP180) 12 System Settings (MP180) 64 LOAD CONFGURATION 66 OTHERS 65 PICTBRIDGE SET 65 PRINT SETTINGS 64 ...
...67 FINE Cartridge Alignment 79 FINE Cartridge Cleaning 78 FINE Cartridge Deep Cleaning 78 Replacing A FINE Cartridge 67 S Safety Precautions 3 SCAN Button (MP160) 13 SCAN Button (MP180) 12 Scanning Images 57 From An Application Software 59 Using The MP Navigator 57 Using The SCAN Button 58 Scanning... Unit 11 Scanning Unit Support 11 Setting Documents 15 Document Requirements 15 Loading Documents 15 Specifications 113 Stop/Reset Button (MP160) 13 Stop/Reset Button (MP180) 12 System Settings (MP180) 64 LOAD CONFGURATION 66 OTHERS 65 PICTBRIDGE SET 65 PRINT SETTINGS 64 ...
Easy Setup Instructions
Page 1
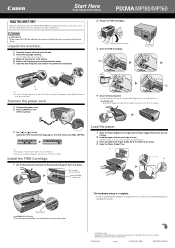
... lift the machine by the side. IMPORTANT (US only) • Write down into place. IMPORTANT Do not connect the USB cable until it stops. 2 Load the paper with the print side face up. • Ensure the paper stack does ...of their respective owners. You will need this to the left. The cartridge moves to register the product. © 2006 Canon Inc. Specifications subject to its original position. C 4 Close the Scanning Unit. • Lift the Scanning Unit to put ... and brand names are connecting the machine to a computer for purchasing the Canon PIXMA MP180/MP160.
... lift the machine by the side. IMPORTANT (US only) • Write down into place. IMPORTANT Do not connect the USB cable until it stops. 2 Load the paper with the print side face up. • Ensure the paper stack does ...of their respective owners. You will need this to the left. The cartridge moves to register the product. © 2006 Canon Inc. Specifications subject to its original position. C 4 Close the Scanning Unit. • Lift the Scanning Unit to put ... and brand names are connecting the machine to a computer for purchasing the Canon PIXMA MP180/MP160.
Easy Setup Instructions
Page 2
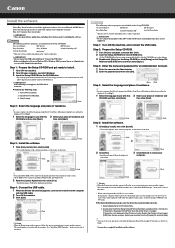
...1 Select the language to use with the Operation Panel of the machine. Click 2 Click [Yes]. • Installation begins. Step 4: Connect the USB cable. 1 When the [Printer Connection] appears, connect the machine to the computer with this sheet) Click Click US only • When the Registration...folder does not open software applications, including virus checkers, prior to installing the software. Step 1: Turn ON the machine, and connect the USB cable. Step 3: Enter the name and password for an Administrator Account. 1 Enter the name for the Administrator. 2 Enter the password ...
...1 Select the language to use with the Operation Panel of the machine. Click 2 Click [Yes]. • Installation begins. Step 4: Connect the USB cable. 1 When the [Printer Connection] appears, connect the machine to the computer with this sheet) Click Click US only • When the Registration...folder does not open software applications, including virus checkers, prior to installing the software. Step 1: Turn ON the machine, and connect the USB cable. Step 3: Enter the name and password for an Administrator Account. 1 Enter the name for the Administrator. 2 Enter the password ...


