
User's Guide
Page 4
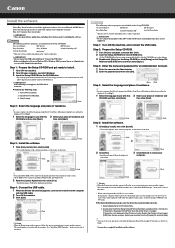
... Canon U.S.A., INC. Table of Contents Safety Precautions 3 Reading The Document 8 Symbols Used In This Guide 8 Legal Limitations On Use Of Your Product And Use Of Images 9 1 Before Printing 10 Machine Parts And Their Functions 10 Turning The Machine ON/OFF 14 Setting Documents 15 General Paper Guidelines 16 Recommended Paper 17 Loading Paper 23 2 Copying 26 Making Copies 26 Changing The Copy Settings (MP180) .........28 Advanced Copy Functions 32 3 Printing From A Memory Card (MP180 36 Using A Memory Card 36 Printing Photograph 39 Print Settings...
... Canon U.S.A., INC. Table of Contents Safety Precautions 3 Reading The Document 8 Symbols Used In This Guide 8 Legal Limitations On Use Of Your Product And Use Of Images 9 1 Before Printing 10 Machine Parts And Their Functions 10 Turning The Machine ON/OFF 14 Setting Documents 15 General Paper Guidelines 16 Recommended Paper 17 Loading Paper 23 2 Copying 26 Making Copies 26 Changing The Copy Settings (MP180) .........28 Advanced Copy Functions 32 3 Printing From A Memory Card (MP180 36 Using A Memory Card 36 Printing Photograph 39 Print Settings...
User's Guide
Page 6
... dry hands. Never attempt any openings on a thick rug or carpet. Do not drop paper clips, staples, or other equipment. If you are no user serviceable parts inside the machine to clear paper jams etc., do not spill water, liquid, or flammable substances inside the machine. Do not block or cover the ventilation port or any maintenance procedure not described in burns or...
... dry hands. Never attempt any openings on a thick rug or carpet. Do not drop paper clips, staples, or other equipment. If you are no user serviceable parts inside the machine to clear paper jams etc., do not spill water, liquid, or flammable substances inside the machine. Do not block or cover the ventilation port or any maintenance procedure not described in burns or...
User's Guide
Page 12
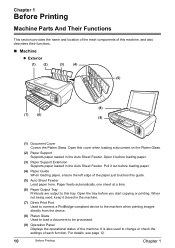
...the machine when printing images directly from the device. (8) Platen Glass Used to load a document to be processed. (9) Operation Panel Displays the operational status of the paper just touches this machine, and also describes their functions. „ Machine z Exterior (1) (2) (3) (4) (5) (8) (7) (6) (9) (1) Document Cover Covers the Platen Glass. For details, see page 12. 10 Before Printing Chapter 1 Paper feeds automatically, one sheet at a time. (6) Paper Output Tray Printouts are output to change or check the settings of this guide. (5) Auto Sheet Feeder Load paper here...
...the machine when printing images directly from the device. (8) Platen Glass Used to load a document to be processed. (9) Operation Panel Displays the operational status of the paper just touches this machine, and also describes their functions. „ Machine z Exterior (1) (2) (3) (4) (5) (8) (7) (6) (9) (1) Document Cover Covers the Platen Glass. For details, see page 12. 10 Before Printing Chapter 1 Paper feeds automatically, one sheet at a time. (6) Paper Output Tray Printouts are output to change or check the settings of this guide. (5) Auto Sheet Feeder Load paper here...
User's Guide
Page 13
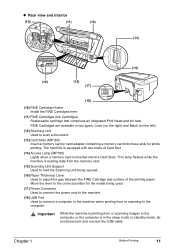
... reading data from the memory card. (15) Scanning Unit Support Used to hold the Scanning Unit being used. (17) Power Connector Used to connect the power cord to the machine. (18) USB Port Used to connect a computer to the machine when printing from or scanning to adjust the gap between the FINE Cartridge and surface of Card Slot. (14) Access Lamp (MP180) Lights when a memory card is printing from or scanning images to the correct position for photo printing. FINE Cartridges are available in the sleep mode...
... reading data from the memory card. (15) Scanning Unit Support Used to hold the Scanning Unit being used. (17) Power Connector Used to connect the power cord to the machine. (18) USB Port Used to connect a computer to the machine when printing from or scanning to adjust the gap between the FINE Cartridge and surface of Card Slot. (14) Access Lamp (MP180) Lights when a memory card is printing from or scanning images to the correct position for photo printing. FINE Cartridges are available in the sleep mode...

User's Guide
Page 14
... Printing Chapter 1 Before turning ON the machine, make sure the Document Cover is closed. (10) Alarm Lamp Lights if an error occurs, or when the paper or ink runs out. (11) [Menu] Button Accesses the settings to customize operation of copies or the image file number. (13) [OK] Button Selects or confirms settings. „ Operation Panel This section describes the buttons on the Operation Panel, and their functions and locations. (1) (2) (3) (4) (5) (6) (7) (8) (9) (10) (11) (12) (13) (14) (1) [Photo Index Sheet] Button Switches the machine...
... Printing Chapter 1 Before turning ON the machine, make sure the Document Cover is closed. (10) Alarm Lamp Lights if an error occurs, or when the paper or ink runs out. (11) [Menu] Button Accesses the settings to customize operation of copies or the image file number. (13) [OK] Button Selects or confirms settings. „ Operation Panel This section describes the buttons on the Operation Panel, and their functions and locations. (1) (2) (3) (4) (5) (6) (7) (8) (9) (10) (11) (12) (13) (14) (1) [Photo Index Sheet] Button Switches the machine...
User's Guide
Page 59
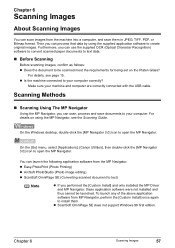
... installed the MP Driver and MP Navigator, these application software were not installed and thus cannot be scanned meet the requirements for being set on using the supplied application software to your computer correctly? z Easy-PhotoPrint (Photo Printing) z ArcSoft PhotoStudio (Photo image editing) z ScanSoft OmniPage SE (Converting scanned document to open the MP Navigator. Make sure your machine and computer are correctly connected with the USB cable. On the Windows desktop, double...
... installed the MP Driver and MP Navigator, these application software were not installed and thus cannot be scanned meet the requirements for being set on using the supplied application software to your computer correctly? z Easy-PhotoPrint (Photo Printing) z ArcSoft PhotoStudio (Photo image editing) z ScanSoft OmniPage SE (Converting scanned document to open the MP Navigator. Make sure your machine and computer are correctly connected with the USB cable. On the Windows desktop, double...
User's Guide
Page 60
... MP Navigator opens. z When using Mac OS X For the machine to uncheck the option, exit the Image Capture, then start scanning when [Black] / [Color] (MP180) or [SCAN] (MP160) is pressed], then click [OK]. In this program for the scanning operations. (See the Scanning Guide) z If you are using Windows XP The program selection screen is connected to Scan Mode. 3 Press [Black] or [Color]. The machine switches to the machine before starting application software in Image Capture...
... MP Navigator opens. z When using Mac OS X For the machine to uncheck the option, exit the Image Capture, then start scanning when [Black] / [Color] (MP180) or [SCAN] (MP160) is pressed], then click [OK]. In this program for the scanning operations. (See the Scanning Guide) z If you are using Windows XP The program selection screen is connected to Scan Mode. 3 Press [Black] or [Color]. The machine switches to the machine before starting application software in Image Capture...
User's Guide
Page 63
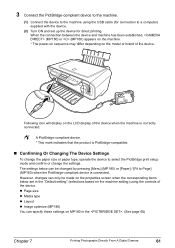
... [Menu] (MP180) or [Paper] / [Fit to Page] (MP160) when the PictBridge-compliant device is PictBridge-compatible. „ Confirming Or Changing The Device Settings To change the paper size or paper type, operate the device to select the PictBridge print setup mode and confirm or change the settings. A PictBridge-compliant device. * This mark indicates that the product is connected. 3 Connect the PictBridge-compliant device to the machine. (1) Connect the device to the machine using the controls...
... [Menu] (MP180) or [Paper] / [Fit to Page] (MP160) when the PictBridge-compliant device is PictBridge-compatible. „ Confirming Or Changing The Device Settings To change the paper size or paper type, operate the device to select the PictBridge print setup mode and confirm or change the settings. A PictBridge-compliant device. * This mark indicates that the product is connected. 3 Connect the PictBridge-compliant device to the machine. (1) Connect the device to the machine using the controls...
User's Guide
Page 72
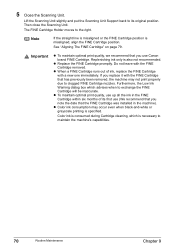
... FINE Cartridge was installed in the FINE Cartridge within six months of ink, replace the FINE Cartridge with the FINE Cartridge removed. z Color ink consumption may not print properly due to exchange the FINE Cartridge will be inaccurate. z Replace the FINE Cartridge promptly. See "Aligning The FINE Cartridge" on page 79. z To maintain optimal print quality, use up all the ink in the machine). Lift the Scanning Unit slightly and put the Scanning Unit Support back...
... FINE Cartridge was installed in the FINE Cartridge within six months of ink, replace the FINE Cartridge with the FINE Cartridge removed. z Color ink consumption may not print properly due to exchange the FINE Cartridge will be inaccurate. z Replace the FINE Cartridge promptly. See "Aligning The FINE Cartridge" on page 79. z To maintain optimal print quality, use up all the ink in the machine). Lift the Scanning Unit slightly and put the Scanning Unit Support back...
User's Guide
Page 87
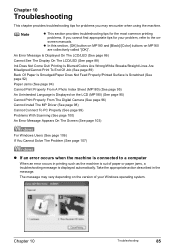
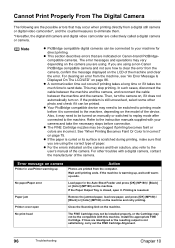
... page 92) Paper Jams (See page 94) Cannot Print Properly From A Photo Index Sheet (MP180) (See page 95) An Unintended Language is Displayed on the LCD (MP180) (See page 95) Cannot Print Properly From The Digital Camera (See page 96) Cannot Install The MP Driver (See page 98) Cannot Connect To PC Properly (See page 99) Problems With Scanning (See page 100) An Error Message Appears On The Screen (See page 103) For Windows Users (See page...
... page 92) Paper Jams (See page 94) Cannot Print Properly From A Photo Index Sheet (MP180) (See page 95) An Unintended Language is Displayed on the LCD (MP180) (See page 95) Cannot Print Properly From The Digital Camera (See page 96) Cannot Install The MP Driver (See page 98) Cannot Connect To PC Properly (See page 99) Problems With Scanning (See page 100) An Error Message Appears On The Screen (See page 103) For Windows Users (See page...
User's Guide
Page 88
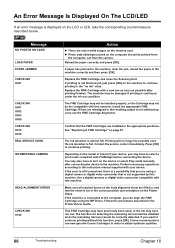
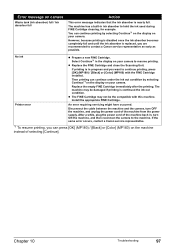
... Cartridge Alignment. Message NO PHOTOS ON CARD LOAD PAPER PAPER JAMMED CHECK INK U041 CHECK INK U051 U052 U053 U059 CHECK INK U075 U076 REQ. If paper has jammed in the machine, clear the jam, reload the paper in the Printer Driver Guide. The ink absorber is continued under the ink out condition. Perform necessary operations according to continue printing. This FINE Cartridge may have previously been used, or the ink may have to turn on the model or brand of your device. Install...
... Cartridge Alignment. Message NO PHOTOS ON CARD LOAD PAPER PAPER JAMMED CHECK INK U041 CHECK INK U051 U052 U053 U059 CHECK INK U075 U076 REQ. If paper has jammed in the machine, clear the jam, reload the paper in the Printer Driver Guide. The ink absorber is continued under the ink out condition. Perform necessary operations according to continue printing. This FINE Cartridge may have previously been used, or the ink may have to turn on the model or brand of your device. Install...
User's Guide
Page 89
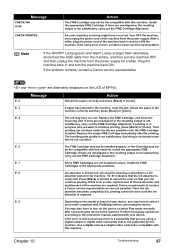
... FINE Cartridge installed. Perform necessary operations according to the instruction manual supplied with PictBridge before connecting the device. Chapter 10 Troubleshooting 87 If lines are required. Plug the machine back in the appropriate positions. Then printing can continue printing. If this error occurs, replacement of the ink absorber and maintenance of the machine are misaligned or the resulting output is not supported by this machine. Canon recommends to select a print mode compliant...
... FINE Cartridge installed. Perform necessary operations according to the instruction manual supplied with PictBridge before connecting the device. Chapter 10 Troubleshooting 87 If lines are required. Plug the machine back in the appropriate positions. Then printing can continue printing. If this error occurs, replacement of the ink absorber and maintenance of the machine are misaligned or the resulting output is not supported by this machine. Canon recommends to select a print mode compliant...

User's Guide
Page 91
... page 78. See "FINE Cartridge Cleaning" on page 76. See "Aligning The FINE Cartridge" on page 67. On the [Main] tab, click [High] for higher print quality. Open the [Print] dialog box. 2. See "Replacing A FINE Cartridge" on page 79. When printing directly from the pop-up . On the [Main] tab of the printer driver, select [Quality & Media] from a digital camera, on the Operation Panel, confirm that the [Media Type] selected matches the paper loaded. z ink...
... page 78. See "FINE Cartridge Cleaning" on page 76. See "Aligning The FINE Cartridge" on page 67. On the [Main] tab, click [High] for higher print quality. Open the [Print] dialog box. 2. See "Replacing A FINE Cartridge" on page 79. When printing directly from the pop-up . On the [Main] tab of the printer driver, select [Quality & Media] from a digital camera, on the Operation Panel, confirm that the [Media Type] selected matches the paper loaded. z ink...
User's Guide
Page 96
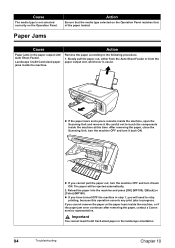
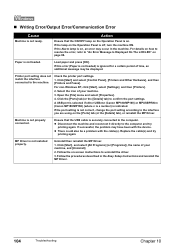
... the Scanning Unit, turn the machine OFF and turn it back ON. z If you have turned OFF the machine in step 1, you will be ejected automatically. 2. Action Ensure that of the paper loaded. Action Remove the paper according to the following procedure. 1. Landscape Credit Card-sized paper jams inside the machine, or if the paper jam error continues after removing the paper, contact a Canon service representative. Important You cannot load Credit Card-sized paper in the paper output slot/ Auto Sheet Feeder...
... the Scanning Unit, turn the machine OFF and turn it back ON. z If you have turned OFF the machine in step 1, you will be ejected automatically. 2. Action Ensure that of the paper loaded. Action Remove the paper according to the following procedure. 1. Landscape Credit Card-sized paper jams inside the machine, or if the paper jam error continues after removing the paper, contact a Canon service representative. Important You cannot load Credit Card-sized paper in the paper output slot/ Auto Sheet Feeder...
User's Guide
Page 98
... the Paper Output Tray is connected to the machine, depending on Canon-brand PictBridgecompatible cameras. Install the appropriate FINE Cartridge. If you are collectively called a digital camera or camera. z Your PictBridge compatible device may stop printing. Wait until warmup ends. Paper jam Remove the jammed paper, load new paper, and press [OK] (MP180) / [Black] or [Color] (MP160) on page 75. For other photo and check if it is closed, open Close the Scanning Unit on . For clearing an error from...
... the Paper Output Tray is connected to the machine, depending on Canon-brand PictBridgecompatible cameras. Install the appropriate FINE Cartridge. If you are collectively called a digital camera or camera. z Your PictBridge compatible device may stop printing. Wait until warmup ends. Paper jam Remove the jammed paper, load new paper, and press [OK] (MP180) / [Black] or [Color] (MP160) on page 75. For other photo and check if it is closed, open Close the Scanning Unit on . For clearing an error from...
User's Guide
Page 99
... machine from the power supply. No ink Printer error z Prepare a new FINE Cartridge. Install the appropriate FINE Cartridge. If printing is continued the ink out condition. z Replace the FINE Cartridge and close the Scanning Unit. z The FINE Cartridge may be the compatible with the FINE Cartridge installed. The machine may not be damaged if printing is in ink absorber to the machine. Replace the empty FINE Cartridge immediately after the printing. If the same error occurs, contact a Canon service...
... machine from the power supply. No ink Printer error z Prepare a new FINE Cartridge. Install the appropriate FINE Cartridge. If printing is continued the ink out condition. z Replace the FINE Cartridge and close the Scanning Unit. z The FINE Cartridge may be the compatible with the FINE Cartridge installed. The machine may not be damaged if printing is in ink absorber to the machine. Replace the empty FINE Cartridge immediately after the printing. If the same error occurs, contact a Canon service...

User's Guide
Page 105
...; Trouble scanning with the machine instead. Chapter 10 Troubleshooting 103 z Change the display setting in the scanner driver and rescan. z Change the resolution setting in the application software. from moving, cancel printing from your computer, then turn OFF the machine and turn it . „ "There Is Not Enough Memory." Action Set the printing size in the selected state, click the [File] menu and select [Print]. 2. Example: ArcSoft PhotoStudio 1. Scanned image won't open. Scanned image enlarged (reduced) on -screen manuals...
...; Trouble scanning with the machine instead. Chapter 10 Troubleshooting 103 z Change the display setting in the scanner driver and rescan. z Change the resolution setting in the application software. from moving, cancel printing from your computer, then turn OFF the machine and turn it . „ "There Is Not Enough Memory." Action Set the printing size in the selected state, click the [File] menu and select [Print]. 2. Example: ArcSoft PhotoStudio 1. Scanned image won't open. Scanned image enlarged (reduced) on -screen manuals...
User's Guide
Page 106
... USB cable is not installed properly. If this error (Paper is not loaded) is ignored for a certain period of your machine. 3. Ensure that the ON/OFF lamp on the Operation Panel is not correct, change the port setting according to uninstall the driver. 3. Replace the cable(s) and try printing again. Follow the on page 86. Open the [File] menu and select [Properties]. 4. MP Driver is securely connected to the computer and try printing...
... USB cable is not installed properly. If this error (Paper is not loaded) is ignored for a certain period of your machine. 3. Ensure that the ON/OFF lamp on the Operation Panel is not correct, change the port setting according to uninstall the driver. 3. Replace the cable(s) and try printing again. Follow the on page 86. Open the [File] menu and select [Properties]. 4. MP Driver is securely connected to the computer and try printing...
Easy Setup Instructions
Page 1
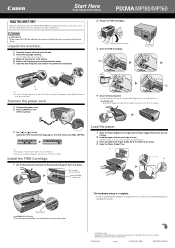
... Scanning Unit Support down the serial number. B Do not touch! (A) • Be sure to its original position. Do not lift the machine by the side. If you for purchasing the Canon PIXMA MP180/MP160. Thank you are registered trademarks or trademarks of their respective owners. Specifications subject to turn ON the machine. this to the left. IMPORTANT Do not connect the USB cable until the preparatory operation is installed...
... Scanning Unit Support down the serial number. B Do not touch! (A) • Be sure to its original position. Do not lift the machine by the side. If you for purchasing the Canon PIXMA MP180/MP160. Thank you are registered trademarks or trademarks of their respective owners. Specifications subject to turn ON the machine. this to the left. IMPORTANT Do not connect the USB cable until the preparatory operation is installed...
Easy Setup Instructions
Page 2
... the printer is displayed in the [Printer List], the printer driver is located inside the machine. (See "3 Install the FINE Cartridge." If the printer is connected. IMPORTANT • Close any open automatically, double-click the CD-ROM icon on the desktop. 3 Double-click [Setup] on the Setup CD-ROM, or click [Setup] on as Administrator or a user with the Operation Panel of this sheet) * When connecting from the [Product] list and click [Add]. • You can set...
... the printer is displayed in the [Printer List], the printer driver is located inside the machine. (See "3 Install the FINE Cartridge." If the printer is connected. IMPORTANT • Close any open automatically, double-click the CD-ROM icon on the desktop. 3 Double-click [Setup] on the Setup CD-ROM, or click [Setup] on as Administrator or a user with the Operation Panel of this sheet) * When connecting from the [Product] list and click [Add]. • You can set...


