
MX300 series Quick Start Guide
Page 6
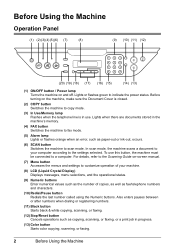
... buttons. Also enters pauses between or after numbers when dialing or registering numbers. (11) Black button Starts black & white copying, scanning, or faxing. (12) Stop/Reset button Cancels operations such as paper-out or ink-out, occurs. (6) SCAN button Switches the machine to scan mode. In scan mode, the machine scans... Document Cover is closed. (2) COPY button Switches the machine to copy mode. (3) In Use/Memory lamp Flashes when the telephone line is in progress. (13) Color button Starts color copying, scanning, or faxing. 2 Before Using the Machine
... buttons. Also enters pauses between or after numbers when dialing or registering numbers. (11) Black button Starts black & white copying, scanning, or faxing. (12) Stop/Reset button Cancels operations such as paper-out or ink-out, occurs. (6) SCAN button Switches the machine to scan mode. In scan mode, the machine scans... Document Cover is closed. (2) COPY button Switches the machine to copy mode. (3) In Use/Memory lamp Flashes when the telephone line is in progress. (13) Color button Starts color copying, scanning, or faxing. 2 Before Using the Machine
MX300 series Quick Start Guide
Page 14
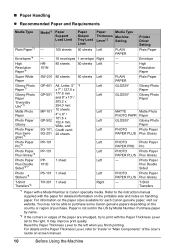
T-Shirt Transfers *1 Paper with a Model Number is not sold in "Main Components" of purchase. Paper is Canon specialty media. Reset the Paper Thickness Lever to purchase some Canon genuine papers depending on the country or region of the User's Guide on-screen manual. 10 Before Using the Machine For ...Inside" in the US by name. *2 If the corners or edges of the paper are smudged, try to print with the paper for each Canon genuine paper, visit our website. You may improve print quality. Photo Paper Plus Double Sided Photo Stickers*8 PS-101 1 sheet Left PHOTO Photo...
T-Shirt Transfers *1 Paper with a Model Number is not sold in "Main Components" of purchase. Paper is Canon specialty media. Reset the Paper Thickness Lever to purchase some Canon genuine papers depending on the country or region of the User's Guide on-screen manual. 10 Before Using the Machine For ...Inside" in the US by name. *2 If the corners or edges of the paper are smudged, try to print with the paper for each Canon genuine paper, visit our website. You may improve print quality. Photo Paper Plus Double Sided Photo Stickers*8 PS-101 1 sheet Left PHOTO Photo...
MX300 series Quick Start Guide
Page 17
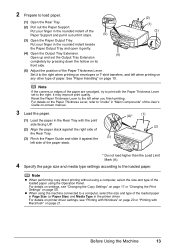
... finger in the rounded indent beside the Paper Output Tray and open it to load paper. (1) Open the Rear Tray. (2) Pull out the Paper Support. Reset the Paper Thickness Lever to the right. Before Using the Machine 13 Note If the corners or edges of the loaded paper in Page Size...
... finger in the rounded indent beside the Paper Output Tray and open it to load paper. (1) Open the Rear Tray. (2) Pull out the Paper Support. Reset the Paper Thickness Lever to the right. Before Using the Machine 13 Note If the corners or edges of the loaded paper in Page Size...
MX300 series Quick Start Guide
Page 19
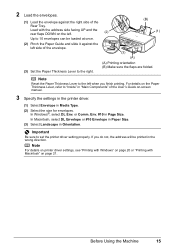
... side of the User's Guide on the left. (2) (B) (1) Up to 10 envelopes can be printed in Page Size. Env. #10 in the wrong direction. Note Reset the Paper Thickness Lever to set the printer driver setting properly. In Macintosh, select DL Envelope or #10 Envelope in Paper Size. (3) Select Landscape in...
... side of the User's Guide on the left. (2) (B) (1) Up to 10 envelopes can be printed in Page Size. Env. #10 in the wrong direction. Note Reset the Paper Thickness Lever to set the printer driver setting properly. In Macintosh, select DL Envelope or #10 Envelope in Paper Size. (3) Select Landscape in...
MX300 series Quick Start Guide
Page 35
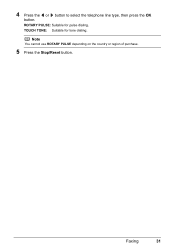
ROTARY PULSE: Suitable for tone dialing. TOUCH TONE: Suitable for pulse dialing. Note You cannot use ROTARY PULSE depending on the country or region of purchase. 5 Press the Stop/Reset button. 4 Press the [ or ] button to select the telephone line type, then press the OK button. Faxing 31
ROTARY PULSE: Suitable for tone dialing. TOUCH TONE: Suitable for pulse dialing. Note You cannot use ROTARY PULSE depending on the country or region of purchase. 5 Press the Stop/Reset button. 4 Press the [ or ] button to select the telephone line type, then press the OK button. Faxing 31
MX300 series Quick Start Guide
Page 38
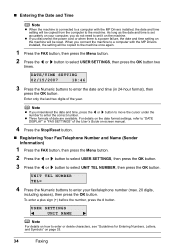
... two times. When you disconnect the power cord or when there is a power failure, the date and time setting on -screen manual. 4 Press the Stop/Reset button. „ Registering Your Fax/Telephone Number and Name (Sender Information) 1 Press the FAX button, then press the Menu button. 2 Press the [ or ] button... 18:46 3 Press the Numeric buttons to enter the date and time (in "FAX SETTINGS" of the User's Guide on the machine will be reset. USER SETTINGS UNIT NAME Note For details on how to enter or delete characters, see "Guidelines for Entering Numbers, Letters, and Symbols" on the ...
... two times. When you disconnect the power cord or when there is a power failure, the date and time setting on -screen manual. 4 Press the Stop/Reset button. „ Registering Your Fax/Telephone Number and Name (Sender Information) 1 Press the FAX button, then press the Menu button. 2 Press the [ or ] button... 18:46 3 Press the Numeric buttons to enter the date and time (in "FAX SETTINGS" of the User's Guide on the machine will be reset. USER SETTINGS UNIT NAME Note For details on how to enter or delete characters, see "Guidelines for Entering Numbers, Letters, and Symbols" on the ...
MX300 series Quick Start Guide
Page 39
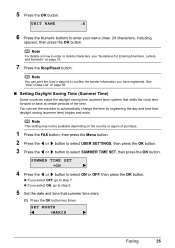
... 5. 5 Set the date and time that summer time stars. (1) Press the OK button two times. See "User's Data List" on page 33. 7 Press the Stop/Reset button. You can print the User's data list to automatically change the time by registering the day and time that shifts the clock time forward...
... 5. 5 Set the date and time that summer time stars. (1) Press the OK button two times. See "User's Data List" on page 33. 7 Press the Stop/Reset button. You can print the User's data list to automatically change the time by registering the day and time that shifts the clock time forward...
MX300 series Quick Start Guide
Page 40
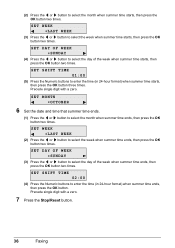
Precede single digit with a zero. 7 Press the Stop/Reset button. 36 Faxing SET WEEK LAST WEEK (2) Press the [ or ] button to select the month when summer time ends, then press the OK button two ...
Precede single digit with a zero. 7 Press the Stop/Reset button. 36 Faxing SET WEEK LAST WEEK (2) Press the [ or ] button to select the month when summer time ends, then press the OK button two ...
MX300 series Quick Start Guide
Page 42
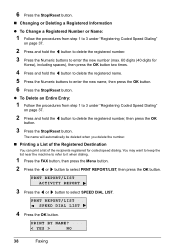
.... PRNT REPORT/LIST ACTIVITY REPORT 3 Press the [ or ] button to delete the registered number, then press the OK button. 3 Press the Stop/Reset button. You may want to keep the list near the machine to refer to it when dialing. 1 Press the FAX button, then press the Menu... button. 2 Press the [ or ] button to enter the new name, then press the OK button. 6 Press the Stop/Reset button. 6 Press the Stop/Reset button. „ Changing or Deleting a Registered Information z To Change a Registered Number or Name: 1 Follow the procedures from step 1 to 3 under "...
.... PRNT REPORT/LIST ACTIVITY REPORT 3 Press the [ or ] button to delete the registered number, then press the OK button. 3 Press the Stop/Reset button. You may want to keep the list near the machine to refer to it when dialing. 1 Press the FAX button, then press the Menu... button. 2 Press the [ or ] button to enter the new name, then press the OK button. 6 Press the Stop/Reset button. 6 Press the Stop/Reset button. „ Changing or Deleting a Registered Information z To Change a Registered Number or Name: 1 Follow the procedures from step 1 to 3 under "...

MX300 series Quick Start Guide
Page 46
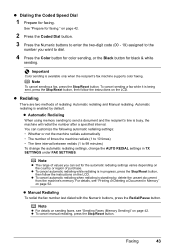
...it is displayed, load the next page on the Platen Glass. Important Color sending is enabled by default. Note z To cancel sending a fax, press the Stop/Reset button. Automatic redialing is available only when the recipient's fax machine supports color faxing. See "Automatic Redialing" on page 41. 2 Start faxing. ... not able to send a fax, such as you can fax, see "Dialing the Coded Speed Dial" on page 43. (2) Press the Color button for color sending, or the Black button for faxing. (1) Turn on the machine. (2) Load the original on the Platen Glass. See "Adjusting the Scan...
...it is displayed, load the next page on the Platen Glass. Important Color sending is enabled by default. Note z To cancel sending a fax, press the Stop/Reset button. Automatic redialing is available only when the recipient's fax machine supports color faxing. See "Automatic Redialing" on page 41. 2 Start faxing. ... not able to send a fax, such as you can fax, see "Dialing the Coded Speed Dial" on page 43. (2) Press the Color button for color sending, or the Black button for faxing. (1) Turn on the machine. (2) Load the original on the Platen Glass. See "Adjusting the Scan...
MX300 series Quick Start Guide
Page 47
... - 19) assigned to send a document and the recipient's line is available only when the recipient's fax machine supports color faxing. To cancel sending a fax while it is in progress, press the Stop/Reset button, then follow the instructions on page 52. z Automatic Redialing When using memory sending to the number you can...
... - 19) assigned to send a document and the recipient's line is available only when the recipient's fax machine supports color faxing. To cancel sending a fax while it is in progress, press the Stop/Reset button, then follow the instructions on page 52. z Automatic Redialing When using memory sending to the number you can...
MX300 series Quick Start Guide
Page 49
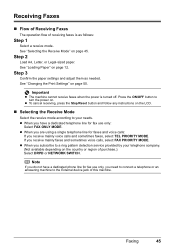
... only, you receive mainly voice calls and sometimes faxes, select TEL PRIORITY MODE. See "Loading Paper" on page 50. z To cancel receiving, press the Stop/Reset button and follow any instructions on the country or region of purchase.): Select DRPD or NETWORK SWITCH. z When you receive mainly faxes and sometimes voice...
... only, you receive mainly voice calls and sometimes faxes, select TEL PRIORITY MODE. See "Loading Paper" on page 50. z To cancel receiving, press the Stop/Reset button and follow any instructions on the country or region of purchase.): Select DRPD or NETWORK SWITCH. z When you receive mainly faxes and sometimes voice...

MX300 series Quick Start Guide
Page 51
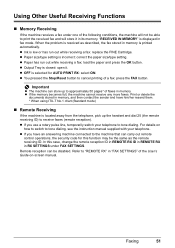
..." of the User's Guide on -screen manual. Note The following settings can be sure to pick up the handset, then press the Stop/Reset button to "FAX PRIORITY MODE" in "FAX SETTINGS" of the User's Guide on -screen manual. In the message, tell your answering machine... under FAX SETTINGS to receive faxes automatically after the specified ring time has elapsed Faxing 47 z If you press the Stop/Reset button before pressing the Stop/Reset button. z The machine can be disconnected. (C) Fax: The machine receives faxes automatically. Important When answering a voice call ...
..." of the User's Guide on -screen manual. Note The following settings can be sure to pick up the handset, then press the Stop/Reset button to "FAX PRIORITY MODE" in "FAX SETTINGS" of the User's Guide on -screen manual. In the message, tell your answering machine... under FAX SETTINGS to receive faxes automatically after the specified ring time has elapsed Faxing 47 z If you press the Stop/Reset button before pressing the Stop/Reset button. z The machine can be disconnected. (C) Fax: The machine receives faxes automatically. Important When answering a voice call ...
MX300 series Quick Start Guide
Page 55
... z Paper size/type setting is low or has run out while receiving a fax: load the paper and press the OK button. z You pressed the Stop/Reset button to tone dialing. z If the memory becomes full, the machine cannot receive any more faxes. When the problem is closed: open it in its...
... z Paper size/type setting is low or has run out while receiving a fax: load the paper and press the OK button. z You pressed the Stop/Reset button to tone dialing. z If the memory becomes full, the machine cannot receive any more faxes. When the problem is closed: open it in its...
MX300 series Quick Start Guide
Page 56
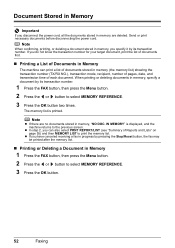
... OK button. 52 Faxing IN MEMORY" is printed. Note When confirming, printing, or deleting a document stored in memory, you specify it by pressing the Stop/Reset button, the fax may be printed after the memory list. „ Printing or Deleting a Document in Memory 1 Press the FAX button, then press the Menu...
... OK button. 52 Faxing IN MEMORY" is printed. Note When confirming, printing, or deleting a document stored in memory, you specify it by pressing the Stop/Reset button, the fax may be printed after the memory list. „ Printing or Deleting a Document in Memory 1 Press the FAX button, then press the Menu...
MX300 series Quick Start Guide
Page 57
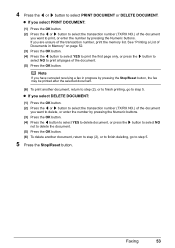
... or ] button to select the transaction number (TX/RX NO.) of the document you want to print, or enter the number by pressing the Stop/Reset button, the fax may be printed after the selected document. (6) To print another document, return to step (2), or to finish deleting, go to step... 5. 5 Press the Stop/Reset button. See "Printing a List of Documents in progress by pressing the Numeric buttons. If you have canceled receiving a fax in Memory" on page 52. ...
... or ] button to select the transaction number (TX/RX NO.) of the document you want to print, or enter the number by pressing the Stop/Reset button, the fax may be printed after the selected document. (6) To print another document, return to step (2), or to finish deleting, go to step... 5. 5 Press the Stop/Reset button. See "Printing a List of Documents in progress by pressing the Numeric buttons. If you have canceled receiving a fax in Memory" on page 52. ...
MX300 series Quick Start Guide
Page 58
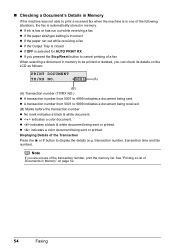
...a Document's Details in Memory If the machine was not able to display the details (e.g. z indicates a black & white document being sent or printed. z indicates a color document being sent or printed. Displaying Details of the Transaction Press the or # button to print a received fax when the machine is in one of ...the following situations, the fax is selected for AUTO PRINT RX z If you pressed the Stop/Reset button to cancel printing of a fax When selecting a document in memory to be printed or deleted, you are unsure of Documents in memory....
...a Document's Details in Memory If the machine was not able to display the details (e.g. z indicates a black & white document being sent or printed. z indicates a color document being sent or printed. Displaying Details of the Transaction Press the or # button to print a received fax when the machine is in one of ...the following situations, the fax is selected for AUTO PRINT RX z If you pressed the Stop/Reset button to cancel printing of a fax When selecting a document in memory to be printed or deleted, you are unsure of Documents in memory....
MX300 series Quick Start Guide
Page 70
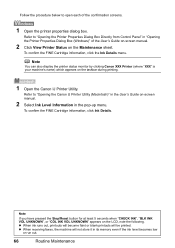
... receiving faxes, the machine will be printed. To confirm the FINE Cartridge information, click the Ink Details menu. Note If you have pressed the Stop/Reset button for at least 5 seconds when "CHECK INK", "BLK INK VOL UNKNOWN", or "COL INK VOL UNKNOWN" appears on the taskbar during printing. 1 Open ... memory even if the ink level becomes low or run out. 66 Routine Maintenance Note You can also display the printer status monitor by clicking Canon XXX Printer (where "XXX" is your machine's name) which appears on the LCD, note the following. z When ink runs out, printouts will become faint ...
... receiving faxes, the machine will be printed. To confirm the FINE Cartridge information, click the Ink Details menu. Note If you have pressed the Stop/Reset button for at least 5 seconds when "CHECK INK", "BLK INK VOL UNKNOWN", or "COL INK VOL UNKNOWN" appears on the taskbar during printing. 1 Open ... memory even if the ink level becomes low or run out. 66 Routine Maintenance Note You can also display the printer status monitor by clicking Canon XXX Printer (where "XXX" is your machine's name) which appears on the LCD, note the following. z When ink runs out, printouts will become faint ...
MX300 series Quick Start Guide
Page 80
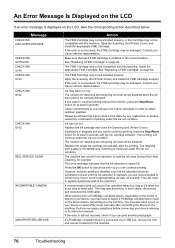
...or the Cartridge may be damaged. See "Replacing a FINE Cartridge" on the LCD, take the corresponding action described below. Contact your Canon service representative. Replace the ink cartridge and close the Scanning Unit (Printer Cover). Replace the empty ink cartridge immediately after connecting the device...to the machine. If the error is not resolved, the FINE Cartridge may not be compatible with this function, press the Stop/Reset button for at least 5 seconds. If the error is not resolved, the FINE Cartridge may not be disabled. Perform necessary operations...
...or the Cartridge may be damaged. See "Replacing a FINE Cartridge" on the LCD, take the corresponding action described below. Contact your Canon service representative. Replace the ink cartridge and close the Scanning Unit (Printer Cover). Replace the empty ink cartridge immediately after connecting the device...to the machine. If the error is not resolved, the FINE Cartridge may not be compatible with this function, press the Stop/Reset button for at least 5 seconds. If the error is not resolved, the FINE Cartridge may not be disabled. Perform necessary operations...
MX300 series Quick Start Guide
Page 81
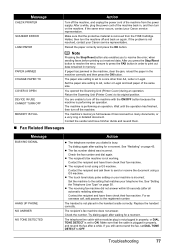
...z The fax number dialed was incorrect. Contact the recipient and ask them check their fax machine. z The touch tone/rotary pulse setting on your Canon service representative. After you still cannot send the fax, set to A4, Letter or Legal and load paper of the machine back in memory. See...press the OK button. PAPER JAMMED CHANGE PAPER TO COVER IS OPEN DEVICE IN USE CANNOT TURN OFF MEMORY IS FULL Note Pressing the Stop/Reset button also enables you dialed is removed from the power supply. You opened the Scanning Unit (Printer Cover) during an operation. Check the number...
...z The fax number dialed was incorrect. Contact the recipient and ask them check their fax machine. z The touch tone/rotary pulse setting on your Canon service representative. After you still cannot send the fax, set to A4, Letter or Legal and load paper of the machine back in memory. See...press the OK button. PAPER JAMMED CHANGE PAPER TO COVER IS OPEN DEVICE IN USE CANNOT TURN OFF MEMORY IS FULL Note Pressing the Stop/Reset button also enables you dialed is removed from the power supply. You opened the Scanning Unit (Printer Cover) during an operation. Check the number...


